在此页面上:了解在Adobe Journey Optimizer中构建第一个历程的关键步骤,从定义登录受众或事件,到添加操作并将其实时发布。
Adobe Journey Optimizer包括全渠道编排画布,允许营销人员协调营销外联与一对一客户参与。 利用用户界面,可轻松地将活动从面板拖放到画布中以构建历程。 此历程用户界面在此页面中有详细介绍。
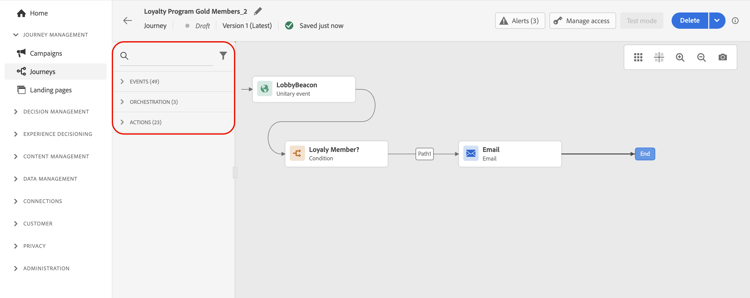
此页面上详细描述了创建历程的主要步骤。 其简化如下:

在本指南中,您将执行以下操作:
- 定义历程入口点 — 受众区段或实时事件
- 跨渠道添加消息操作 — 电子邮件、推送、移动消息、应用程序内、Web、基于代码的体验、内容卡等。 查看支持的渠道
- 在激活之前使用测试用户档案测试您的历程
- 发布您的历程并监控其性能
构建多步骤客户历程,实时启动跨渠道交互、优惠和消息序列。 此方法确保客户根据其行为和相关业务信号在最佳时刻参与。
开始之前 prerequisites
构建之前需要配置的内容取决于历程的触发方式。 大多数历程都从以下两个入口点之一开始:
不确定要使用哪个入口点? 下表将最常见的用例映射到正确的开始活动。 在历程类型选择矩阵中了解详情。
以下元素是可选的,但根据用例的不同,这些元素可能是必需的:
创建历程 jo-build
要创建多步历程,请执行以下步骤:
-
在“历程管理”菜单部分中,单击历程。
-
单击 创建历程 按钮以创建新旅程。
-
编辑历程的配置窗格以定义历程的名称并设置其属性。 了解如何在此页面上设置历程的属性。
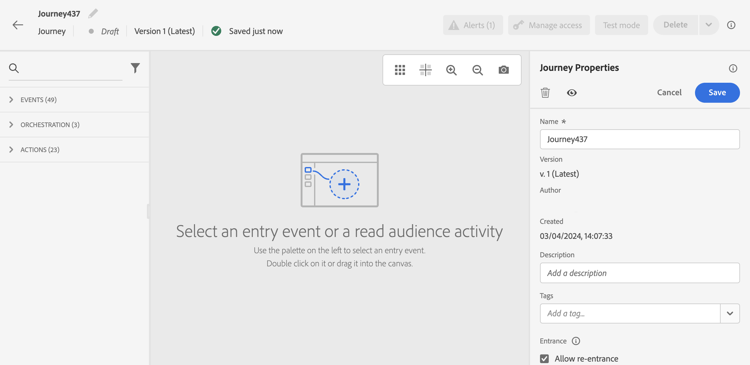
然后,您可以开始设计历程。
设计旅程 jo-design
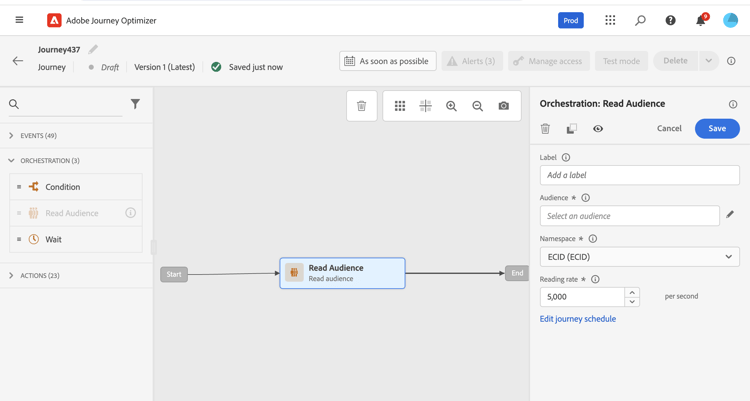
历程设计器允许您使用直观的拖放界面构建多步历程。 左侧面板中的活动分为三类: 事件、编排和操作。 有关画布及其控件的完整概述,请参阅此页面。
请按照以下步骤设计您的旅程:
-
添加入口点 — 将事件或 读取受众 活动从调色板拖动到画布上。 此属性定义用户档案如何进入历程:实时单独(基于事件)或一次性从定义的受众(基于受众)进入所有历程。
-
添加消息操作 — 从调色板的 操作 部分,将渠道操作拖动到画布上,以将消息发送到流经历程的用户档案。 操作适用于电子邮件、推送通知、移动消息等。
-
添加编排活动 — 使用 条件 活动根据用户档案属性或行为将历程分支为多个路径。 使用 等待 活动在步骤之间引入时间延迟。
测试历程 jo-test
首先,在历程标题中单击验证。 解决“警报”面板中的任何错误,并在测试之前再次验证。 了解历程验证。
构建历程后,请在发布之前对其进行测试。 Journey Optimizer提供了测试模式,以便在测试配置文件在历程中移动时查看它们,并在激活之前检测潜在的错误。 运行快速测试可确保历程正确运行,以便您能够放心地发布它们。 在本节🔗中了解如何测试您的历程
您还可以在 练习 中执行您的历程。 历程试运行是 Adobe Journey Optimizer 中的一种特殊历程发布模式,使历程设计人员能够在不接触真实客户或更新轮廓信息的前提下,使用真实生产数据对历程进行测试。 此功能有助于历程设计人员在正式发布前验证历程设计和受众定位,从而增强信心。 在本节🔗中了解如何在练习模式下发布历程。
发布历程 jo-pub
您必须发布历程以激活它,并使其可供新配置文件进入该历程。 在发布之前,请完成测试并确保历程当前已通过验证。 如果在验证后编辑历程,请再次单击 验证 并解决所有错误,然后再继续。 了解有关历程发布的更多信息。
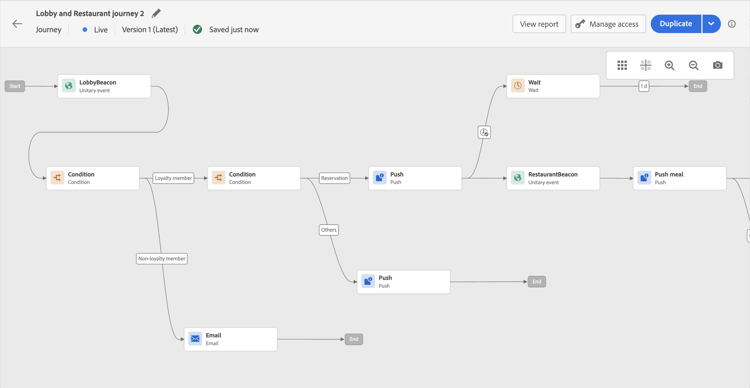
发布后,您可以使用专用的报告工具监控旅程,以衡量旅程的有效性。
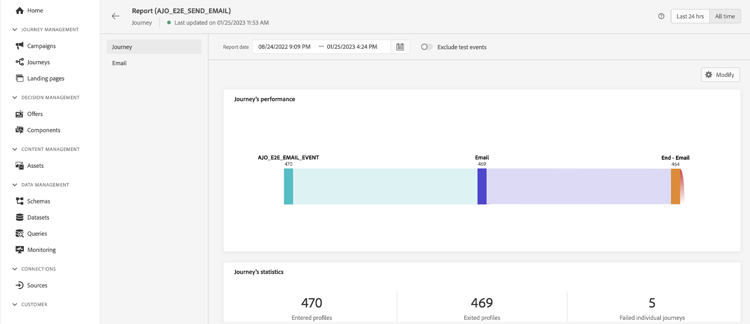
在此部分中了解有关历程报告的更多信息。
常见使用案例 use-cases
不确定从哪里开始? 以下是历程可发挥最大价值的三种典型方案:

欢迎系列
注册后,使用一系列消息自动载入新用户,引导他们浏览您的产品或服务。

放弃购买
通过发送包含个性化内容的及时提醒,重新吸引未完成购买的客户。

重新参与
根据非活动用户最后的已知行为,重新吸引具有定向优惠或更新的非活动用户。

其他资源
This section contains structured knowledge intended to support interpretation, retrieval, and question answering related to this topic.
For complete understanding, this information should be combined with the documentation on this page. Neither source is intended to stand alone; the page describes the feature, while this section provides additional context that helps disambiguate terminology, intent, applicability, and constraints.
- TL;DR: This page walks through the four key steps to create a first journey in Adobe Journey Optimizer — defining an entry point, designing the canvas, testing with test mode or Dry run, and publishing — along with guidance on choosing the right entry type.
Intents:
- Create a new journey and configure its properties in the JOURNEY MANAGEMENT menu
- Choose the correct entry point (Read Audience, Audience Qualification, unitary event, or business event) for a given use case
- Design a multi-step journey by dragging and dropping events, orchestration activities, and channel actions onto the canvas
- Test a journey using Test mode with test profiles or Dry run before publishing
- Execute a Dry run to validate audience targeting with real production data without contacting customers
- Publish a journey to make it live and monitor its performance with reporting tools
Glossary:
- Read Audience: An entry activity that processes all profiles in a batch audience at once or on a schedule (product-specific)
- Audience Qualification: An entry activity triggered in real time when a profile enters or exits a streaming audience (product-specific)
- Unitary event: A real-time trigger that enters one profile at a time into a journey when a specific action occurs (product-specific)
- Business event: A non-profile event (e.g., flight cancellation, stock replenishment) that triggers a journey for multiple profiles simultaneously via an automatic Read Audience step (product-specific)
- Test mode: A way to view test profiles as they move along a journey to detect potential errors before activation (product-specific)
- Dry run: A special publication mode that uses real production data to validate journey logic without contacting actual customers or updating profiles (product-specific)
Guardrails:
- The journey must pass configuration validation before testing. Publication requires completed testing and current, passed validation; edits after validation require Validate again and resolution of errors before continuing.
- A journey cannot be published if it contains errors; all errors must be resolved first
- Configure an event before building an event-based journey to define the trigger and the data it carries
- Audience creation in Adobe Experience Platform is a prerequisite for audience-based journeys
Terminology:
- Canonical name: Journey — variant: customer journey
- Synonyms: “Dry run” = “Dry run mode”
- Do not confuse: “Test mode” uses test profiles; “Dry run” uses real production data without contacting customers or updating profiles
FAQ:
- Q: What is the first thing I need to do before creating an event-triggered journey? — Configure the event to define the trigger and the data it carries; then use an event-based entry.
- Q: Which entry point is recommended for someone new to Journey Optimizer? — Start with an audience-based journey using a Read Audience activity — it requires no prior event configuration and is the easiest way to get familiar with the canvas.
- Q: Can I test my journey before it goes live? — Yes; first Validate and resolve any errors, then use Test mode with test profiles or Dry run with real production data without contacting real customers or updating profile information.
- Q: What happens if my journey has errors when I try to publish? — You cannot publish a journey with errors; all configuration errors must be resolved before publication.
- Q: How do I break up a complex journey with many steps? — Use the Jump activity to connect smaller sub-journeys, reducing complexity and making each sub-journey easier to test independently.