このページでは、 エントリのオーディエンスまたはイベントの定義からアクションの追加および公開に至るまで、Adobe Journey Optimizerで最初のジャーニーを構築するための主な手順について説明します。
Adobe Journey Optimizer には、マーケターがマーケティングアウトリーチを 1 対 1 の顧客エンゲージメントと調和させるためのオムニチャネルオーケストレーションキャンバスが含まれています。 ユーザーインターフェイスを使用すると、パレットからキャンバスにアクティビティを簡単にドラッグ&ドロップして、ジャーニーを作成できます。 ジャーニーのユーザーインターフェイスについて詳しくは、このページを参照してください。
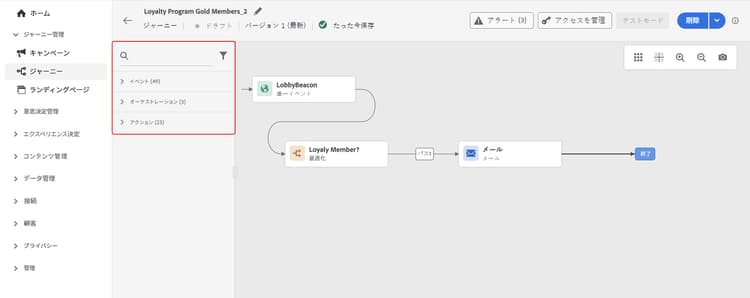
ジャーニーを作成する主な手順について詳しくは、このページを参照してください。 次のように効率化されています。

この記事では、デジタル CXの概要、重要性、ベストプラクティスを解説します。
- ジャーニーのエントリポイント(オーディエンスセグメントまたはリアルタイムイベント)を定義
- 電子メール、プッシュ通知、モバイルメッセージ、アプリ内メッセージ、web、コードベースのエクスペリエンス、コンテンツカードなど、チャネル全体でメッセージアクションを追加できます。 サポートされているチャネルを見る
- アクティベーション前にプロファイルをテストして、ジャーニーをテスト
- ジャーニーを公開し、そのパフォーマンスを監視する
複数の手順から成るカスタマージャーニーを作成し、チャネルをまたいでインタラクション、オファーおよびメッセージのシーケンスをリアルタイムで開始します。 このアプローチにより、お客様の行動と関連するビジネスシグナルに基づいて、最適なタイミングで顧客と関与できるようになります。
事前準備 prerequisites
構築する前に設定すべきことは、ジャーニーがどのようにトリガーされるかによって異なります。 多くのジャーニーは、次のふたつのエントリーポイントのどちらかから始まります。
-
オーディエンスベースのエントリ — ジャーニーは、スケジュールされた時間に定義されたプロファイルのセットに対して実行されます。 ジャーニーを構築する前に、Adobe Experience Platformで オーディエンス を作成します。 Journey Optimizerを初めて使用する場合は、これを出発点として使用することをお勧めします。
-
イベントベースのエントリ – 個人が購入やサインアップなどのアクションを実行すると、ジャーニーがリアルタイムでトリガーされます。 トリガーとそのデータを定義するようにイベント を設定します。
使用するエントリポイントが不明ですか? 次の表は、最も一般的なユースケースを適切な開始アクティビティにマッピングしています。 詳しくは、ジャーニー型選択行列を参照してください。
次の要素はオプションですが、ユースケースに応じて必要になる場合があります。
-
データソース – 外部システムからのデータでジャーニーの条件やパーソナライゼーションを強化するには、 データソース を設定します。
-
カスタムアクション – 組み込みチャネルではなくサードパーティシステムを介してメッセージを配信する場合は、 カスタムアクション を設定します。
ジャーニーの作成 jo-build
複数の手順から成るジャーニーを作成するには、次の手順に従います。
-
「ジャーニー管理」メニューセクションで、「ジャーニー」をクリックします。
-
「ジャーニーを作成」ボタンをクリックして、新しいジャーニーを作成します。
-
ジャーニーの設定パネルを編集して、ジャーニーの名前を定義し、そのプロパティを設定します。 ジャーニーのプロパティを設定する方法について詳しくは、このページを参照してください。
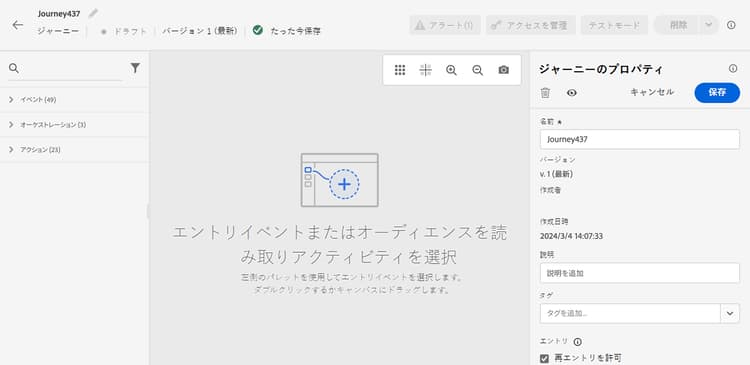
その後、ジャーニーのデザインを開始できます。
ジャーニーのデザイン jo-design
ジャーニーデザイナーでは、直感的なドラッグ&ドロップ操作のインターフェイスを使用して、マルチステップのジャーニーを構築できます。 左側のパレットのアクティビティは、イベント、オーケストレーション、アクションの3つのカテゴリに分類されます。 キャンバスとその制御の概要については、このページ を参照してください。
ジャーニーをデザインするには、次の手順に従います。
-
エントリポイントを追加 — イベントまたはオーディエンスの読み取り アクティビティをパレットからキャンバスにドラッグします。 これにより、プロファイルがジャーニーに入る方法を定義します。個々にリアルタイム(イベントベース)で、または定義されたオーディエンスから一度にすべて(オーディエンスベース)で指定します。

-
メッセージアクションを追加 — パレットのアクション セクションから、チャネルアクションをキャンバスにドラッグして、ジャーニーを流れるプロファイルにメッセージを送信します。 アクションは、電子メール、プッシュ通知、モバイルメッセージなどで利用できます。
-
オーケストレーションアクティビティを追加 — 条件 アクティビティを使用して、プロファイル属性または行動に基づいてジャーニーを複数のパスに分岐します。 待機 アクティビティを使用して、ステップ間に時間の遅延を導入します。
ジャーニーのテスト jo-test
まず、ジャーニーヘッダーの「検証」をクリックします。 アラートパネルのエラーを解決し、テスト前に再度検証します。 ジャーニー検証について説明します。
ジャーニーを作成したら、公開する前にテストします。 Journey Optimizer では、ジャーニーに沿って進む際にテストプロファイルを表示し、アクティブ化の前に潜在的なエラーを検出する方法として、テストモードを提供しています。 クイックテストを実行すると、ジャーニーが正しく動作することを確認できるので、自信を持って公開できます。 ジャーニーをテストする方法について詳しくは、この節を参照してください。
また、ドライランでジャーニーを実行することもできます。 ジャーニーのドライランは、Adobe Journey Optimizer の特別なジャーニー公開モードで、ジャーニー実務担当者は実際の顧客に連絡したり、プロファイル情報を更新したりすることなく、実際の実稼動データを使用してジャーニーをテストできます。 この機能により、ジャーニー実務担当者は、ジャーニーをライブで公開する前に、ジャーニーのデザインとオーディエンスのターゲティングに自信を持つことができます。 ドライランモードでのジャーニーの公開方法について詳しくは、この節を参照してください。
ジャーニーの公開 jo-pub
ジャーニーをアクティブ化し、新しいプロファイルが入力できるようにするには、ジャーニーを公開する必要があります。 公開する前に、テストを完了し、ジャーニーに最新の合格した検証があることを確認します。 検証後にジャーニーを編集する場合は、検証をもう一度クリックし、エラーを解決してから続行します。 ジャーニーの公開の詳細をご覧ください。
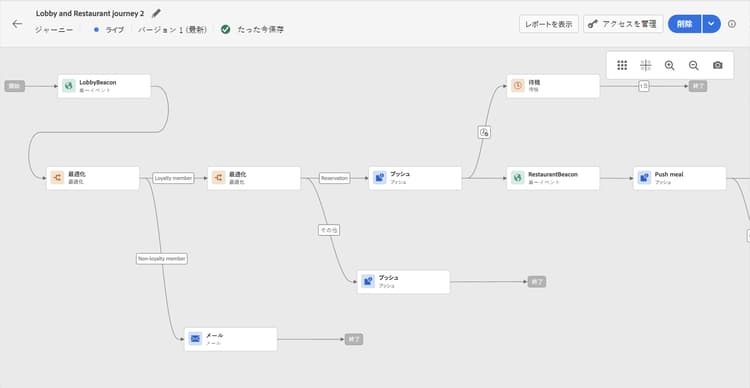
公開したら、専用のレポートツールを使用してジャーニーを監視し、ジャーニーの有効性を測定できます。
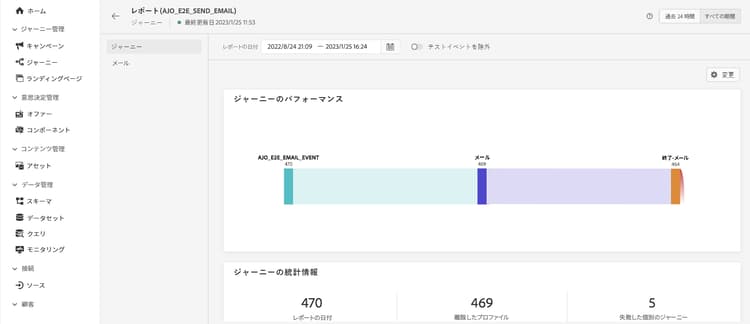
ジャーニーレポートについて詳しくは、この節を参照してください。
よくあるユースケース use-cases
どこから始めてよいかわからない方は、 ここでは、ジャーニーが最も価値を提供する3つの典型的なシナリオを紹介します。

ウェルカムシリーズ
サインアップ後、一連のメッセージを新規ユーザーに自動的にオンボーディングし、製品またはサービスを通じてユーザーを導きます。

カートの放棄
パーソナライズされたコンテンツを含むタイムリーなリマインダーを送信して、購入を完了せずに離脱した顧客をリエンゲージします。

リエンゲージメント
最後に確認した行動に基づいて、ターゲットを絞ったオファーまたはアップデートを使用して、非アクティブなユーザーを取り戻します。

その他のリソース
- ジャーニーの種類とプロファイルのエントリ – すべてのジャーニーの種類(単一イベント、ビジネスイベント、読み取りオーディエンス、オーディエンスの選定)と、プロファイルがジャーニーを入力、再入力、フローする方法を理解します。
- ジャーニーデザイナーの概要 - ジャーニーキャンバスインターフェイスを習得して、カスタマージャーニーをデザインおよび調整します。
- ジャーニーアクティビティ - イベント、アクション、オーケストレーションコンポーネントを含む、使用可能なすべてのアクティビティを検出します。
- ジャーニーのテスト - 実稼動環境に公開する前に、テストモードを使用してジャーニーをテストする方法について説明します。
- ジャーニーの公開 - ジャーニーの公開プロセスとライブジャーニーの管理方法について説明します。
- ジャーニーレポート - 詳細な指標とインサイトを使用して、ジャーニーのパフォーマンスを追跡および分析します。
- ジャーニーのトラブルシューティング - 一般的なジャーニーの問題に対する解決策とデバッグのベストプラクティスについて説明します。
- ジャーニーのチュートリアル - ジャーニーの作成とベストプラクティスに関するステップバイステップのビデオチュートリアルを参照してください。
This section contains structured knowledge intended to support interpretation, retrieval, and question answering related to this topic.
For complete understanding, this information should be combined with the documentation on this page. Neither source is intended to stand alone; the page describes the feature, while this section provides additional context that helps disambiguate terminology, intent, applicability, and constraints.
- TL;DR: This page walks through the four key steps to create a first journey in Adobe Journey Optimizer — defining an entry point, designing the canvas, testing with test mode or Dry run, and publishing — along with guidance on choosing the right entry type.
Intents:
- Create a new journey and configure its properties in the JOURNEY MANAGEMENT menu
- Choose the correct entry point (Read Audience, Audience Qualification, unitary event, or business event) for a given use case
- Design a multi-step journey by dragging and dropping events, orchestration activities, and channel actions onto the canvas
- Test a journey using Test mode with test profiles or Dry run before publishing
- Execute a Dry run to validate audience targeting with real production data without contacting customers
- Publish a journey to make it live and monitor its performance with reporting tools
Glossary:
- Read Audience: An entry activity that processes all profiles in a batch audience at once or on a schedule (product-specific)
- Audience Qualification: An entry activity triggered in real time when a profile enters or exits a streaming audience (product-specific)
- Unitary event: A real-time trigger that enters one profile at a time into a journey when a specific action occurs (product-specific)
- Business event: A non-profile event (e.g., flight cancellation, stock replenishment) that triggers a journey for multiple profiles simultaneously via an automatic Read Audience step (product-specific)
- Test mode: A way to view test profiles as they move along a journey to detect potential errors before activation (product-specific)
- Dry run: A special publication mode that uses real production data to validate journey logic without contacting actual customers or updating profiles (product-specific)
Guardrails:
- The journey must pass configuration validation before testing. Publication requires completed testing and current, passed validation; edits after validation require Validate again and resolution of errors before continuing.
- A journey cannot be published if it contains errors; all errors must be resolved first
- Configure an event before building an event-based journey to define the trigger and the data it carries
- Audience creation in Adobe Experience Platform is a prerequisite for audience-based journeys
Terminology:
- Canonical name: Journey — variant: customer journey
- Synonyms: “Dry run” = “Dry run mode”
- Do not confuse: “Test mode” uses test profiles; “Dry run” uses real production data without contacting customers or updating profiles
FAQ:
- Q: What is the first thing I need to do before creating an event-triggered journey? — Configure the event to define the trigger and the data it carries; then use an event-based entry.
- Q: Which entry point is recommended for someone new to Journey Optimizer? — Start with an audience-based journey using a Read Audience activity — it requires no prior event configuration and is the easiest way to get familiar with the canvas.
- Q: Can I test my journey before it goes live? — Yes; first Validate and resolve any errors, then use Test mode with test profiles or Dry run with real production data without contacting real customers or updating profile information.
- Q: What happens if my journey has errors when I try to publish? — You cannot publish a journey with errors; all configuration errors must be resolved before publication.
- Q: How do I break up a complex journey with many steps? — Use the Jump activity to connect smaller sub-journeys, reducing complexity and making each sub-journey easier to test independently.