在此頁面上:瞭解在Adobe Journey Optimizer中建立第一個歷程的關鍵步驟,從定義進入對象或事件,到新增動作和發佈歷程。
Adobe Journey Optimizer包含全通路協調畫布,可讓行銷人員透過一對一客戶參與來協調行銷拓展。 使用者介面可讓您輕鬆將活動從浮動視窗拖放至畫布,以建立您的歷程。 歷程使用者介面在此頁面上詳細說明。
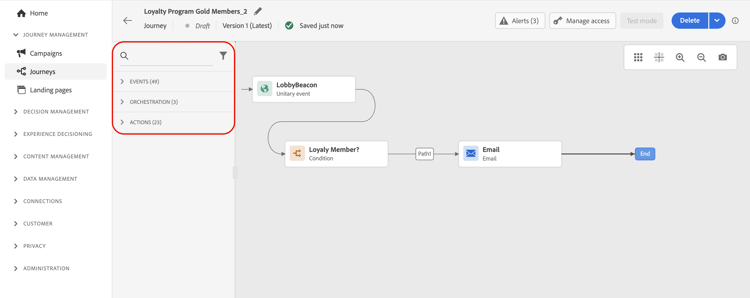
建立歷程的主要步驟將於本頁詳細說明。 其簡化如下:

在本指南中,您將瞭解:
- 定義歷程進入點 — 對象區段或即時事件
- 跨頻道新增訊息動作 — 電子郵件、推播、簡訊、應用程式內、網頁、程式碼型體驗、內容卡等。 檢視支援的管道
- 在啟用之前使用測試設定檔測試您的歷程
- 發佈您的歷程並監控其效能
建立多步驟客戶歷程,以即時啟動跨管道的互動、優惠方案和訊息順序。 此方法可確保根據客戶的動作和相關業務訊號,在最佳時刻與客戶互動。
開始之前 prerequisites
建置之前需要設定的專案取決於觸發歷程的方式。 大部分的歷程始於以下兩個入口點之一:
不確定要使用哪個進入點? 下表對映右側開始活動的最常見使用案例。 進一步瞭解歷程型別選擇矩陣。
以下元素為選用元素,但視您的使用案例而定,可能是必要元素:
建立歷程 jo-build
若要建立多步驟歷程,請遵循下列步驟:
-
在「歷程管理」功能表區段中,按一下歷程。
-
按一下 建立歷程 按鈕以建立新歷程。
-
編輯歷程的設定窗格以定義歷程的名稱並設定其屬性。 瞭解如何在此頁面上設定您的歷程屬性。
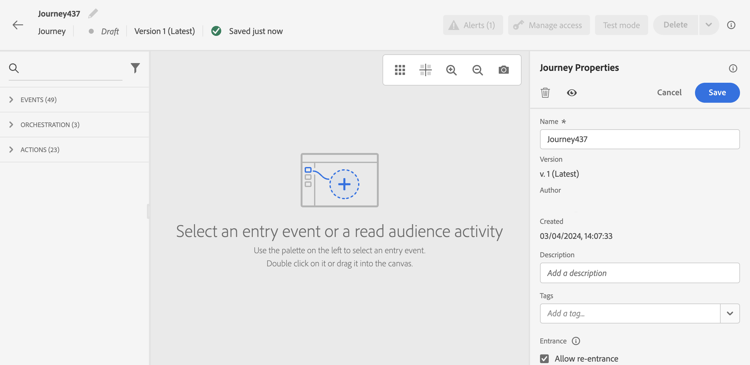
接著,您就可以開始設計您的歷程。
設計歷程 jo-design
歷程設計器可讓您使用直覺式的拖放介面來建立多步驟歷程。 左側浮動視窗中的活動分為三個類別: 事件、協調流程和動作。 如需畫布及其控制項的完整概觀,請參閱此頁面。
請依照下列步驟設計您的歷程:
-
新增進入點 — 將事件或 讀取對象 活動從調色盤拖曳到畫布上。 這定義了設定檔如何進入歷程:個別即時(以事件為基礎),或一次從定義的對象(以對象為基礎)進入全部。

-
新增訊息動作 — 從浮動視窗的 動作 區段,將頻道動作拖曳到畫布上,以傳送訊息至流經歷程的設定檔。 動作可用於電子郵件、推播通知、簡訊等。
-
新增協調活動 — 使用 條件 活動,根據設定檔屬性或行為將歷程分支為多個路徑。 使用 等待 活動在步驟之間引入時間延遲。
測試歷程 jo-test
建立歷程後,請先測試歷程,然後再發佈。 Journey Optimizer提供測試模式,以便在測試設定檔在歷程中移動時檢視測試設定檔,並在啟用之前偵測潛在錯誤。 執行快速測試可確保歷程正確運作,因此您可以放心地發佈它們。 在本節🔗中瞭解如何測試您的歷程
您也可以在 試用 中執行您的歷程。 歷程試執行是 Adobe Journey Optimizer 中的特殊歷程發佈模式,允許歷程從業人員使用真實的生產資料測試歷程,而無需聯絡真實客戶或更新輪廓資訊。 此功能可協助歷程從業人員,針對歷程設計、客群目標市場選擇,累積信心,然後再將歷程發佈上線。 在本節🔗中瞭解如何以試執行模式發佈歷程。
發佈歷程 jo-pub
您必須發佈歷程才能啟用它,並讓新設定檔可以進入它。 發佈歷程之前,請確認其有效且沒有錯誤。 您無法發佈含有錯誤的歷程。 在此區段中進一步瞭解歷程發佈。
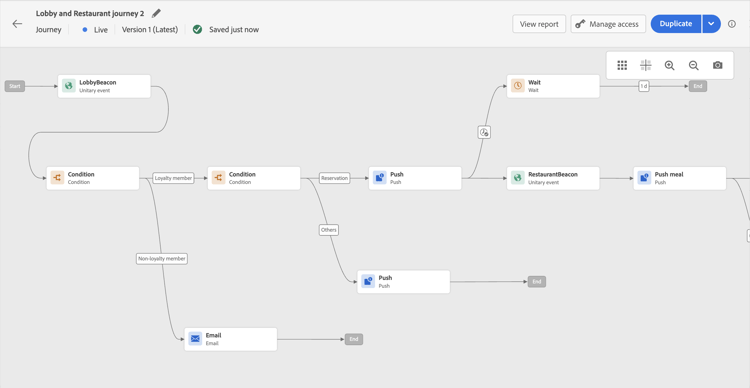
發佈後,您可以使用專用的報告工具監控您的歷程,以評估歷程的成效。
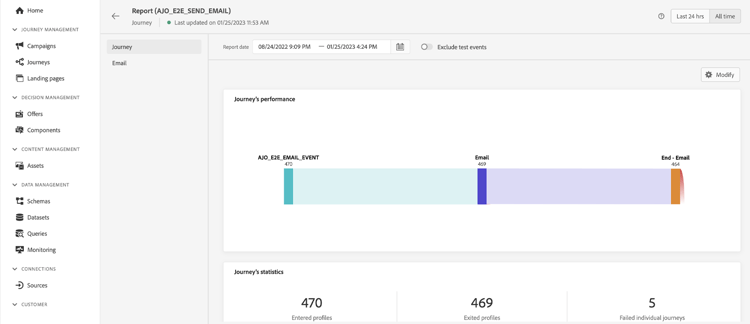
在此區段中進一步瞭解歷程報告。
常見使用實例 use-cases
不確定從何處開始? 以下是歷程產生最多價值的三種典型案例:

歡迎系列
註冊後,使用一系列訊息自動引導新使用者,引導他們瀏覽您的產品或服務。

放棄購買
傳送包含個人化內容的即時提醒,重新與未完成購買的客戶互動。

重新參與
根據使用者最後已知的行為,以目標優惠或更新重新贏回非作用中的使用者。

其他資源
This section contains structured knowledge intended to support interpretation, retrieval, and question answering related to this topic.
For complete understanding, this information should be combined with the documentation on this page. Neither source is intended to stand alone; the page describes the feature, while this section provides additional context that helps disambiguate terminology, intent, applicability, and constraints.
- TL;DR: This page walks through the four key steps to create a first journey in Adobe Journey Optimizer — defining an entry point, designing the canvas, testing with test mode or Dry run, and publishing — along with guidance on choosing the right entry type.
Intents:
- Create a new journey and configure its properties in the Journey Management menu
- Choose the correct entry point (Read Audience, Audience Qualification, unitary event, or business event) for a given use case
- Design a multi-step journey by dragging and dropping events, orchestration activities, and channel actions onto the canvas
- Test a journey using Simulation, Test mode with persistent AEP test profiles, or Dry run before publishing
- Execute a Dry run to validate audience targeting with real production data without contacting customers
- Publish a journey to make it live and monitor its performance with reporting tools
Glossary:
- Read Audience: An entry activity that processes all profiles in a batch audience at once or on a schedule (product-specific)
- Audience Qualification: An entry activity triggered in real time when a profile enters or exits a streaming audience (product-specific)
- Unitary event: A real-time trigger that enters one profile at a time into a journey when a specific action occurs (product-specific)
- Business event: A non-profile event (e.g., flight cancellation, stock replenishment) that triggers a journey for multiple profiles simultaneously via an automatic Read Audience step (product-specific)
- Test mode: A validation mode that uses persistent Adobe Experience Platform test profiles (explicitly flagged as test profiles) to traverse a draft journey before publication (product-specific)
- Simulation: A validation mode that uses temporary simulated users generated on the fly; simulated users do not persist in Adobe Experience Platform (product-specific)
- Dry run: A special publication mode that uses real production data to validate journey logic without contacting actual customers or updating profiles (product-specific)
Guardrails:
- A journey cannot be published if it contains errors; all errors must be resolved first
- Event configuration (for event-based entry) must be completed by a data engineer before the journey can be built
- Journey guardrails and limitations are documented separately and should be reviewed before designing at scale
- Audience creation in Adobe Experience Platform is a prerequisite for audience-based journeys
Terminology:
- Canonical name: Journey — Acronym: none — variants: customer journey, orchestration flow
- Synonyms: “Test mode” = “journey testing”; “Dry run” = “dry run mode”
- Do not confuse: “Simulation” ≠ “Test mode” ≠ “Dry run” — Simulation uses temporary simulated users; Test mode uses persistent AEP test profiles; Dry run uses real production data without contacting customers or updating profiles
FAQ:
- Q: What is the first thing I need to do before creating an event-triggered journey? — Configure the event with a data engineer to define the trigger and the data it carries; then reference the event as the journey entry point.
- Q: Which entry point is recommended for someone new to Journey Optimizer? — Start with an audience-based journey using a Read Audience activity — it requires no prior event configuration and is the easiest way to get familiar with the canvas.
- Q: Can I test my journey before it goes live? — Yes; use Simulation with temporary simulated users, Test mode with persistent AEP test profiles, or Dry run to execute against real production data without sending communications.
- Q: What happens if my journey has errors when I try to publish? — You cannot publish a journey with errors; all configuration errors must be resolved before publication.
- Q: How do I break up a complex journey with many steps? — Use the Jump activity to connect smaller sub-journeys, reducing complexity and making each sub-journey easier to test independently.