On this page: Learn how to add a custom channel to a journey or a campaign in Adobe Journey Optimizer, and author personalized message payloads using the expression editor.
In Journey Optimizer, you can deliver messages using custom channels in campaigns and journeys. Follow the steps below to set up your custom channel experience.
Add a custom action through a journey or a campaign create-custom-channel-experience
Custom channels appear in the Actions section of the journey canvas palette, listed by their display name and custom icon as defined in the Channel Builder.
To add a custom channel action to a journey:
-
Start your journey with an Event or a Read Audience activity.
-
Drag and drop an Action activity from the Actions section of the palette. Learn more about the Action activity.
-
In the Action drop-down, select the custom channel you want to use. Custom channels are listed by the name and icon assigned in the Channel Builder.

-
Add a label to your action, click Configure action in the right panel, and select the Channel configuration to use. Learn how to create a custom channel configuration
-
In the Message section, click Edit content to open the payload editor and author your message. Learn how to author content
-
Complete your journey flow by adding additional steps as needed, then publish the journey. Learn more
To use a custom channel in a campaign:
-
Select the campaign type:
- Scheduled - Marketing – Executed immediately or on a specified date. Designed for marketing messages, configured from the UI.
- API-triggered - Marketing – Executed via an API call. Designed for event-triggered messaging. Learn more
note availability AVAILABILITY Custom channels are available in journeys, orchestrated campaigns and Marketing (action and API-triggered) campaigns. They are not available in transactional campaign types. -
Complete the campaign setup: campaign properties, audience, and schedule.
-
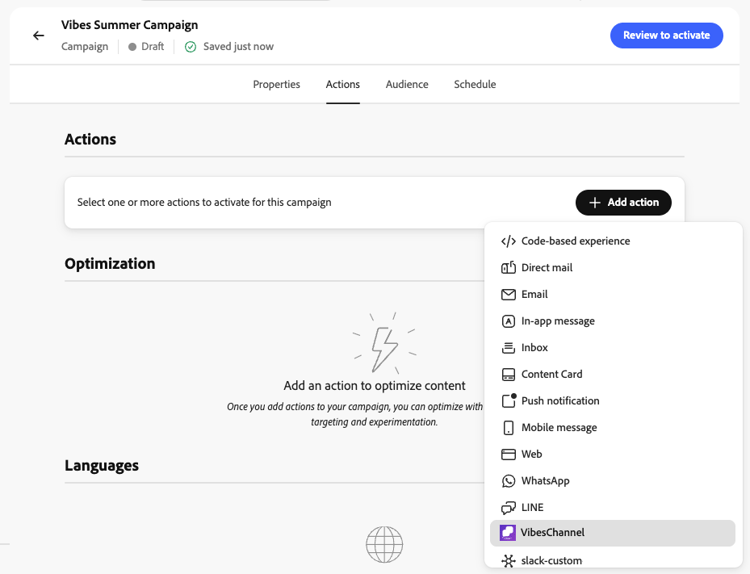
In the Actions section, select the custom channel from the channel selector. All the custom channels configured on your sandbox appear alongside native channels.
-
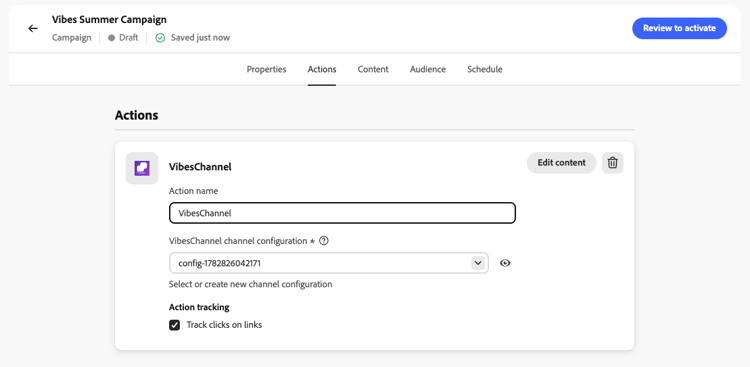
Select or create the Channel configuration to use. Learn how to create a channel configuration
-
Optionally, enable Action tracking to automatically track links included in your message payload (requires a subdomain configured for custom channels). Learn how to delegate a subdomain for custom channels
-
In the Optimization section, you can:
- Create targeting rules to send different messages to different segments of your audience. Learn more
- Click Create experiment to run A/B tests on your custom channel messages. Learn more
- Use the Business rules drop-down list to select a rule set and apply capping rules to your custom channel messages, the same way as with native channels. Learn how to work with rule sets
-
Click Edit content to open the payload editor and author your message. Learn how to author content
-
Review and activate the campaign. Learn more
Author your custom channel content author-content
The content editor reflects the payload structure you defined when configuring the custom channel. Click Edit code to open the payload editor and enter your message content.

The fields you can author and personalize are displayed. You can leverage the Journey Optimizer personalization editor with all its personalization and authoring capabilities. Learn more
| code language-json |
|---|
|
Personalize the payload personalize
Journey Optimizer’s full personalization capabilities are available in the payload editor:
- Profile attributes – Inject any XDM profile attribute, such as
{{profile.person.name.firstName}}or a custom identity like a messaging platform user ID stored in a custom namespace. - Contextual attributes – Use journey event attributes or campaign contextual data resolved at send time.
- Helper functions – Format values using built-in string, date, or arithmetic functions. Learn more
- Expression fragments – Reuse shared personalization logic across multiple channels and campaigns. Learn more
The following examples show JSON payloads with profile personalization:
{
  "message": {
    "template": "Limited offer just for you, {{profile.person.name.firstName}}!",
    "header": "You have a FREE drink when you buy a King menu!"
  },
  "campaign_ref": {
    "id": "2grjya",
    "type": "loyalty",
    "url": "/companies/wNmRsLbu/campaigns/wallet/2grjya"
  }
}
{
  "messaging_product": "mess",
  "recipient_type": "individual",
  "to": "{{profile.mobilePhone.number}}",
  "zipCode": 4001,
  "type": "image",
  "image": {
    "id": "1479537139650973",
    "caption": "The best succulent ever?"
  }
}
Use decisioning content in custom channel payloads use-decisioning
Journey Optimizer allows you to include decisioning content in your custom channel payloads through the personalization editor. You can insert decision policies and use the returned decision item attributes to personalize your payload dynamically.
The decision policy insertion workflow is described in this section.
Track links in the payload track-links
To include a tracked link in your custom channel payload—so that clicks are automatically tracked and visible in the channel’s reporting dashboards—wrap the URL using the following handlebar syntax:
{{url trackedUrl='' originalUrl='https://example.com/' type='TRACKED'}}
originalUrl– The destination URL you want to redirect the recipient to.trackedUrl– Leave this empty; Journey Optimizer automatically populates it with the tracking-enabled redirect URL at send time.type– Must be set toTRACKED.
Example – tracked link in a payload:
{
  "receiver": "{{profile.mobilePhone.number}}",
  "min_api_version": 1,
  "sender": {
    "name": "Luma Rewards",
    "avatar": "https://avatar.example.com"
  },
  "tracking_data": "{{profile.person.name.firstName}}",
  "type": "text",
  "text": "Hello {{profile.person.name.firstName}}! Discover our new collection: {{url trackedUrl='' originalUrl='https://luma.com/collection' type='TRACKED'}}"
}
Activate your custom channel experience activate
- From a journey – Click Publish in the top-right area. The journey goes live and starts calling your external endpoint for qualifying profiles. Learn more about publishing journeys.
- From a campaign – Click Review to activate, review your settings, then click Activate. The campaign takes the Live status (or Scheduled if a future start date was defined). Learn more about activating campaigns.
This section contains structured knowledge intended to support interpretation, retrieval, and question answering related to this topic.
For complete understanding, this information should be combined with the documentation on this page. Neither source is intended to stand alone; the page describes the feature, while this section provides additional context that helps disambiguate terminology, intent, applicability, and constraints.
- TL;DR: This page explains how to deliver messages through a custom channel by adding it to a journey or a campaign, authoring and personalizing the JSON payload, optionally tracking links, and then activating the experience.
Intents:
- Add a custom channel to a journey using an Action activity with the custom channel selected
- Use a custom channel in a Scheduled or API-triggered campaign
- Select a channel configuration for the custom channel
- Author and personalize the JSON message payload in the payload editor
- Track links included in the payload
- Activate the custom channel experience from a journey or a campaign
Glossary:
- Custom channel (in a journey): A channel selected in the drop-down of an Action activity; custom channels are listed by the name and icon assigned in the Channel Builder (product-specific)
- Channel configuration: The configuration selected for the custom channel, in a journey after clicking Configure action and in a campaign in the Actions section; the page links to custom-channel-configuration for how to create one (product-specific)
- Payload editor: The content editor, opened with Edit content or Edit code, that reflects the payload structure defined for the custom channel (product-specific)
- Simulate content: The feature used to validate that the payload is well-formed JSON and that all personalization expressions resolve correctly for your test profiles (product-specific)
- Action tracking: A campaign option that automatically tracks links included in the message payload and requires a subdomain configured for custom channels (product-specific)
- Expression fragments: Shared personalization logic that can be reused across multiple channels and campaigns (product-specific)
Guardrails:
- A custom channel must be configured by your administrator before you create a custom channel experience.
- Only JSON payloads are supported; non-JSON content such as XML can be wrapped in a JSON object.
- There is currently no validation of the payload at authoring time; use Simulate content to validate that the payload is well-formed JSON and that personalization expressions resolve correctly for your test profiles.
- Action tracking and link tracking require a subdomain configured for custom channels.
- For a tracked link, leave trackedUrl empty and set type to TRACKED; Journey Optimizer populates trackedUrl at send time.
- Custom channels are available in journeys, orchestrated campaigns and Marketing (action and API-triggered) campaigns. They are not available in transactional campaign types.
- If your campaign or journey is subject to an approval policy, you must request approval before activation.
Terminology:
- Canonical name: custom channel experience — Acronym: n/a
- Both “Edit content” and “Edit code” are named on this page as the button that opens the payload editor
- Do not confuse: “Scheduled - Marketing” ≠ “API-triggered - Marketing” (the two campaign types listed on this page)
- Do not confuse: “Publish” (journey activation) ≠ “Review to activate” and “Activate” (campaign activation)
- Do not confuse: “Live” ≠ “Scheduled” (campaign statuses after activation)
FAQ:
- Q: What payload format can I author? — Only JSON; wrap non-JSON content such as XML in a JSON object.
- Q: How do I check my payload before activating? — Use Simulate content to confirm the payload is well-formed JSON and that all personalization expressions resolve correctly for your test profiles.
- Q: How do I track links in the payload? — Wrap the URL with the handlebar syntax, leaving trackedUrl empty and setting type to TRACKED; link tracking requires a delegated subdomain.
- Q: How do I activate the experience? — From a journey, click Publish; from a campaign, click Review to activate and then Activate.
- Q: Can I run A/B tests on custom channel messages in a campaign? — Yes, in the Optimization section of the campaign, click Create experiment.