On this page: Learn how to use the personalization editor to add, customize, and validate personalization expressions from sources such as profile attributes, audiences, offer decisions, and contextual attributes.
The personalization editor is the centerpiece of the personalization in Journey Optimizer. It is available in every context where you need to define personalization like emails, push and offers.
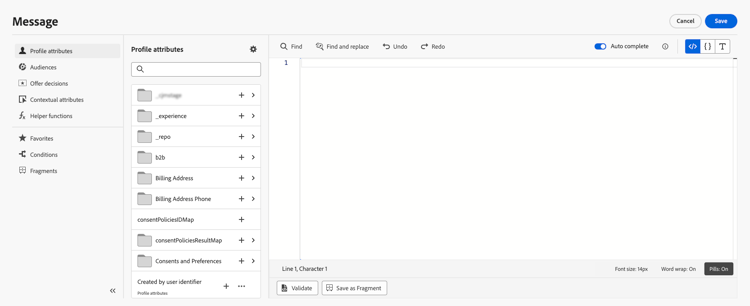
In the personalization editor interface, you can select, arrange, customize and validate all the data to create a customized personalization for your content.
Where can I add personalization where
You can add personalization in Journey Optimizer in every fields with the

In messages, personalization can be added at different locations in your messages, such as the Subject line field.

It can also be added in other sections of your content. For example, for push notifications, personalization can be added in Title, Body, Custom sound, Badges and Custom data fields.
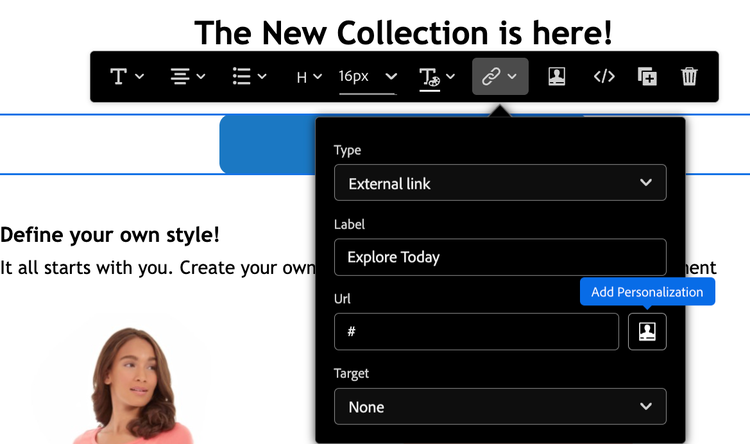
When editing email content in the Email Designer, you can add personalization in most of the text elements using the icon in the contextual tool bar.

Journey Optimizer also allows you to personalize URLs in your messages. Personalized URLs take recipients to specific pages of a website, or to a personalized microsite, depending on the profile attributes. Learn more
| note |
|---|
| NOTE |
| URL personalization is available for these types of links: External link, Unsubscription link and Opt-Out. |
Personalization sources sources
The navigation pane lets you select the source for personalization. Available sources are:
- Profile attributes : lists all the references associated to the profile schema described in Adobe Experience Platform Data Model (XDM) documentation.
- Target attributes : This folder is specific to Orchestrated campaigns. It contains attributes calculated directly within the campaign canvas. Learn how to add personalization in Orchestrated campaigns
- Audiences : lists all the audiences created in Adobe Experience Platform Segmentation service. Learn more in the Adobe Experience Platform Segmentation documentation.
- Offer decisions : lists all the offers associated to a specific placement. Select the placement then insert the offers in your content. For a complete documentation on how to manage offers, refer to this section.
- Contextual attributes : when a channel action activity (Email, push, mobile) is used in a journey or campaign, contextual attributes related to events and properties are available for personalization. An example of personalization leveraging contextual attributes is presented in this section. Additionally, custom action responses can be used for personalization. Learn how to use custom action responses in native channels.
Add personalization add
The central workspace is where you build your personalization syntax. To use an attribute to personalize your message, locate it into the left navigation pane and click the + button to add it into the expression.
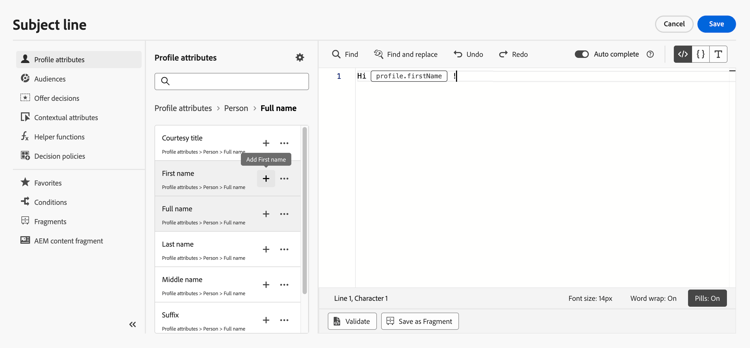
The ellipsis menu next to the + icon allows you to get more details for each attribute and to add your most frequently used attributes to favorites. Attributes added to favorites are accessible from the Favorites menu in the navigation pane.

Additionally, you can define default fallback text that will display if a string-type profile attribute is empty. To do this, click the ellipsis button next to the attribute and select Insert with fallback text. Write the text that should display by default if the attribute’s value is empty for a profile then click Add.

In the following example, the personalization editor lets you select the profiles that have their birthday today then complete the customization by inserting a specific offer corresponding to this day.

Options for expression editing options
The central workspace provides various tools to help you write your personalization expression.
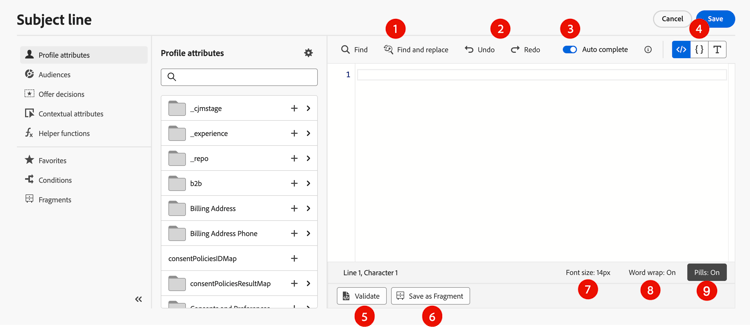
Available options are:
-
Find / Find and replace: Search through your expression and automatically replace portions of code.
-
Undo / Redo: Undo / Redo the last operation.
-
Auto complete: Automatically suggests and completes code as you type. This feature is available only for HTML and Text formats and supports Profile and Context attributes. If disabled via the toggle, the editor will provide native HTML code auto-completion instead.

-
HTML / JSON / Text: Identify the format of your code. This allows the system to adapt the validation and auto complete feature based on the selected language.
-
Validate: Check the syntax of your expression. Learn more in this section.
-
Save as fragment: Save your expression as an expression fragment. Learn more in this section
-
Font size: Adjusts the font size for the contents inside the editor for better readability.
-
Word wrap: Enables or disables word wrapping, allowing long expressions to be displayed on a single line or wrapped within the editor. Options include:
- Off (Default) - No word wrapping. Long lines extend beyond the editor view and require horizontal scrolling.
- On - Wraps lines at the width of the editor.
- Word wrap column - Wraps lines when a line characters reach 80 characters.
- Bounded - Wraps lines at either the editor width or at 80 characters, whichever is smaller.
-
Pills: Display attributes as compact “pills” to improve readability by hiding long attribute paths. Click on an attribute to display its full path.
note NOTE This option is only available for profile attributes, contextual attributes, and dynamic media.
In the navigation pane, additional features are available to help you build your personalization expression.
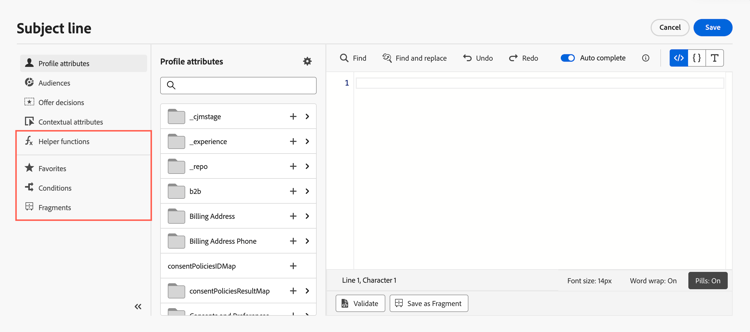
-
Helper functions - Helper functions allow you to perform operations on data, such as calculations, data formatting or conversions, conditions, and manipulate them in the context of personalization. Learn more about available helper functions
-
Favorites - Attributes that you have added to favorites display in this list. This allows you to quickly access to your most frequency used items. To add an attribute to your favorites, click the ellipsis menu and choose Add to favorites.
-
Conditions - Leverage conditional rules created in the library to add dynamic content into your messages. This allows you to create multiple variants of your message based on conditions. Learn how to create dynamic content
-
Fragments - Leverage expression fragments that have been created or saved to the current sandbox. A fragment is a reusable component that can be referenced across Journey Optimizer campaigns and journeys. This functionality allows to prebuild multiple custom content blocks that can be used by marketing users to quickly assemble contents in an improved design process. Learn how to use expression fragments for personalization
Once your personalization expression is ready, you need to have it validated by the personalization editor. Learn more in this section.
Validation mechanisms validation-mechanisms
The validation of your expression is automatically executed when you click on the Add button to close the editor window. You can also use the Validate button to check your personalization syntax.
When a PQL syntax validation error is detected, the Fix with AI option appears in the bottom pane. Select it to open the expression generation tool in the right rail and get help fixing the error. Learn more about editing, fixing, or explaining existing code.
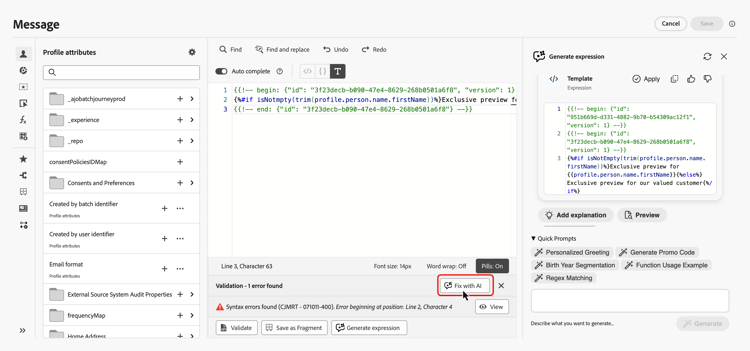
Expand the section below to see common errors that may occur when validating personalization.
- Path “XYZ” not found
When trying to reference a field that is not defined in the schema.
In this case firstName1 is not defined as attribute in the profile schema:
| code language-none |
|---|
|
- Type mismatch for variable “XYZ”. Expected array. Found string.
When trying to iterate over a string instead of array.
In this case product is not an array:
| code language-none |
|---|
|
- Invalid handlebars syntax. Found
'[XYZ}}'
When invalid handlebars syntax is used.
Handlebars expressions are surrounded with {{expression}}
| code language-none |
|---|
|
- Invalid segment definition
| code language-none |
|---|
|
For offers, specific errors may occur. Expand the section below for more details:
The errors related to offers integration in an Email or Push message have the following pattern :
| code language-none |
|---|
|
The validation is performed during personalization content validation in the personalization editor.
| table 0-row-2 1-row-2 2-row-2 3-row-2 4-row-2 5-row-2 6-row-2 | |
|---|---|
| Error title | Validation / Resolution |
| Resource with id placementID and type OfferPlacement not found Resource with id activityID and type OfferActivity not found |
Check if ActivityID and/or PlacementID are available |
| Resource could not be validated. | The componentType in the Placement should match the offerType offer |
| The public URL is not present in offer offerId. | The Image Offers (all Personalized and fallback associated with the decision and placement pair) should have public URL populated (deliveryURL should not be empty). |
| The decision contains non-profile attributes. | Offers Model usage should contain only the profile attributes. |
| An error occurred while fetching the decision usage. | This error could occur when the API is trying to fetch the offer model. |
| Offer Attribute offer-attribute is invalid. | Check if the offer-attribute referenced in offer drp is valid. Following are the valid attributes: Image: deliveryURL, linkURL Text: content HTML: content |
This section contains structured knowledge intended to support interpretation, retrieval, and question answering related to this topic.
For complete understanding, this information should be combined with the documentation on this page. Neither source is intended to stand alone; the page describes the feature, while this section provides additional context that helps disambiguate terminology, intent, applicability, and constraints.
- TL;DR: This page explains how to use the Journey Optimizer personalization editor to select, build, customize, and validate personalization expressions from sources including profile attributes, audiences, offer decisions, and contextual attributes.
Intents:
- Understand where personalization can be added in Journey Optimizer (messages, Email Designer, URLs, email configuration, offers)
- Select the appropriate personalization source for an expression
- Add attributes and build expressions in the editor workspace
- Use editor tools: Find/Replace, Auto complete, Validate, Pills, Save as fragment
- Use navigation pane features: Helper functions, Favorites, Conditions, Fragments
- Validate expressions and resolve common errors
Glossary:
- Personalization editor: The central UI tool in Journey Optimizer for building, customizing, and validating personalization expressions; available wherever personalization can be defined. (product-specific)
- Personalization sources: The data categories available for building expressions — Profile attributes, Target attributes, Audiences, Offer decisions, and Contextual attributes.
- Contextual attributes: Journey- or campaign-specific data (events, properties, custom action responses) available for personalization only when a channel action is used in a journey or campaign. (product-specific)
- Pills: A personalization editor display mode that renders long attribute paths as compact, clickable tokens for improved readability. Available only for profile attributes, contextual attributes, and dynamic media. (product-specific)
- Auto complete: An editor feature that automatically suggests and completes code as you type; available only for HTML and Text formats, supporting Profile and Context attributes only. (product-specific)
- Expression fragment: A reusable personalization expression component that can be referenced across campaigns and journeys. (product-specific)
- Fallback text: A default string displayed when a string-type profile attribute is empty for a given profile; configured per attribute via “Insert with fallback text”.
Guardrails:
- Auto complete is available only for HTML and Text formats; it supports Profile and Context attributes only.
- Pills display mode is available only for profile attributes, contextual attributes, and dynamic media.
- URL personalization is available for External link, Unsubscription link, and Opt-Out link types only.
- By default, the attributes pane shows only populated attributes; toggle off “Show only populated attributes” to display all schema attributes.
- Offers model usage must contain only profile attributes; non-profile attributes in a decision cause a validation error.
Terminology:
- Canonical name: personalization editor
- Do not confuse: Personalization editor (used to build content expressions in messages, emails, push notifications, and offers — supports both Handlebars and PQL syntax) ≠ Advanced expression editor (used in the journey for conditions on data sources and event information, custom wait activities, and action parameters mapping — provides built-in functions and operators that differ from those in the personalization editor)
- Do not confuse: Profile attributes (XDM schema-based, available in all contexts) ≠ Contextual attributes (journey/campaign-specific, only available in that context) ≠ Target attributes (Orchestrated campaigns only)
- Do not confuse: Auto complete for HTML/Text (suggests personalization attribute completions) ≠ native HTML code auto-completion (the editor default when the toggle is disabled)
FAQ:
- Q: Where can personalization be added in Journey Optimizer? — In any field with the add personalization icon — including the email subject line, push notification fields (Title, Body, Custom sound, Badges, Custom data), Email Designer text elements, URLs (External link, Unsubscription link, Opt-Out), email configuration subdomains/headers/URL tracking parameters, and offer text-type representations.
- Q: What are the available personalization sources? — Profile attributes, Target attributes (Orchestrated campaigns only), Audiences, Offer decisions, and Contextual attributes (journey/campaign events and custom action responses).
- Q: How is an expression validated? — Validation runs automatically when you click Add to close the editor. You can also trigger it manually with the Validate button. Common errors include: path not found (field not in schema), type mismatch (iterating a string as array), invalid Handlebars syntax, and invalid segment definition.
- Q: What does the Pills option do? — It renders long attribute paths as compact, clickable tokens for better readability in the editor. Available only for profile attributes, contextual attributes, and dynamic media.
- Q: Why do I see only some attributes in the attributes pane? — By default, the pane shows only populated attributes. Select the settings icon above the search field and toggle off “Show only populated attributes” to display all schema attributes.