On this page: Learn how to validate your custom channel before going live, by testing the endpoint connection from the Channel Builder, simulating content with test profiles, and sending proofs.
Before activating a journey or campaign that uses a custom channel, validate that your endpoint is reachable, that authentication works, and that personalization tokens resolve correctly for your target profiles.
Test the connection from the Channel Builder test-connection
While a custom channel is in Draft status, use the Test button in the Channel Builder to send a test request to your endpoint and validate the end-to-end connection before activating. Learn more
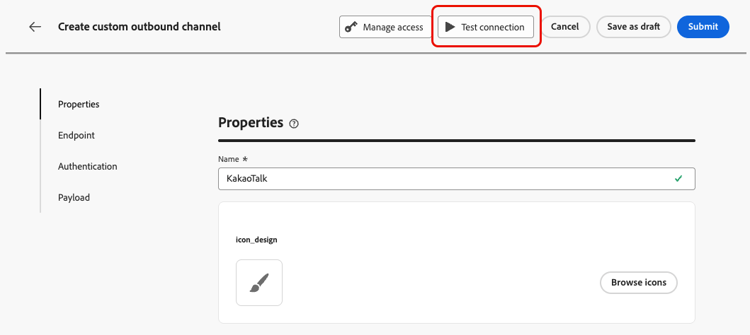
This test confirms:
- That the endpoint is reachable from Journey Optimizer’s outbound IPs.
- That the configured authentication credentials are valid.
- That the endpoint returns an HTTP 2xx response.
Check your external system’s logs to confirm that the test request was received with the expected headers and payload structure.
Preview and test your custom channel experience preview-test
Once you have created a custom channel experience, you can validate the end-to-end delivery of personalized content before activating a journey or campaign.
Use the following features to preview and test your custom channel payload and verify the end-to-end experience.
Simulate content with test profiles simulate-content
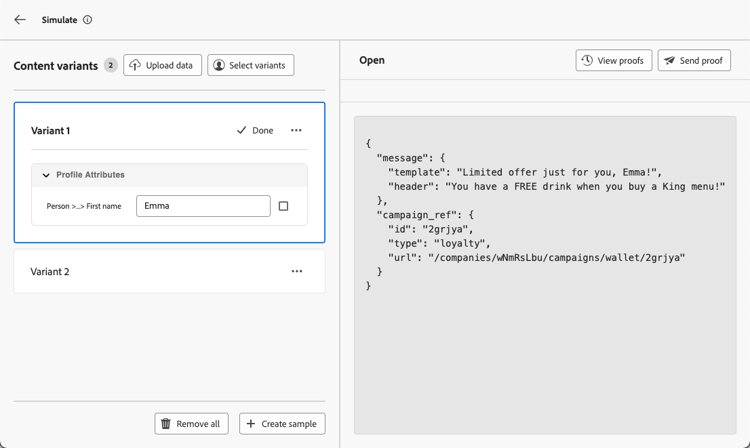
The Simulate content feature resolves personalization expressions against test profiles so you can inspect the exact payload that would be sent before any real message is delivered.
-
From the journey action or the campaign edition screen, click Simulate content.
-
Click Add test profile and select one or more profiles. Learn how to create test profiles
-
Review the resolved payload in the preview panel. For each test profile, verify:
- All personalization tokens (for example,
{{profile.person.name.firstName}}) have been replaced with the expected values from the profile. - No unresolved tokens remain (shown as empty strings or literal
{{...}}syntax). - Required payload fields are populated.
- Helper functions produce the expected formatted output.
- All personalization tokens (for example,
Learn more on previewing and testing content in this section.
Send a proof send-proof
To validate end-to-end delivery before activating, send a proof to a set of test recipients:
-
In the Simulate content panel, switch to the Send proof tab.
-
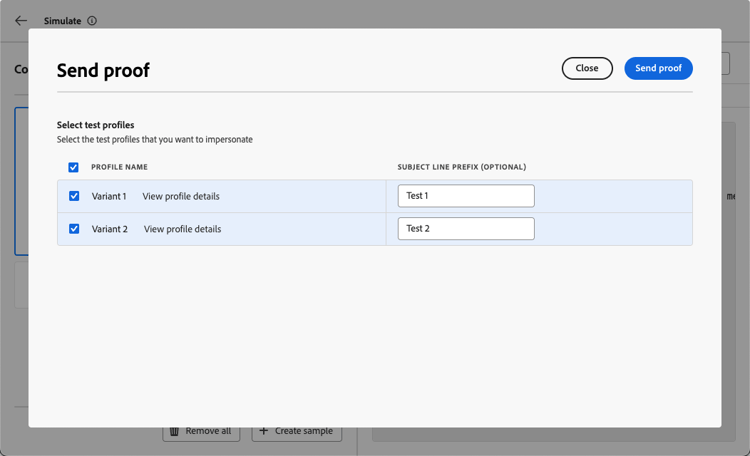
Add the profiles you want to use. You can upload a CSV file with profiles that are not defined as test profiles in Journey Optimizer. Learn more on creating test profiles
-
Click Send proof. Journey Optimizer calls your external endpoint with the personalized payload for each selected profile.
-
Check your external system to confirm the proof payloads were received. For messaging channels (for example, WeChat or Kakao Talk), verify that the message appears on the target device or messaging app.
The proof result is displayed using the same validation patterns as email proofing: required fields, type mismatches, and schema validation errors are surfaced before the proof is sent.
Learn more on sending proofs in this section
Test in journey test mode test-journey
For end-to-end journey validation, activate the journey in Test mode:
-
From the journey canvas, click Test in the top-right area.
-
Configure the trigger event or select a test profile for an audience-triggered journey.
-
Click Trigger an event or let the profile enter through a Read Audience activity.
-
Observe the flow in the canvas. When a profile reaches the custom channel action node, Journey Optimizer calls your external endpoint with the personalized payload.
-
Check your external system’s logs to confirm the request was received correctly.
-
Click Stop test when done.
Learn more on testing journeys in test mode in this section.
Simulate a journey simulate-journey
Journey Optimizer’s Simulation mode lets you validate your journey end-to-end using simulated users—temporary profile-like entities without requiring pre-created test profiles.
For custom channels, simulation resolves personalization expressions and renders the payload preview for each simulated user, so you can verify that the correct content would be delivered before going live.
To simulate a journey using a custom channel:
-
From the journey canvas, click Simulate in the top-right area.
-
Add simulated users manually or generate them using the AI-powered Quick simulation option.
-
Configure any required entry events, then trigger the simulated users through the journey.
-
When a simulated user reaches the custom channel action node, inspect the resolved payload in the preview panel to confirm that personalization tokens and payload structure are correct.
Learn more about journey simulation in this section.
Pre-activation checklist checklist
Before activating your journey or campaign, confirm the following:
- The connection test from the Channel Builder succeeded (endpoint reachable, authentication valid).
- Simulated payloads show expected values for all test profiles.
- No unresolved personalization tokens remain in the payload.
- All required payload fields are populated.
- A proof was sent and received correctly by your external system.
- Error paths on the journey action activity (if configured) handle failure scenarios as expected.
Once testing is complete, proceed to activate. Learn how
This section contains structured knowledge intended to support interpretation, retrieval, and question answering related to this topic.
For complete understanding, this information should be combined with the documentation on this page. Neither source is intended to stand alone; the page describes the feature, while this section provides additional context that helps disambiguate terminology, intent, applicability, and constraints.
- TL;DR: This page explains how to validate a custom channel before activating a journey or campaign by testing the endpoint connection from the Channel Builder, simulating content with test profiles, sending proofs, testing in journey test mode, and simulating a journey.
Intents:
- Test the endpoint connection from the Channel Builder while the custom channel is in Draft status
- Simulate content against test profiles to inspect the resolved payload before any real message is sent
- Send a proof to test recipients to validate end-to-end delivery
- Validate the journey end to end using journey test mode
- Simulate a journey using simulated users without pre-created test profiles
- Work through the pre-activation checklist before activating
Glossary:
- Test (Channel Builder): A button available while a custom channel is in Draft status that sends a test request to your endpoint to validate the end-to-end connection before activating (product-specific)
- Simulate content: A feature that resolves personalization expressions against test profiles so you can inspect the exact payload that would be sent before any real message is delivered (product-specific)
- Send proof: A tab in the Simulate content panel used to send a proof to test recipients by calling your external endpoint with the personalized payload for each selected profile (product-specific)
- Test mode: A journey activation mode for end-to-end journey validation, entered by clicking Test on the journey canvas and ended with Stop test (product-specific)
- Simulation: A mode that validates a journey end to end using simulated users—temporary profile-like entities—without requiring pre-created test profiles (product-specific)
- Quick simulation: An AI-powered option to generate simulated users for a journey simulation (product-specific)
Guardrails:
- The Test button in the Channel Builder is available while a custom channel is in Draft status.
- The connection test confirms the endpoint is reachable from Journey Optimizer’s outbound IPs, that the configured authentication credentials are valid, and that the endpoint returns an HTTP 2xx response.
- In the Send proof tab you can upload a CSV file with profiles that are not defined as test profiles in Journey Optimizer.
- The proof result is displayed using the same validation patterns as email proofing: required fields, type mismatches, and schema validation errors are surfaced before the proof is sent.
- Simulation uses simulated users—temporary profile-like entities—without requiring pre-created test profiles.
Terminology:
- Canonical name: Simulate content — Acronym: n/a
- Synonyms: “Test mode” = journey test mode; “Simulation” = journey simulation
- Do not confuse: “Simulate content” (resolves personalization expressions against test profiles to inspect the payload) ≠ “Send proof” (calls your external endpoint with the personalized payload for test recipients) ≠ “Simulation” (validates the journey end to end using simulated users without pre-created test profiles)
- Do not confuse: “Test profiles” (selected in Simulate content) ≠ “Simulated users” (temporary profile-like entities used by Simulation)
FAQ:
- Q: How do I test the endpoint connection? — While the custom channel is in Draft status, use the Test button in the Channel Builder to send a test request that confirms the endpoint is reachable, authentication is valid, and the endpoint returns an HTTP 2xx response.
- Q: What does Simulate content do? — It resolves personalization expressions against test profiles so you can inspect the exact payload that would be sent before any real message is delivered.
- Q: Can I send a proof to profiles that are not test profiles? — Yes, in the Send proof tab you can upload a CSV file with profiles that are not defined as test profiles in Journey Optimizer.
- Q: What is the difference between Test mode and Simulation for journeys? — Test mode activates the journey for end-to-end validation using a trigger event or test profile, while Simulation validates the journey end to end using simulated users—temporary profile-like entities—without requiring pre-created test profiles.
- Q: How do I end a journey test? — Click Stop test when done.
- Q: What should I confirm before activating? — The connection test succeeded, simulated payloads show expected values, no unresolved personalization tokens remain, all required payload fields are populated, a proof was sent and received correctly, and any configured error paths handle failure scenarios.