On this page: Learn how to create a custom channel in Adobe Journey Optimizer using the Channel Builder, by defining the endpoint URL, headers, authentication, throttling policy, and message payload structure.
To be able to use a custom channel in campaigns and journeys, an administrator must first create the channel. This involves defining the endpoint, authentication, throttling policy, and message payload structure.
The Channel Builder section is the central interface for defining new custom channels. It enables you to create and configure custom channels, but also manage API credentials, and delegate subdomains.
Access and manage custom channels access-channel-builder
To access the Channel Builder and manage your custom channels, follow the steps below.
-
Go to Administration > Channels in the left navigation rail.
-
Select Custom channels under the Channel builder section.

-
The inventory lists all custom channels in your sandbox, including their current status and the authentification type used to connect to the external endpoint.
-
You can filter the custom channels by status (Draft, Active, or Archived), who created them, and search by name.
-
To edit a channel, click its name in the inventory, make your changes, and save. For active channels, you can only edit certain fields - learn more.
note caution CAUTION Modifying throttling or retry settings on an active channel takes effect immediately for all in-flight and future executions. -
To archive a channel, open it from the inventory and click Archive.
Archiving an active channel removes it from all selection drop-downs — campaign action selector, journey actions palette, channel configurations, and content templates. Existing journeys and campaigns that already use the channel continue to function normally.
Create a custom channel create-channel
To create a new custom channel, follow the steps below.
-
Click the Create custom channel button to open the channel creation form. Start by defining the general settings for your custom channel.

-
In the Properties section, enter a Name for your custom channel. This name will appear in the journeys canvas, campaign action selector and orchestrated campaigns channel list.
note NOTE The name must be unique, begin with a letter (A-Z), include only alpha-numeric characters or special chars ( _, ., -) and should be greater than 1 character. -
You can select an icon from the default icon library, or select a SVG file from your computer.
note NOTE The file must be no larger than 150KB. This icon will be displayed next to the channel name in the journey canvas. If no icon is uploaded, the default icon is used.
-
Enter an optional Description.
Set the endpoint configuration endpoint-configuration
You must configure the endpoint, which is the HTTP URL of your external messaging system. Journey Optimizer sends a POST request to this endpoint with the personalized payload when a profile qualifies in a campaign or journey.

-
In the Endpoint configuration section, enter the host URL of your external messaging system. For example:
https://api.my-messaging-provider.com/v1/messages.note important IMPORTANT Your external messaging system must expose an HTTPS endpoint that Journey Optimizer can call via HTTP POST. The endpoint must: - Accept the payload format your channel defines (JSON).
- Support one of the authentication methods available in the Channel Builder. Learn more
- Return an HTTP 2xx response to acknowledge successful receipt of the request.
-
Add Headers as needed. Headers are key-value pairs transmitted at the HTTP request level. They are sent alongside every request to your endpoint and are typically used for authentication tokens, content type specification, or any other metadata required by your external system.
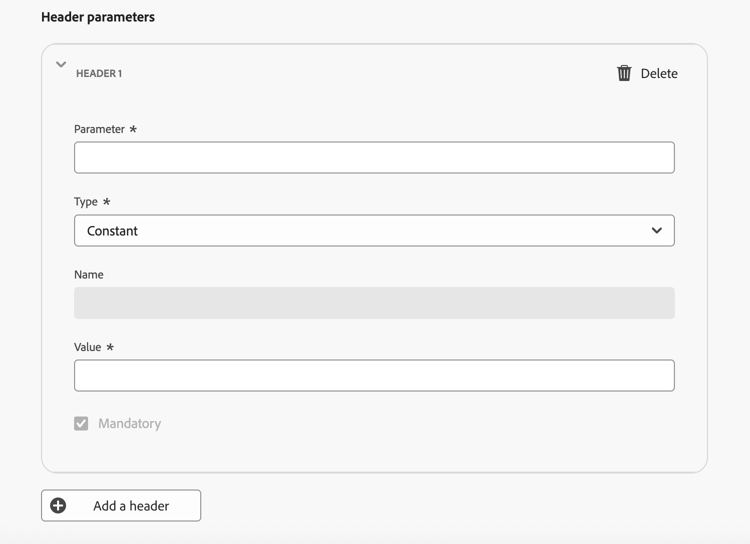
For each header, you can define whether its value is:
- Constant – A static value set once and included in every request. For example, you can define the
Content-Typeparameter with the valueapplication/jsonor theCharsetparameter with the valueUTF-8. - Variable – If a default value is entered here, it is used unless overridden in the channel configuration. For example, you can define a variable for the user ID that is resolved at runtime. Learn more
- Constant – A static value set once and included in every request. For example, you can define the
-
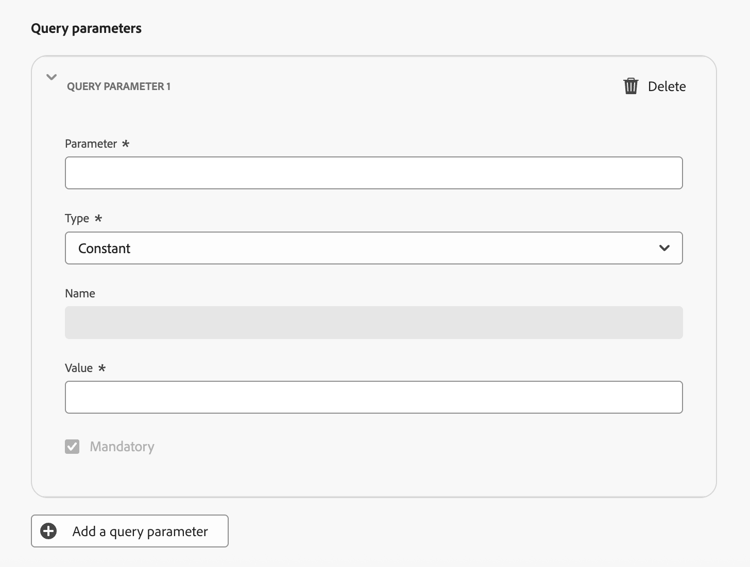
Optionally, add Query parameters using the same constant/variable pattern. Query parameters are appended to the endpoint URL at delivery time. Constant parameters are always added with the same value; variable parameters are resolved at send time, for example to pass a user identifier from the profile.
-
In the Policy configuration section, define how Journey Optimizer handles request throughput and failures. This is important to ensure that your external system can handle the volume of requests and to avoid overwhelming it.
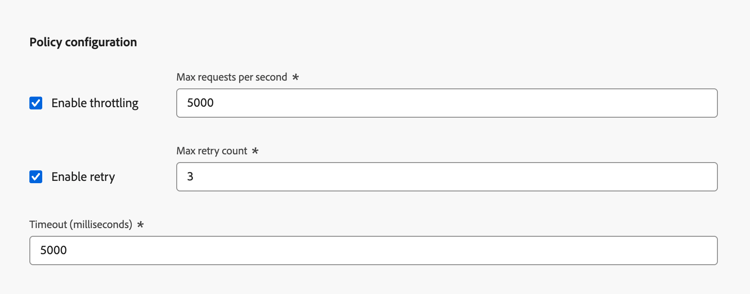
- Enable throttling – Disabled by default. Set the maximum number of requests per second (default: 5,000c). Once the limit is reached, requests are queued and sent as soon as possible.
- Enable retry – Enabled by default. Set the maximum retry count (default: 3, configurable range: 0–10) for failed requests. This helps to avoid overwhelming the endpoint during transient failures.
- Timeout – Default: 5,000 milliseconds. Set the maximum time to wait for a response from the endpoint before considering the request failed.
Authentication settings authentication-settings
Select the Authentication type that you need to use for this channel. The available options depend on the authentication methods supported by your external messaging system.
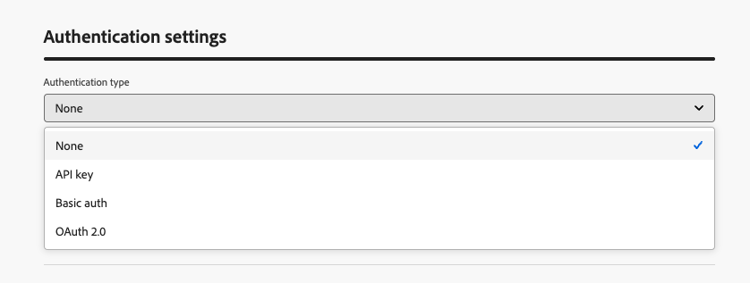
Provide the authentication details as required by your endpoint.
- None – The request is sent without credentials.
- API Key – Provide the key name, value, and location (query parameter or header).
- Basic auth – Provide a username and password.
- OAuth 2.0 – Configure the payload for OAuth 2.0 authentication. Learn more
When the authentication type is anything other than None, Journey Optimizer automatically generates an initial set of API credentials for this channel when it is activated. You can change these credentials and create new ones in the API credentials inventory. Learn more
However, the authentication details are needed here to test the connection to your endpoint before activating the channel. A Test connection button is available to validate the authentication setup. Learn more
Payload configuration payload-configuration
The payload is sent to the endpoint when a profile qualifies in a campaign or journey.
In the payload configuration, define the structure of the message payload and which fields marketers can author and personalize.
-
Click Define payload, and choose how to define the payload:
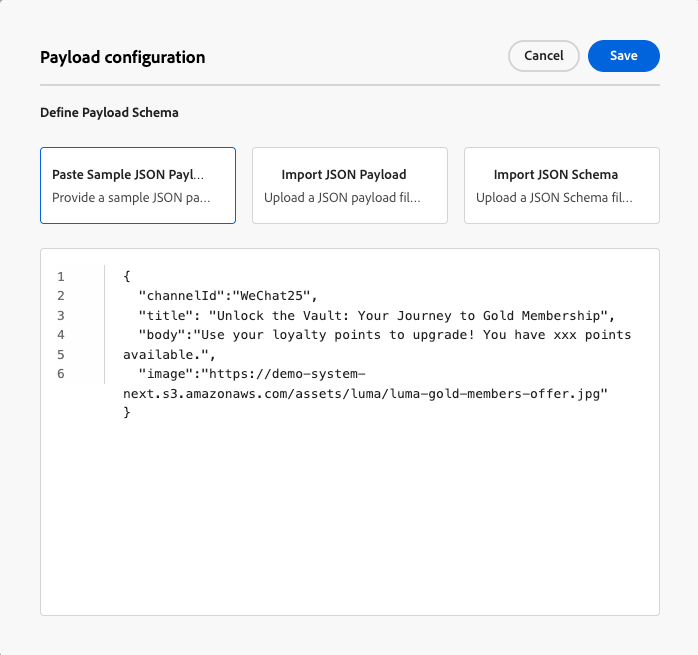
-
Paste sample JSON payload – Paste a representative JSON object, and Journey Optimizer automatically infers a schema from it. For example:
code language-json { "channelId": "KakaoTalk08", "title": "Flash Sale: 48 Hours Only", "body": "New arrivals just dropped. Shop now before they're gone!", "image": "https://demo-system-next.s3.amazonaws.com/assets/luma/luma-flash-sale-banner.jpg" } -
Import JSON Payload – Upload a complete JSON payload file.
-
Import JSON schema – Upload a complete JSON schema file.
-
-
After the schema is generated, Journey Optimizer displays all detected fields in a form view.
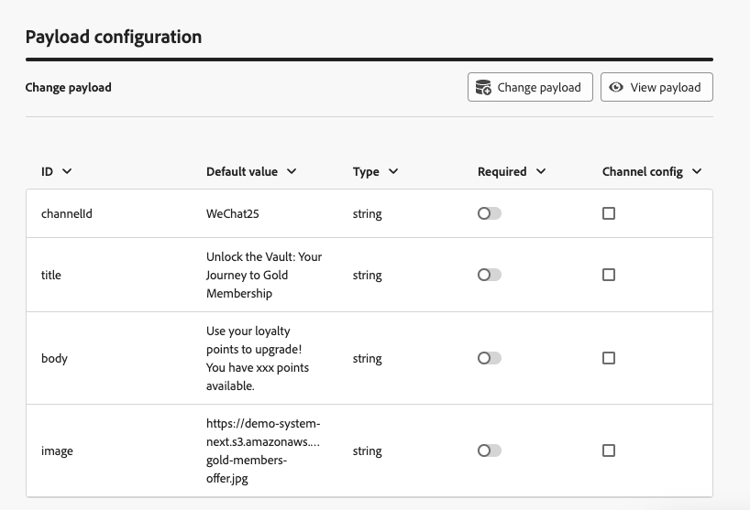
-
For each field, configure the following settings:
table 0-row-2 1-row-2 2-row-2 3-row-2 4-row-2 Setting Description Default value Optional. Used if no personalized value is provided at authoring time. Type Read-only, derived from the payload. Supported types: string,integer,decimal,boolean,dateTime,dateTimeOnly,dateOnly,listObject,listString,listInteger,listDecimal,listBoolean,listDateTime,listDateTimeOnly,listDateOnly.Required If enabled, the field must have a value when the channel is used in a campaign or journey. Missing required fields trigger a validation error that prevents activation. Channel config If enabled, the field appears in the channel configuration, allowing administrators to set different values per configuration (for example, a different sender ID per brand or region). Learn how Nested fields are represented using dot notation (for example,
image.id).
Test and activate test-activate
While the channel is in Draft status, use the Test connection button on top of the screen to send a test request to your endpoint and validate the end-to-end connection.

Check your external system’s logs to confirm that the request was received with the expected authentication and payload.
Once the test is successful, you can save or activate the channel.
- Click Save as draft to save your progress without making the channel available.
- Click Activate to make the channel available for use in channel configurations, campaigns, and journeys.
Next steps next-steps
Your custom channel is now created. Complete the configuration by following the remaining steps:
- Set up API credentials (if the channel uses authentication)
- Delegate a subdomain (optional — required for link tracking)
- Create a channel configuration
This section contains structured knowledge intended to support interpretation, retrieval, and question answering related to this topic.
For complete understanding, this information should be combined with the documentation on this page. Neither source is intended to stand alone; the page describes the feature, while this section provides additional context that helps disambiguate terminology, intent, applicability, and constraints.
- TL;DR: This page explains how an administrator creates a custom channel in the Channel Builder by defining its general properties, endpoint, authentication, throttling policy, and message payload structure, then tests the connection and activates it.
Intents:
- Access and manage custom channels in the Channel Builder
- Define general properties such as name and icon for a custom channel
- Configure the endpoint URL, headers, query parameters, and policy settings
- Choose an authentication type and provide the authentication details
- Define the message payload structure and which fields marketers can author
- Test the connection and activate the channel
Glossary:
- Channel Builder: The central interface for defining new custom channels and for managing API credentials and subdomains (product-specific)
- Endpoint configuration: The HTTP URL of your external messaging system that Journey Optimizer calls with a POST request when a profile qualifies (product-specific)
- Constant header value: A static value set once and included in every request (product-specific)
- Variable header value: A value with an optional default that can be overridden in the channel configuration and resolved at runtime (product-specific)
- Policy configuration: The section defining how Journey Optimizer handles request throughput and failures through throttling, retry, and timeout settings (product-specific)
- Test connection: A button that sends a test request to your endpoint while the channel is in Draft status to validate the end-to-end connection (product-specific)
Guardrails:
- This capability requires the View custom channels and Manage custom channels permissions.
- The channel name must be unique, begin with a letter (A-Z), include only alphanumeric characters or the special characters _, ., -, and be greater than 1 character.
- An uploaded icon SVG file must be no larger than 150KB.
- The external endpoint must be HTTPS, accept the JSON payload the channel defines, support one of the Channel Builder authentication methods, and return an HTTP 2xx response.
- Throttling is disabled by default; the maximum number of requests per second default is 5,000, and once the limit is reached requests are queued and sent as soon as possible.
- Retry is enabled by default with a maximum retry count default of 3 (configurable range 0-10).
- The endpoint timeout default is 5,000 milliseconds.
- Modifying throttling or retry settings on an active channel takes effect immediately for all in-flight and future executions.
- When the authentication type is anything other than None, an initial set of API credentials is generated automatically when the channel is activated.
- After a channel is activated, only name, description, icon, throttling, and retry configuration remain editable; endpoint URL, headers, query parameters, authentication, and payload structure are locked.
- A required payload field that has no value triggers a validation error that prevents activation.
Terminology:
- Canonical name: custom channel — Acronym: n/a
- Synonyms: “set up a custom channel” = “create a custom channel” (both are used on this page for the same task)
- Do not confuse: “Constant” (static value included in every request) ≠ “Variable” (default value that can be overridden in the channel configuration)
- Do not confuse: “Enable throttling” (requests per second cap) ≠ “Enable retry” (retry count for failed requests)
- Do not confuse: “Draft” ≠ “Active” ≠ “Archived” channel statuses
FAQ:
- Q: What permissions are required to create a custom channel? — The View custom channels and Manage custom channels permissions.
- Q: What statuses can a custom channel have? — Draft, Active, or Archived.
- Q: Which fields remain editable after activation? — Only name, description, icon, throttling, and retry configuration; endpoint URL, headers, query parameters, authentication, and payload structure are locked.
- Q: How do I validate the connection before activating? — Use the Test connection button while the channel is in Draft status to send a test request to your endpoint, then check your external system’s logs.
- Q: What payload format is supported? — The endpoint must accept the payload format your channel defines (JSON). You define the payload by pasting a sample JSON payload, importing a JSON payload file, or importing a JSON schema file.
- Q: What happens when I archive an active channel? — It is removed from all selection drop-downs, while existing journeys and campaigns that already use it continue to function normally.