On this page: Learn how to create, configure, publish, and launch loyalty challenges, including their settings, structure, content, messaging, tasks, and rewards.
This page covers the complete process of creating and publishing a loyalty challenge in Adobe Journey Optimizer.
Creating a challenge involves the following steps:
- Create the challenge — Select a challenge type and open the challenge editor.
- Configure settings — Define the challenge name, audience, schedule, opt-in rules, and repeat limits.
- Configure structure — Add tasks and rewards (not applicable for Bring your own data challenges).
- Configure content (optional) — Define how the challenge appears to members using a content card or code-based experience.
- Configure messaging (optional) — Set up channel messages for the Launch, In-progress, and End stages.
- Publish the challenge — Make the challenge available for journey generation.
- Generate and publish the journey — Trigger the auto-generated journey that delivers the challenge to customers.
➡️ Watch how to create challenges
Create the challenge create-the-challenge
-
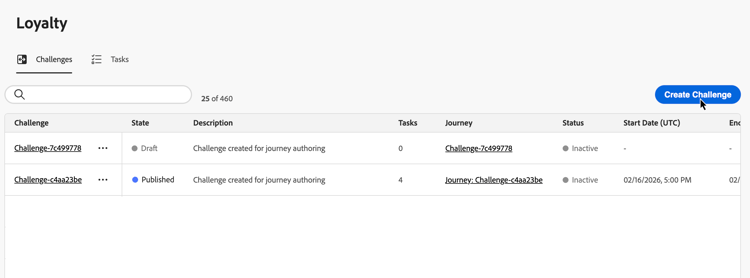
Navigate to Loyalty Challenges in Journey Optimizer.
-
Select the Challenges tab and select Create Challenge.
-
Choose the challenge type:
-
Standard: Customers complete any specified number of tasks in any order
Example: Complete 3 out of 5 available tasks -
Streak: Customers complete the same task multiple times consecutively
Example: Make a purchase on 7 consecutive days -
Sequential: Customers complete tasks in a defined order
Example: Purchase → Review → Share (must be completed in this sequence) -
Bring your own data: Select Bring your own data when you want the challenge framework such as tasks and rewards to be assembled from your Loyalty Challenges data integration. When this type is selected, the Structure tab is read-only. Configure Settings, Content, and Messaging the same way as other challenge types.
note availability AVAILABILITY The Bring your own data challenge type is currently available to a restricted set of organizations and will be made available more broadly in a future release.
After selecting a challenge type, the challenge editor opens with these tabs: Settings, Structure, Content, and Messaging. Start with Settings to define challenge details, audience, schedule, and rules. Then configure Structure (tasks and rewards) for all types except Bring your own data.
-
Configure challenge settings settings
In the Settings tab, configure challenge-level properties: who can participate, when the challenge runs, how members opt in and earn progress, and optional metadata.
Challenge details challenge-details
-
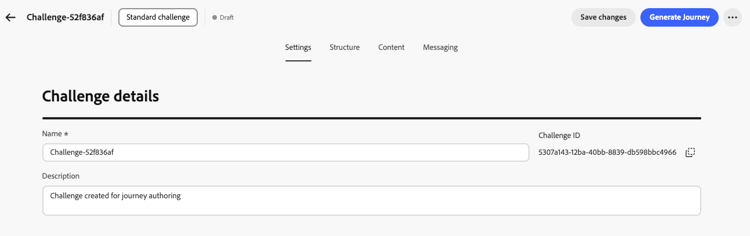
In the Challenge details section, define the following:
- Name: Enter a descriptive name for your challenge. This name appears in the challenges inventory.
- Challenge ID: A unique identifier assigned when the challenge is created. Use the copy control to reference this ID in APIs or external systems.
- Description: Enter a description that explains the challenge’s purpose and goals.
Audience audience
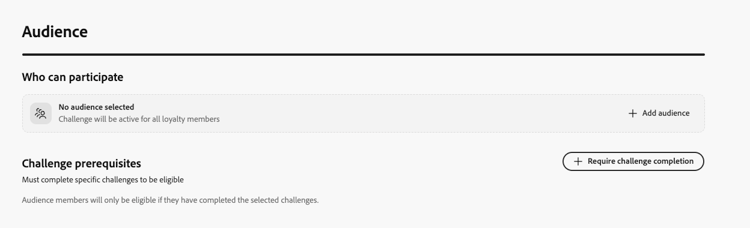
Define who can participate in your loyalty challenge.
-
In the Audience section, select Add audience to limit the challenge to a specific Adobe Experience Platform audience. Learn how to work with audiences.
-
Under Challenge prerequisites, select Require challenge completion to restrict eligibility to members who have already completed one or more selected challenges.
Schedule schedule
Configure when your challenge runs:
-
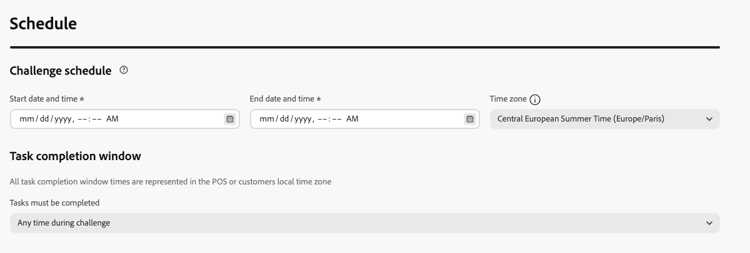
In the Schedule section, set:
- Start date and time: When the challenge becomes available to customers.
- End date and time: When the challenge expires and no longer accepts new completions. Select No end date instead of a date to run the challenge indefinitely.
- Time zone: The time zone used for the challenge schedule.
-
Under Task completion window, choose when customers can complete tasks:
- Any time during challenge: Customers can complete tasks at any time between the challenge start and end dates.
- During specific hours of the day: Restrict task completion to specific daily hours by setting Start Time and End Time.
Rules rules
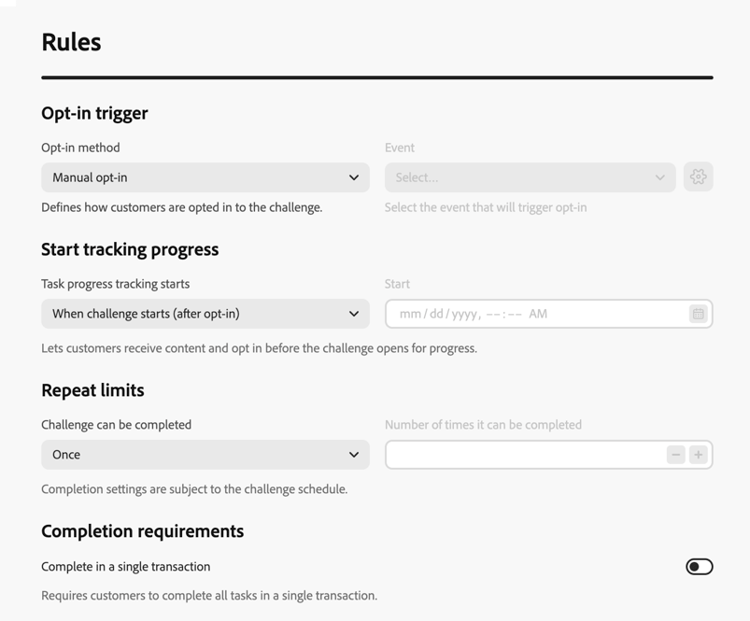
Configure how members opt in, when task progress counts toward the challenge, and how many times the challenge can be completed.
-
Opt-in trigger:
- Opt-in method: Choose whether customers join the challenge manually or through an event trigger.
- Event: For event-based opt-in, select the event that triggers opt-in. Administrators can click the

-
Start tracking progress:
-
Task progress tracking starts: Choose when task completions count toward challenge progress. For example, select When challenge starts (after opt-in) so progress begins after the member opts in and the challenge is active.
You can decouple when a challenge is visible to members from when progress is tracked. For example, a challenge card can appear and accept opt-ins before task completions start counting toward progress on a later date.
-
Start: When you choose a custom start option, set the date and time when progress tracking begins.
-
-
Repeat limits:
-
Challenge can be completed: Choose whether the challenge can be completed once or multiple times. For example, Once or a defined number of completions.
-
Number of times it can be completed: When repeat is enabled, specify how many times a member can complete the challenge.
-
-
Completion requirements (Standard challenges only):
- Complete in a single transaction: When enabled, customers must complete all tasks within a single transaction. When disabled, tasks can be completed across separate transactions.
Custom metadata custom-metadata
In the Custom metadata section, select Add key/value pair to add custom metadata. Use metadata for tracking or integration with external systems.

Configure the challenge structure structure
In the Structure tab, define the tasks customers must complete and the rewards they earn. This tab is not used for Bring your own data challenges.
Add tasks add-tasks
Tasks define the specific actions customers must complete to earn rewards. You can configure task types (purchase, spend, or custom event), quantities, product filters, and other attributes.
To add tasks to your challenge, follow these steps:
-
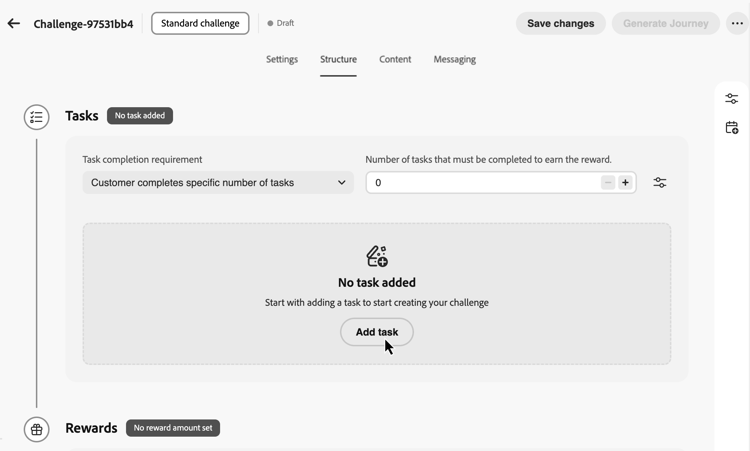
In the Tasks section, select Add task.
-
The Tasks Inventory opens. Select one or more tasks from the list and select Add. To create a new task, select New. Learn how to create and configure tasks.
-
Specify when the challenge is considered completed. Available settings depend on the challenge type:
accordion Standard challenges In the Task completion requirement drop-down, choose between:
- Customer chooses 1 task to complete - Customers can select and complete any single task to earn rewards
- Customer completes a specific number of tasks - Customers must complete a defined number of tasks. Specify the required number of tasks to complete.
accordion Streak challenges In the Streak type drop-down, choose between:
-
Consecutive: Customers must complete the task on consecutive days without breaks. Example: Purchase on Monday, Tuesday, Wednesday—missing a day breaks the streak.
-
Non-consecutive: Customers can complete the task with gaps between completions. Example: Complete 7 purchases over 30 days, with breaks allowed.
In the Streak length field, specify how many times the task must be completed. Example: Set to 7 for a “7-day purchase streak.”
accordion Sequential challenges In the Task completion requirement drop-down, choose between:
- Customer chooses 1 task to complete - Customers can select and complete any single task to earn rewards
- Customer completes a specific number of tasks - Customers must complete a defined number of tasks in the exact order you define. Missing or skipping a task breaks the sequence. Specify the required number of tasks to complete
After adding tasks to your challenge, configure the rewards customers will earn for completing them.
Configure rewards rewards
Rewards are the loyalty points or benefits customers receive for completing challenges.
To configure when and how rewards are delivered:
-
In the Reward delivery drop-down menu, choose when to deliver rewards:
-
Deliver rewards when challenge is completed: Award rewards when customers complete the entire challenge
Example: Award 100 points after completing all 5 tasks -
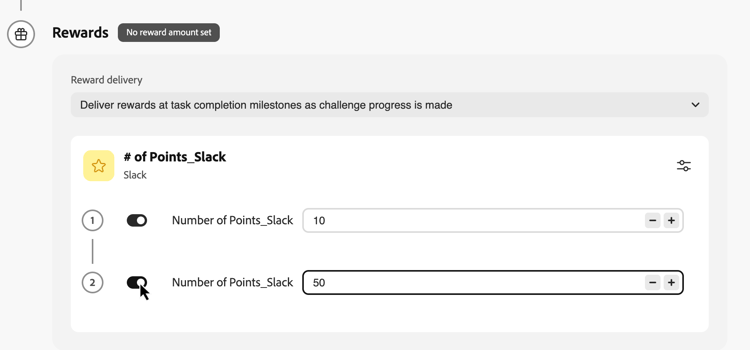
Deliver rewards at task completion milestones as challenge progress is made: Award rewards incrementally as customers complete individual tasks (only available for challenges requiring more than one task)
Example: Award 10 points after task 1, 20 points after task 2, and 50 points after task 3
-
-
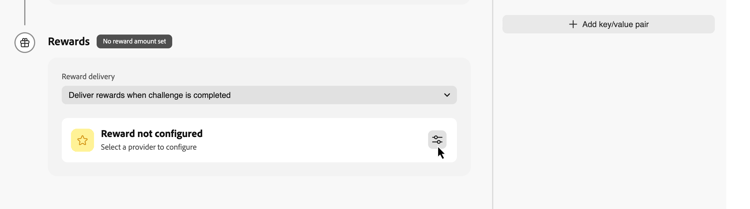
Select your reward provider. This is your loyalty solution that manages customer points and rewards. Reward providers are created in the Loyalty configurations menu before you author challenges. Learn how to configure reward providers
-
Configure the reward amounts based on your selected delivery method:
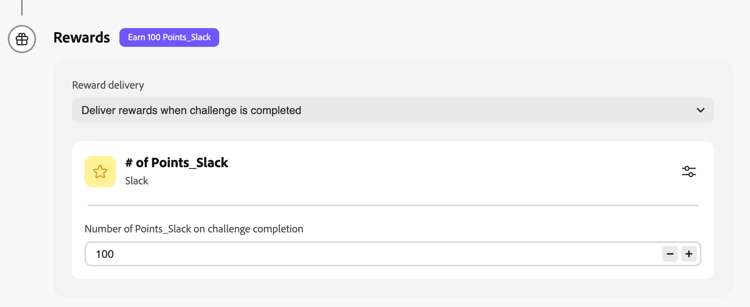
accordion Deliver rewards when challenge is completed Specify the total reward amount to give when customers complete the entire challenge.
In the example below, customers are awarded 100 points when completing the challenge.
accordion Deliver rewards at task completion milestones Specify reward amounts for task completion milestones. This option allows you to create progressive rewards that increase customer motivation as they progress through the challenge.
For any task where you want to deliver a reward, toggle on the reward option and specify how many points to award when customers complete that specific task. You can choose to reward only certain task completions—for example, if you have 10 tasks, you might reward only tasks 1, 5, and 10.
In the example below, customers are awarded 10 points when completing the first task, then 50 additional points after completing the second task.
After configuring the challenge structure with tasks and rewards, you can optionally configure how the challenge is represented to customers. If you do not need challenge content, skip this step and proceed directly to Configure messaging.
Configure challenge content (optional) configure-content-cards
The Content tab controls how the challenge is represented in locations where loyalty members access challenges and track their progress.
To configure challenge content:
-
Navigate to the Content tab and click Add action.
-
Choose the action type:
- Content card: Displays the challenge as a card-style experience on customer devices. Select a Channel configuration and click Edit content to design and personalize the card. Learn more about content cards.
- Code-based experience: Delivers challenge content through your own custom implementation using Journey Optimizer’s code-based channel. Select a Channel configuration and click Edit content to define the content. Learn more about code-based experiences.
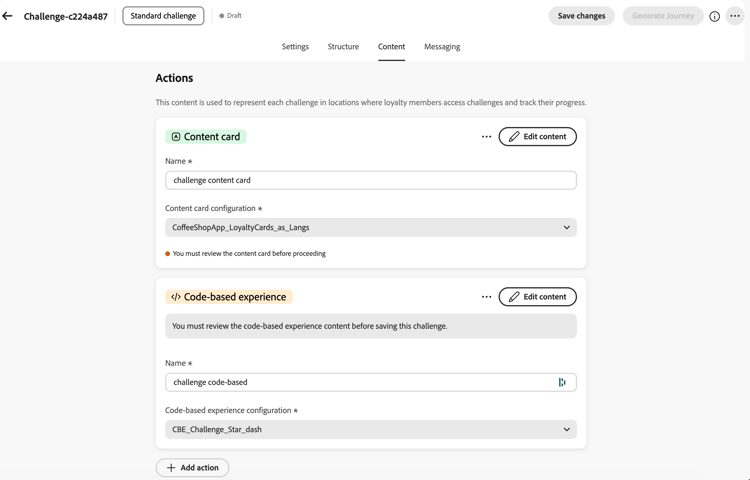
You can add multiple actions to represent the challenge across different surfaces.
➡️ Watch how to build a challenge content card
After configuring the content, set up messaging to engage customers throughout the challenge lifecycle.
Configure messaging configure-messaging
Set up multi-channel messages to engage customers at key stages of the challenge lifecycle. Messaging is optional but recommended to maximize customer engagement.
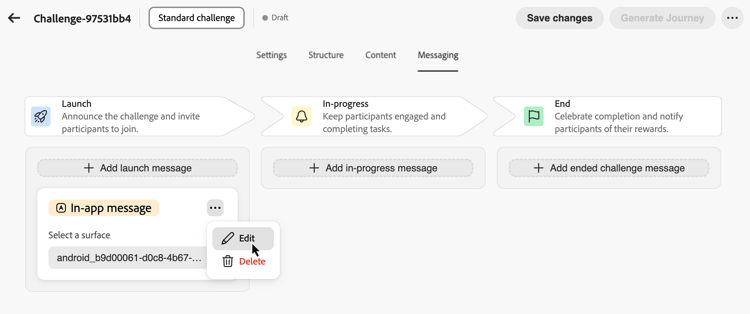
Navigate to the Messaging tab and configure messages for each lifecycle stage:
- Launch: Announce the challenge and invite participants to join.
- In-progress: Keep participants engaged and completing tasks.
- End: Celebrate completion and notify participants of their rewards.
For each stage, click the add message button (Add launch message, Add in-progress message, or Add ended challenge message) and choose a channel.
Select the associated Channel configuration and click Edit to design your message content.
➡️ Watch how to set up lifecycle messaging for a challenge
Your challenge is now fully configured with its settings, structure, content, and messaging. To launch it, you must publish the challenge and its associated journey.
Launching the challenge launch
You have two options for launching your challenge:
-
Publish Challenge (available in the … menu) — Use this option to publish the challenge without generating a journey. This allows you to test, preview, and simulate the challenge experience before delivery. Customers will not receive the challenge until you generate and publish a journey.
-
Generate Journey — Use this option to automatically publish the challenge and create the journey that will orchestrate your challenge delivery to customers.
➡️ Watch how to publish a challenge and generate a journey
Publish the challenge publish-challenge
-
Review your challenge configuration to ensure all required fields are completed.
-
Click the

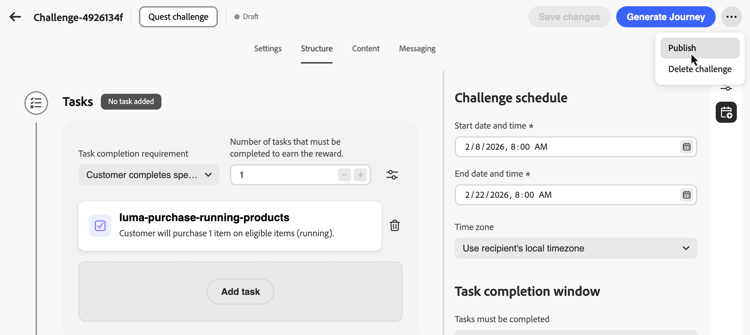
You are redirected to the challenges inventory. The challenge now appears with a Published status.
When you are ready to deliver the challenge to customers, you can generate the associated journey. For more information, see Generate the journey.
Generate the journey generate-journey
-
Review your challenge configuration to ensure all required fields are completed.
-
Select Generate Journey to automatically publish the challenge and create the journey that will orchestrate your challenge delivery.
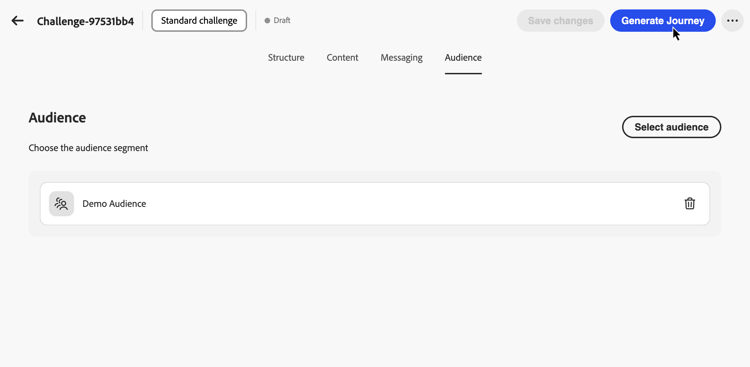
A confirmation message appears. Click Open Journey to navigate directly to the generated journey, or Acknowledge to dismiss it and access the journey later.
note important IMPORTANT Any changes to the challenge must be made in the Loyalty Challenge editor and will require you to generate a new journey. Any work done directly on the existing challenge journey will be lost if you make changes to the challenge. No journey is generated for challenges configured with No end date, since journeys cannot run longer than 90 days. The challenge itself still runs correctly and members can still opt in and complete tasks. -
Open the generated journey and publish it. The journey appears in Draft status with the name format “Journey: [Challenge Name]” and can be accessed from:
- The confirmation message at the previous step — click Open Journey.
- The challenges inventory — use the Journey column link next to the challenge.
- The journeys inventory — find the journey by name.
Once published, the journey starts automatically on your specified challenge start date. Learn how to publish a journey.
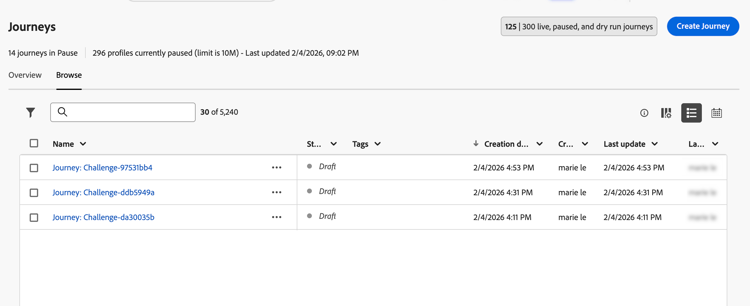
-
Once your challenge is live, monitor program KPIs, challenge results, and task-level metrics in Loyalty performance. You can also monitor message delivery in the journey report.
How-to videos video
Learn how to create and configure loyalty challenges with these step-by-step video tutorials:
Set up a loyalty challenge - Create and configure a new loyalty challenge
Configure rewards - Set up reward delivery and fulfillment
➡️ Watch how to build a challenge content card
➡️ Watch how to set up lifecycle messaging for a challenge
➡️ Watch how to publish a challenge and generate a journey