[AEM Assets]{class="badge positive" title="Applies to AEM Assets)."}
Search assets in AEM search-assets-in-aem
Adobe Experience Manager Assets delivers robust, intelligent asset search methods that drive higher content velocity. Teams reduce time to market through a seamless, intelligent search experience that combines out-of-the-box functionality with custom methods. The search assets capability is central to any digital asset management (DAM) system, because it determines how quickly users locate, reuse, and govern content – whether for further use by creatives, for robust management of assets by business users and marketers, or for administration by DAM administrators. Simple, advanced, and custom searches that you can perform via the Assets user interface or other apps and surfaces fulfill these use cases across the Assets user interface, connected apps, and other surfaces.
Asset search in AEM supports the following use cases, and this article describes the usage, concepts, configurations, limitations, and troubleshooting for each of these use cases.
Search assets using Omnisearch
Search assets using the Omnisearch field at the top of the Experience Manager web interface. To run a search:
- Go to Assets > Files in Experience Manager.
- Click

/(forward slash) to open the Omnisearch field. - Enter your search keyword and select
Return.
By default, Location:Assets is pre-selected to limit the searches to DAM assets. This ensures results are scoped to DAM assets only. Path:/content/dam also displays when you are performing a search at the root level within the Files folder. If you navigate to any other folder, Path:/content/dam/<folder name> displays in the Omnisearch field to limit the search scope to the current folder. Experience Manager provides suggestions as you start typing a search keyword, which speeds up query entry and reduces mistyped searches.
Filter search results
Use the Filters panel to search for assets, folders, tags, and metadata. You can filter search results based on named predicates, including:
- File type
- File size
- Last modified date
- Status of asset
- Insights data
- Adobe Stock licensing
You can customize the Filters panel and add or remove search predicates using search facets. The File Type filter in the Filters panel uses mixed-state checkboxes. As a result, a first-level checkbox appears only partially checked until all of its nested predicates (formats) are selected.
Search collections
Experience Manager search capability supports searching for collections and searching for assets within a collection. See search collections.
Understand asset search interface searchui
The asset search interface in Adobe Experience Manager (AEM) Assets provides a centralized workspace for locating, filtering, sorting, and organizing digital assets. Mastering this interface and its available actions lets you retrieve the exact files you need quickly, refine large result sets with precision, and save frequently used searches for repeated use.
Figure: Understand Experience Manager Assets search results interface.
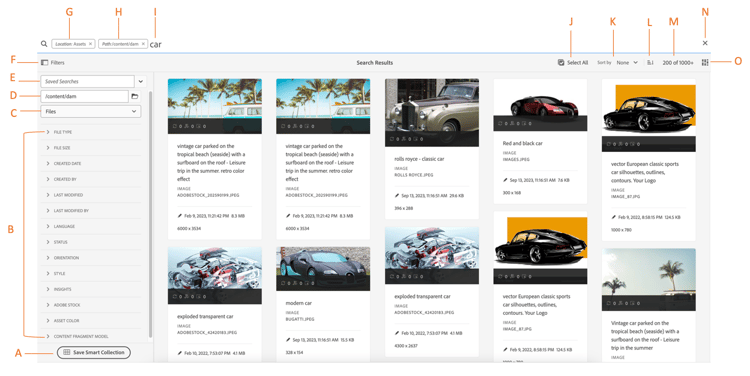
Search interface controls (A–O)
Each labeled control in the search results interface performs a specific function:
A. Save search as a smart collection. A smart collection is a dynamically updated set of assets defined by your saved search criteria, so any new asset matching those criteria is automatically included without manual updates.
B. Filters or predicates to narrow the search results. Applying filters or predicates restricts results to the assets that match your chosen attributes, which reduces noise and surfaces the most relevant files.
C. Display files, folders, or both, letting you scope results to the content type you are looking for.
D. Search location is the Digital Asset Management (DAM) repository, the central store for managed assets.
E. Access Saved Searches, so you can re-run previously stored searches without re-entering criteria.
F. Click Filters to open or close the left rail, which houses the filtering predicates.
G. Shows Assets as the default search scope.
H. Search location is the Digital Asset Management (DAM) repository.
I. Omnisearch field with the user-provided search keyword. Omnisearch is the unified search field where you type keywords to query assets across the DAM repository.
J. Select the loaded search results for further actions.
K. Sort by Created, Modified, Name, or None, so you can arrange results in the order most useful to your task.
L. Sort by Ascending or Descending order to control the direction of the applied sort.
M. Number of displayed search results out of the total search results, indicating how much of the full result set is currently loaded.
N. Close search.
O. Switch between card view and list view, letting you choose between a visual thumbnail layout and a compact, detail-oriented list.
Understanding these controls together makes asset retrieval faster and more accurate, because it allows you to combine keyword search, filtering, sorting, and saved searches into an efficient workflow.
Dynamic search facets dynamicfacets
Dynamic search facets let you find the desired assets faster from the search results page, displaying the dynamically updated number of expected search results in real time — even before you apply a filter. The expected number of assets is updated even before the search filter is applied. Seeing the expected count against each filter helps you navigate through the search results quickly and efficiently. Faceted navigation of this kind is a widely used pattern for narrowing large result sets, and surfacing counts up front reduces trial-and-error filtering.

Figure: See the approximate number of assets without filtering search results in search facets.
Default facet properties
Experience Manager Assets displays facet counts for two properties by default:
-
Asset type (jcr:content/metadata/dc:format)
-
Approval status (jcr:content/metadata/dam:status)
The damAssetLucene-9 indexing change
As of August 2023, Experience Manager Assets includes a new version 9 of the damAssetLucene index. The previous versions, damAssetLucene-8 and below, use the statistical mode to evaluate access control against a sample of the items for each search facet count.
damAssetLucene-9 changes the behavior of Oak Query facet counting to no longer evaluate access control on the facet counts returned by the underlying search index. As a result, search responses return faster, because the index no longer performs per-item permission checks during counting. Because of this change, users might be presented with facet count values that include assets they do not have access to. These users cannot access, download, or read any other detail of those assets, including their paths, or gain any further information about them.
Reverting to statistical mode
If you need to switch to the previous behavior (statistical mode), see Content Search and Indexing to create a custom version of the damAssetLucene-9 index. Adobe does not recommend switching to the secure mode due to the impact on search response times with large result sets.
For more information on Oak’s facet capabilities, including a detailed description of these modes, see Facets - Oak Documentation - Lucene Index.
Search suggestions as you type searchsuggestions
Adobe Experience Manager provides real-time search suggestions as you begin typing a keyword, proposing possible search keywords or phrases before you finish entering a query. Experience Manager generates these suggestions directly from the assets stored in the system, because it indexes all metadata fields to power fast, relevant search. As a result, the quality and completeness of your asset metadata directly determine how useful and accurate these suggestions are.
To generate search suggestions, the system draws on the values of five specific metadata fields. To improve the relevance and discoverability of your assets, populate the following fields with appropriate, descriptive keywords — doing so ensures that users see meaningful suggestions that match how they actually search:
- Asset tags — maps to
jcr:content/metadata/cq:tags. Tags provide categorized keywords that help surface assets across related searches. - Asset title — maps to
jcr:content/metadata/dc:title. A clear, keyword-rich title increases the likelihood of a suggestion match. - Asset description — maps to
jcr:content/metadata/dc:description. Descriptive text adds context and broadens the range of matching queries. - Title in the Java Content Repository (JCR) — maps to
jcr:content/jcr:title. This value may be mapped to the Asset title. - Description in the Java Content Repository (JCR) — maps to
jcr:content/jcr:description. This value may be mapped to the Asset description.
Because Experience Manager builds suggestions from indexed metadata, completing these fields with accurate, well-chosen keywords is the most effective way to make assets easy to find. Sparse or empty metadata reduces the number and relevance of the suggestions that Experience Manager can offer during search.
Understand search results and behavior searchbehavior
Basic search terms and results searchbasics
You can run keyword searches from the OmniSearch field, the unified search bar in Experience Manager. The keyword search is a full-text search, meaning it matches terms across the popular metadata fields associated with each asset. The keyword search is not case-sensitive, so uppercase and lowercase queries return the same results. If more than one keyword is used, AND is the default operator between the keywords, so results must contain every term.
How results are ranked
The results are sorted by relevance, starting with the closest matches. For multiple keywords, the more relevant results are the assets that contain both terms in their metadata. The ranking follows a clear hierarchy within metadata:
- Keywords appearing as smart tags are ranked higher than keywords appearing in other metadata fields.
- Experience Manager allows giving a particular search term higher weight, tuning which terms influence relevance most.
- You can boost the rank of targeted assets for specific search terms, promoting selected content to the top for chosen queries.
Because relevance depends on metadata quality, assets with well-structured smart tags and complete metadata surface more prominently in search results.
Filtering, sorting, and refining results
To quickly find the relevant assets, the rich interface provides several refinement mechanisms:
- Filtering results based on multiple criteria, with the number of searched assets shown for each filter.
- Sorting results to reorder them by your preferred order.
- Selection mechanisms for acting on matching assets.
Alternatively, you can rerun the search by changing the query in the OmniSearch field. When you change your search terms or filters, the other filters remain applied to preserve the context of your search.
Number of assets displayed
Experience Manager displays the first 100 assets in card view and 200 assets in list view when a search returns many results. As users scroll, more assets are loaded on demand. This lazy-loading approach improves performance because it avoids rendering the entire result set at once. Watch a video demonstration of the number of assets displayed.
Unexpected results
Occasionally, the search results include assets that do not appear to match the query. This typically happens because a keyword resides in a metadata field that is not immediately visible. For more info, see unexpected results.
Experience Manager can search many file formats, and the search filters can be customized to suit your business requirements. Contact your administrator to understand what search options are made available for your Digital Asset Management (DAM) repository and what restrictions your account has.
Search ranking and boosting searchrank
Search results are ranked by match precision: results matching all search terms in metadata fields are displayed first, followed by results matching any of the search terms in smart tags. This tiered ordering ensures that the most specific, closely matched assets surface ahead of broader partial matches.
Default search ranking order
For the example search woman running, the approximate order of display of search results is:
- Matches of
woman runningacross the various metadata fields. - Matches of
woman runningin smart tags. - Matches of
womanor ofrunningin smart tags.
Because metadata-field matches take priority over smart-tag matches, and full-phrase matches take priority over single-word matches, assets with accurate, complete metadata rank higher and are easier for users to discover.
Boosting assets with promoted keywords
You can improve keyword relevance for particular assets so that the images for which you promote specific keywords appear at the top of the search results whenever those keywords are searched. This directly influences ranking, giving prioritized assets greater visibility for the keywords that matter most.
To promote an asset for a specific keyword:
- From the Assets user interface, open the properties page for the asset. Click Advanced and click Add under Elevate for search keywords.
- In the Search Promote box, specify a keyword for which you want to boost the search for the image and then click Add. You can specify multiple keywords in the same way, promoting a single asset for several targeted keywords.
- Click Save & Close. As a result, the asset promoted for this keyword ranks among the top search results for that keyword.
Use this capability to deliberately boost the rank of high-priority assets in the search results for a targeted keyword, ensuring that the most relevant or important images consistently appear first. See the example video below. For detailed info, see search in Experience Manager.
Video: Understand how search results are ranked and how the rank can be influenced.
Configure asset batch size to display search results configure-asset-batch-size
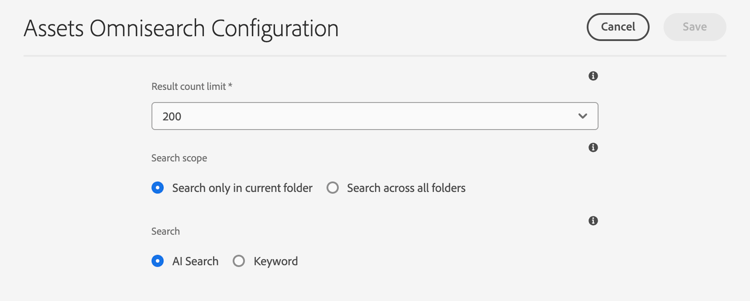
Administrators can configure the batch size of assets that display when you perform a search in Experience Manager Assets, choosing from three available options: 200, 500, and 1000 assets. The asset search results display in multiples of the configured batch size as you scroll down to load additional results. Setting a lower batch size reduces the number of assets loaded per request, which directly reduces search response times, because fewer assets must be retrieved, processed, and rendered before results appear.
How incremental batch loading works
When you set a result count limit, Experience Manager Assets returns results in fixed-size increments rather than loading every matching asset at once. This incremental (lazy-loading) approach keeps the initial search fast and responsive, then loads more results only as you scroll.
For example, if you set the result count limit to a batch size of 200 assets, Experience Manager Assets displays the first 200 assets in the search results when you begin the search. As you scroll down to navigate through the results, Experience Manager Assets loads and displays the next batch of 200 assets. This process continues until all assets that match the search query are displayed.
Choosing the right batch size:
- Select a smaller batch size, such as 200, when you want the fastest initial response times and expect to review results incrementally.
- Select a larger batch size, such as 500 or 1000, when you want more results loaded per scroll and are less concerned about initial load speed.
To configure the asset batch size
-
Navigate to Tools > Assets > Assets Configurations > Assets Omnisearch Configuration.
-
Select the result count limit and click Save.

Advanced search scope
Experience Manager provides filters that apply to searched assets, letting you locate the desired assets faster. Filters narrow large asset libraries down to the exact items you need, which is essential when working across extensive digital asset repositories. Commonly used filtering methods include narrowing results to files or folders and restricting the search to a specific folder path, as described below. Some illustrated examples are shared below.
Search for files or folders: In the search results, display files, folders, or both. From the Filters panel, select the appropriate option to control which asset types appear. This is useful when you know whether the target is an individual asset or an entire folder, because it removes irrelevant result types from view. See search interface.
Search for assets within a folder: Limit the search to a specific folder to reduce noise and return only assets stored in that location. In the Filters panel, add the path of a folder. Only one folder can be selected at a time, which keeps the folder-scoped search precise and unambiguous. Restricting results to a single folder path improves relevance because the search engine evaluates only the assets contained within that path.
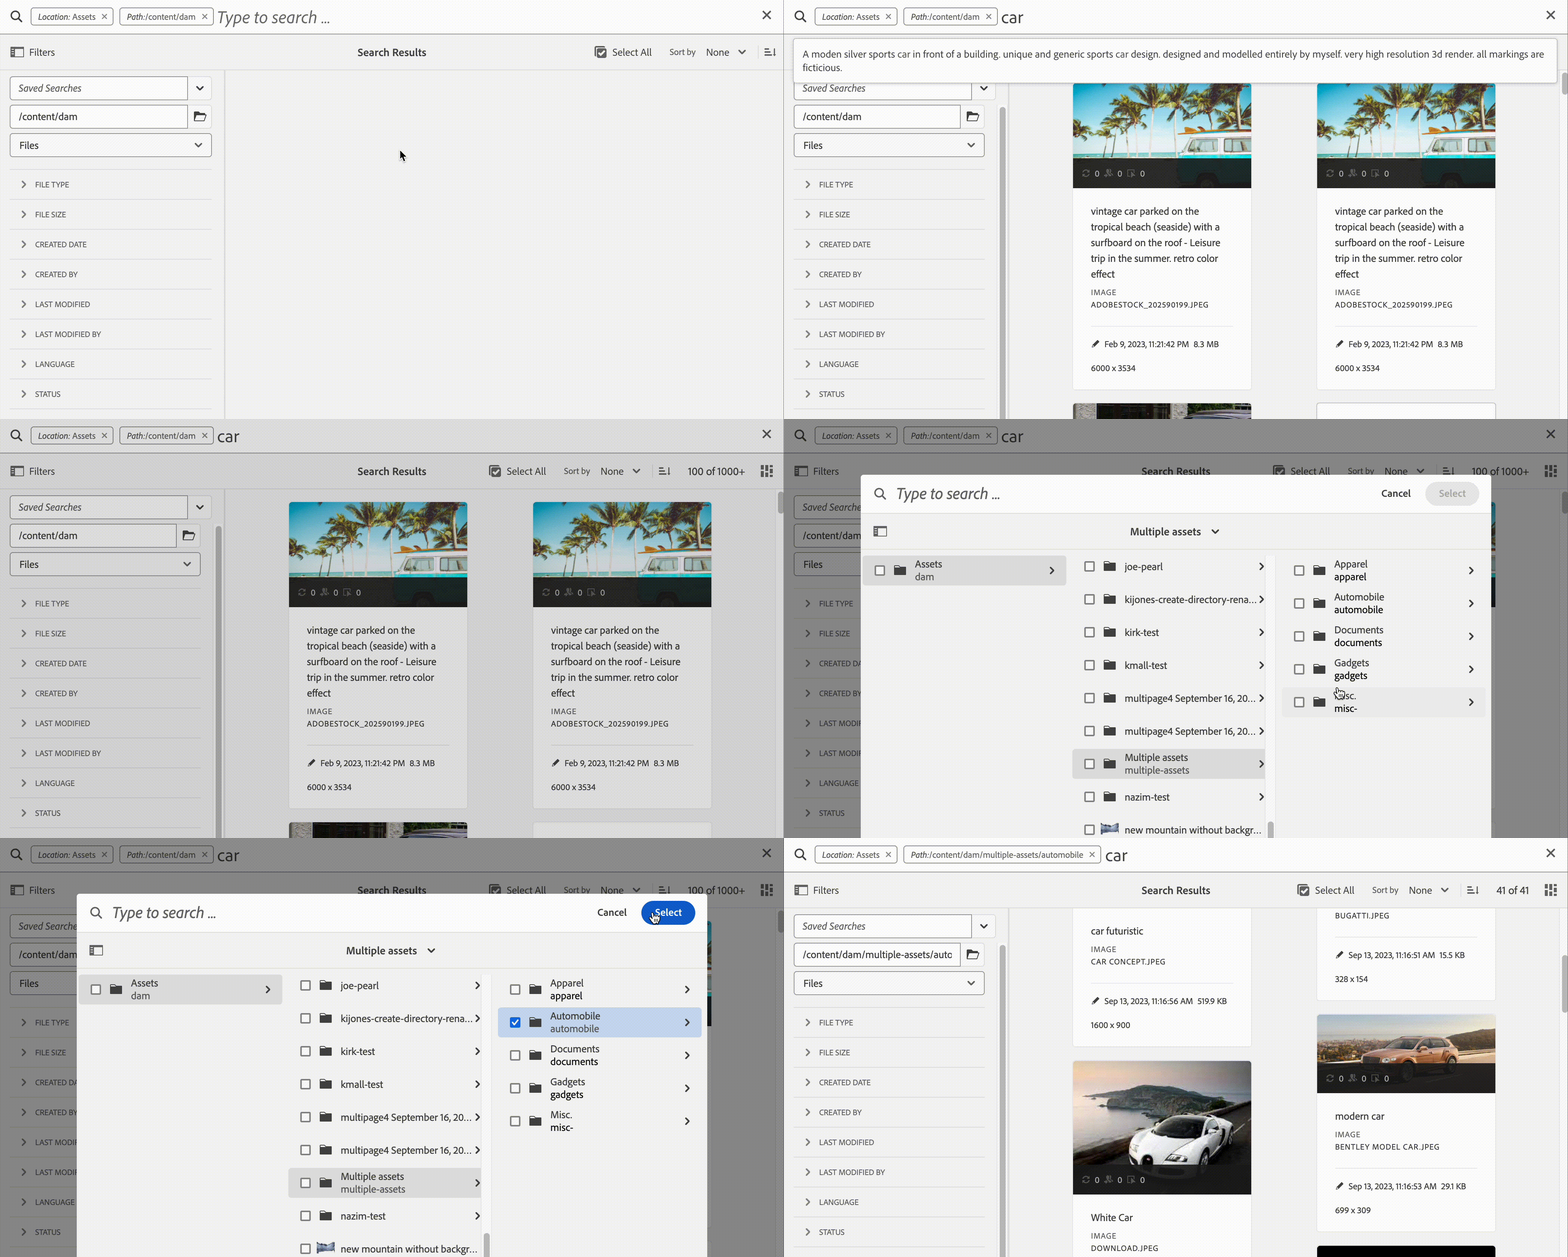
Figure: Limit search results to a folder by adding a folder path in the Filters panel.
Find similar images visualsearch
The Find Similar feature locates images that are visually similar to a user-selected image, helping you quickly surface related assets across a large content library. Experience Manager returns smart-tagged images from the Digital Asset Management (DAM) repository that closely match the selected image in visual content.
Steps to find visually similar images
-
Open the image you want to use as a reference.
-
Click the Find Similar option from either of these locations:
- The card view of the image, or
- The toolbar.
-
Experience Manager displays the smart-tagged images from the Digital Asset Management (DAM) repository that are visually similar to the user-selected image.

Figure: Find similar images using the option in the card view.
Experience Manager relies on smart tagging to power this similarity matching. Because assets in the DAM repository are automatically analyzed and tagged based on their visual characteristics, the system can compare those characteristics and return the closest visual matches to the reference image. This means the results reflect actual visual resemblance rather than only file names or manual metadata.
Why use Find Similar
- Locate related assets faster by starting from an existing image instead of searching by keywords.
- Identify near-duplicates and variations of an asset already stored in the DAM repository.
- Streamline asset selection when you need images that share a consistent visual style or subject.
Adobe Stock images adobe-stock
From within the Experience Manager user interface, users can search Adobe Stock assets and license the assets they need directly, without leaving the authoring environment. This integration streamlines creative workflows by keeping asset discovery, licensing, and content authoring in a single interface.
To search and license Adobe Stock assets, add Location: Adobe Stock in the Omnisearch bar.
Users can locate Adobe Stock assets in Experience Manager through the following methods:
- Omnisearch keyword search: Add
Location: Adobe Stockin the Omnisearch bar to scope results to Adobe Stock assets. - Filters panel: Use the Filters panel to find all licensed or unlicensed assets, making it easy to distinguish assets that are ready to use from those still requiring a license.
- Adobe Stock file number: Search for a specific asset directly using its Adobe Stock file number.
Dynamic Media assets dmassets
You can filter for Dynamic Media images by selecting Dynamic Media > Sets from the Filters panel. This filter locates and displays interactive Dynamic Media asset types that are grouped as sets, making it faster to isolate rich, viewer-ready assets from standard single images.
Applying the Sets filter surfaces the following Dynamic Media set types:
- Image sets — a collection of related images grouped together so viewers can switch between alternate views of a single product or subject.
- Carousels — a rotating sequence of banner-style images or slides, typically used to showcase multiple offers, features, or products in a single interactive component.
- Mixed media sets — a combined grouping that can include images, spin sets, and video within one interactive viewer, delivering a complete visual experience for a product or story.
- Spin sets — a series of images captured from multiple angles that let viewers rotate and inspect a product in 360 degrees.
Because these assets are stored as grouped sets rather than individual files, filtering by Sets streamlines the process of locating interactive experiences directly, ensuring that carousels, spin sets, image sets, and mixed media sets appear together instead of being scattered among standalone image assets.
GQL search using specific values in metadata fields gql-search
GQL (Graph Query Language) full-text search lets you locate assets by the exact values of metadata fields such as title, description, and creator. GQL search returns only those assets whose metadata value exactly matches the search query. Both the property names (Creator, Title, and so on) and their values are case-sensitive, so precise capitalization is required for a match.
Supported metadata fields and facet syntax
Operator constraints
The properties path, limit, size, and orderby cannot be combined using the OR operator with any other property. These properties govern scope, result count, and ordering rather than metadata matching, so they must be applied independently.
Keyword rule for user-generated properties
The keyword for a user-generated property is its field label as it appears in the property editor, converted to lowercase with all spaces removed. This ensures that custom fields defined in the property editor map to a valid GQL keyword.
Search formats for complex queries
The following examples demonstrate how to build GQL queries for common matching scenarios:
- Match multiple facet fields (for example, title=John Doe and creator tool=Adobe Photoshop):
title:"John Doe" creatortool:Adobe* - Match a multi-word facet value where the value is a sentence rather than a single word (for example, title=Scott Reynolds):
title:"Scott Reynolds" - Match multiple values of a single property (for example, title=Scott Reynolds or John Doe):
title:"Scott Reynolds" OR "John Doe" - Match property values starting with a string (for example, title beginning with Scott Reynolds):
title:Scott* - Match property values ending with a string (for example, title ending with Reynolds):
title:*Reynolds - Match property values containing a string (for example, title=Basel Meeting Room):
title:*Meeting* - Match a string within an asset that also has a specific property value (for example, search for the string Adobe in assets having title=John Doe):
*Adobe* title:"John Doe"
The asterisk (*) acts as a wildcard, enabling prefix, suffix, and substring matching, while quotation marks group multi-word values so that the entire phrase is treated as a single search term.
Search assets from other Experience Manager offerings or interfaces search-assets-other-surfaces
Adobe Experience Manager connects its Digital Asset Management (DAM) repository to multiple connected Experience Manager solutions and interfaces, giving teams faster access to digital assets and streamlining creative workflows. Because these surfaces draw from the same underlying repository, asset discovery is unified: every workflow begins with either browse or search.
Why search behavior stays consistent
Search behavior remains largely consistent across these surfaces and solutions. This consistency results from the shared DAM repository underpinning each connected interface, so the core search experience—querying, filtering, and locating assets—works the same way regardless of which Experience Manager solution you are using. As a result, skills learned in one surface transfer directly to others.
What varies across solutions
Some search methods change because the following factors differ across the Experience Manager solutions:
- Target audience — the intended users of each solution and their expectations.
- Use cases — the specific tasks and creative workflows each surface supports.
- User interface — how the search experience is presented and interacted with in each solution.
The specific search methods are documented for the individual solutions at the links below. The universally applicable tips and behaviors are documented in this article, providing a single reference for the search practices that apply everywhere the DAM repository is connected.
Search assets from Adobe Asset Link panel aal
Adobe Asset Link gives creative professionals direct access to content stored in Experience Manager Assets from within their supported Adobe Creative Cloud applications: Adobe Photoshop, Adobe Illustrator, and Adobe InDesign. Because the connection lives inside an in-app panel, creatives work with managed, approved assets without leaving their design environment, keeping the creative workflow uninterrupted and reducing context switching.
Core capabilities
Creatives can seamlessly manage assets directly from the in-app panel. Key actions include:
- Browse content stored in Experience Manager Assets
- Search the digital asset management (DAM) repository for the right files
- Check out assets to work on them
- Check in assets once edits are complete
This tight integration ensures teams use current, governed assets rather than local or outdated copies, supporting brand consistency across projects.
Visual search powered by Adobe AI
Asset Link also supports visual similarity search, allowing users to surface aesthetically related results. These visual search results are powered by Adobe AI machine learning algorithms, which help creative professionals find aesthetically similar images because the system matches images by visual characteristics rather than relying only on filenames or keywords. As a result, creatives can quickly locate on-brand or stylistically consistent imagery even when they do not know the exact file name.
See search and browse assets using Adobe Asset Link.
Search assets in Experience Manager desktop app desktop-app
The Experience Manager desktop app makes Assets easily searchable and directly accessible on a local desktop (Windows or Mac), allowing creative professionals to locate and open assets in their native desktop applications without downloading files manually. The app connects local desktop tools to the central Experience Manager repository, so creatives can work in familiar applications while keeping every asset synchronized with the source of truth.
Supported search capabilities
The application supports basic searches, giving creative professionals precise control over how they find assets. Search capabilities include:
- One or more keywords to match asset names and metadata
*(asterisk) and?(question mark) wildcards for partial or pattern-based matching- The
ANDoperator to combine multiple search terms and narrow results
Edit-and-save workflow
The desktop app streamlines the process of finding, editing, and returning assets to Experience Manager. The workflow follows these steps:
- Reveal the desired assets in Mac Finder or Windows Explorer.
- Open the assets in the appropriate desktop applications.
- Edit the assets locally on the desktop.
- Save the changes, which are automatically written back to Experience Manager. As a result, a new version is created in the repository. This ensures every edit is tracked and previous versions remain recoverable, protecting the integrity of the asset history.
For detailed guidance, see browse, search, and preview assets in the desktop app.
Search assets in Brand Portal brand-portal
Brand Portal is a cloud-based Adobe Experience Manager offering that enables line-of-business users and marketers to efficiently and securely distribute approved, on-brand digital assets to audiences outside the core content team. Rather than granting broad access to the full asset repository, Brand Portal provides controlled distribution of only the assets that have been reviewed and cleared for use.
Brand Portal is designed to serve extended stakeholders, including:
- Internal teams across departments and regions who need ready-to-use marketing materials
- Partners who require access to sanctioned brand assets for co-marketing and joint initiatives
- Resellers distributing products under agreed brand guidelines
Sharing only approved digital assets ensures brand consistency and reduces the risk of outdated, unlicensed, or off-brand content reaching external audiences. This controlled, secure model allows organizations to accelerate go-to-market activities while maintaining governance over how their brand is represented.
Search capabilities within Brand Portal help these users quickly locate the exact assets they need, streamlining asset discovery for large libraries and saving time when preparing campaigns, product launches, or partner enablement materials. See search assets on Brand Portal.
Search Adobe Stock images adobe-stock1
Users can search Adobe Stock assets and license the required assets directly from within the Experience Manager user interface, without leaving their existing workflow. This integration keeps discovery, licensing, and asset management in a single environment, so teams can source stock imagery and put it to use without switching applications.
To locate Adobe Stock assets in Experience Manager, use any of the following methods:
- Search by location: Add
Location: Adobe Stockin the Omnisearch field to scope your search to Adobe Stock assets. - Filter by license status: Use the Filters panel to find all the licensed or unlicensed assets. This helps users quickly distinguish assets that are already licensed and ready for production use from those that still require licensing.
- Search by file number: Search a specific asset using the Adobe Stock file number, which returns the exact asset when the identifier is known.
See manage Adobe Stock images in Experience Manager.
Search Dynamic Media assets search-dynamic-media-assets
To filter for Dynamic Media images, select Dynamic Media > Sets from the Filters panel. This filter displays Dynamic Media set assets, including:
- Image sets
- Carousels
- Mixed media sets
- Spin sets
While authoring web pages, authors can search for these sets directly from within the Content Finder, which streamlines the workflow by keeping asset discovery within the authoring environment. The Content Finder provides a dedicated filter for sets, available through a pop-up menu, so authors can quickly locate and place the correct set type without leaving the page they are building.
Search assets in Content Finder when authoring web pages content-finder
Content Finder enables authors to locate and reuse approved digital assets directly while building web pages, drawing on both local and remote Experience Manager repositories. Content Finder is the in-context search panel that surfaces images, documents, and other media from the Digital Asset Management (DAM) repository so authors place the right asset without leaving the page they are authoring.
Authors work with two complementary asset-sourcing capabilities:
- Content Finder (local search): Authors use Content Finder to search the Digital Asset Management (DAM) repository for the relevant assets and place those assets directly into the web pages they create. Because assets are pulled from the managed DAM repository, this ensures authors reuse the approved, up-to-date version of each asset and maintain visual and brand consistency across pages.
- Connected Assets (remote search): Authors use the Connected Assets functionality to search for assets that are available on a remote Experience Manager deployment. Authors then use these remote assets in web pages on a local Experience Manager deployment. This allows a local site to draw on a centralized or shared asset library hosted elsewhere, eliminating the need to duplicate assets across deployments.
Access remote assets with Connected Assets
For step-by-step guidance on searching and consuming assets stored on a connected, remote Experience Manager instance, see use remote assets.
Search collections collections
Adobe Experience Manager search capability enables you to search across collections and to search for assets within a collection. A collection is a grouping of related digital assets—such as images, documents, or videos—organized together so teams can manage and reuse them efficiently.
Experience Manager supports two distinct search modes:
- Searching for collections — locate an entire collection by name or attribute across the repository.
- Searching for assets within a collection — find a specific asset inside a known collection, narrowing results to that grouping.
This dual capability helps you retrieve the right content quickly, whether you need the full collection or a single asset within it. As a result, teams working with large asset libraries can navigate directly to the material they need instead of browsing folder by folder. For detailed steps, see search collections.
Content Advisor asset-picker
Launch URL and Capabilities
Content Advisor is available at https://[aem_server]:[port]/aem/assetpicker.html and lets you search, filter, and browse Digital Asset Management (DAM) assets in a specialized way. Content Advisor was called the asset picker in prior versions of Adobe Experience Manager (AEM). Developers can fetch the metadata of selected assets directly through Content Advisor.
Content Advisor launches with supported request parameters, such as asset type (image, video, text) and selection mode (single or multiple selections). These parameters set the context of Content Advisor for a particular search instance and remain intact throughout the selection. This ensures that the search scope you define at launch stays consistent for the entire selection session.
Content Advisor uses the HTML5 Window.postMessage message to send data for the selected asset to the recipient. Content Advisor operates only in browse mode and functions exclusively with the Omnisearch result page.
Request Parameters
Pass the following request parameters in a URL to launch Content Advisor in a particular context. Each parameter narrows or configures the selection experience so that users see only the relevant assets:
/content/dam/we-retail/en/activities selected, the URL should be of the form: https://localhost:4502/aem/assetpicker.html/content/dam/we-retail/en/activities?assettype=imagesmodehttps://localhost:4502/aem/assetpicker.html?mode=singlehttps://localhost:4502/aem/assetpicker.html?mode=multiple
dialogpickerSrc URL.roothttps://localhost:4502/aem/assetpicker.html?assettype=images&root=/content/dam/we-retail/en/activitiesviewmodehttps://localhost:4502/aem/assetpicker.html?viewmode=searchassettype and mimetype parameters.assettypehttps://localhost:4502/aem/assetpicker.html?viewmode=search&assettype=imageshttps://localhost:4502/aem/assetpicker.html?viewmode=search&assettype=documentshttps://localhost:4502/aem/assetpicker.html?viewmode=search&assettype=multimediahttps://localhost:4502/aem/assetpicker.html?viewmode=search&assettype=archives
mimetype/jcr:content/metadata/dc:format) of an asset (wildcard also supported).https://localhost:4502/aem/assetpicker.html?mimetype=image/pnghttps://localhost:4502/aem/assetpicker.html?mimetype=*pnghttps://localhost:4502/aem/assetpicker.html?mimetype=*presentationhttps://localhost:4502/aem/assetpicker.html?mimetype=*presentation&mimetype=*png
How to Access the Content Advisor Interface
To access the Content Advisor interface at https://[aem_server]:[port]/aem/assetpicker, follow these steps:
- Navigate to
https://[aem_server]:[port]/aem/assetpicker. - Browse to the desired folder and select one or more assets.
- Alternatively, search for the desired asset from the Omnisearch box, apply a filter as required, and then select it.
Limitations limitations
Text and Omnisearch Limitations
The search capability in Experience Manager Assets has the following documented limitations:
- Do not enter a leading space in the search query, because a leading space causes the search to fail and return no results. Always begin the query with the search term itself.
- Experience Manager may continue to display the search term after you select the properties of an asset from the searched results and then cancel the search. This is expected behavior, and the retained term does not affect the underlying asset.
- When searching for folders, or for files and folders together, the search results cannot be sorted on any parameter. Sorting controls are unavailable for these mixed and folder-only result sets.
- If you select
Returnwithout typing in the Omnisearch bar, Experience Manager returns a list of only files and not folders. If you search specifically for folders without using a keyword, Experience Manager returns no results, so a keyword is required to surface folder matches. - Full-text search on folders is supported, but it requires a search term to function. Specify a keyword for the folder search to work, because an empty query does not trigger full-text matching.
Visual (Similarity) Search Limitations
Visual search, also called similarity search, has the following limitations:
- Visual search works best with a large repository. There is no minimum number of images required for results, but the quality of matches with only a few images is not as good as the matches produced from a large repository. A larger image set gives the search more visual data to compare against, which improves match relevance.
- You cannot change the model or train Experience Manager to find similar images. For example, adding or removing smart tags on a few assets does not change the model, because the similarity model is not retrained by tag edits. Those tagged assets are, however, excluded from the visually similar search results.
Performance Limitations
The search functionality can encounter performance limitations in the following scenario:
- Card view has a faster load time than list view when displaying search results. To reach results more quickly, use card view rather than list view, because card view renders the result set with lower overhead.
Search tips tips
-
When monitoring the review status of assets, use the appropriate option to find which assets are approved or which assets are pending approval.
-
Use the Insights predicate to search for supported assets based on their usage statistics obtained from various Creative apps. Usage data is grouped under the Usage score, Impressions, Clicks, and Media channels categories, indicating where the assets appear.
-
Use the Select All check box to select the searched assets. Experience Manager initially displays 100 assets in card view and 200 assets in list view. More assets are loaded as you scroll the search results. You can select more assets than the loaded assets. The count of the selected assets is displayed in the upper-right corner of the search results page. You can then operate on the selection. For example, download the selected assets, update metadata properties in bulk, or add the selected assets to a Collection. When more assets are selected than displayed, an action is either applied on all selected assets or a dialog displays the number of assets it is applied on. To apply an action to the assets that did not load, ensure that all assets are explicitly selected.
-
To search for assets that do not contain the mandatory metadata, see mandatory metadata.
-
Search uses all metadata fields. A generic search, such as searching for 12, returns many results because search scans every metadata field. For better results, use double (not single) quotes, because double quotes bind the search terms together. Alternatively, ensure that the number is contiguous to a word without a special character (for example,
shoe12). -
Full-text search supports operators such as
-and^. To search these letters as string literals, enclose the search expression in double quotes. For example, use"Notebook - Beauty"instead ofNotebook - Beauty. -
If the search results are too many, limit the scope of search to zero-in on the desired assets. This approach works best when you have some idea of how to better look for the desired assets, for example, a specific file type, a specific location, specific metadata, and so on.
-
Tagging: Tags categorize assets so they can be browsed and searched more efficiently. Tagging propagates the appropriate taxonomy to other users and workflows. Experience Manager offers methods to automatically tag assets using Adobe AI services that keep getting better at tagging your assets with usage and training. When you search for assets, the smart tags are factored in. Smart tagging works alongside the in-built search functionality, improving the relevance of results by matching assets to concepts even when explicit metadata is absent. See search behavior. To optimize the order in which the search results are displayed, you can boost the search ranking of a few select assets.
-
Indexing: Only indexed metadata and assets are returned in the search results. As a result, unindexed assets remain invisible to search. For better coverage and performance, ensure proper indexing and follow the best practices. See indexing.
See more Search best practices.
Some examples illustrating search samples
Exact-phrase search: Enclose keywords in double quotation marks to find assets that contain the exact phrase in the exact order specified. This narrows results to precise matches, which is useful when the order of words changes the meaning of a query.

Figure: Search behavior with and without quotation marks.
Search with the asterisk (*) wildcard for partial matching: To broaden a search, place an asterisk before or after a search word to match any number of characters. This allows you to capture every variation of a root word in a single query. For example, searching for run without an asterisk returns only exact matches and does not return assets containing any variation of the word, including in the metadata. An asterisk substitutes for any number of characters, expanding the match automatically. For example:
runreturns assets with exactly therunkeyword.run*returns assets withrunning,run,runaway, and other words that begin withrun.*runreturns assets withoutrun,rerun, and other words that end withrun.*run*returns all possible combinations containingrunanywhere in the word.
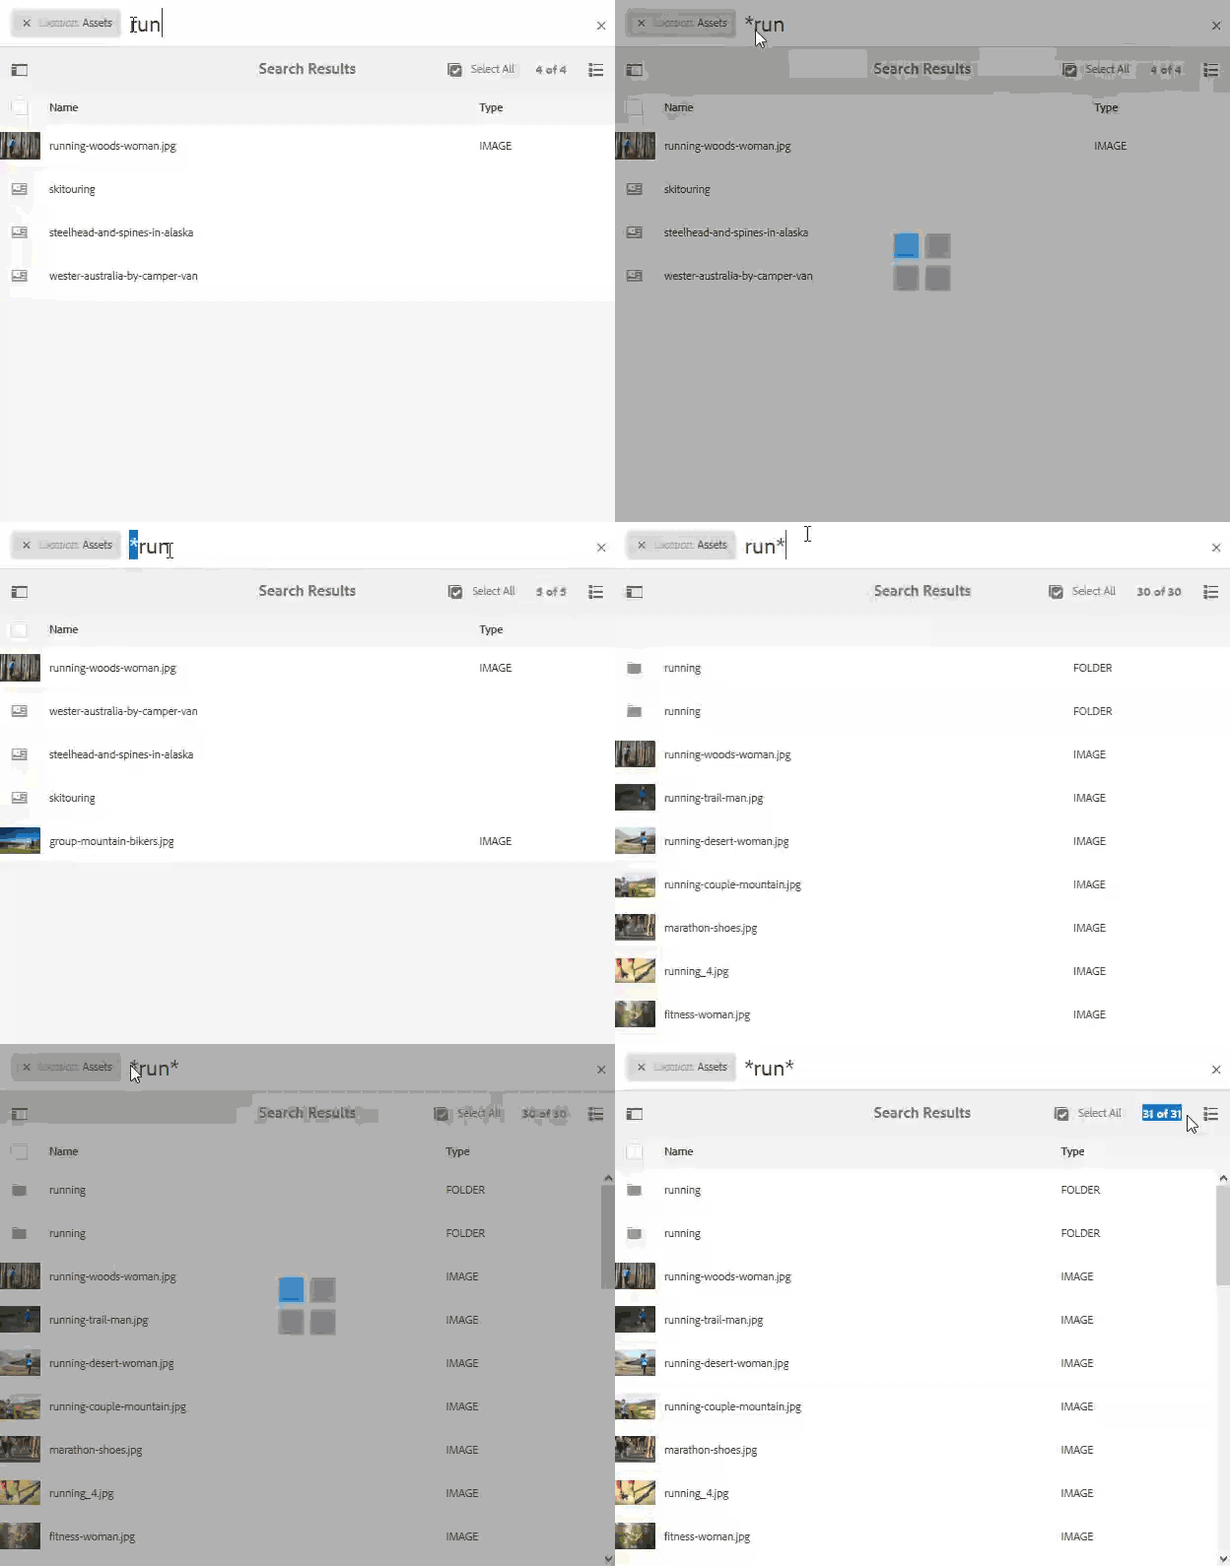
Figure: Illustrating use of asterisk wildcard in Asset search using an example.
Search with the question mark (?) wildcard for fixed-length matching: To broaden a search while controlling length, use one or more ? characters, where each ? matches exactly one character. Because the number of ? characters sets the required character length, the wildcard matches only words of a specific size. For example:
-
run???matches no asset, because it requires exactly three characters afterrun. -
run????matches the wordrunning, which has four characters afterrun. -
??runmatches the wordrerun, which has two characters beforerun.
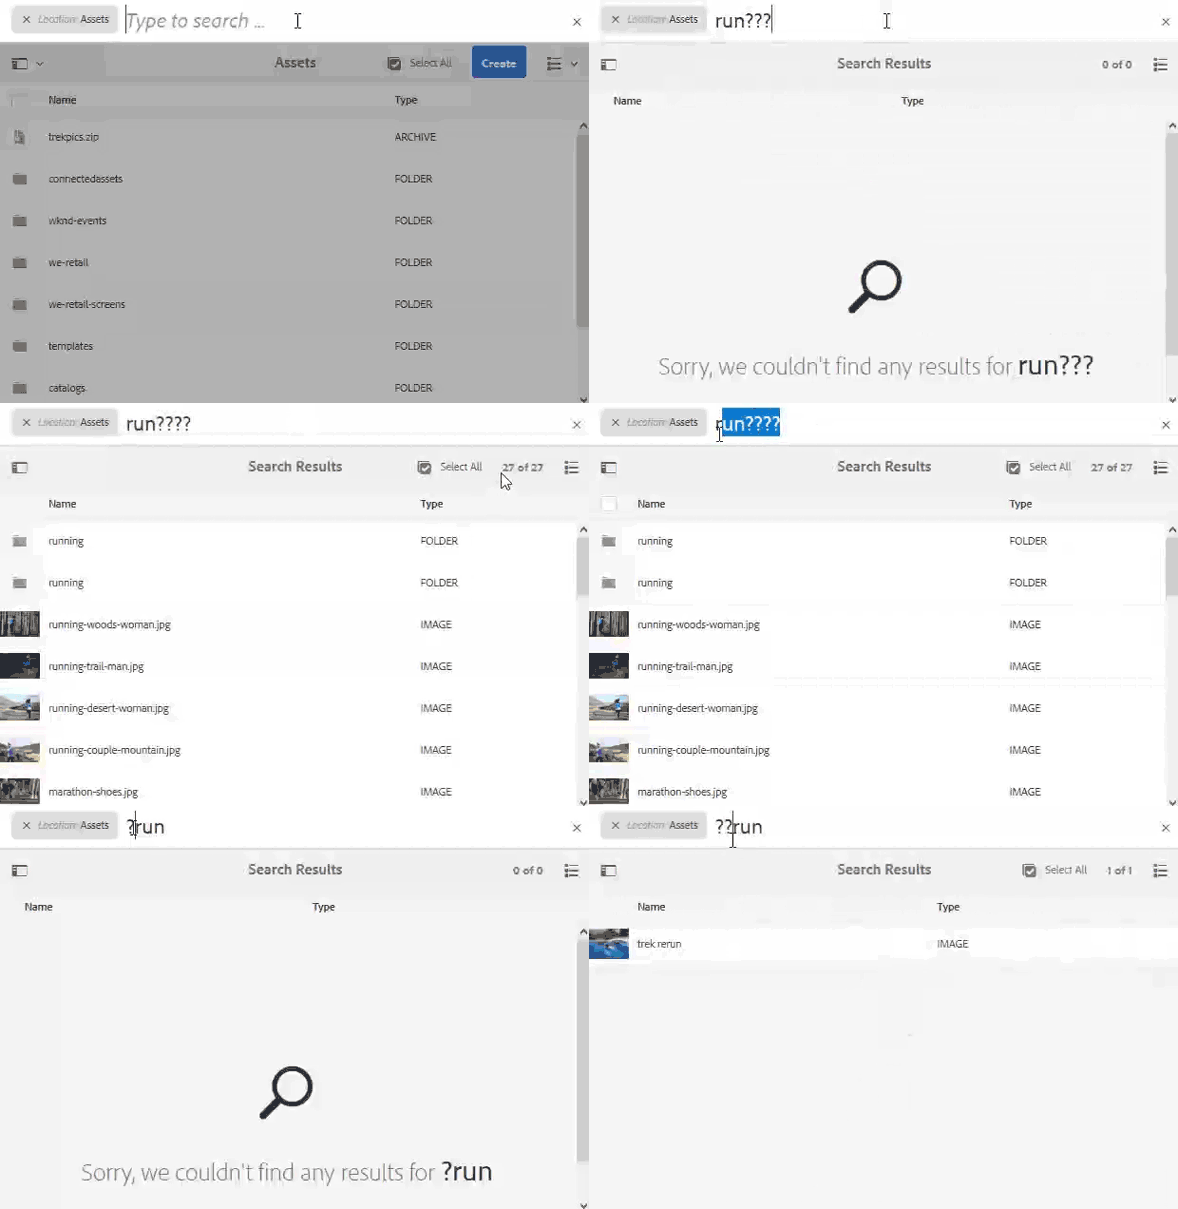
Figure: Illustrating use of question mark wildcard in Asset search using an example.
Exclude a keyword using the dash (-) operator: Use the dash (-) operator, which functions as a Boolean NOT, to search for assets that do not contain a keyword. For example:
running -shoereturns assets that containrunningbut notshoe.camp -nightreturns assets that containcampbut notnight.camp-night(with no space) returns assets that contain bothcampandnight, because the dash without a leading space is treated as part of the phrase rather than as an exclusion operator.
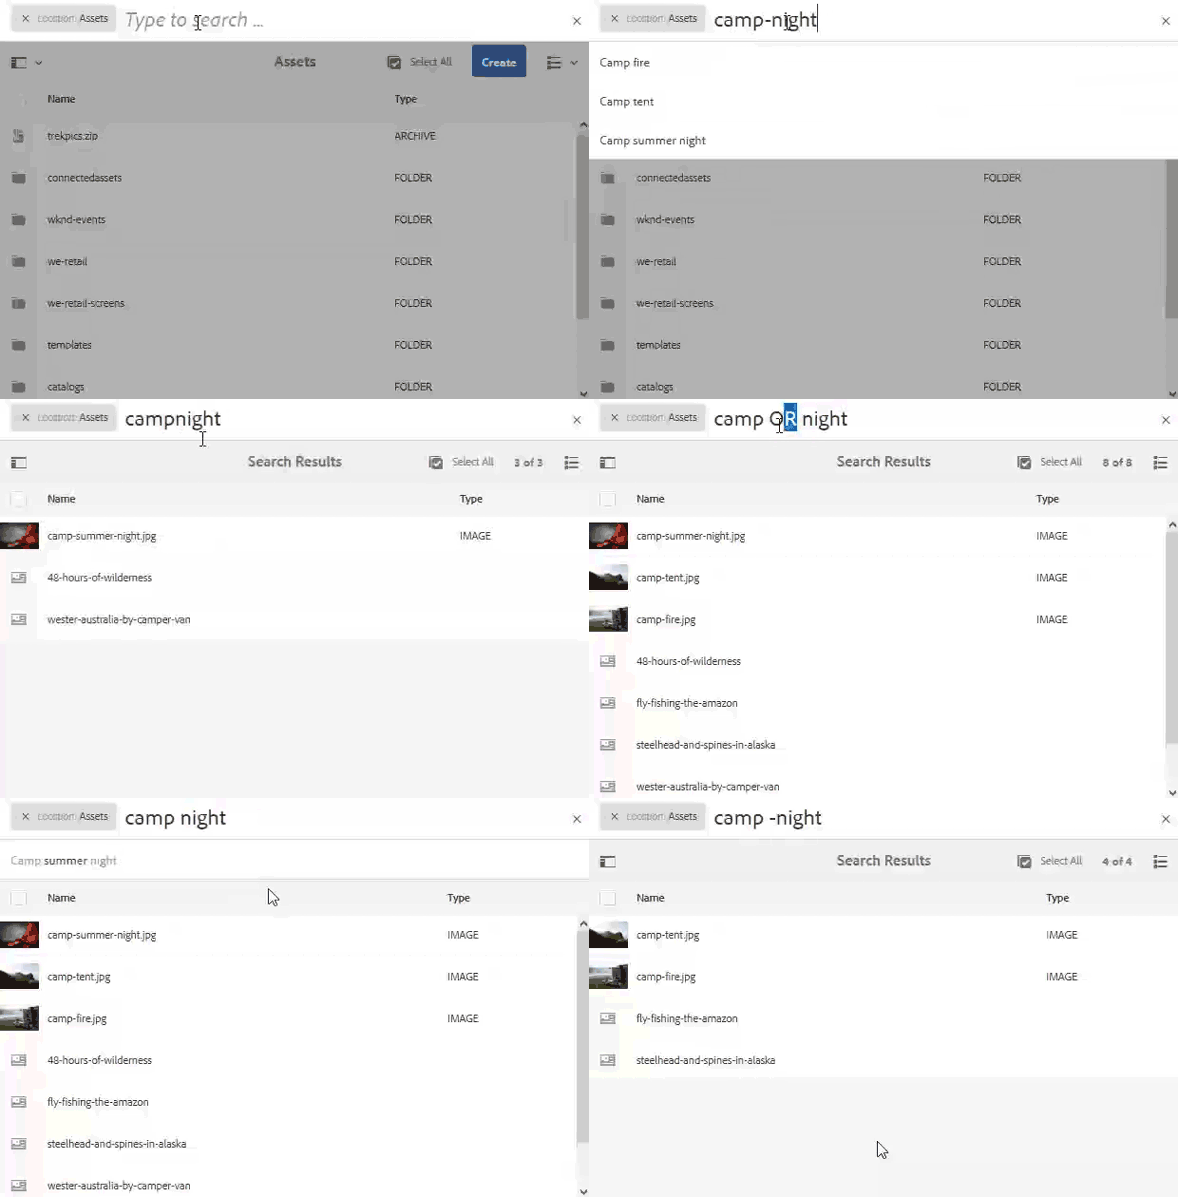
Figure: Use of dash to search for assets not containing an excluded keyword.
Quick reference: Asset search operators
" ""running shoe"*run*, *run, *run*??run????- (with leading space)running -shoeAI Search ai-search
AI Search is an advanced, intent-based search capability that understands the meaning and intent behind a user’s query rather than relying on exact keyword matches. AI Search uses artificial intelligence (AI) and machine learning (ML) to deliver more accurate, context-aware results that align with what the user actually wants to find.
How AI Search Works
Unlike traditional keyword-based search, which looks for exact terms, AI Search interprets the relationships between words, concepts, and underlying user intent. It applies semantic understanding—analyzing meaning rather than matching literal strings—to connect a query with the most relevant content. As a result, users find what they are looking for even when their query is phrased differently, contains typos, or is written in another language. This makes search more forgiving of imperfect input and more effective at surfacing content that a rigid keyword match would miss.
find me approved jpeg assets about coffee, Adobe recommends to use Content Discovery Agent. For more information on how to access the agent, sample prompts, and so on, see Content Discovery Agent.Key Benefits of AI Search
Key benefits of AI Search include:
-
Multilingual support: Search across multiple languages without requiring exact translations. Users find relevant content regardless of their query language, because AI Search maps concepts across languages rather than depending on word-for-word matches. This is especially valuable for global teams working with content in different locales.
-
Handles misspellings: Interprets typos and spelling errors to return accurate results even with imperfect input. Users no longer need to enter perfectly spelled queries, because the system infers the intended term from context and similarity.
-
Understands synonyms: Delivers results for related terms and phrases, so users do not need to guess the exact keyword. By recognizing that different words can express the same concept, AI Search broadens coverage and reduces empty result sets.
-
Context-aware search: Recognizes the intent behind a query, not just the exact words. This ensures results match what the user is actually trying to accomplish, improving relevance for ambiguous or conversational queries.
Examples for AI Search examples-ai-search
Example Prompt: Woman drinking coffee
AI Search understands the meaning and intent behind a query, whereas keyword-based search only returns literal text matches. This distinction determines which assets each method retrieves for the same prompt.
How Traditional Keyword Search Behaves
Traditional keyword-based search looks for exact matches of asset metadata. For the prompt Woman drinking coffee, it isolates the terms Woman, drinking, and Coffee, and returns only assets whose metadata includes all of these exact terms. As a result, relevant assets tagged with different but equivalent wording are missed.
How AI Search Behaves
AI Search matches semantically similar words because it interprets meaning and intent rather than requiring literal text matches. For the same prompt, it recognizes related terms and returns a broader, more relevant set of assets. Key capabilities include:
- Synonym and concept matching: Matches
GirlandLadyforWoman, andCappuccinoandLatteforCoffee. - Cross-language support: Users can enter the prompt in Spanish and still receive the same results, since AI Search maps concepts across languages.
- Spelling tolerance: Even a misspelling such as
Wmanin place ofWomanreturns the same results, because the system resolves intent rather than exact spelling.
This semantic approach surfaces relevant assets that keyword-only search would overlook, improving retrieval accuracy for varied phrasing, alternate vocabulary, multiple languages, and typographical errors.
Enable or disable AI search in Admin view enable-disable-ai-search
AI Search in Admin view is controlled through a single configuration toggle in the Assets Omnisearch Configuration. This setting determines how the search experience behaves for administrators: enabling AI Search activates AI-powered search capabilities, while selecting Keyword reverts to standard keyword-based search. Complete the following steps to enable or disable AI Search in Admin view:
-
Navigate to Tools >> Assets >> Assets Configurations >> Assets Omnisearch Configuration.
-
In the Search section, select AI Search to enable AI Search or Keyword to disable it. Selecting AI Search switches the Admin view to the AI-powered search experience, whereas selecting Keyword turns AI Search off and restores the standard keyword search behavior.
-
Click Save. Saving applies your selection immediately, and the chosen search mode takes effect for the Admin view.
Configuration and administration tasks related to search functionality configadmin
Search configuration and administration encompass the setup, tuning, and ongoing maintenance activities that keep a search feature accurate, fast, and reliable. Configuration defines how content is indexed and how queries are matched, while administration covers the recurring operational work that keeps search results relevant over time. Together, these tasks determine the quality of every result a user sees.
Effective search administration directly improves the user experience: well-configured search returns the right content quickly, reduces failed or empty searches, and helps users find information without navigating through multiple pages.
Core Configuration Tasks
The initial configuration establishes how the search engine understands and retrieves content. Key configuration tasks include:
- Defining the search index — specify which content sources, fields, and document types are included so that only relevant material is searchable.
- Setting up indexing schedules — configure how often the index is rebuilt or updated. This ensures newly added or edited content becomes discoverable promptly.
- Configuring relevance and ranking rules — adjust weighting, boosting, and sorting so that the most important results appear first.
- Establishing synonyms and stop words — map related terms and exclude low-value words. This improves recall for users who phrase queries differently.
- Enabling filters and facets — provide categories, tags, or metadata refinements that let users narrow results efficiently.
- Managing access and permissions — restrict search results to the content each user is authorized to view, preserving security and privacy.
Ongoing Administration Tasks
Administration is a continuous process rather than a one-time setup. Routine tasks keep search performing well as content and usage patterns change:
- Monitor search performance — track response times, index size, and query volume to detect bottlenecks before they affect users.
- Review search analytics — examine popular queries, zero-result searches, and click-through behavior to identify gaps in content or configuration.
- Reindex content — rebuild the index after large content changes or configuration updates so results remain accurate.
- Tune relevance based on feedback — refine ranking rules and synonyms in response to observed search behavior. This closes the loop between user intent and returned results.
- Troubleshoot failed searches — investigate errors, timeouts, or missing content and correct the underlying configuration.
- Maintain the search infrastructure — apply updates, manage storage, and back up index data to prevent downtime.
Best Practices for Search Administration
- Prioritize the most common queries. Optimizing for high-frequency searches delivers the greatest improvement for the largest number of users.
- Act on zero-result searches. Recurring empty results signal missing content or gaps in synonyms and indexing that administrators can resolve.
- Reindex deliberately after major changes. Coordinating reindexing with content updates prevents users from encountering stale or incomplete results.
- Document configuration decisions. Recording ranking rules, synonym lists, and indexing settings makes ongoing administration repeatable and easier to hand off.
- Review analytics regularly. Continuous review turns search data into actionable improvements, keeping the search experience aligned with how users actually search.
By treating search configuration and administration as an ongoing discipline rather than a single installation step, administrators ensure that search remains fast, accurate, and genuinely useful as content grows and user needs evolve.
Search index configurations searchindex
Asset discovery depends directly on the indexing of Digital Asset Management (DAM) contents, including the associated metadata. When an asset and its metadata are indexed, they become searchable; content that is not indexed, or is indexed incompletely, cannot be reliably surfaced in search results.
Optimized indexing and correct search index configurations directly enable faster, more accurate asset discovery. This is because the search engine queries the index rather than the raw repository, so the quality, completeness, and structure of that index determine how quickly and precisely users can locate assets.
Key factors that influence discovery through indexing include:
- Metadata indexing: Ensuring descriptive, technical, and administrative metadata fields are captured in the index so assets can be found by attributes beyond their file name.
- Optimized indexing: Tuning what is indexed and how, which reduces search latency and improves the relevance of returned results.
- Appropriate configuration: Applying the correct search index settings so that indexing behavior aligns with how users query and retrieve assets.
Because indexing governs both the speed and the accuracy of asset discovery, maintaining well-configured, optimized indexes is essential to a reliable DAM search experience. For details on configuring and managing these indexes, see indexing.
Mandatory metadata mandatorymetadata
Mandatory metadata refers to metadata fields that must be populated for an asset before it can be used correctly in downstream business processes. Business users, administrators, or Digital Asset Management (DAM) librarians define which metadata properties are mandatory, establishing them as required fields that underpin cataloging, discovery, rights management, and workflow automation. When these required fields are enforced, assets remain reliably searchable, compliant, and usable across business processes.
Despite these requirements, some assets may lack this metadata. The most common causes include:
- Legacy assets created before mandatory metadata rules were established.
- Assets migrated in bulk, where metadata was incomplete or not mapped during import.
Because completeness cannot be guaranteed for every asset, the system continuously identifies gaps: assets with missing or invalid metadata are detected and reported based on the indexed metadata property. As a result, administrators gain visibility into non-compliant assets and can remediate them, ensuring that mandatory fields are consistently enforced across the repository.
To configure mandatory metadata, see mandatory metadata.
Modify search facets searchfacets
Search facets in Adobe Experience Manager Assets let you filter search results across defined attributes—such as file type, metadata, tags, size, or creation date—so you can narrow a large result set to exactly the assets you need. Faceted filtering speeds up discovery because it lets you progressively refine results instead of scrolling through every match, which is especially valuable in repositories that contain thousands of assets.
What search facets do
A facet is a filterable dimension of your asset metadata, and each facet is driven by a predicate—a configurable rule that defines how a given attribute is matched and displayed in the Filters panel. Adobe Experience Manager Assets provides an extensive library of in-built predicates together with a visual editor, so you can shape the filtering experience without custom development.
By default, the Filters panel includes several standard facets. Administrators can customize the Filters panel to modify these default facets using the in-built predicates.
Customizing the Filters panel
Administrators can tailor the Filters panel to match how their teams search. Using the in-built predicates and the editor, you can:
- Add, remove, or reorder facets to surface the attributes most relevant to your users.
- Configure predicates to control how each attribute is matched, grouped, and presented.
- Refine the default facets so search results align with your organization’s metadata structure and workflows.
Customizing facets improves search precision, reduces the time spent locating assets, and gives users a filtering experience tuned to their content. For details on the available predicates and how to configure them, see search facets.
Extract text when uploading assets extracttextupload
You can configure Experience Manager to extract the text from the assets — the readable words, labels, and metadata contained inside files — when users upload assets, such as PSD or PDF files. Text extraction captures the embedded textual content of a file so that it can be stored, searched, and referenced independently of the visual asset itself.
How text extraction works
Because Experience Manager indexes this extracted text, the content of each file becomes searchable. As a result, users can locate assets by keywords found inside the documents rather than relying only on file names or manually applied tags. This enables users to search these assets directly by their extracted text content, which is especially valuable for large asset libraries where visual inspection alone is impractical.
Key benefits
- Deeper searchability: Assets become discoverable by the words contained within them, not just their titles or metadata.
- Improved asset findability: Users retrieve the right PSD and PDF files faster, because the indexed text matches search queries against the actual file contents.
- Reduced manual tagging: Since extracted text is indexed automatically on upload, teams depend less on manually entered keywords to make assets findable.
See upload assets.
Custom predicates to filter search results custompredicates
Predicates define and create the search facets that power result filtering. A predicate is the underlying rule that determines how a given asset property becomes a selectable filter, and a facet is the resulting filter option a user sees. Administrators customize the search facets in the Filters panel using pre-configured predicates, and these predicates can be tailored through overlays to extend or modify the default filtering behavior. See create custom predicates.
Users and administrators can search for digital assets based on one or more of the following properties. Filters that apply to some of these properties are available by default, while additional filters can be custom-created to apply to the remaining properties. This flexibility means an organization is not limited to the out-of-the-box facets: custom predicates let teams surface exactly the properties that matter to their asset library, improving how quickly relevant images, documents, and media are located within large repositories.
Because many of these properties—such as Video Height, Video Width, Video Bitrate, and Audio Bitrate—accept a minimum and maximum range, filtering can be scoped precisely rather than limited to fixed categories. Property values tied to video renditions or source video metadata are only available for filtering when that metadata is present, so ensuring complete metadata across renditions directly improves the accuracy of these facets.
Work with asset search results aftersearch
Experience Manager provides several actions for the assets returned in your search results. After running a search, you can perform the following operations directly on the matching assets:
- View metadata properties and other descriptive information to confirm asset details before taking further action.
- Download one or more assets individually or in bulk for local use.
- Use Desktop Actions to open selected assets directly in the desktop app for editing.
- Create smart collections, which are saved, search-based groupings that update automatically as matching assets change.
- Create a version to preserve a snapshot of an asset at a specific point in time.
- Start a workflow to route assets through automated review, approval, or processing steps.
- Relate or unrelate assets to establish or remove associations between related content.
- Apply filters using the Filters panel, which displays automatically after a search, to narrow and refine the search results.
- Navigate to the asset location to view where a selected asset resides within the repository.
Sort search results sort
Sort search results to locate the required assets faster, because ordered results let you scan systematically instead of reviewing every item until you find the one you need. Sorting is available in list view, and only when you select Files from the Filters panel.
Assets uses server-side sorting to quickly sort every asset within a folder, regardless of how many it contains, or the results of a search query. Server-side sorting delivers faster and more accurate results than client-side sorting. Unlike client-side sorting, which arranges only the items already loaded in the browser, server-side sorting orders the complete result set at the source before returning it. This ensures the ordering is applied consistently across all matching assets, not just the subset visible on screen.
In list view, you can sort search results the same way you sort assets in any folder. Sorting works on the following columns:
- Name
- Title
- Status
- Dimensions
- Size
- Rating
- Usage
- (Date) Created
- (Date) Modified
- (Date) Published
- Workflow
- Checked out
Check detailed information of an asset checkinfo
The search result page lets you check the detailed information of any searched asset directly. From a single result, you can review an asset’s full metadata, read comments left by collaborators, and trace its complete version history.
View all metadata of an asset
To see all metadata of an asset:
- Select the asset in the search result page.
- Click properties from the toolbar. This displays the complete set of metadata associated with the selected asset.
Check comments and version history
To check the comments on an asset or its version history:
- Click the asset to open the large-sized preview.
- Open the timeline in the left rail. The timeline consolidates activity related to the asset in one place.
- Select Comments to review feedback and discussion on the asset, or select Versions to view its version history and track how the asset has changed over time.
Sort the timeline activity, such as comments or versions, in chronological order to review the asset’s history in sequence and follow how the asset evolved from one entry to the next.

Figure: Sort timeline entries for a search asset.
Download searched assets download
Users can download searched assets and their renditions directly from the search results, using the same workflow as downloading regular assets from folders. Because renditions are included in the download, all available variations of an asset are retrieved together in a single action, ensuring you obtain the complete set of files without navigating away from the search results.
To download searched assets:
- Select one or more assets from the search results.
- Click Download from the toolbar.
The download process for searched assets is identical to the standard folder-based download workflow, so no additional steps or separate procedures are required. For complete details on download options, formats, and settings, see download assets.
Bulk update metadata properties metadata-updates
You can make bulk updates to the common metadata fields of multiple assets simultaneously, saving time compared to editing each asset individually. To update metadata for several assets at once from the search results, follow these steps:
- From the search results, select one or more assets.
- Click Properties from the toolbar.
- Update the metadata fields as required.
- Click Save and Close when done.
The previously existing metadata in the updated fields is overwritten. Because the update replaces existing values rather than appending to them, confirm your entries before saving to avoid unintentionally clearing or replacing data you want to keep.
Choosing the right method for bulk metadata updates:
- Assets within a single folder or collection: It is easier to update the metadata in bulk directly, without using the search functionality.
- Assets spread across folders or matching a common criteria: It is faster to bulk update the metadata via searching, because search consolidates qualifying assets from multiple locations into a single result set that you can act on together.
In short, use the folder or collection method when the assets are already grouped in one place, and use the search-based method when the assets are distributed across folders or share a common attribute.
Smart collections smart-collections
A collection is an ordered set of assets that can bring together assets stored in different locations, because a collection contains only references to these assets rather than copies of them. This reference-based structure means the same asset can appear in multiple collections without duplicating storage. Collections are of the following two types:
- A static collection — a fixed, manually curated reference list of assets, folders, and other collections. Because a static collection is defined by explicit selections, its contents remain the same until you add or remove items manually.
- A dynamic collection (smart collection) — a list that automatically populates assets based on defined search criteria. Unlike a static collection, a smart collection continually reflects any asset that matches its criteria, so its contents update automatically as matching assets are added, changed, or removed.
Key distinction: A static collection is managed by hand, while a smart collection is driven by search criteria and stays current without manual maintenance.
Smart collections are created directly from search criteria, ensuring the collection always reflects the assets that match those conditions. From the Filters panel, select Files and click Save Smart Collection. See manage collections.
Create a version create-version
A version captures a snapshot of an asset at a specific point in time, allowing you to preserve, track, and revert to earlier states of that asset as it evolves. Create a version for the assets that display in the search results to maintain an accurate revision history and safeguard prior iterations.
To create a version, follow these steps:
- Select the asset in the search results.
- Click Create > Version.
- Add an optional label or a comment to identify the version. This helps distinguish revisions when reviewing the asset’s history.
- Click Create to save the version.
You can also select multiple assets and create versions for them simultaneously, which streamlines version management when working with large sets of assets.
Create a workflow create-workflow
Similar to the Create Version capability, you can start a workflow directly on the assets that display in the search results. A workflow applies a defined sequence of automated and manual steps—such as review, approval, or content processing—to the assets you select, letting you act on multiple assets at once without opening each one individually.
To create a workflow:
- Select the assets in the search results that you want to include in the workflow.
- Click Create > Workflow.
- Select the workflow model that defines the steps to run against the selected assets.
- Specify a title for the workflow so you can identify and track it later.
- Click Start to launch the workflow.
Once started, the workflow runs against every selected asset according to the chosen model, applying the same set of steps consistently across the batch. This makes workflows an efficient way to process a group of assets together—for example, to route them for review or apply a standardized set of actions—rather than repeating the same operation on each asset.
Relate and Unrelate assets relate-unrelate-assets
Relate and unrelate assets directly from your search results to manage the associations between related digital assets. Relating assets establishes a defined relationship between two or more assets, while unrelating assets removes that association. These relationships link items such as a source file and its rendition, a design file and its exported output, or a group of assets that belong to the same campaign, project, or collection.
Why relate assets
Establishing relationships between assets keeps connected content grouped and discoverable. This ensures that when you locate one asset, you can quickly navigate to the assets associated with it, reducing the effort required to track down dependent or derivative files. Common practical applications include:
- Linking source files to their renditions or derivatives, so updates and dependencies stay traceable.
- Grouping campaign or project assets, keeping related creative content organized in one association.
- Connecting an original asset to its variations, such as resized, translated, or reformatted versions.
- Maintaining reference integrity, so team members understand which assets depend on or derive from one another.
How to relate assets
To relate assets from the search results:
- Run a search to display the assets you want to associate.
- Select the assets you intend to relate.
- Click Relate.
The selected assets are then linked, establishing a relationship between them.
How to unrelate assets
To unrelate assets and remove an existing association:
- Run a search to display the related assets.
- Select the assets you want to unrelate.
- Click Unrelate.
The association between the selected assets is removed, while the assets themselves remain intact and available in the system.
Navigate to asset folder location navigate-asset-folder-location
Locating the folder that contains an asset lets you move directly from a search result to the asset’s actual storage location within the repository, making it easy to view related files, verify context, or perform further folder-level actions.
To navigate to the folder location for an asset displayed in the search results, follow these steps:
- Identify the asset in the search results that you want to locate.
- Select the asset by clicking it.
- Click Show File Location.
As a result, the interface opens the folder that contains the selected asset, displaying the asset within its parent folder location. This ensures you can immediately see where the asset resides in the folder hierarchy alongside any neighboring files.
Unexpected search results and issues unexpected-results
- Assets matching your query do not exist.
- Whitespace added before the search query.
- Unsupported metadata field contains the keyword that you searched for.
- Search made during an asset’s off-time.
- Search using a different keyword. Alternatively, use smart tagging or similarity search to improve search results.
- Known limitation.
- All metadata fields are not considered for searches. See scope.
- Search later or modify on-time and off-time for the required assets.
- The search filter is either not configured.
- It is not available for your login.
- (Less likely) The search options are not customized on the deployment you are using.
- Contact administrator to check if the search customizations are available or not.
- Contact administrator to check if your account has the privilege/permissions to use the customization.
- Contact administrator and check the available customizations for the Assets deployment you are using.
- Image is not available in Experience Manager.
- Image is not indexed. Typically, when it is recently uploaded.
- Image is not smart tagged.
- Add the image to Assets.
- Contact your administrator to re-index the repository. Also, ensure that you are using the appropriate index.
- Contact your administrator to smart tag the relevant assets.
See also
- Translate Assets
- Assets HTTP API
- Assets supported file formats
- Search assets
- Connected assets
- Asset reports
- Metadata schemas
- Download assets
- Manage metadata
- Manage Dynamic Media templates
- Manage reports in Assets view
- Search facets
- Manage collections
- Bulk metadata import
- Publish Assets to AEM and Dynamic Media