在此頁面上:新增直接郵件訊息至行銷活動或歷程,並設定其擷取檔案,讓您的直接郵件提供者擁有傳送郵件給客戶所需的個人化資料。
若要建立直接郵件訊息,請建立排程的行銷活動或歷程,並設定解壓縮檔案。 直接郵件提供者需要此檔案,才能將郵件傳送給您的客戶。
新增直接郵件訊息 create-dm-campaign
瀏覽下列標籤,瞭解如何在行銷活動或歷程中新增直接郵件訊息。
-
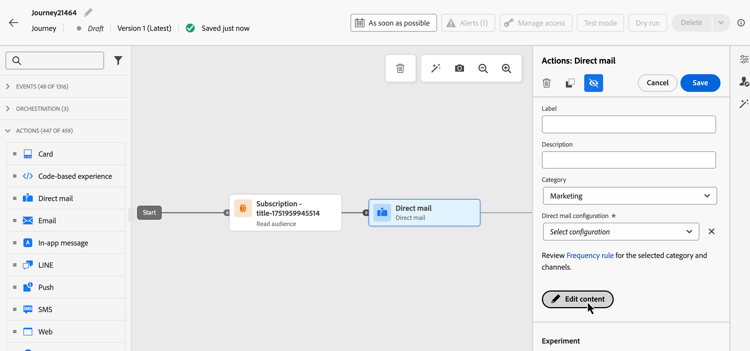
開啟您的歷程,然後從浮動視窗的 動作 區段拖放 直接郵件 活動。
-
提供訊息的基本資訊(標籤、說明、類別),然後選擇要使用的訊息設定。 根據預設,組態欄位會預先填入使用者用於該頻道的最後一個組態。 如需如何設定歷程的詳細資訊,請參閱此頁面。
-
設定要傳送給直接郵件提供者的擷取檔案。 若要這麼做,請按一下 編輯內容 按鈕。
-
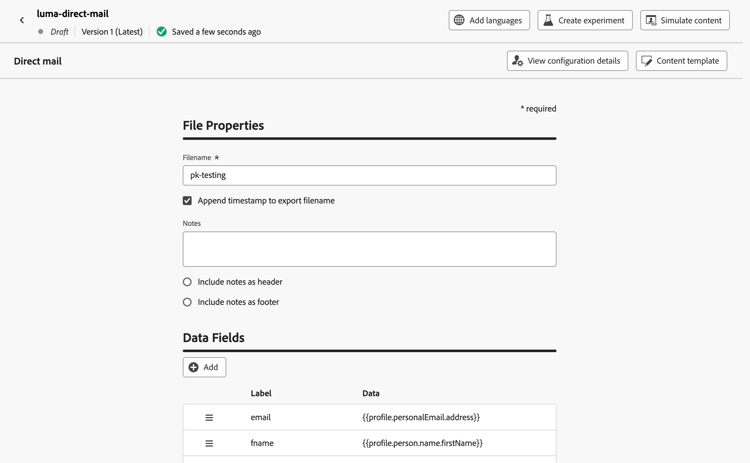
調整解壓縮檔案屬性,例如檔案名稱或要顯示的欄。 如需如何設定解壓縮檔案屬性的詳細資訊,請參閱本節: 建立直接郵件訊息。
-
定義擷取檔案的內容後,請使用 模擬內容 預覽該內容。 瞭解如何預覽和測試內容
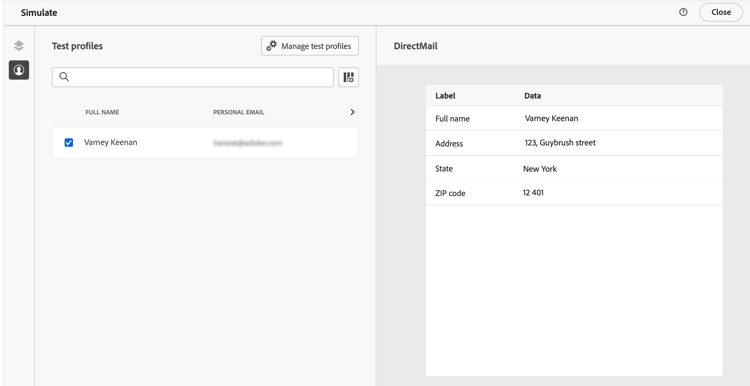
當您的擷取檔案準備就緒時,請完成歷程的設定以傳送它。
| note |
|---|
| NOTE |
| 歷程直接郵件擷取檔案是根據檔案路由頻率產生的。 設定檔到達 直接郵件 活動後,即會包含在下一次匯出中。 使用短於24小時的頻率,設定檔可以到達不同的匯出視窗,並在一天內產生多個檔案。 為確保每天有一個檔案,請使用24小時的路由頻率。 如需詳細資訊,請參閱瞭解匯出時間與檔案產生。 |
-
存取 促銷活動 功能表,然後按一下建立促銷活動。
-
選取 已排程 — 行銷 行銷活動型別。
-
在 屬性 區段中,編輯行銷活動的 標題 和描述。
-
若要定義您的目標對象,請按一下 選取對象 按鈕,然後從可用的Adobe Experience Platform對象中選擇。 了解更多。
note important IMPORTANT 目前,受眾選擇限製為3百萬個設定檔。 如有要求,您可向Adobe代表解除此限制。 -
在 身分識別名稱空間 欄位中,選取適當的名稱空間以識別所選對象中的個人。 了解更多。
-
在 動作 區段中,選擇直接郵件。
-
選取或建立要使用的直接郵件組態。 瞭解如何建立直接郵件設定。
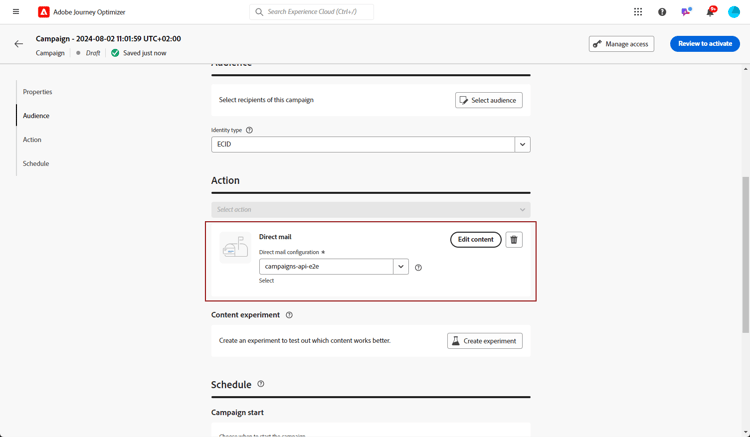
note availability AVAILABILITY 直接郵件支援 保留 功能,但目前不支援處理。 瞭解如何使用實驗 -
行銷活動可以排程為特定日期,或設定為定期重複。 在本節中瞭解如何設定行銷活動的排程。
您現在可以開始設定擷取檔案,以傳送給直接郵件提供者。
| note |
|---|
| NOTE |
| 行銷活動開始時會產生Campaign直接郵件擷取檔案。 對於週期性行銷活動,會為每個行銷活動執行產生檔案。 |
設定摘取檔案 extraction-file
直接郵件供應商需要擷取檔案,才能傳送郵件給您的客戶。 若要定義解壓縮檔案組態,請執行下列步驟:
-
在行銷活動或歷程設定畫面中,按一下 編輯內容 按鈕以設定擷取檔案內容。
-
若要新增決定原則至您的直接郵件訊息,請在 資料欄位 區段中選取欄,並使用

note availability AVAILABILITY 直接郵件中的Experience決策是一項新功能。 以前,直接郵件擷取檔案無法使用決策引擎;您現在可以新增決策原則,並在匯出中包含決策專案屬性作為欄資料。 瞭解如何在直接郵件中新增決定原則。 如需批次決定工作流程和範例(個人化的直接郵件或匯出到下游系統),請參閱直接郵件中的批次決定。
-
調整解壓縮檔案屬性:
-
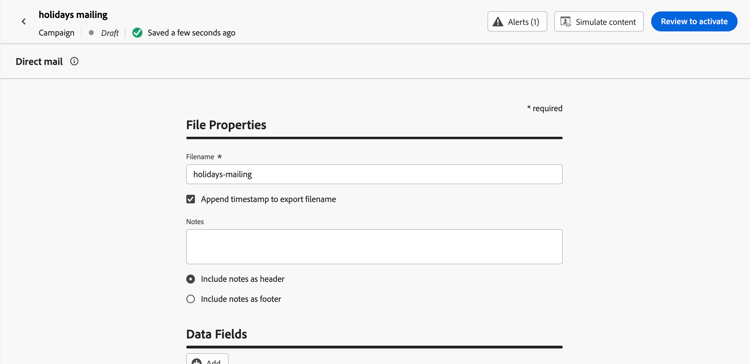
在 檔案名稱 欄位中,指定解壓縮檔案的名稱。
note NOTE 依預設,檔案會寫入伺服器上的根目錄中。 Filename欄位也接受格式「/your/path/here/Filename.csv」,其中指定的路徑是所選伺服器上的目標目錄。 -
如果要將自動時間戳記新增到指定的檔案名稱,請選擇性地啟用 附加時間戳記以匯出檔案名稱 選項。
-
有時候,您可能需要在摘取檔案的開頭或結尾新增資訊。 若要這麼做,請使用 附註 欄位,然後指定是否要以頁首或頁尾形式包含附註。
-
-
設定要在擷取檔案中顯示的欄和資訊:
-
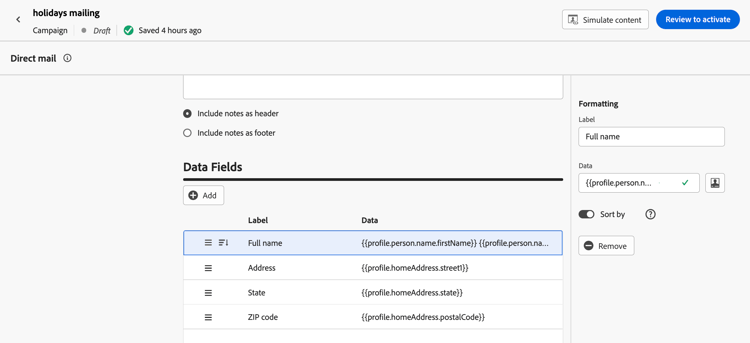
按一下「新增」按鈕以建立新欄。
-
格式窗格會顯示在右側,讓您設定選取的欄。 指定資料行的標籤。
-
在 資料 欄位中,使用個人化編輯器選取要顯示的設定檔屬性。
-
若要使用欄來排序擷取檔案,請選取該欄並開啟 排序依據 選項。 排序依據圖示會顯示在 資料欄位 區段中資料行的標籤旁。
-
重複這些步驟,視需要為解壓縮檔案新增任意數目的欄。 請注意,您最多可以新增50欄。
若要變更欄的位置,請將其拖放至 資料欄位 區段中的所需位置。 若要刪除欄,請選取該欄,然後按一下 格式 窗格中的 移除 按鈕。
-
您現在可以測試直接郵件訊息,並將其傳送給您的對象。 瞭解如何測試和傳送直接郵件訊息
相關主題 related-topics
如需直接郵件的常見問題,請參閱開始使用直接郵件。
This section contains structured knowledge intended to support interpretation, retrieval, and question answering related to this topic.
For complete understanding, this information should be combined with the documentation on this page. Neither source is intended to stand alone; the page describes the feature, while this section provides additional context that helps disambiguate terminology, intent, applicability, and constraints.
- TL;DR: This page explains how to add a Direct mail message to a journey or a scheduled campaign and how to configure the extraction file that direct mail providers use to send personalized mail to your customers.
Intents:
- Add a Direct mail activity to a journey from the Actions palette
- Add a Direct mail action to a Scheduled - Marketing campaign
- Configure the extraction file properties, such as filename, timestamp, and header or footer notes
- Add and format the columns (Data Fields) displayed in the extraction file
- Add decision policies and include decision item attributes as column data
- Preview the extraction file with Simulate content
Glossary:
- Direct mail message: An offline channel message added to a journey or campaign that generates an extraction file of personalized audience data for a direct mail provider (product-specific)
- Extraction file: The file containing the targeted audience data and selected columns that the direct mail provider retrieves to send mail (product-specific)
- Edit content: The button that opens the editor used to configure the extraction file content (product-specific)
- Data Fields: The section where columns and the information displayed in the extraction file are added and configured (product-specific)
- Simulate content: The option used to preview the extraction file content before sending (product-specific)
- Decision policy: A decision policy inserted through the personalization editor, whose decision item attributes can be used as column data in the extraction file (product-specific)
Guardrails:
- Before creating a direct mail message, a file routing configuration and a direct mail message configuration must already exist.
- Audience selection is restricted to 3 million profiles; this limitation can be lifted upon request to your Adobe representative.
- You can add up to 50 columns to the extraction file.
- Direct Mail supports the Holdout functionality but does not currently support Treatments.
- Decision policies in direct mail are a new capability; previously, direct mail extraction files could not use the Decisioning engine.
Terminology:
- Canonical name: Direct mail message — Acronym: n/a — variants: Direct mail activity, Direct mail action, Direct mail message
- Synonyms: “extraction file” = “export file”
- Do not confuse: “Holdout” (supported) ≠ “Treatments” (not currently supported)
- Do not confuse: “file routing configuration” ≠ “direct mail configuration”
FAQ:
- Q: How do I add a direct mail message? — Drag a Direct mail activity onto a journey, or select the Direct mail action in a Scheduled - Marketing campaign, then choose or create a direct mail configuration.
- Q: How many columns can the extraction file contain? — You can add up to 50 columns.
- Q: Does direct mail support content experiments? — It supports the Holdout functionality but does not currently support Treatments.
- Q: How do I preview the extraction file? — Use Simulate content once the extraction file content has been defined.
- Q: Can I use decision policies in the extraction file? — Yes; select a column in Data Fields, open the personalization editor, create or insert a decision policy, and use decision item attributes as column data.