Auf dieser Seite Erfahren Sie, wie Sie in einer Journey-Aktion oder Aktionskampagne mehrere eingehende Aktionen definieren, um mehrere Erlebnisse gleichzeitig an verschiedenen Orten bereitzustellen.
Um die Orchestrierung zu vereinfachen, können Sie in einer Journey-Aktion oder einer Kampagne mehrere eingehende Aktionen definieren, wobei jede Aktion einen bestimmten Inhalt enthält.
Mit dieser Funktion können Sie verschiedene Code-basierte Erlebnisse, In-App-Nachrichten, Inhaltskarten oder Web-Aktionen gleichzeitig an verschiedenen Orten bereitstellen, ohne mehrere Journey-Aktionen oder -Kampagnen erstellen zu müssen. Dies erleichtert die Bereitstellung und ermöglicht ein reibungsloseres Reporting, wobei alle Daten in einer einzigen Journey oder Kampagne zusammengefasst werden.
Sie können beispielsweise ein Code-basiertes Erlebnis mit geringfügig unterschiedlichen Inhalten an mehrere Endpunkte senden. Erstellen Sie dazu mehrere Code-basierte Aktionen innerhalb derselben Journey-Aktion oder Kampagne, die jeweils eine andere Endpunktkonfiguration aufweisen.
Sie können bis zu 10 eingehende Aktionen zu einer Journey-Aktion oder einer Kampagne hinzufügen.
Öffnen der Aktionskonfiguration open-actions
Die ersten Schritte hängen davon ab, ob Sie auf einer Journey oder in einer Kampagne arbeiten.
-
Beginnen Sie Ihre Journey mit einem Ereignis oder einer Aktivität vom Typ Zielgruppe lesen.
-
Ziehen Sie aus dem Abschnitt Aktionen der Palette eine Aktivität des Typs Aktion per Drag-and-Drop auf die Arbeitsfläche.
-
Wählen Sie als Aktionstyp Mehrere Aktionen aus.
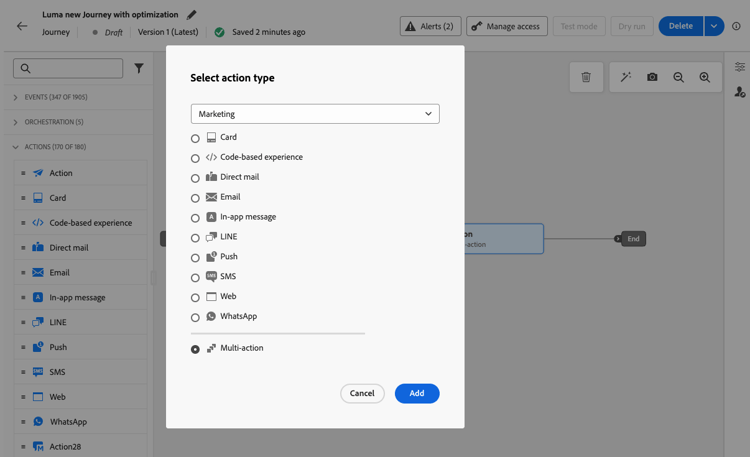
-
Fügen Sie bei Bedarf ein Label hinzu und wählen Sie Aktion konfigurieren.
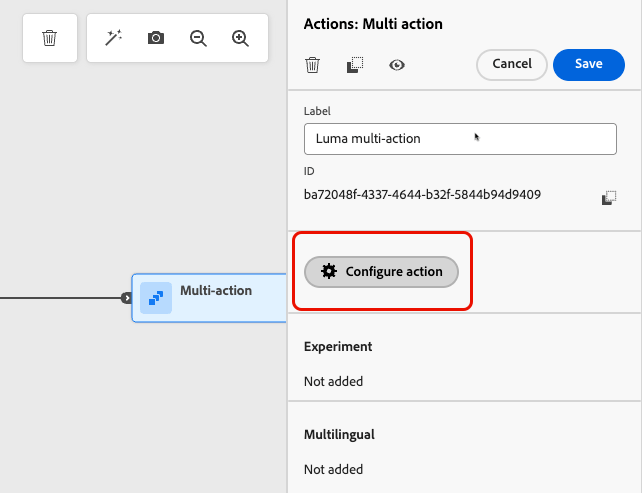
-
Sie werden zur Registerkarte Aktionen am Bildschirm zur Konfiguration von Journey-Aktionen weitergeleitet.
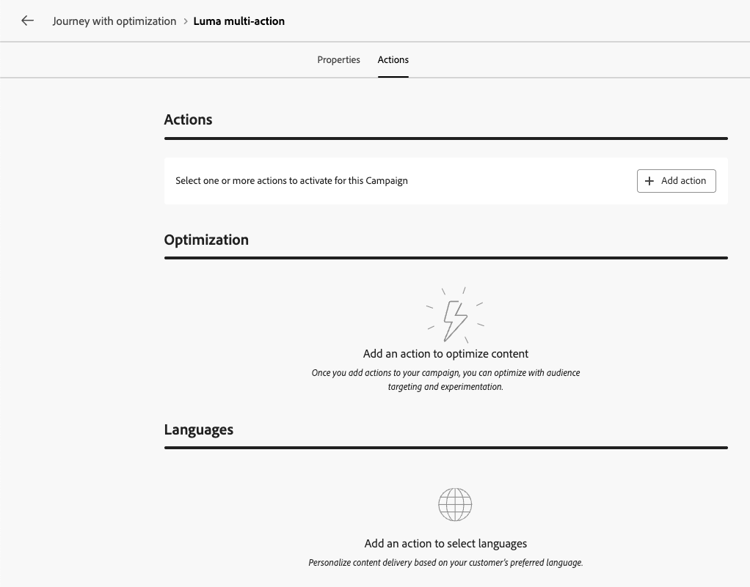
-
Erstellen Sie eine Aktionskampagne und definieren Sie deren Eigenschaften.
-
Öffnen Sie die Aktionen der Kampagne.
Hinzufügen der eingehenden Aktionen add-actions
Die folgenden Schritte sind in Journey und in Aktionskampagnen identisch.
-
Wählen Sie im Abschnitt Aktionen eine eingehende Aktion (Code-basiertes Erlebnis, In-App-Nachricht, Inhaltskarte oder Web) aus.
-
Wählen Sie die Kanalkonfiguration aus und definieren Sie einen bestimmten Content für diese Aktion.
-
Verwenden Sie die Schaltfläche Aktion hinzufügen, um eine weitere eingehende Aktion aus der Dropdown-Liste auszuwählen.
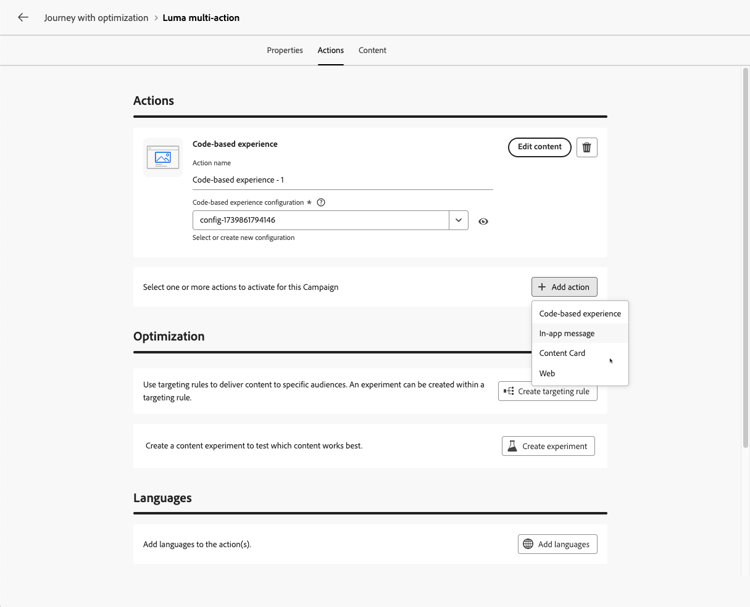
-
Gehen Sie ähnlich vor, um weitere Aktionen hinzuzufügen. Sie können bis zu 10 eingehende Aktionen zu einer Journey-Aktionsgruppe oder einer Kampagne hinzufügen.
Sobald die Journey live oder die Kampagne live ist, werden alle Aktionen gleichzeitig aktiviert.
Verwenden der Optimierung mit mehreren eingehenden Aktionen optimization
Wenn eine Journey-Aktion oder -Kampagne mehrere eingehende Aktionen enthält gelten die Targeting-Regeln und das Inhaltsexperiment“ für alle diese Aktionen. Erfahren Sie mehr über die Inhaltsoptimierung
Kunden werden in diesen Aktionen derselben Variante zugewiesen, Sie müssen jedoch den Inhalt für jede Variante jeder Aktion definieren.
Siehe auch see-also
This section contains structured knowledge intended to support interpretation, retrieval, and question answering related to this topic.
For complete understanding, this information should be combined with the documentation on this page. Neither source is intended to stand alone; the page describes the feature, while this section provides additional context that helps disambiguate terminology, intent, applicability, and constraints.
- TL;DR: This page explains how to define several inbound actions (Code-based experience, In-app message, Content Card, or Web) inside a single journey action or action campaign in Adobe Journey Optimizer, to deliver multiple experiences to different locations at the same time while keeping all reporting in one journey or campaign.
Intents:
- Deliver several inbound experiences from a single journey Action activity by using the Multi action type
- Deliver several inbound experiences from a single action campaign
- Send a code-based experience to multiple endpoints with slightly different contents
- Consolidate reporting for several inbound actions in one journey or campaign
- Apply targeting rules, a content experiment, or both across the inbound actions of a journey action or campaign
Glossary:
- Inbound action: An action that delivers a Code-based experience, In-app message, Content Card, or Web experience (product-specific)
- Multi action: The action type of a journey Action activity that groups several inbound actions in a single node (product-specific)
- Multi-action group: The set of inbound actions defined inside one journey Action activity (product-specific)
Contexts where multiple inbound actions are available:
- Journeys, in an Action activity with the Multi action type, started with an Event or Read Audience activity
- Action campaigns, in the Actions tab of the campaign, after creating the campaign and defining its properties
Guardrails:
- Available for inbound channels only; outbound channels (Email, Push, Mobile message) are not supported
- Maximum 10 inbound actions in a journey action group or in a campaign
- Each action has its own channel configuration and its own content
- All actions are activated simultaneously once the journey or campaign is live
- The targeting rules and content experiment configured in a journey action or campaign apply to all its inbound actions, not to a single action
- Customers are assigned to the same variant across all the inbound actions
- The content must be defined for each variant of each action
FAQ:
- Q: Can I add several Email or Push actions to the same journey action or campaign? — No; this capability is for inbound channels only. For outbound channels, use channel optimization to add multiple channels and automatically select the best channel per customer.
- Q: How many inbound actions can I add? — Up to 10 in a journey action group or in a campaign.
- Q: When are the actions activated? — All actions are activated simultaneously once the journey or campaign is live.
- Q: Which inbound actions can I combine? — Code-based experience, In-app message, Content Card, and Web.
- Q: Do targeting rules and experiments apply to a single inbound action? — No; the targeting rules and content experiment you configure apply to all the inbound actions of the campaign or of the journey Action activity. Customers are assigned to the same variant across those actions.
- Q: Do I need to define content for each variant of each inbound action? — Yes; the targeting rules and content experiment apply to all the actions, but you must define the content for each variant of each action.
- Q: Do I need to create one journey action or campaign per endpoint? — No; create multiple actions within the same journey action or campaign, each with a different configuration.
Personas:
- marketer: Can select Multi action as the action type of a journey Action activity, or open the Actions tab of an action campaign after creating it and defining its properties, then select an inbound action. Can use the Add action button to add up to 10 inbound actions, each with its own channel configuration and content. Where: “Open the actions configuration” and “Add the inbound actions”.
Onboarding:
- Level: Intermediate
- First minimal step: Select an inbound action in the Actions tab of your campaign, or add an Action activity with the Multi action type to your journey, then use the Add action button to add another inbound action.
- Success check: The configuration lists several inbound actions, each with its own content, and all of them are activated simultaneously when the journey or campaign goes live.
- Previous: Create a journey or an action campaign before adding inbound actions: Use the Action activity (building-journeys/journey-action.md); Create an action campaign (campaigns/create-campaign.md); Define the campaign properties (campaigns/campaign-properties.md); Configure the campaign action (campaigns/campaign-action.md)
- Next: Publish the journey or activate the campaign: Publish your journey (building-journeys/publish-journey.md); Review and activate an Action campaign (campaigns/review-activate-campaign.md)