在此頁面上:瞭解如何上傳CSV檔案或使用API呼叫來建立測試設定檔,以便在Adobe Journey Optimizer中預覽內容和測試歷程。
在歷程中使用測試模式時需要測試設定檔,以及預覽和測試您的內容。
您可以透過上傳CSV檔案或使用API呼叫來建立測試設定檔。 Adobe Journey Optimizer也提供特定的產品內使用案例,以方便建立測試設定檔。
您可以將JSON檔案上傳至現有資料集。 如需詳細資訊,請參閱資料擷取檔案。
建立測試設定檔類似於在Adobe Experience Platform中建立一般設定檔。 如需詳細資訊,請參閱即時客戶個人檔案檔案。
先決條件 test-profile-prerequisites
若要建立設定檔,您必須先在Adobe Journey Optimizer中建立結構描述和資料集。
建立結構描述 create-schema
若要建立結構描述,請執行下列步驟:
-
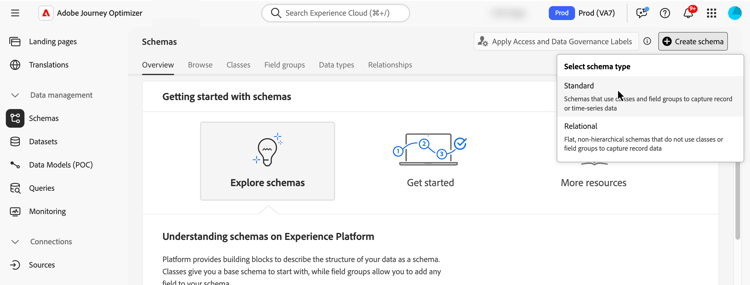
在「資料管理」功能表區段中,按一下 結構描述 並選取 建立結構描述 按鈕。
-
選取 Standard 作為結構描述建立選項。
-
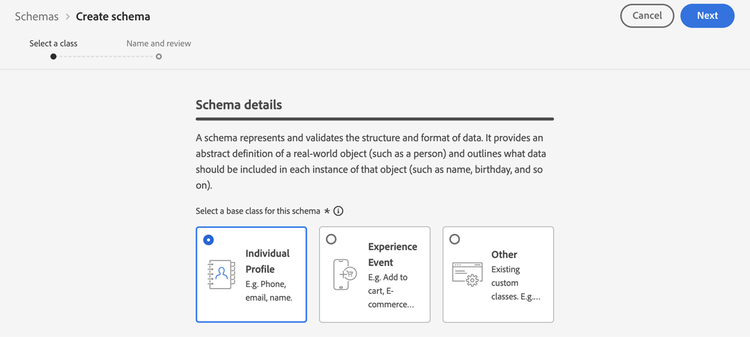
選取結構描述型別,例如個別設定檔,然後按一下下一步。
-
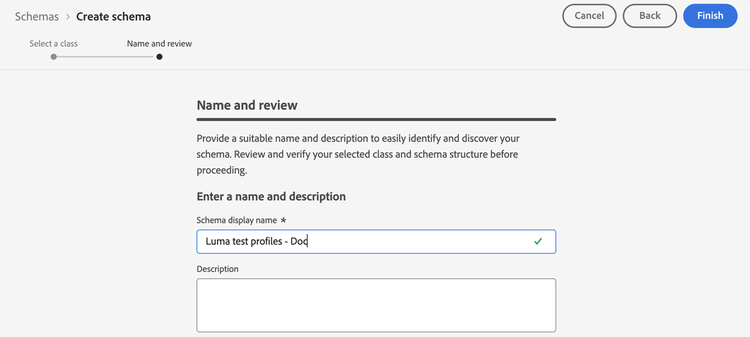
輸入結構描述的名稱,然後按一下完成。
-
在 欄位群組 區段中,按一下左側的 新增 並選取適當的欄位群組。 請確定您已新增 設定檔測試詳細資料 欄位群組。
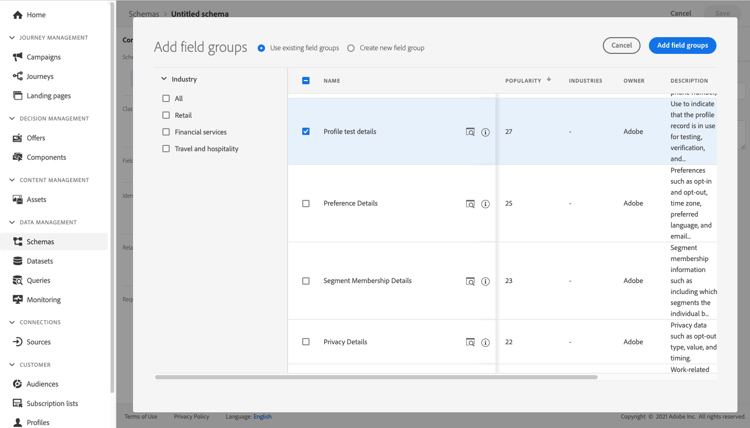
完成後,按一下新增欄位群組:欄位群組清單會顯示在結構描述概觀畫面上。
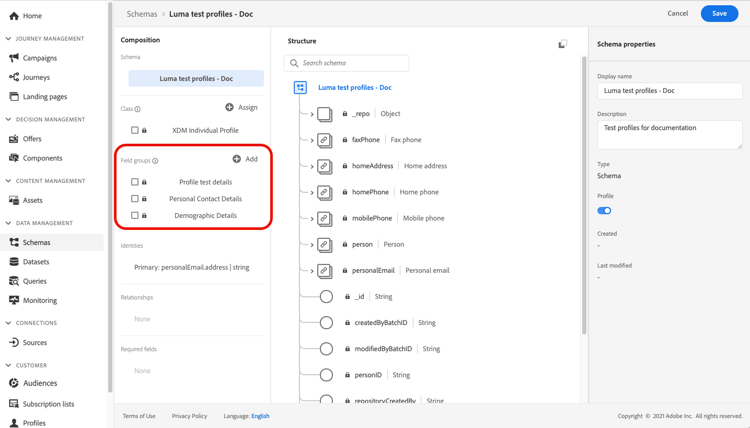
note NOTE 按一下結構描述的名稱以更新其屬性。 -
在欄位清單中,按一下要定義為主要身分的欄位。
用於選取主要身分的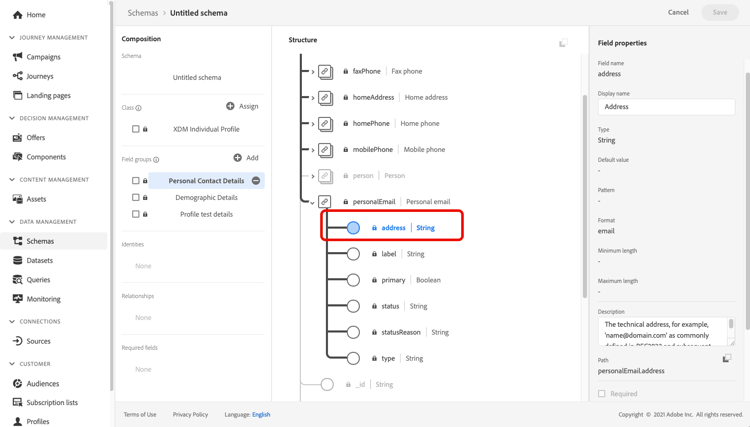
-
在 欄位屬性 右側窗格中,檢查 身分 和 主要身分 選項,並選取名稱空間。 如果您希望主要身分識別是電子郵件地址,請選擇 電子郵件 名稱空間。 按一下套用。
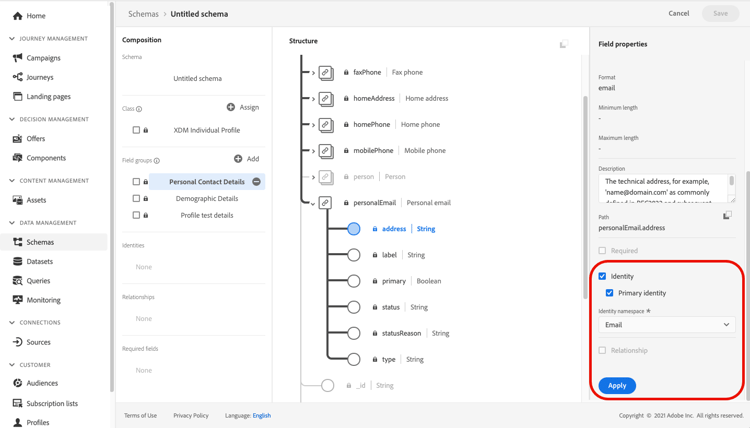
-
選取結構描述並啟用 結構描述屬性 窗格中的 設定檔 選項。
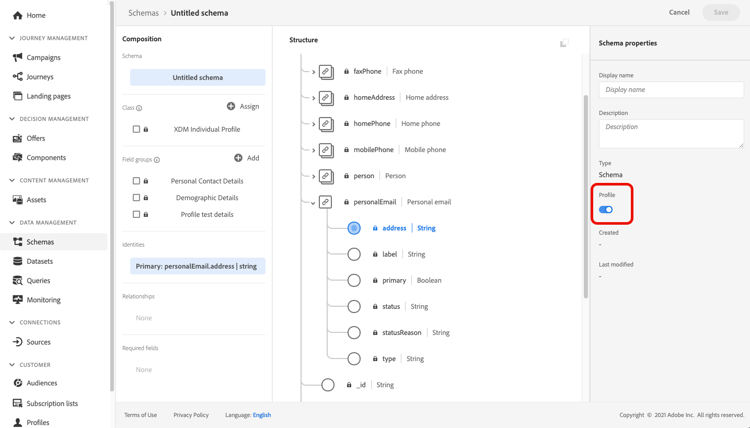
-
按一下儲存。
如需建立結構描述的詳細資訊,請參閱XDM檔案。
/personID)的正確身分描述項。 如果身分描述項遺失或設定不正確,即使擷取程式成功完成,擷取至此資料集的設定檔可能不會標示為測試設定檔(testProfile = true)。- 檢閱與資料集相關聯的結構描述。
- 確認主要身分欄位具有適用於您名稱空間的正確身分描述項(請參閱上述步驟6至7)。
- 如果缺少描述項,請更新結構描述以新增身分描述項並重新內嵌資料。
建立資料集 create-dataset
然後,您需要建立將匯入設定檔的資料集。 請依照下列步驟操作:
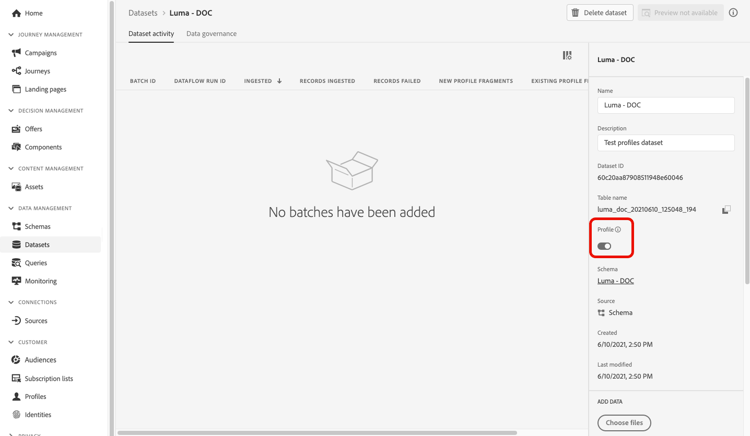
- 瀏覽至資料集,然後按一下建立資料集。
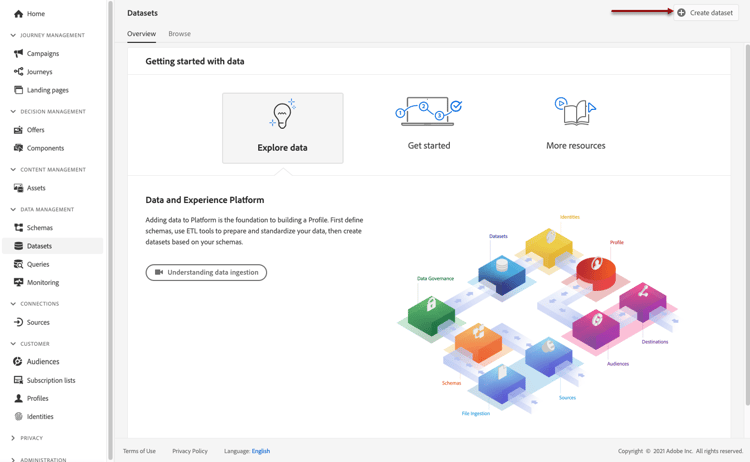
- 選擇從結構描述建立資料集。
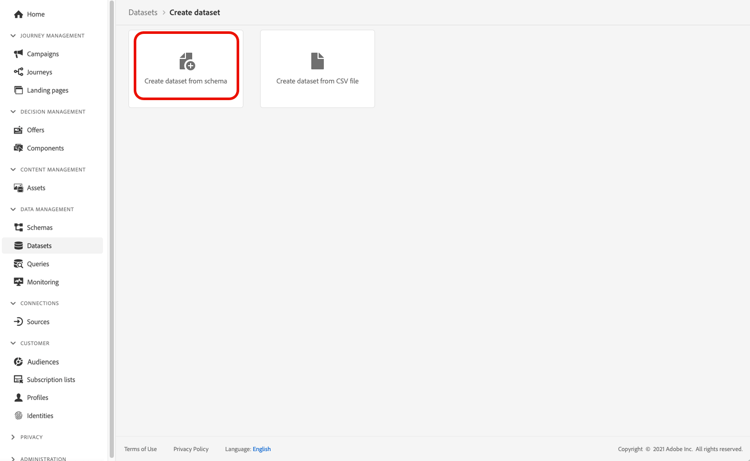
- 選取先前建立的結構描述,然後按一下下一步。
用於建立資料集的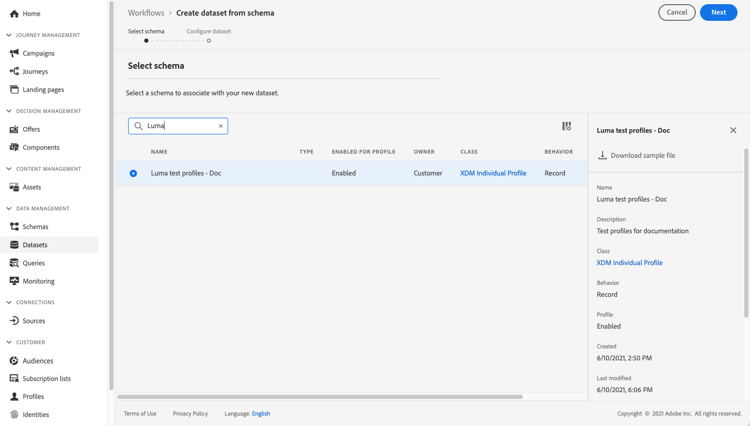
- 選擇名稱,然後按一下完成。
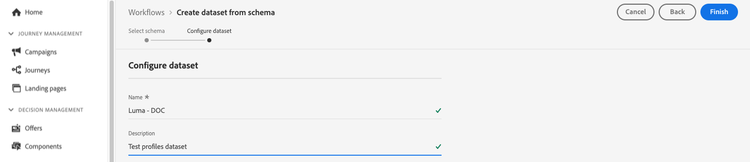
- 啟用 設定檔 選項。
產品內使用案例 use-case-1
從Adobe Journey Optimizer首頁,您可以利用產品使用案例中的測試設定檔。 此使用案例有助於建立測試設定檔,用於在發佈前測試歷程。
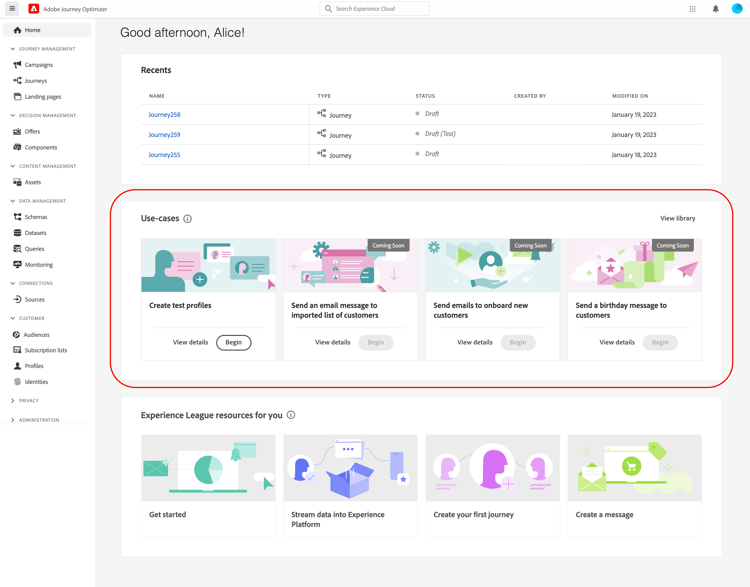
按一下 開始 按鈕以開始使用案例。
需要下列資訊:
-
身分名稱空間:用來唯一識別測試設定檔的身分名稱空間。 例如,如果使用電子郵件來識別測試設定檔,則應選取身分名稱空間電子郵件。 如果唯一識別碼是電話號碼,則應該選取識別名稱空間電話。
-
CSV檔案:包含要建立之測試設定檔清單的逗號分隔檔案。 使用案例需要預先定義的CSV檔案格式,其中包含要建立的測試設定檔清單。 檔案中的每一列應包括下列正確順序的欄位:
- 人員ID:測試設定檔的唯一識別碼。 此欄位的值應該反映選取的身分名稱空間。 (例如,如果為身分名稱空間選取電話,則此欄位的值應為電話號碼。 同樣地,如果選取電子郵件,則此欄位的值應為電子郵件)
- 電子郵件地址:測試設定檔電子郵件地址。 (人員ID欄位和 電子郵件地址 欄位可能包含相同的值,如果選取 電子郵件 做為身分名稱空間)
- 名字:測試設定檔名字。
- 姓氏:測試設定檔姓氏。
- 城市:測試設定檔居住城市
- 國家/地區:測試設定檔居住國家/地區
- 性別:測試設定檔性別。 可用的值為男性、女性和非指定
選取身分名稱空間並根據上述格式提供CSV檔案後,請選取右上方的 執行 按鈕。 使用案例可能需要幾分鐘才能完成。 一旦使用案例完成處理和建立測試設定檔,就會傳送通知以通知使用者。
使用CSV檔案建立測試設定檔 create-test-profiles-csv
在Adobe Experience Platform中,您可以上傳包含不同設定檔欄位的csv檔案來建立設定檔。 這是最簡單的方法。
- 使用試算表軟體建立簡單的csv檔案。
- 為每個必要欄位新增一欄。 請確定您新增主要身分欄位(以上範例中為
personID),且testProfile欄位設為true。
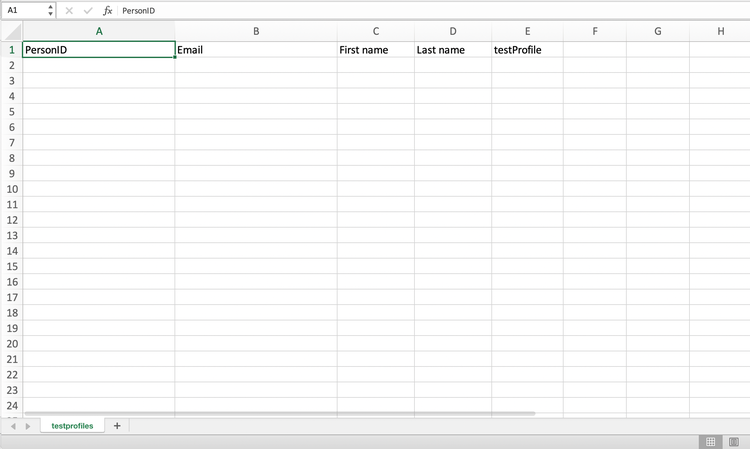
- 為每個設定檔新增一行,並填寫每個欄位的值。
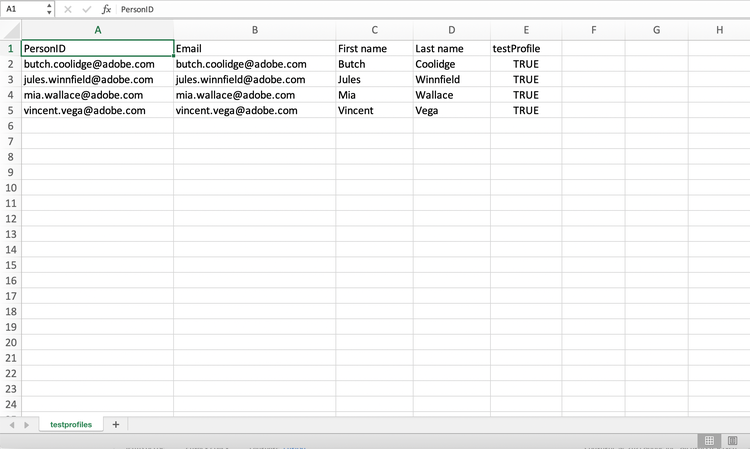
- 將試算表儲存為csv檔案。 請務必使用逗號做為分隔符號。
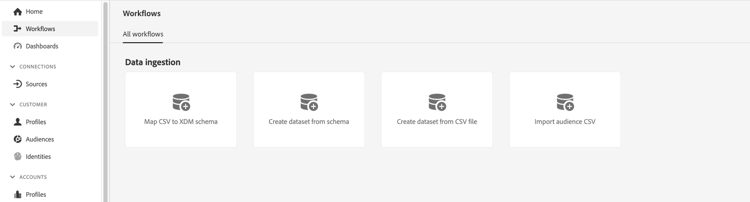
- 瀏覽至Adobe Experience Platform 工作流程。
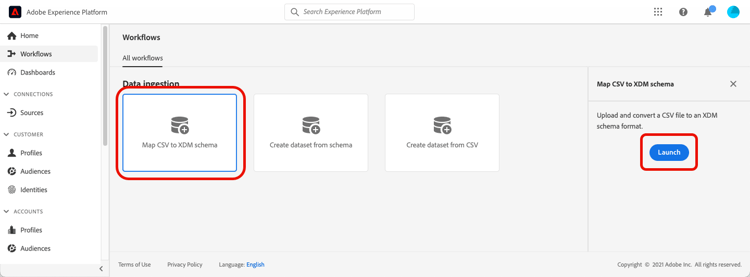
- 選擇將CSV對應到XDM結構描述,然後按一下啟動。
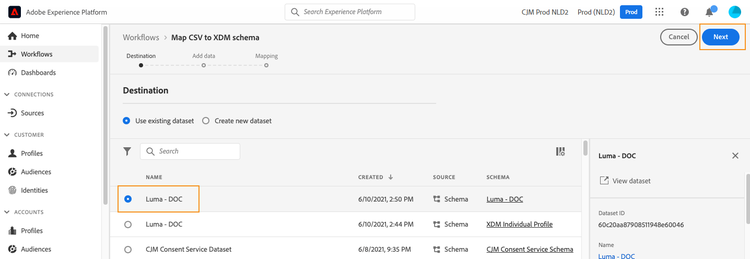
- 選取您要將設定檔匯入的資料集。 按一下下一步。
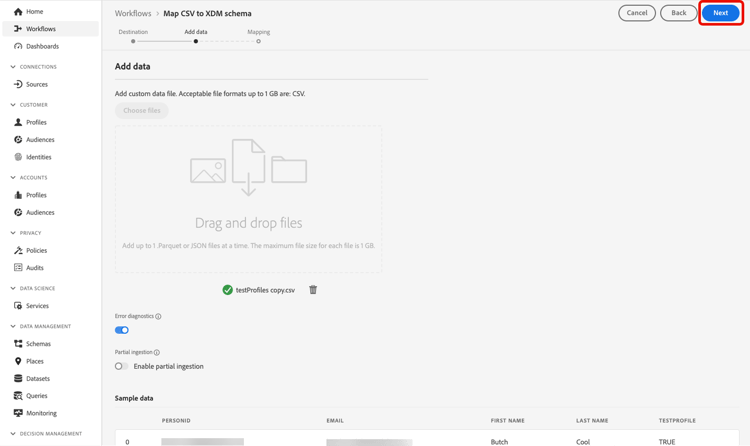
- 按一下 選擇檔案 並選取您的csv檔案。 上傳檔案時,按一下下一步。
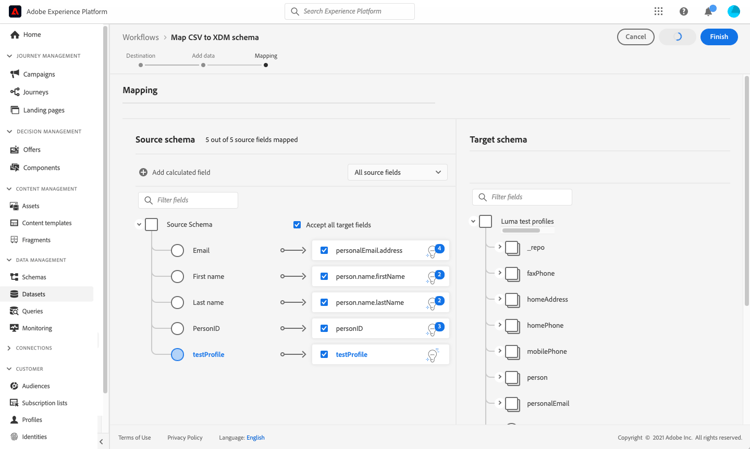
- 將來源csv欄位對應到結構描述欄位,然後按一下完成。
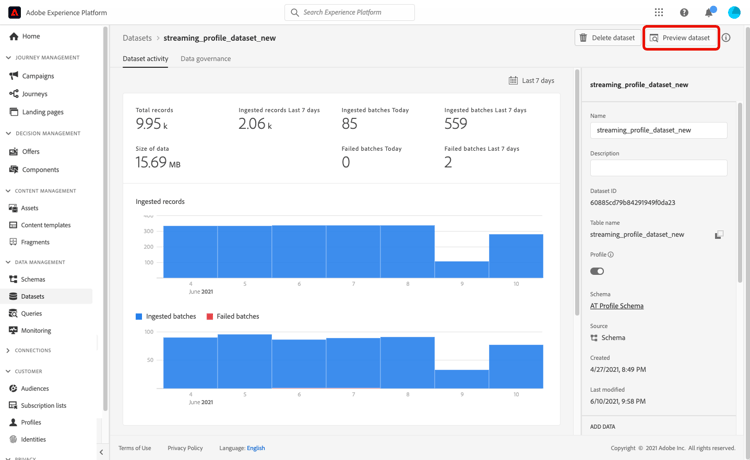
- 資料匯入隨即開始。 狀態將從 處理 移至成功。 按一下右上角的預覽資料集。
- 檢查測試設定檔是否已正確新增。
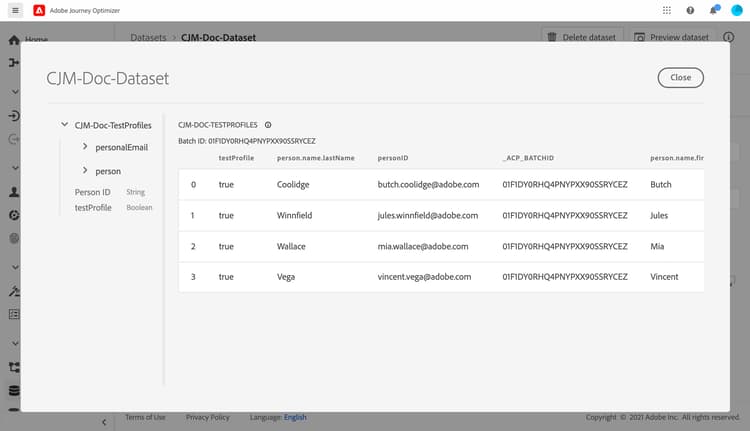
您的測試設定檔已新增,現在可用於測試歷程。 請參閱本節。
使用API呼叫建立測試設定檔 create-test-profiles-api
您也可以透過API呼叫建立測試設定檔。 在Adobe Experience Platform 檔案中瞭解更多。
您必須使用包含 設定檔測試詳細資料 欄位群組的設定檔結構描述。 testProfile旗標是此欄位群組的一部分。
建立設定檔時,請務必傳遞值: testProfile = true。
您也可以更新現有的設定檔,將其testProfile標幟變更為true。
以下為建立測試設定檔的API呼叫範例:
curl -X POST \
'https://dcs.adobedc.net/collection/xxxxxxxxxxxxxx' \
-H 'Cache-Control: no-cache' \
-H 'Content-Type: application/json' \
-H 'Postman-Token: xxxxx' \
-H 'cache-control: no-cache' \
-H 'x-api-key: xxxxx' \
-H 'x-gw-ims-org-id: xxxxx' \
-d '{
"header": {
"msgType": "xdmEntityCreate",
"msgId": "xxxxx",
"msgVersion": "xxxxx",
"xactionid":"xxxxx",
"datasetId": "xxxxx",
"imsOrgId": "xxxxx",
"source": {
"name": "Postman"
},
"schemaRef": {
"id": "https://example.adobe.com/mobile/schemas/xxxxx",
"contentType": "application/vnd.adobe.xed-full+json;version=1"
}
},
"body": {
"xdmMeta": {
"schemaRef": {
"contentType": "application/vnd.adobe.xed-full+json;version=1"
}
},
"xdmEntity": {
"_id": "xxxxx",
"_mobile":{
"ECID": "xxxxx"
},
"testProfile":true
}
}
}'
作法影片 video
瞭解如何建立測試設定檔。
This section contains structured knowledge intended to support interpretation, retrieval, and question answering related to this topic.
For complete understanding, this information should be combined with the documentation on this page. Neither source is intended to stand alone; the page describes the feature, while this section provides additional context that helps disambiguate terminology, intent, applicability, and constraints.
- TL;DR: This page explains how to create test profiles by uploading a CSV file, using API calls, or the in-product use case, including the schema and dataset prerequisites, so you can preview content and test journeys in Journey Optimizer.
Intents:
- Set up the schema (with the Profile test details field group) and dataset prerequisites for test profiles
- Create test profiles by uploading a CSV file using the Map CSV to XDM schema workflow
- Create test profiles using API calls
- Use the in-product use case to generate test profiles from a predefined CSV format
- Flag profiles as test profiles by setting the
testProfilefield totrue
Glossary:
- Test profile: A profile flagged with
testProfile = true, required for using test mode in a journey and for previewing and testing content (product-specific) - Profile test details: The field group that must be added to the schema; the
testProfileflag is part of this field group (product-specific) - Simulate content: The action to test content variations with sample input data or AI auto-generation (product-specific)
- Simulate content (AEP profiles): The option selected from the Simulate content dropdown to preview content with test profiles (product-specific)
- In-product use case: A use case available from the Journey Optimizer home page that facilitates the creation of test profiles used for testing journeys before publishing, from a predefined CSV format (product-specific)
- Identity namespace: The namespace (for example Email or Phone) used to uniquely identify the test profiles (product-specific)
Guardrails:
- Test profiles are required when using test mode in a journey and to preview and test content.
- To create profiles you must first create a schema and a dataset; the schema must include the Profile test details field group.
- The schema must have the correct identity descriptor applied to the primary identity field for the intended namespace; if it is missing or incorrectly configured, ingested profiles may not be flagged as test profiles (
testProfile = true) even if ingestion completes successfully. - When creating a profile via CSV or API, the
testProfilefield must be set totrue. - Test profiles may override existing profiles; before running the in-product use case, ensure the CSV contains test profiles only and that it is executed against the correct sandbox.
- The in-product use case expects a predefined CSV format with fields in this order: Person Id, Email Address, First Name, Last Name, City, Country, Gender (available values male, female, non_specified).
Terminology:
- Canonical name: Test profile — Acronym: n/a — variants: test profiles
- Synonyms: “
testProfileflag” = “testProfilefield” - Do not confuse: “Simulate content” (sample input data or AI auto-generation) ≠ “Simulate content (AEP profiles)” (preview with test profiles)
FAQ:
- Q: What are the ways to create test profiles? — By uploading a CSV file, using API calls, or the in-product use case.
- Q: What must the schema include? — The Profile test details field group, which contains the
testProfileflag. - Q: Why are my ingested profiles not flagged as test profiles? — The primary identity field may be missing the correct identity descriptor for your namespace; review the schema, confirm the descriptor, and re-ingest the data.
- Q: How do I mark a profile as a test profile? — Set the
testProfilefield totruewhen creating (or updating) the profile. - Q: What should I check before running the in-product use case? — That the CSV contains test profiles only and that it runs against the correct sandbox, since test profiles may override existing profiles.