このページ:キャンペーンやジャーニーにダイレクトメールメッセージを追加し、抽出ファイルを設定します。これにより、ダイレクトメールプロバイダーは、顧客への送信に必要なパーソナライズされたデータを使用できます。
ダイレクトメールメッセージを作成するには、スケジュール済みキャンペーンまたはジャーニーを作成し、抽出ファイルを設定します。 このファイルは、ダイレクトメールプロバイダーが顧客にメールを送信するために必要です。
- ファイルのルーティング設定:抽出ファイルをアップロードして保存するサーバーを指定します。
- ダイレクトメールメッセージ設定:ファイルのルーティング設定を参照します。
ダイレクトメールメッセージの追加 create-dm-campaign
キャンペーンまたはジャーニーにダイレクトメールメッセージを追加する方法については、以下のタブを参照してください。
-
ジャーニーを開き、パレットの「アクション」セクションから ダイレクトメール アクティビティをドラッグ&ドロップします。
-
メッセージに関する基本情報(ラベル、説明、カテゴリ)を入力したあと、使用するメッセージ設定を選択します。 設定フィールドはデフォルトで、ユーザーがチャネルで最後に使用した設定で事前入力されます。 ジャーニーの設定方法について詳しくは、このページを参照してください。
-
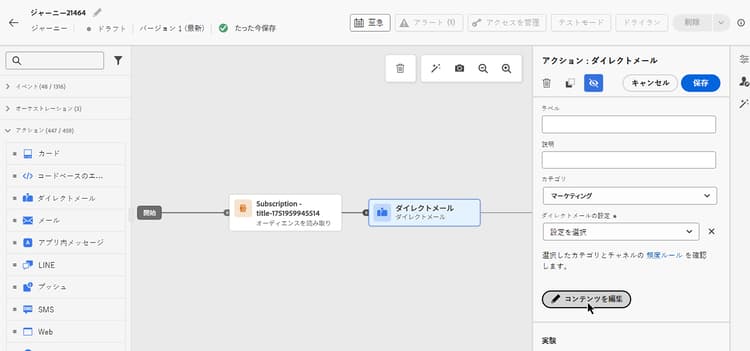
ダイレクトメールプロバイダーに送信する抽出ファイルを設定します。 これを行うには、「コンテンツを編集」ボタンをクリックします。
-
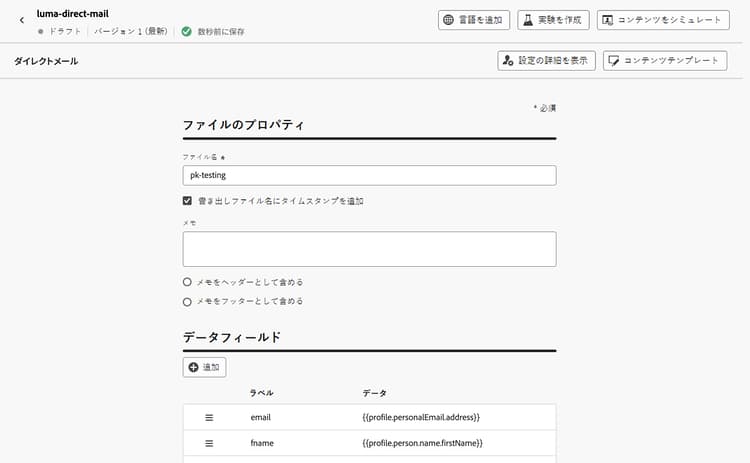
ファイル名や表示する列など、抽出ファイルのプロパティを調整します。 抽出ファイルのプロパティの設定方法について詳しくは、ダイレクトメールメッセージの作成の節を参照してください。
-
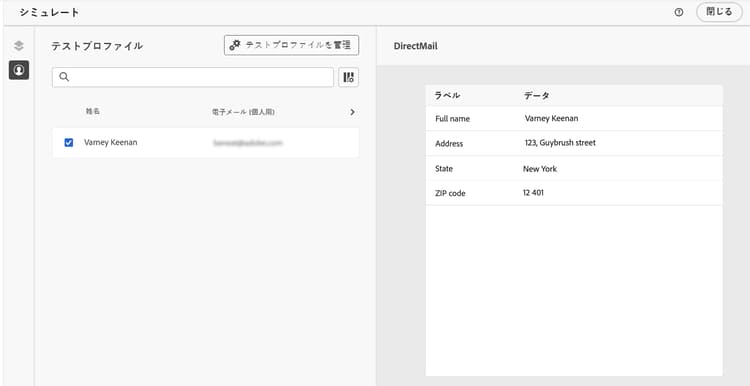
抽出ファイルのコンテンツを定義したら、コンテンツをシミュレートを使用してプレビューします。 コンテンツのプレビューとテストの方法の詳細情報
抽出ファイルの準備が整ったら、ジャーニーの設定を完了させて送信します。
| note |
|---|
| NOTE |
| ジャーニーダイレクトメール抽出ファイルは、ファイルのルーティング頻度に従って生成される。 プロファイルは、ダイレクトメール アクティビティに到達した後、次の書き出しに含まれます。 24時間未満の頻度では、プロファイルは異なる書き出しウィンドウに到達し、1日に複数のファイルを生成できます。 1日に1つのファイルを確保するには、24時間のルーティング頻度を使用します。 詳しくは、書き出しのタイミングとファイル生成についてを参照してください。 |
-
キャンペーンメニューにアクセスし、「キャンペーンを作成」をクリックします。
-
キャンペーンのタイプとして スケジュール済み - マーケティング を選択します。
-
「プロパティ」セクションで、キャンペーンの「タイトル」と「説明」を編集します。
-
ターゲットオーディエンスを定義するには、「オーディエンスを選択」ボタンをクリックして、使用可能な Adobe Experience Platform オーディエンスから選択します。 学習を増やす。
note NOTE オーディエンス選択は、最大1億件のプロファイルをサポートします。 -
「ID 名前空間」フィールドで、選択したオーディエンス内の個人を識別するために適した名前空間を選択します。 詳細情報
-
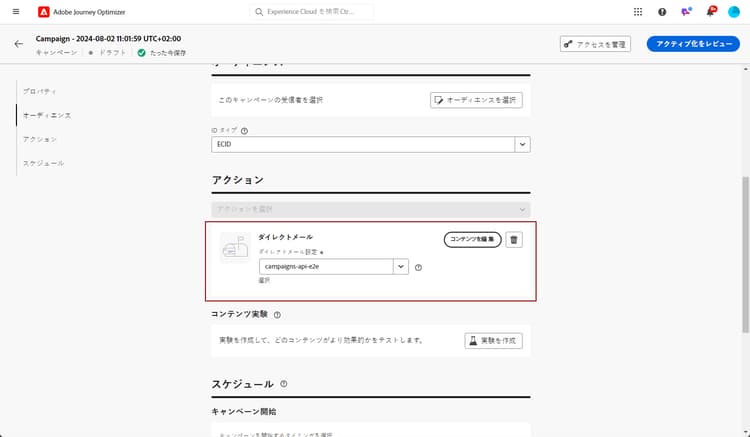
「アクション」セクションで、「ダイレクトメール」を選択します。
-
使用する ダイレクトメール設定 を選択または作成します。 ダイレクトメール設定の作成方法について詳しくは、こちらを参照してください。
note availability AVAILABILITY ダイレクトメールは、ホールドアウト機能をサポートしていますが、現在、処理はサポートしていません。 実験の操作方法の詳細情報 -
キャンペーンは特定の日付にスケジュールすることも、定期的に繰り返すように設定することもできます。 キャンペーンの スケジュール を設定する方法については、この節を参照してください。
これで、ダイレクトメールプロバイダーに送信する抽出ファイルの設定を開始できます。
| note |
|---|
| NOTE |
| キャンペーンのダイレクトメール抽出ファイルは、キャンペーンの開始時に生成されます。 繰り返しキャンペーンの場合、キャンペーン実行ごとにファイルが生成されます。 |
抽出ファイルの設定 extraction-file
抽出ファイルは、ダイレクトメールプロバイダーが顧客にメールを送信するために必要です。 抽出ファイルの設定を定義するには、次の手順に従います。
-
キャンペーンまたはジャーニーの設定画面で、「コンテンツを編集」ボタンをクリックして、抽出ファイルのコンテンツを設定します。
-
ダイレクトメールメッセージに決定ポリシーを追加するには、「データフィールド」セクションで列を選択し、

note availability AVAILABILITY ダイレクトメールのエクスペリエンス決定は新しい機能です。 以前は、ダイレクトメール抽出ファイルでは決定エンジンを使用できませんでした。決定ポリシーを追加し、決定項目の属性を列データとしてエクスポートに含めることができるようになりました。 ダイレクトメールでの決定ポリシーの追加方法の詳細情報。 バッチ決定ワークフローと例(パーソナライズされたダイレクトメールまたはダウンストリームシステムへのエクスポート)について詳しくは、ダイレクトメールでのバッチ決定を参照してください。
-
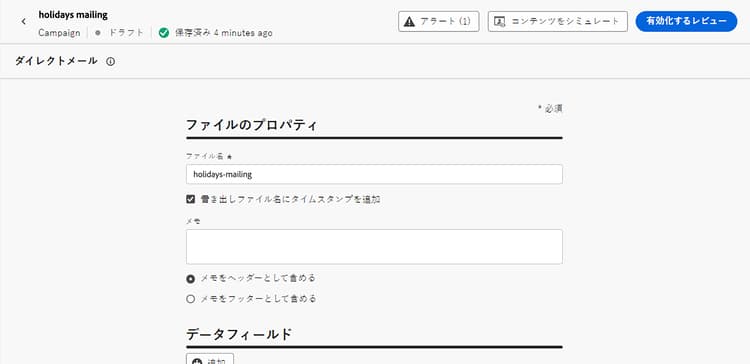
次のように、抽出ファイルのプロパティを調整します。
-
「ファイル名」フィールドで、抽出ファイルの名前を指定します。
note NOTE デフォルトでは、ファイルはサーバーのルートディレクトリに書き込まれます。 また、「ファイル名」フィールドでは、「/your/path/here/Filename.csv」という形式も受け入れられます。指定したパスは、選択したサーバー上のターゲットディレクトリです。 -
指定したファイル名に自動タイムスタンプを付加する場合は、「エクスポートファイル名にタイムスタンプを追加」オプションを有効にします。
-
抽出ファイルの先頭または末尾に情報を追加することが必要になる場合があります。 その場合は、「メモ」フィールドを使用して、メモをヘッダーまたはフッターとして含めるかどうかを指定します。
-
-
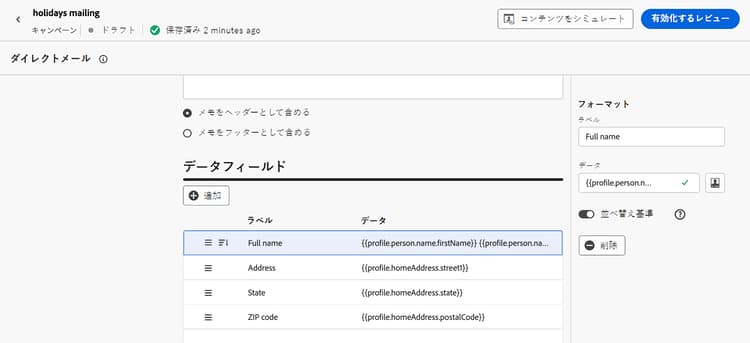
抽出ファイルに表示する列と情報を設定します。
-
「追加」ボタンをクリックして、新しい列を作成します。
-
右側に フォーマット パネルが表示され、選択した列をセットアップできます。 列の「ラベル」を指定します。
各列には ラベル が必要です。
-
「データ」フィールドで、パーソナライゼーションエディターを使用して、表示するプロファイル属性を選択します。
-
列を使用して抽出ファイルを並べ替えるには、列を選択し、「並べ替え基準」オプションの切替スイッチをオンにします。 「データフィールド」セクションで、列のラベルの横に 並べ替え基準 アイコンが表示されます。
-
これらの手順を繰り返して、抽出ファイルに必要な数の列を追加します。 なお、追加できる列数は最大 50 です。
列の位置を変更するには、「データフィールド」セクションで、目的の位置に列をドラッグ&ドロップします。 列を削除するには、列を選択し、フォーマットパネルの「削除」ボタンをクリックします。
-
これで、ダイレクトメールメッセージをテストし、オーディエンスに送信できるようになりました。 ダイレクトメールメッセージのテストおよび送信の方法についてはこちらを参照
関連トピック related-topics
ダイレクトメールに関するよくある質問について詳しくは、ダイレクトメールの基本を学ぶを参照してください。
This section contains structured knowledge intended to support interpretation, retrieval, and question answering related to this topic.
For complete understanding, this information should be combined with the documentation on this page. Neither source is intended to stand alone; the page describes the feature, while this section provides additional context that helps disambiguate terminology, intent, applicability, and constraints.
- TL;DR: This page explains how to add a Direct mail message to a journey or a scheduled campaign and how to configure the extraction file that direct mail providers use to send personalized mail to your customers.
Intents:
- Add an Action activity from the Actions palette to a journey and select the Direct mail channel
- Choose Direct mail in the Actions section of a Scheduled - Marketing campaign
- Configure the extraction file properties, such as filename, timestamp, and header or footer notes
- Add and format the columns (Data Fields) displayed in the extraction file
- Add decision policies and include decision item attributes as column data
- Preview the extraction file with Simulate content
Glossary:
- Direct mail message: A message added to a journey or a Scheduled - Marketing campaign, for which you configure the extraction file that your direct mail provider requires to send mail to your customers (product-specific)
- Extraction file: The file, configured with a filename and columns, that direct mail providers require to send mail to your customers (product-specific)
- Edit content: The button that opens the editor used to configure the extraction file content (product-specific)
- Data Fields: The section where columns and the information displayed in the extraction file are added and configured (product-specific)
- Simulate content: The option used to preview the extraction file once its content has been defined (product-specific)
- Decision policy: A decision policy inserted through the personalization editor, whose decision item attributes can be used as column data in the extraction file (product-specific)
Guardrails:
- Before creating a direct mail message, a file routing configuration and a direct mail message configuration must already exist.
- In a campaign, audience selection supports up to 100 million profiles.
- You can add up to 50 columns to the extraction file.
- Each column in the extraction file must have a Label.
- Direct Mail supports the Holdout functionality but does not currently support Treatments.
- Journey direct mail extraction files are generated according to the file routing frequency; profiles are included in the next export after they reach the Direct mail node. With a frequency shorter than 24 hours, profiles can arrive in different export windows and produce multiple files during a day; a 24-hour routing frequency produces one file per day.
- Campaign direct mail extraction files are generated when the campaign starts; for recurring campaigns, a file is generated for each campaign execution.
- Decision policies in direct mail are a new capability; previously, direct mail extraction files could not use the Decisioning engine.
Terminology:
- Canonical name: Direct mail message — Acronym: n/a
- Do not confuse: “Holdout” (supported) ≠ “Treatments” (not currently supported)
- Do not confuse: “file routing configuration” ≠ “direct mail configuration”
FAQ:
- Q: How do I add a direct mail message? — Add an Action activity to a journey and select the Direct mail channel, or select Direct mail in a Scheduled - Marketing campaign, then choose or create a direct mail configuration.
- Q: How many columns can the extraction file contain? — You can add up to 50 columns.
- Q: Does direct mail support Holdout and Treatments? — It supports the Holdout functionality but does not currently support Treatments.
- Q: How do I preview the extraction file? — Use Simulate content once the content of the extraction file has been defined.
- Q: Can I use decision policies in the extraction file? — Yes; select a column in Data Fields, open the personalization editor, create or insert a decision policy, and use decision item attributes as column data.