このページ:開始日と終了日、受信者のタイムゾーン配信、実行頻度、レート制御を設定して、アクションキャンペーンをスケジュールします。これにより、ダウンストリームシステムに負担をかけることなく、適切なタイミングで適切なオーディエンスにメッセージを届けることができます。
「スケジュール」タブを使用して、キャンペーンのスケジュールを定義します。
キャンペーン開始日の設定
デフォルトでは、アクションキャンペーンは手動でアクティブ化した後に開始され、メッセージが 1 回送信された直後に終了します。 アクティブ化直後にキャンペーンを実行しない場合は、「キャンペーン開始」セクションで、メッセージを送信する日時を指定できます。
Adobe Journey Optimizer でキャンペーンをスケジュールする場合は、開始日時が目的の最初の配信に合っていることを確認します。 繰り返しキャンペーンで、最初にスケジュールした時間が既に過ぎている場合、キャンペーンは繰り返しルールに従って、次に使用可能な時間スロットに繰り越されます。
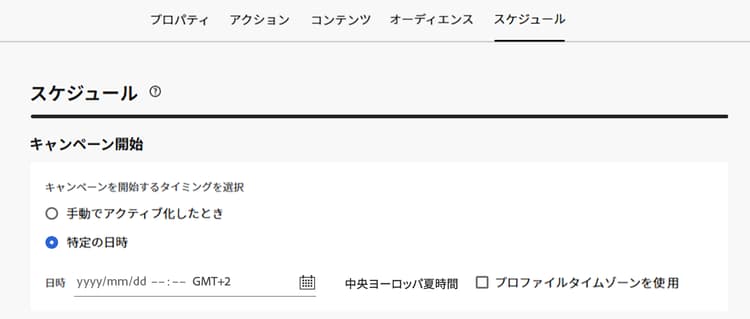
受信者の現地時間に送信 profile-timezone
特定の日時にキャンペーンをスケジュールする場合、各受信者のプロファイルタイムゾーンに基づいてメッセージを送信することを選択できます。 これにより、すべての受信者は、地理的な場所に関係なく、同じローカル時間にメッセージを受信できます。
例えば、プロファイルタイムゾーンを使用して午前 9 時に送信するキャンペーンをスケジュールすると、ニューヨーク(ET)の受信者は午前 9 時(ET)に受信し、ロサンゼルス(PT)の受信者は午前 9 時(PT)に受信します。
プロファイルタイムゾーンスケジュールを有効にするには:
-
「キャンペーン開始」セクションで、メッセージを送信する日時を指定します。
-
「プロファイルタイムゾーンを使用」オプションを有効にします。
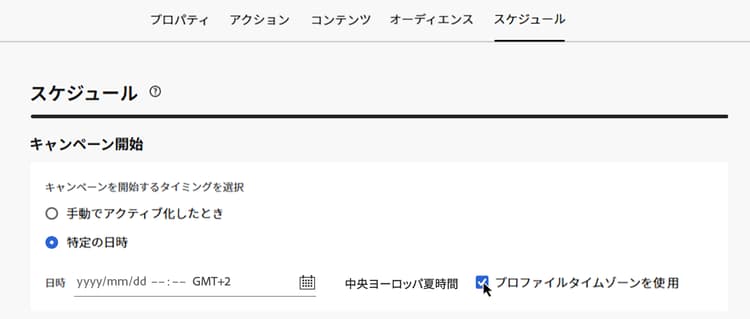
仕組み:
システムは、各受信者の Adobe Experience Platform プロファイルの profile.timeZone フィールドを使用して、ローカルタイムゾーンを判断します。 プロファイルにタイムゾーン値がない場合、キャンペーンを作成したタイムゾーンがフォールバックとして使用されます。
メッセージがすべてのタイムゾーンをまたいで配信されている間、キャンペーンは ライブ ステータスのままです。 すべてのタイムゾーンを処理すると、キャンペーンのステータスが 完了 に変更されます。
サポートされているタイムゾーン識別子:
profile.timeZone の形式には、IANA の命名規則または UTC オフセットによる定義のいずれかを使用できます。 IANA の命名規則は、夏時間ルールに合わせて自動的に調整されるので、推奨される形式です。
IANA の命名規則を使用する場合、識別子は大文字と小文字が区別され、公式の IANA の命名規則と一致する必要があります。 オフセットは、夏時間ルールや履歴の更新により、時間の経過と共に変化する場合があります。 識別子の公式リストについて詳しくは、IANA タイムゾーンデータベース{_blank}を参照してください。
実行頻度の設定
電子メール、モバイルメッセージ、プッシュ通知 アクションの場合、キャンペーンのメッセージを送信する頻度を定義できます。 これを行うには、キャンペーン作成画面にある「アクショントリガー」オプションを使用して、キャンペーンの実行頻度を日単位、週単位または月単位のいずれにするかを指定します。
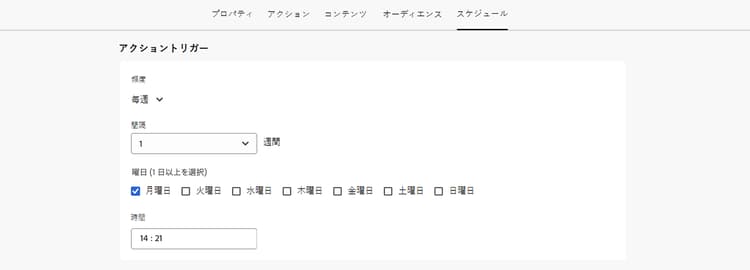
終了日の設定
「キャンペーン終了」セクションでは、キャンペーンの実行を停止するタイミングを指定できます。 指定した日付以外では、キャンペーンは実行されません。
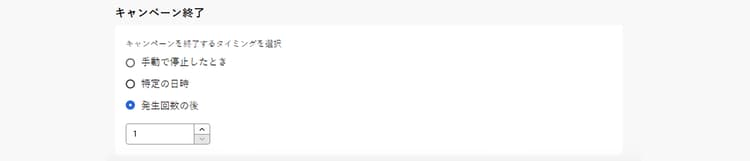
レート制御の設定
Journey Optimizerでは、アウトバウンドアクション(電子メール、モバイルメッセージ、プッシュ通知)のレート制御を有効にできます。
この機能は、ランディングページやカスタマーケアプラットフォームなどのダウンストリームシステムの過負荷を防ぐのに特に役立ちます。 例えば、ダウンストリームシステムに負担をかけずに安定した配信を確保するために、1 秒あたり 165 メッセージのレート制限を設定できます。
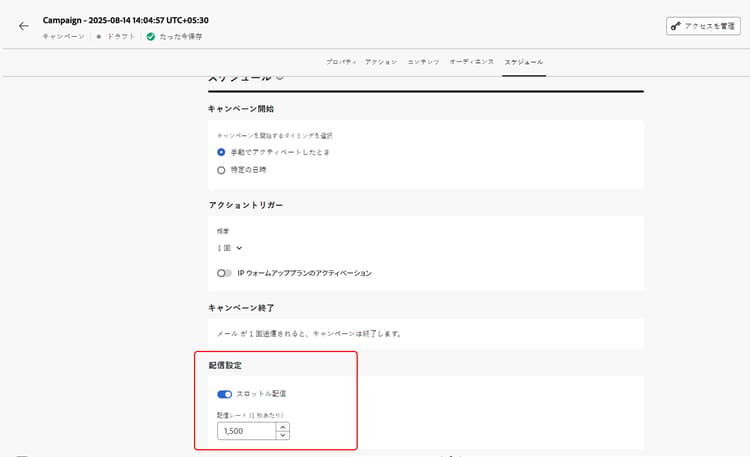
レート制御を設定するには、「配信設定」セクションで「配信をスロットル」オプションを有効にし、1 秒あたりの目的の 配信レート を指定します。
- サポートされる最小配信レート:1 秒あたり 1 件。
- サポートされる最大配信レート:「配信をスロットル」オプションが有効になっている場合、1 秒あたり 2000 件。
ウェーブを使用した送信
キャンペーンメッセージを一度にではなく一括で配信するには、ウェーブ送信を使用します。 これにより、負荷のバランス、配信品質のサポート、ダウンストリームシステム(例:コールセンターやランディングページ)への負担の軽減を実現できます。 ウェーブの数、サイズ(割合または絶対数)、各ウェーブのスケジュールを定義します。
次の手順 next
キャンペーンスケジュールの準備が整ったら、キャンペーンをレビューしてアクティブ化できます。 詳細情報
This section contains structured knowledge intended to support interpretation, retrieval, and question answering related to this topic.
For complete understanding, this information should be combined with the documentation on this page. Neither source is intended to stand alone; the page describes the feature, while this section provides additional context that helps disambiguate terminology, intent, applicability, and constraints.
- TL;DR: This page explains how to schedule an Action campaign in the Schedule tab: start and end dates, recipient local time delivery, execution frequency, rate control, and wave sending.
Intents:
- Set a start date and time with Campaign start
- Send messages at each recipient’s local time with Use profile timezone
- Set a daily, weekly, or monthly execution frequency
- Set an end date with Campaign end
- Set rate control with Throttle delivery
- Deliver the message in batches over time using waves
Glossary:
- Profile timezone: The
profile.timeZonefield of each recipient’s Adobe Experience Platform profile, used to determine their local timezone. (product-specific) - Rate control: Limits the delivery rate for outbound actions to prevent overload on downstream systems. (product-specific)
- Delivery rate: The rate per second set when Throttle delivery is enabled in Delivery settings. (product-specific)
- Waves: Batches in which the campaign message is delivered over time; you define the number of waves, their size (by percentage or absolute number), and the schedule for each wave. (product-specific)
- IP warmup plan activation campaign: A campaign for email actions whose schedule is driven by the IP warmup plan it is associated with. (product-specific)
Guardrails:
- By default, Action campaigns start once they are activated manually, and end as soon as the message has been sent once.
- Outside of the dates specified in Campaign start and Campaign end, the campaign is not executed.
- For recurring campaigns, if the initial scheduled time has already passed, the campaigns roll over to the next available time slot according to their recurrence rules.
- Use profile timezone is available for these outbound channels only: Email, Push, Mobile message, WhatsApp, and LINE.
- If a profile does not have a timezone value, the timezone in which the campaign was created is used as the fallback.
- Time zone identifiers:
profile.timeZonecan be IANA naming or UTC offsets. IANA naming is the preferred format, as it automatically adjusts for daylight-saving rules. IANA identifiers are case-sensitive and must match the official IANA naming. - Execution frequency (daily, weekly, or monthly) is available for Email, Mobile message, and Push notification actions.
- Delivery rate: minimum 1 per second (hard limit); maximum 2000 per second (hard limit) when the Throttle delivery option is enabled. Rate control is available for outbound actions (Email, Mobile messages, Push notifications).
- When a delivery rate is set, the maximum timeframe for which the campaign audience can execute is 12 hours (hard limit). If the delivery rate does not allow all the audience to be sent the message in the 12 hour timeframe, the remaining profiles are excluded from the campaign. The count of excluded profiles is visible in the campaign report.
Terminology:
- Canonical name: Action campaign schedule — variants: campaign schedule
- Synonyms: “Send at recipient’s local time” = “Use profile timezone” (section title and option name)
- Do not confuse: “Live” (status while messages are being delivered across all timezones) ≠ “Completed” (status once all timezones have been processed)
FAQ:
- Q: When does an Action campaign start and end by default? — It starts once it is activated manually, and ends as soon as the message has been sent once.
- Q: How do I send at the same local time for every recipient? — Specify the date and time in Campaign start, then enable Use profile timezone. This is available for Email, Push, Mobile message, WhatsApp, and LINE only.
- Q: What happens if a profile has no timezone value? — The timezone in which the campaign was created is used as the fallback.
- Q: What are the campaign statuses during profile timezone delivery? — The campaign remains in Live status while messages are being delivered across all timezones; when all timezones have been processed, the status changes to Completed.
- Q: Which delivery rates can I set? — From 1 to 2000 per second when Throttle delivery is enabled.
- Q: Why were some profiles excluded from my campaign? — When a delivery rate is set, the maximum timeframe is 12 hours; the remaining profiles are excluded from the campaign if the rate does not allow sending to the whole audience in that timeframe. Their count is in the campaign report.
Examples:
- Profile timezone: a campaign scheduled to send at 9 AM using profile timezone reaches recipients in New York (ET) at 9 AM ET and recipients in Los Angeles (PT) at 9 AM PT.
- Rate control: set a rate limit of 165 messages per second to ensure steady delivery without overwhelming downstream systems.
Related pages:
- IP warmup campaigns: Learn how to create IP warmup campaigns (configuration/ip-warmup-campaign.md)
- IANA identifiers: IANA Time Zone Database (external, https://www.iana.org/time-zones)
- Waves: Learn how to send using waves (delivery/send-using-waves.md)
- Next step, activation: Review and activate an Action campaign (campaigns/review-activate-campaign.md)
Personas:
- marketer: Can set a campaign start date and time in Campaign start, and enable Use profile timezone to send messages at each recipient’s local time. Can set a daily, weekly, or monthly execution frequency for Email, Mobile message, and Push notification actions, and set an end date in Campaign end. Can enable Throttle delivery and set a Delivery rate per second, and send the campaign message in batches using waves. The page states that the Delivery rate ranges from 1 to 2000 per second when Throttle delivery is enabled. Where: “Schedule the Action campaign”.
Onboarding:
- Level: Beginner
- First minimal step: Use the Schedule tab to define the campaign schedule.
- Success check: The campaign status changes to Completed once all timezones have been processed.
- Previous: For email actions associated with an IP warmup plan: Create IP warmup campaigns (configuration/ip-warmup-campaign.md)
- Next: Once your campaign schedule is ready: Review and activate an Action campaign (campaigns/review-activate-campaign.md); To deliver the campaign message in batches over time: Send using waves (delivery/send-using-waves.md)