Activate audiences to batch profile export destinations
- To activate audiences and enable the mapping step of the workflow, you need the View Destinations, Activate Destinations, View Profiles, and View Segments access control permissions.
- To activate audiences without going through the mapping step of the workflow, you need the View Destinations, Activate Segment without Mapping, View Profiles, and View Segments access control permissions.
- To export identities, you need the View Identity Graph access control permission.
Overview overview
This article explains the workflow required to activate audiences in Adobe Experience Platform to batch profile file-based destinations, such as cloud storage and email marketing destinations.
Prerequisites prerequisites
To activate audiences to destinations, you must have successfully connected to a destination. If you haven’t done so already, go to the destinations catalog, browse the supported destinations, and configure the destination that you want to use.
Supported file formats for export supported-file-formats-export
The following file formats are supported when exporting audiences:
- CSV
- JSON
- Parquet
Note that exporting CSV files gives you greater flexibility in terms of how you want to structure your exported files. Read more about file formatting configuration for CSV files.
Select your desired file format for export when creating a connection to the file-based destination.
Select your destination select-destination
-
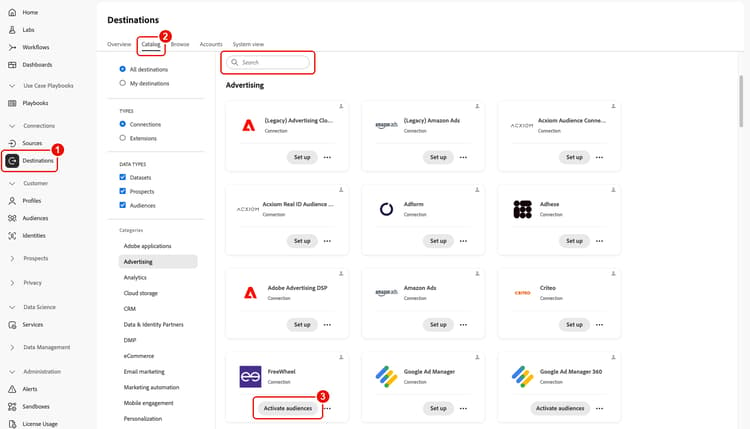
Select Destinations in the left navigation, select the Catalog tab, then select Activate audiences on the card corresponding to the destination where you want to activate your audiences.
(Optional) Search for your destination by name instead of browsing the full catalog.
-
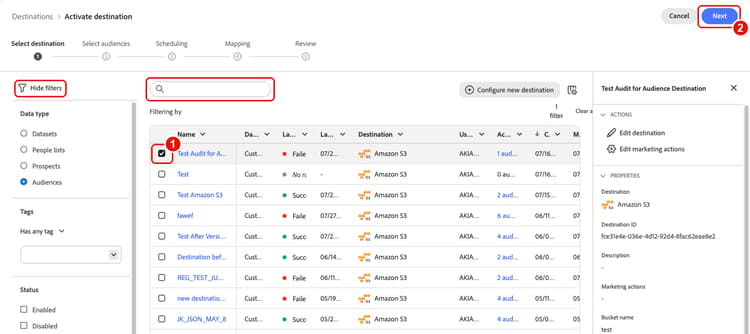
Select the checkbox next to the destination connection that you want to use to activate your audiences, then select Next.
(Optional) Use the search box to find a destination connection by name, or select the filter icon to show the filters panel and narrow down the results based on your preferred criteria.
-
Move to the next section to select your audiences.
Select your audiences select-audiences
-
Select the checkbox next to the audiences that you want to activate to the destination, then select Next.
(Optional) Use the search box to find an audience by name, or select the filter icon to narrow down the results by evaluation type (edge, streaming, or batch), namespace origin, or tags.
note tip TIP You can filter by the same tags you use on the audience browse screen. Any tags you added to an audience there carry over to this screen. 
You can select from multiple types of audiences, depending on their origin:
- Segmentation Service: Audiences generated within Experience Platform by the Segmentation Service. See the segmentation documentation for more details.
- Custom upload: Audiences generated outside of Experience Platform, and uploaded into Experience Platform as CSV files. To learn more about external audiences, see the documentation on importing an audience. Selecting audiences originating from Custom uploads automatically enables the Select enrichment attributes step.
- Other types of audiences, originating from other Adobe solutions, such as Audience Manager.
Schedule audience export scheduling
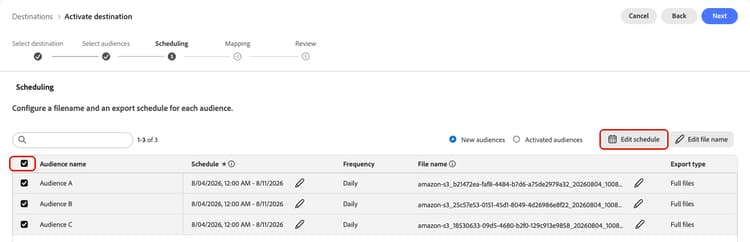
Adobe Experience Platform exports data for email marketing and cloud storage destinations as different file types. In the Scheduling page, you can configure the schedule and the file names for each audience you are exporting.
Use the New audiences and Activated audiences options to switch between two views of this page:
- New audiences: Shows only the audiences that you added to the destination in the current activation flow.
- Activated audiences: Shows the audiences that you activated to the destination in previous activation flows.
Experience Platform automatically sets a default schedule for each file export. You can modify the default schedule according to your needs, by selecting the pencil icon next to each schedule, and defining a custom schedule.
For each audience, choose one of two export types: Export full files or Export incremental files.
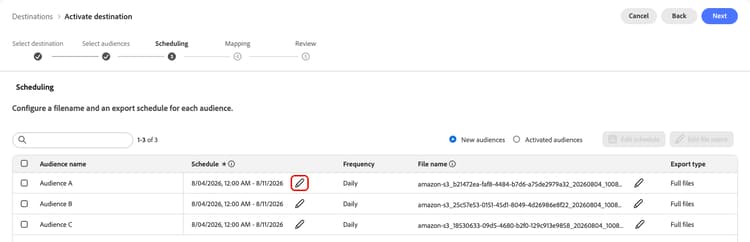
To edit multiple schedules at the same time, select the audiences by using the checkboxes on the left side of the screen, then select Edit schedule. The schedule you configure will then be applied to all the exported files for the selected audiences.
filename.csv, filename_2.csv, filename_3.csv.Export full files export-full-files
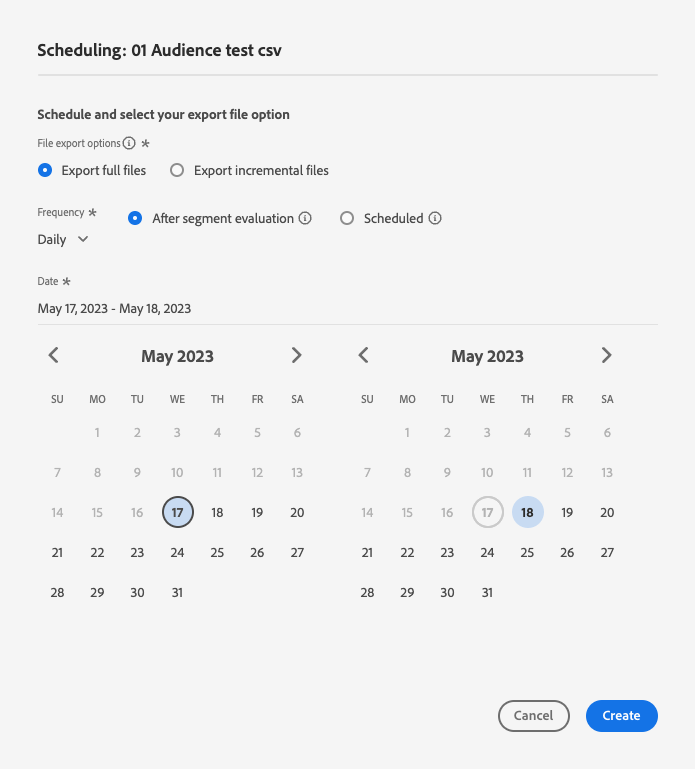
Select Export full files to trigger the export of a file containing a full snapshot of all profile qualifications for the selected audience.
-
Use the Frequency selector to select the export frequency:
- Once: schedule a one time on-demand full file export.
- Daily: schedule full file exports once a day, every day, at the time you specify.
- Weekly: select the start date and subsequent exports will occur on that day of the week until the selected end date.
- Monthly: select the start date and subsequent exports will occur on that date of the month until the selected end date. For months with fewer than 30 or 31 days, the export occurs on the last day of the month.
note NOTE Weekly and monthly scheduling options are currently supported only for the following file-based cloud storage destinations, and only when activating people audiences and prospect audiences. Weekly and monthly scheduling options are not available for other destination types. -
Use the Time toggle to select whether the export should happen immediately after audience evaluation or on a scheduled basis, at a specified time. When selecting the Scheduled option, you can use the selector to choose the time of day, in UTC format, when the export should take place.
Use the After segment evaluation option to have the activation job run immediately after the daily Experience Platform batch segmentation job completes. This option ensures that when the activation job runs, the most up-to-date profiles are exported to your destination. This might result in an audience being exported multiple times a day, based on your actions.
note important IMPORTANT If you run flexible audience evaluation on audiences which are already set to be activated after segment evaluation, the audiences will be activated as soon as the flexible audience evaluation job finishes, regardless of any previous daily activation jobs. This might result in audiences being exported multiple times a day, based on your actions. 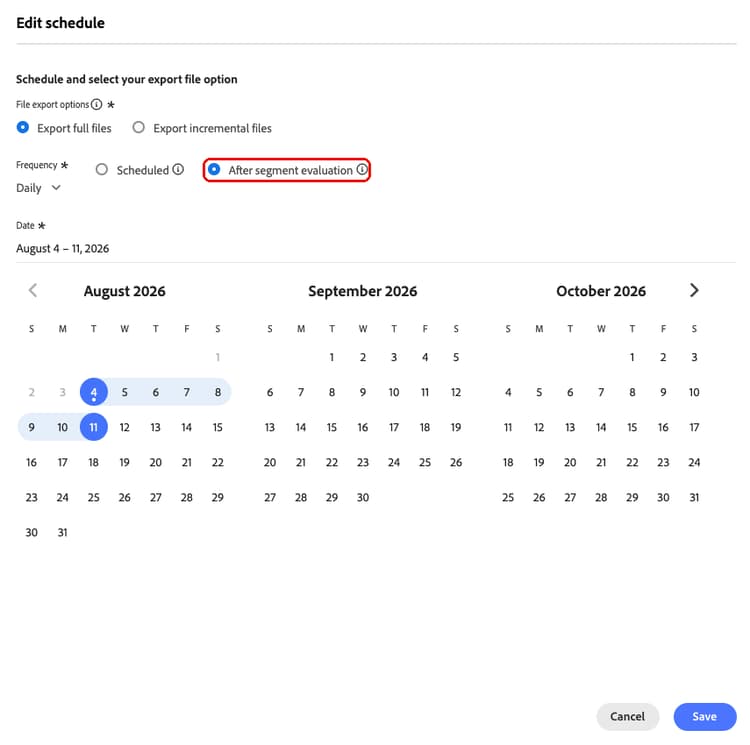
Use the Scheduled option to have the activation job run at a fixed time. This option ensures that Experience Platform profile data is exported at the same time each day. However, the profiles you export may not be the most up to date, depending on whether the batch segmentation job has completed before the activation job kicks off.
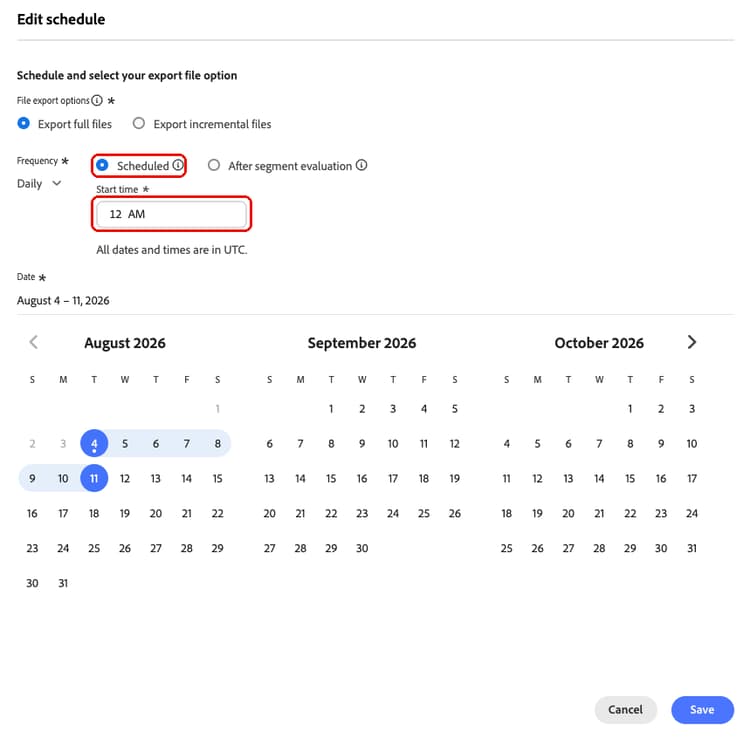
When mapping an audience which was created within the last 24 hours and evaluated through batch segmentation, set your daily export schedule to start the following day at the earliest. This assures that the daily batch evaluation job runs first and you are exporting complete audience data.
When configuring export schedules, set the start time at least 1 hour after completing the activation flow. Audience activations can take up to 1 hour to propagate through the system. If you schedule an export to run sooner than 1 hour after activation, the scheduled export may be missed.
-
Use the Date selector to choose the day or interval when the export should take place. For daily exports, best practice is to set your start and end date to line up with the duration of your campaigns in your downstream platforms.
note important IMPORTANT When selecting an export interval, the last day of the interval is not included in the exports. For example, if you select an interval of January 4 - 11, the last file export will take place on January 10. -
Select Create to save the schedule.
Understanding scheduled export behavior export-behavior
Scheduled exports include audience snapshot data plus any incremental profile or identity changes that occur between snapshot creation and export time. This differs from on-demand exports, which use snapshot data only.
The following table highlights how scheduled exports differ from on-demand exports, particularly in terms of data freshness and intended use:
If profiles get updated after audience evaluation, scheduled exports will include the updated attribute values even though audience membership was determined at evaluation time.
Example: An audience for “profiles where retailID is null” may export profiles with retailID populated if that field was updated after evaluation but before the scheduled export.
Recommendations
- Configure a deduplication key to prevent duplicate records
- Use on-demand exports for exact snapshot-based data
- Align batch ingestion with evaluation schedules to minimize discrepancies
For on-demand exports, see the documentation on exporting files on-demand.
Export incremental files export-incremental-files
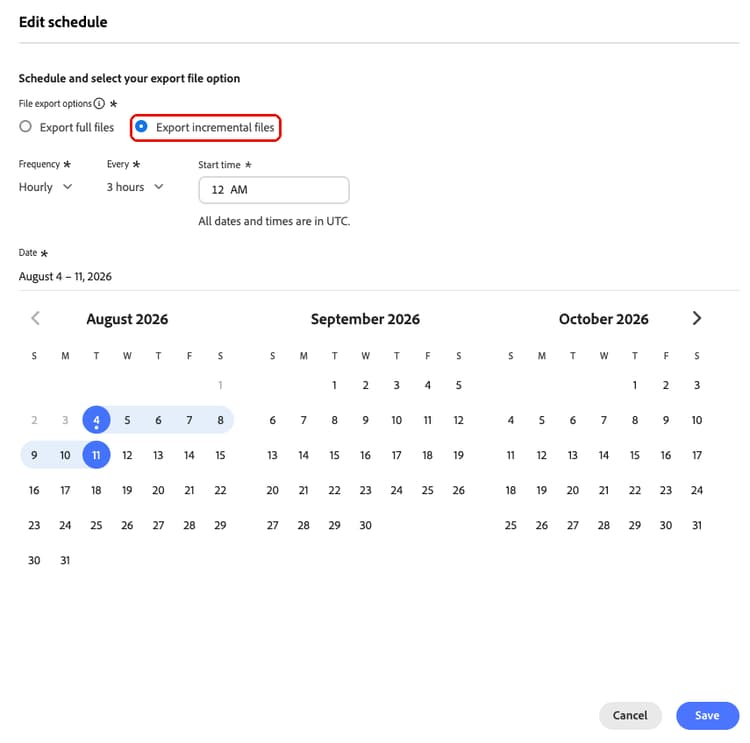
Select Export incremental files to trigger an export where the first file is a full snapshot of all profile qualifications for the selected audience, and subsequent files are incremental profile qualifications since the previous export.
-
Use the Frequency selector to select the export frequency:
- Daily: schedule incremental file exports once a day, every day, at the time you specify.
- Hourly: schedule incremental file exports every 3, 6, 8, or 12 hours.
-
Use the Time selector to choose the time of day, in UTC format, when the export should take place.
-
Use the Date selector to choose the interval when the export should take place. Best practice is to set your start and end date to line up with the duration of your campaigns in your downstream platforms.
note important IMPORTANT The last day of the interval is not included in the exports. For example, if you select an interval of January 4 - 11, the last file export will take place on January 10. -
Select Create to save the schedule.
Configure file names configure-file-names
For most destinations, the default file names consist of destination name, audience ID, and a date and time indicator. For example, you can edit your exported file names to distinguish between different campaigns or to have the data export time appended to the files. Note that some destination developers might select to have different default file name append options shown for their destinations.
To open a modal window and edit the file names, select the pencil icon. File names are limited to 255 characters.

In the file name editor, you can select different components to add to the file name.
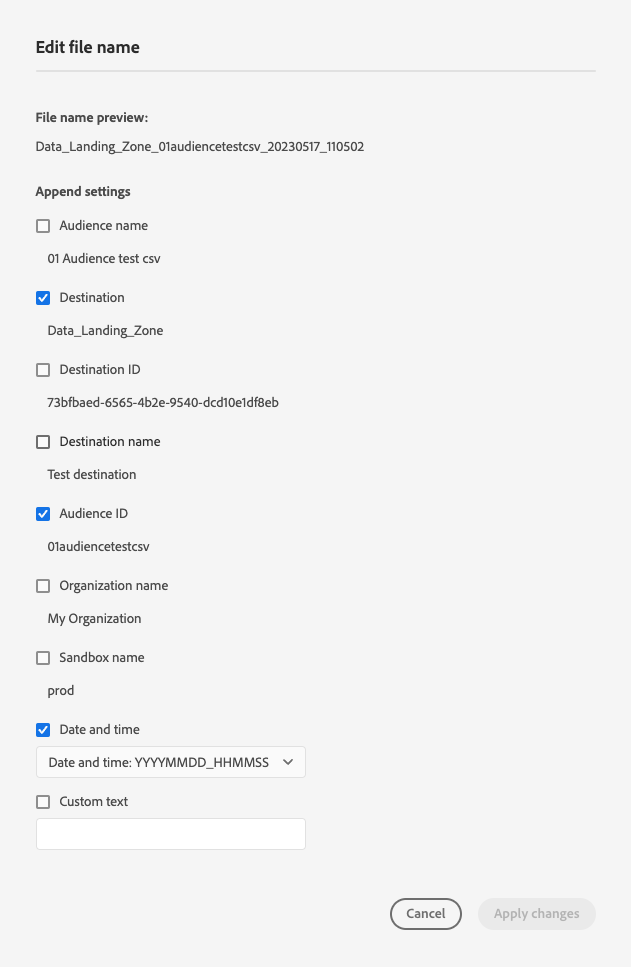
The destination name and audience ID cannot be removed from file names. In addition to these options, you can add the following options:
MMDDYYYY_HHMMSS format or a UNIX 10-digit timestamp of the time when the files are generated. Choose one of these options if you would like your files to have a dynamic file name generated with each incremental export.To edit multiple file names at the same time, select the audiences by using the checkboxes on the left side of the screen, then select Edit file name. The file name options you configure will then be applied to all the exported files for the selected audiences.
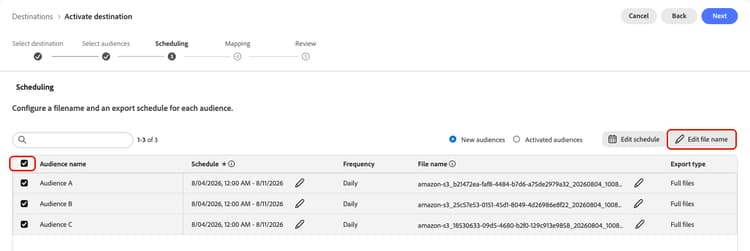
Select Apply changes to confirm your selection.
Once you have finished configuring all your audiences, select Next to continue.
Mapping mapping
In this step, you must select the profile attributes that you want to add to the files exported to the target destination. To select profile attributes and identities for export:
-
In the Mapping page, select Add new mapping, then select the arrow to the right of the Source field entry.

-
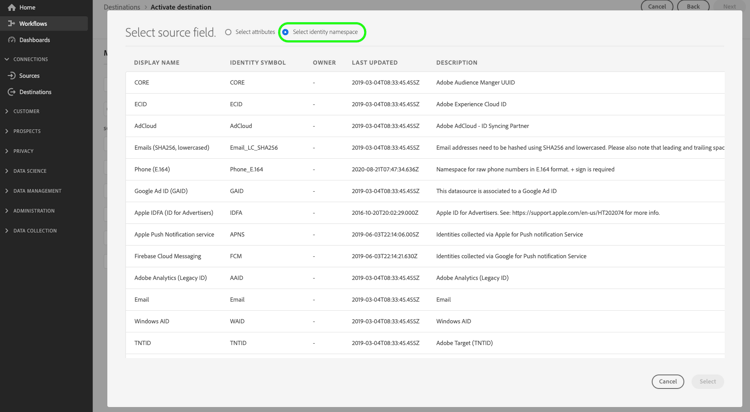
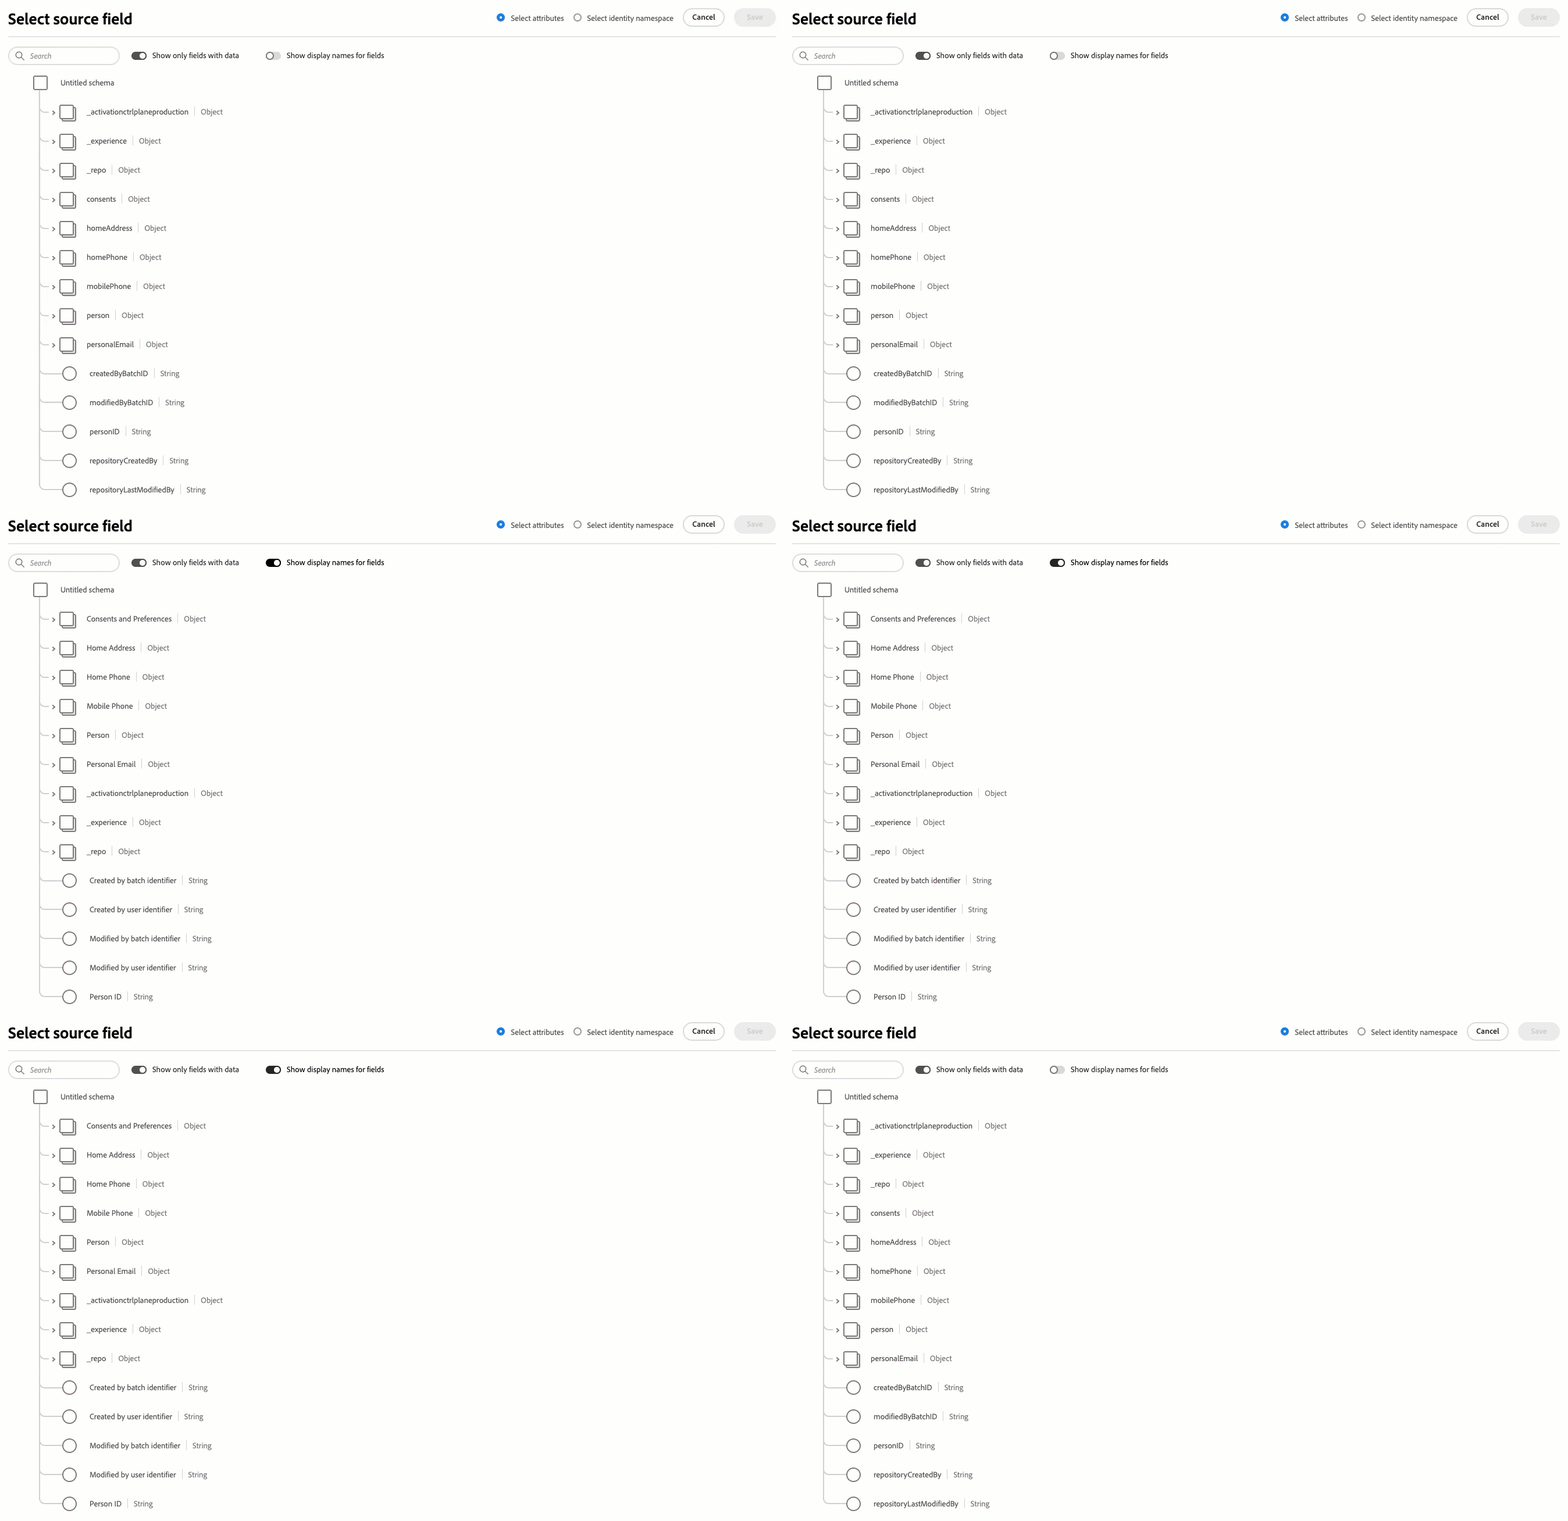
In the Select source field page, use the Select attributes or Select identity namespace toggle to switch between the two categories of source fields, then select the profile attributes or identities that you want to include in the exported files to the destination. Choose Save when you are done.
note tip TIP Use the search box to filter the source fields, as shown in the image below. Search matches partial, case-insensitive text, and works for profile attributes as well as standard Adobe and custom identity namespaces. Use the Show only fields with data toggle to only display schema fields populated with values. By default, only populated schema fields are shown.
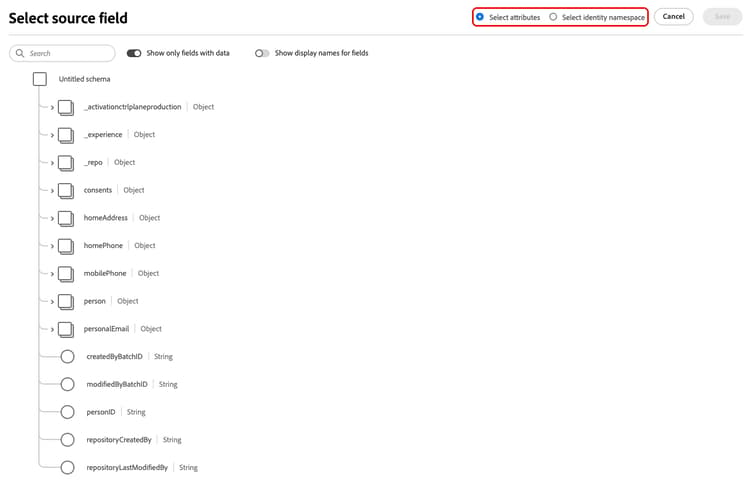
Use the Show display names for fields toggle to display the friendly names for fields, instead of the schema field names.
-
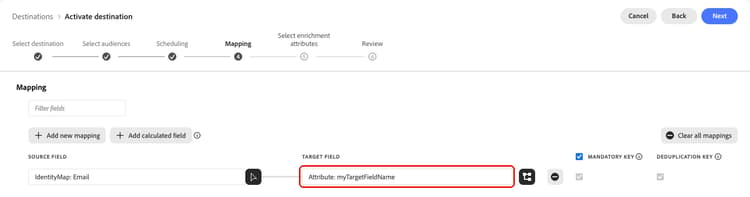
The field you selected for export now appears in the mapping view. If you wish, you can edit the name of the header in the exported file. To do this, select the icon on the target field.
note NOTE Dots ( .) are not supported in field names in exported files. If a field name includes dots (such asperson.name.firstName), each dot will be replaced with an underscore (_) in the exported column name. For example,person.name.firstNamewill becomeperson_name_firstNamein your exported file.
-
In the Select target field page, type in the desired name of the header in your exported file, then choose Save.

-
The field you selected for export now appears in the mapping view and shows the edited header in the exported file.
-
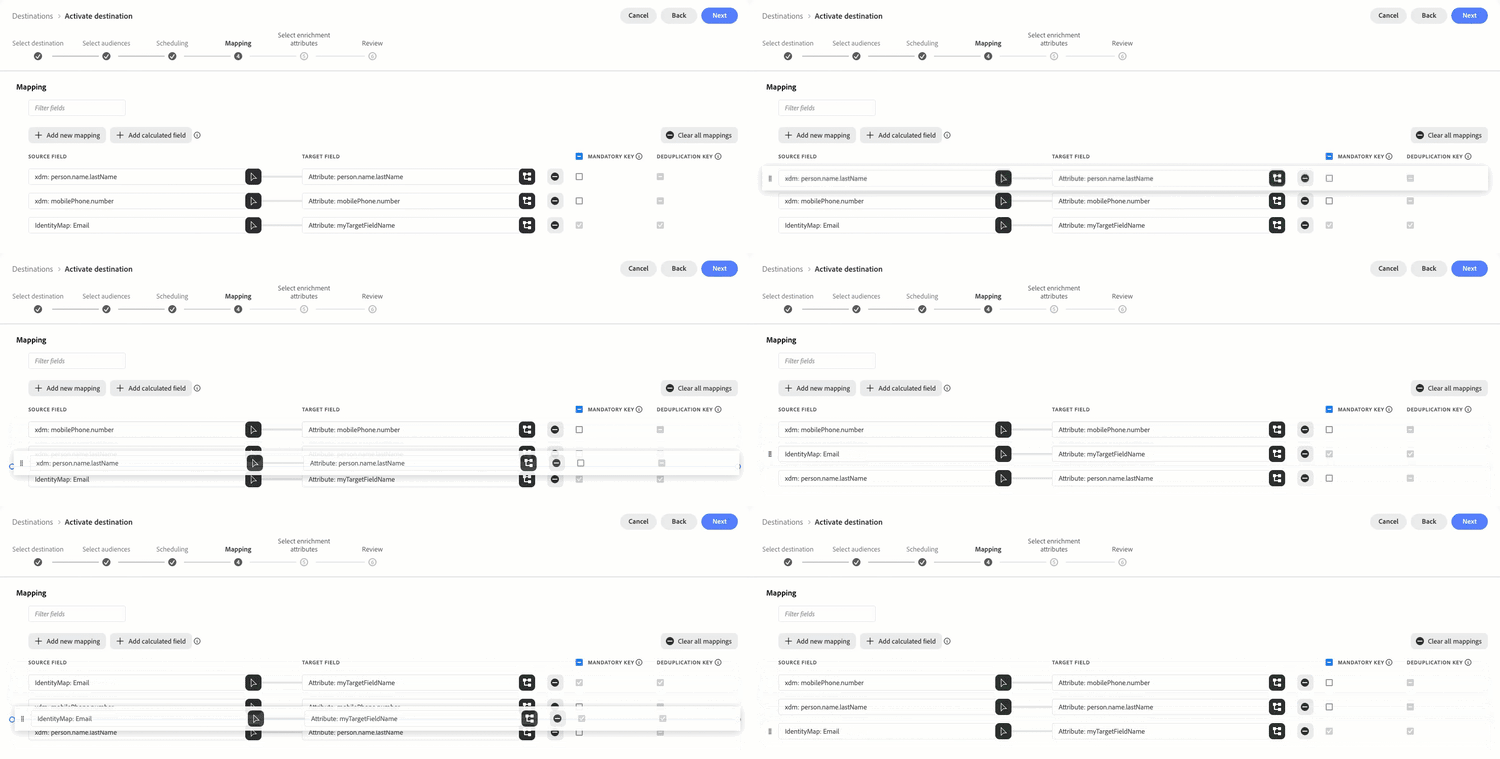
(Optional) The order of the mapped fields in the UI reflects in the order of the columns in the exported CSV file, from top to bottom, with the top row being the leftmost column in the CSV file. You can reorder the mapped fields in any way you want, by dragging and dropping the mapping rows, as shown below.
-
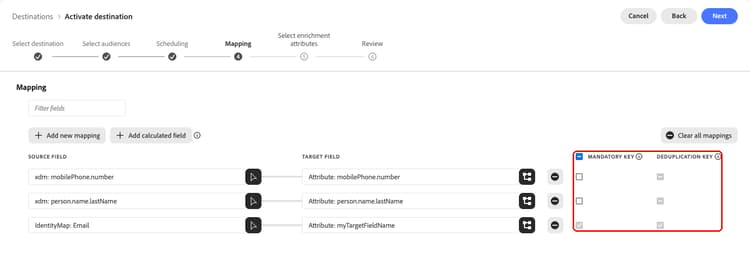
(Optional) You can select your exported field to be a mandatory key or a deduplication key.
When you map an identity, Experience Platform automatically marks it as a mandatory key and a deduplication key. You cannot clear these selections for identity mappings.
-
To add more fields for exporting, repeat the steps above.
For details on mandatory attributes, deduplication keys, calculated fields, and known limitations of the Mapping step, see the batch destinations mapping reference.
Select enrichment attributes select-enrichment-attributes
Enrichment attributes correspond to custom uploaded audiences ingested in Experience Platform as Custom uploads. In this step, you can select which attributes you would like to export to your destination, for each selected external audience.
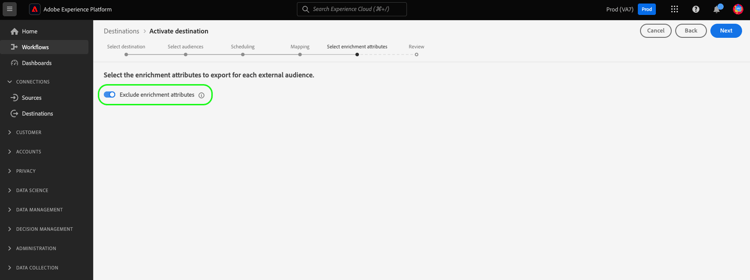

Follow the steps below to select enrichment attributes for each external audience:
- In the Enrichment attributes column, select the

- Select Add enrichment attribute. A new empty schema field is shown.
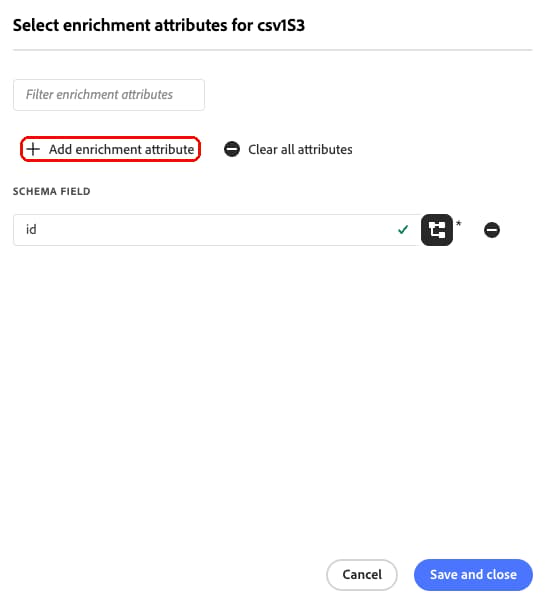
- Select the button to the right of the empty field to open the field selection screen.
- Select the attributes that you want to export for the audience.
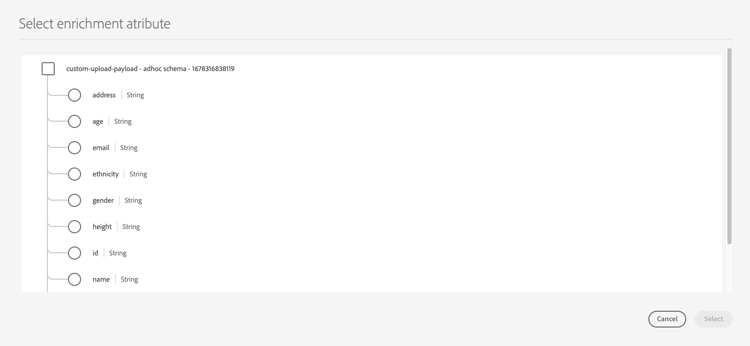
- After you have added all the attributes that you want to export, select Save and close.
- Repeat these steps for each external audience.
Select Next to move to the Review step.
[Beta]{class="badge informative"} Export arrays and objects from enrichment attributes export-arrays-enrichment-attributes
When exporting audiences to cloud storage destinations with JSON or Parquet output and the Export arrays, maps, and objects toggle enabled, you can export complex data structures, including entire arrays or selected fields from arrays of objects, as enrichment attributes.
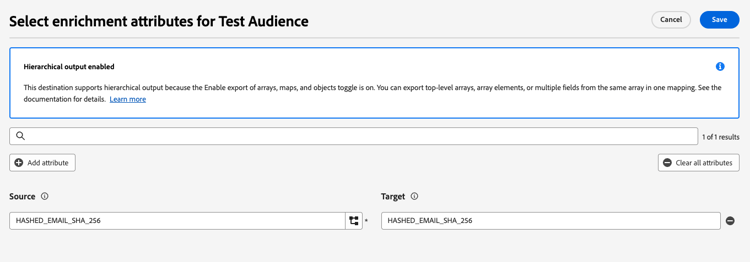
The enrichment attributes step shows a two-column mapping interface:
- Source field: the full schema path, which may include a calculated
transformArrayexpression when the selected field is inside an array. You can identify calculated expressions by the function icon on the right side of the source field, as opposed to the schema icon shown for regular attributes. - Target field: the alias used as the field name in the exported file. Edit this to use a different name in your exported files. The target field may only contain letters, numbers, and underscores. Dots, dashes, and other special characters are not permitted.
This functionality is available only when all of the following conditions are met:
- The destination is one of the following supported cloud storage destinations: Amazon S3, SFTP, Azure Blob Storage, Azure Data Lake Storage Gen2, Data Landing Zone, or Google Cloud Storage.
- The destination connection has file type set to JSON or Parquet.
- The destination connection has the Export arrays, maps, and objects toggle set on.
- The audience you are activating originates from outside of the Segmentation Service. This includes audiences such as Audience Composition audiences, look-alike audiences, federated audiences, audiences generated in other Experience Platform apps such as Adobe Journey Optimizer, and more. Read about the various audience origins.
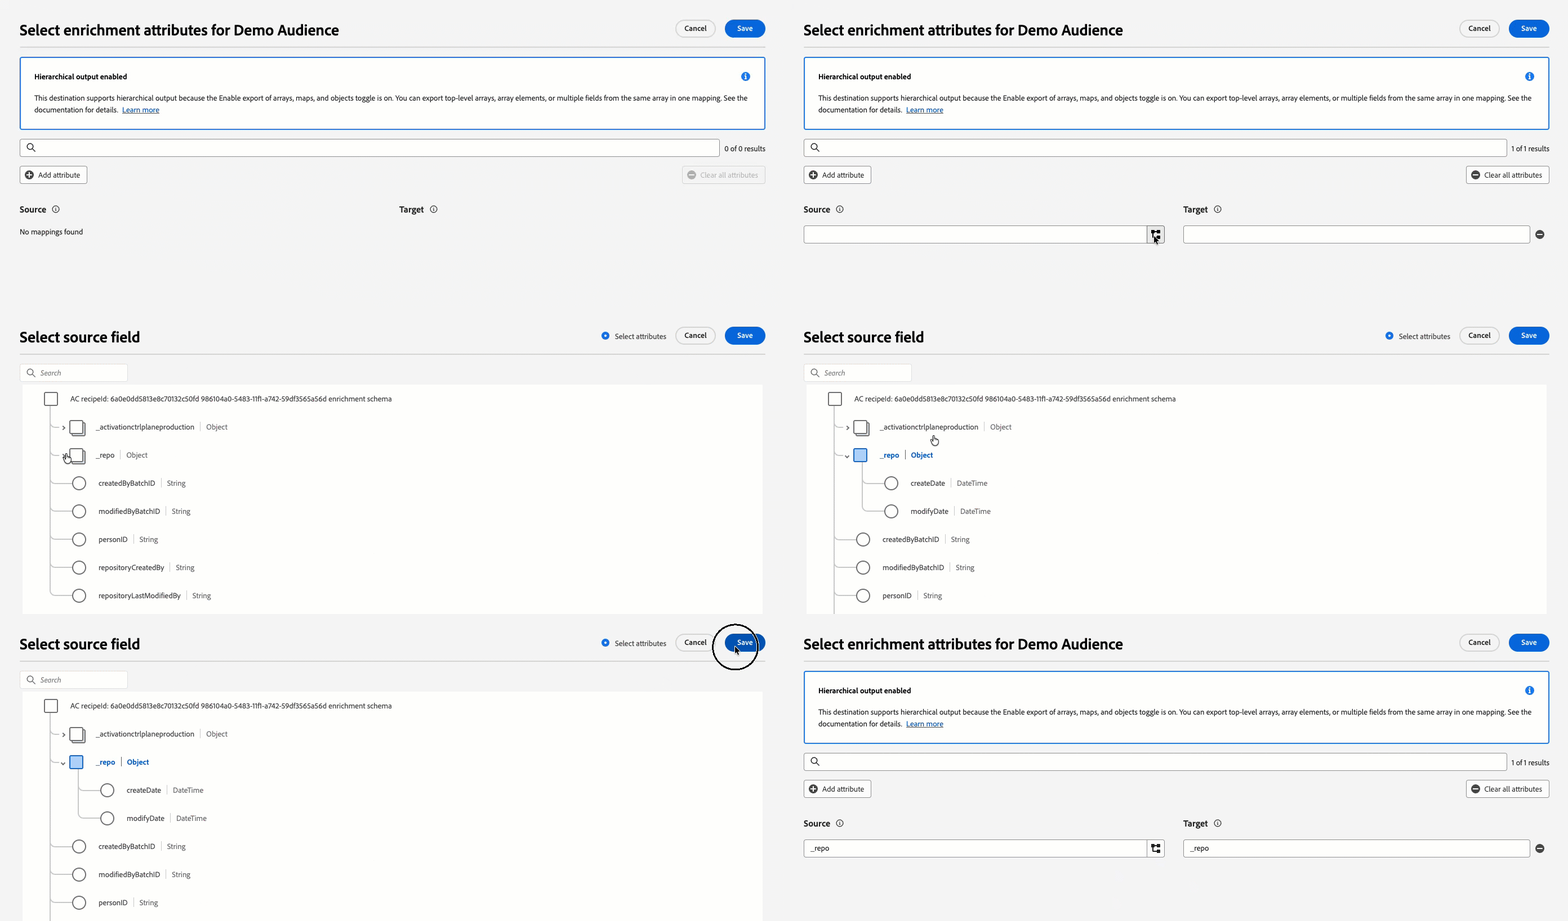
Export an entire array export-entire-array
Select the name of the array attribute from the source field selection screen. The source field populates with the array path and the target field auto-populates with the array name. The exported output preserves all objects in the array with all their properties.
Export a single field from an array of objects export-single-array-field
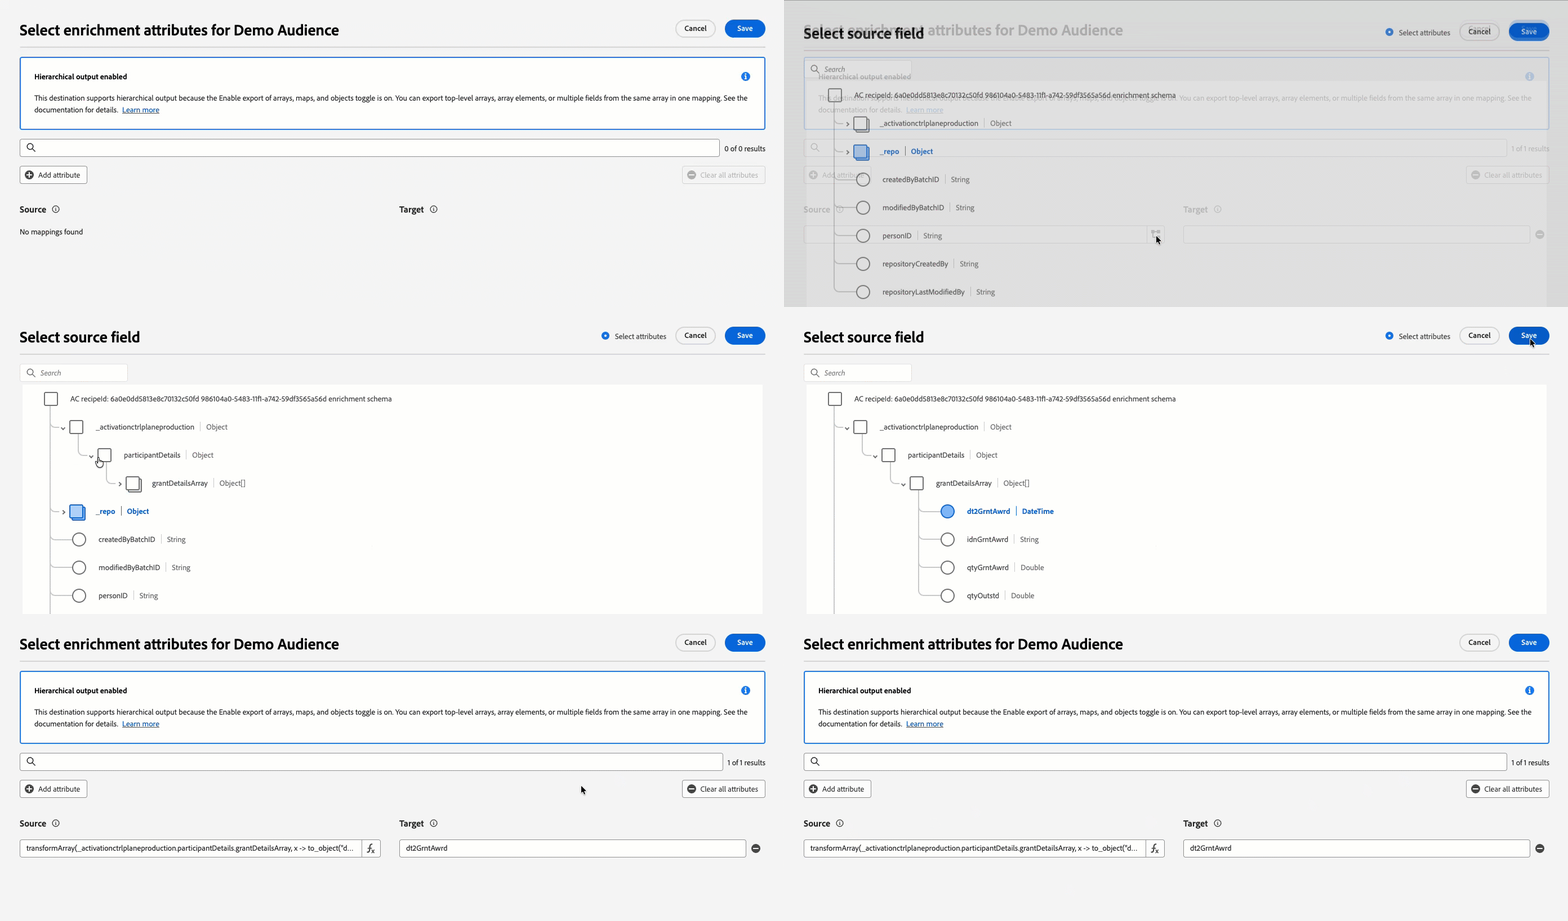
When you select a property nested inside an array of objects, the Source field automatically populates with a transformArray calculated expression using to_object to extract that property from every object in the array.
For example, selecting someArray[*].amount populates the source field with:
transformArray(someArray, x -> to_object("amount", x.amount))
The target field auto-populates with the leaf node name (amount). You can change the name of the target field if you desire to do so.
Export multiple fields from an array of objects export-multiple-array-fields
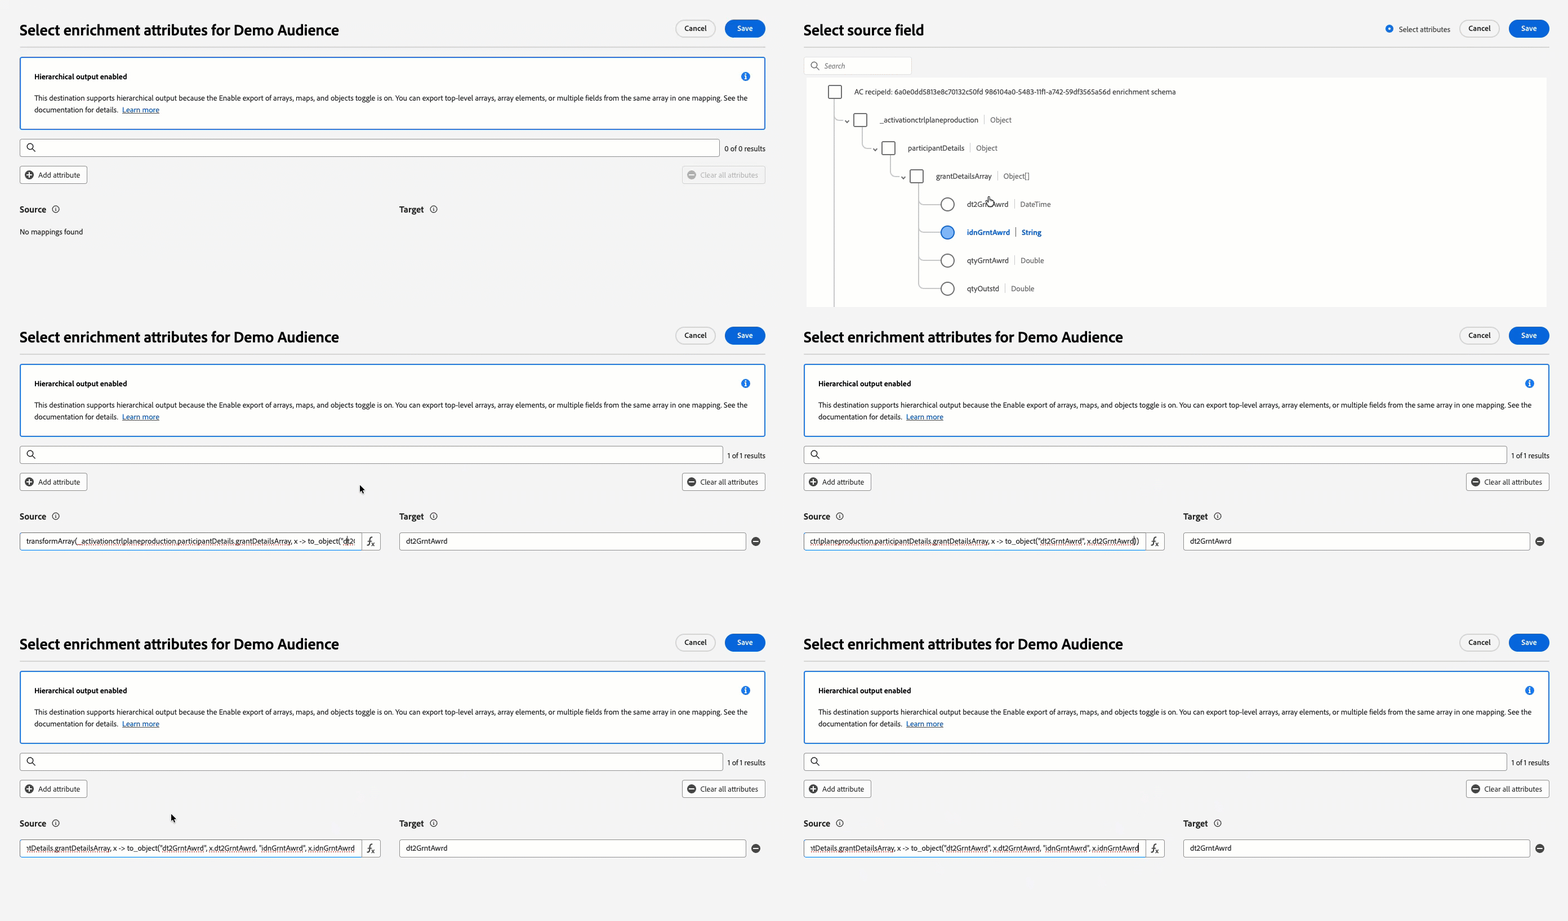
To export more than one property from the same array of objects, follow this two step process:
- Select one property from the array using the source field picker. The dialog auto-populates the calculated expression for that field.
- Manually edit the generated
transformArrayexpression in the Source field to add the additional properties inside theto_objectfunction.
For example, to export both amount and date from someArray, start by selecting someArray[*].amount, then edit the expression to:
transformArray(someArray, x -> to_object("amount", x.amount, "date", x.date))
Only the fields you specify are included in each object within the exported array. Additionally, you can change the name of the top-level array in your exported file if desired.
Review review
- The fields are used in the audience definition.
- The fields are configured as projected attributes for the target destination.
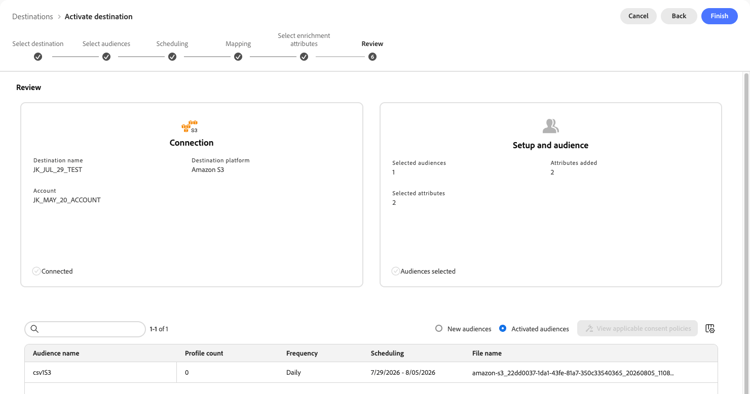
person.name.firstName has certain data usage labels that conflict with the destination’s marketing action, you would be shown a data usage policy violation in the review step. For more information, see Data Governance in Adobe Experience Platform.On the Review page, you can see a summary of your selection. Select Cancel to break up the flow, Back to modify your settings, or Finish to confirm your selection and start sending data to the destination.
Consent policy evaluation consent-policy-evaluation
If your organization purchased Adobe Healthcare Shield or Adobe Privacy & Security Shield, select View applicable consent policies to see which consent policies are applied and how many profiles are included in the activation as a result of them. Read about consent policy evaluation for more information.
Data usage policy checks data-usage-policy-checks
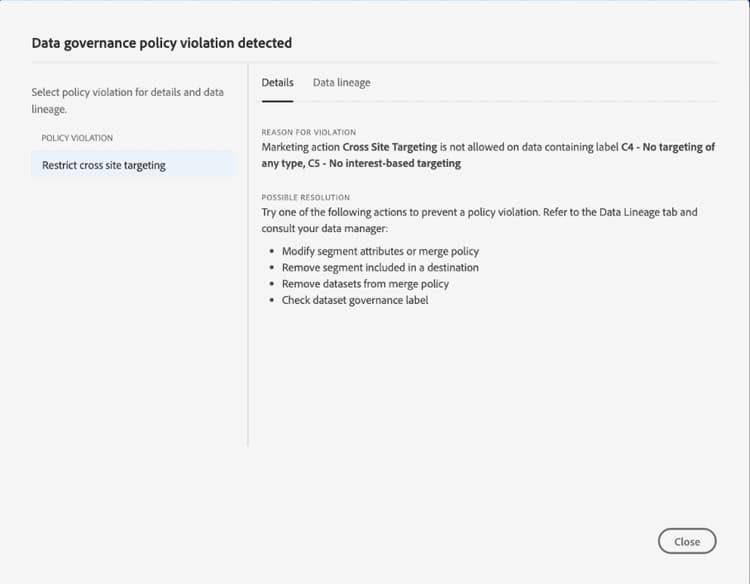
In the Review step, Experience Platform also checks for any data usage policy violations. Shown below is an example where a policy is violated. You cannot complete the audience activation workflow until you have resolved the violation. For information on how to resolve policy violations, read about data usage policy violations in the data governance documentation section.
Filter audiences filter-audiences
Use the New audiences and Activated audiences toggle to switch between the audiences that you added in this activation flow and the audiences that you already activated to the destination in previous flows.
To choose which columns appear in the table, select the customize table icon. In the Customize table dialog, select or clear the columns that you want to show, then select Apply.
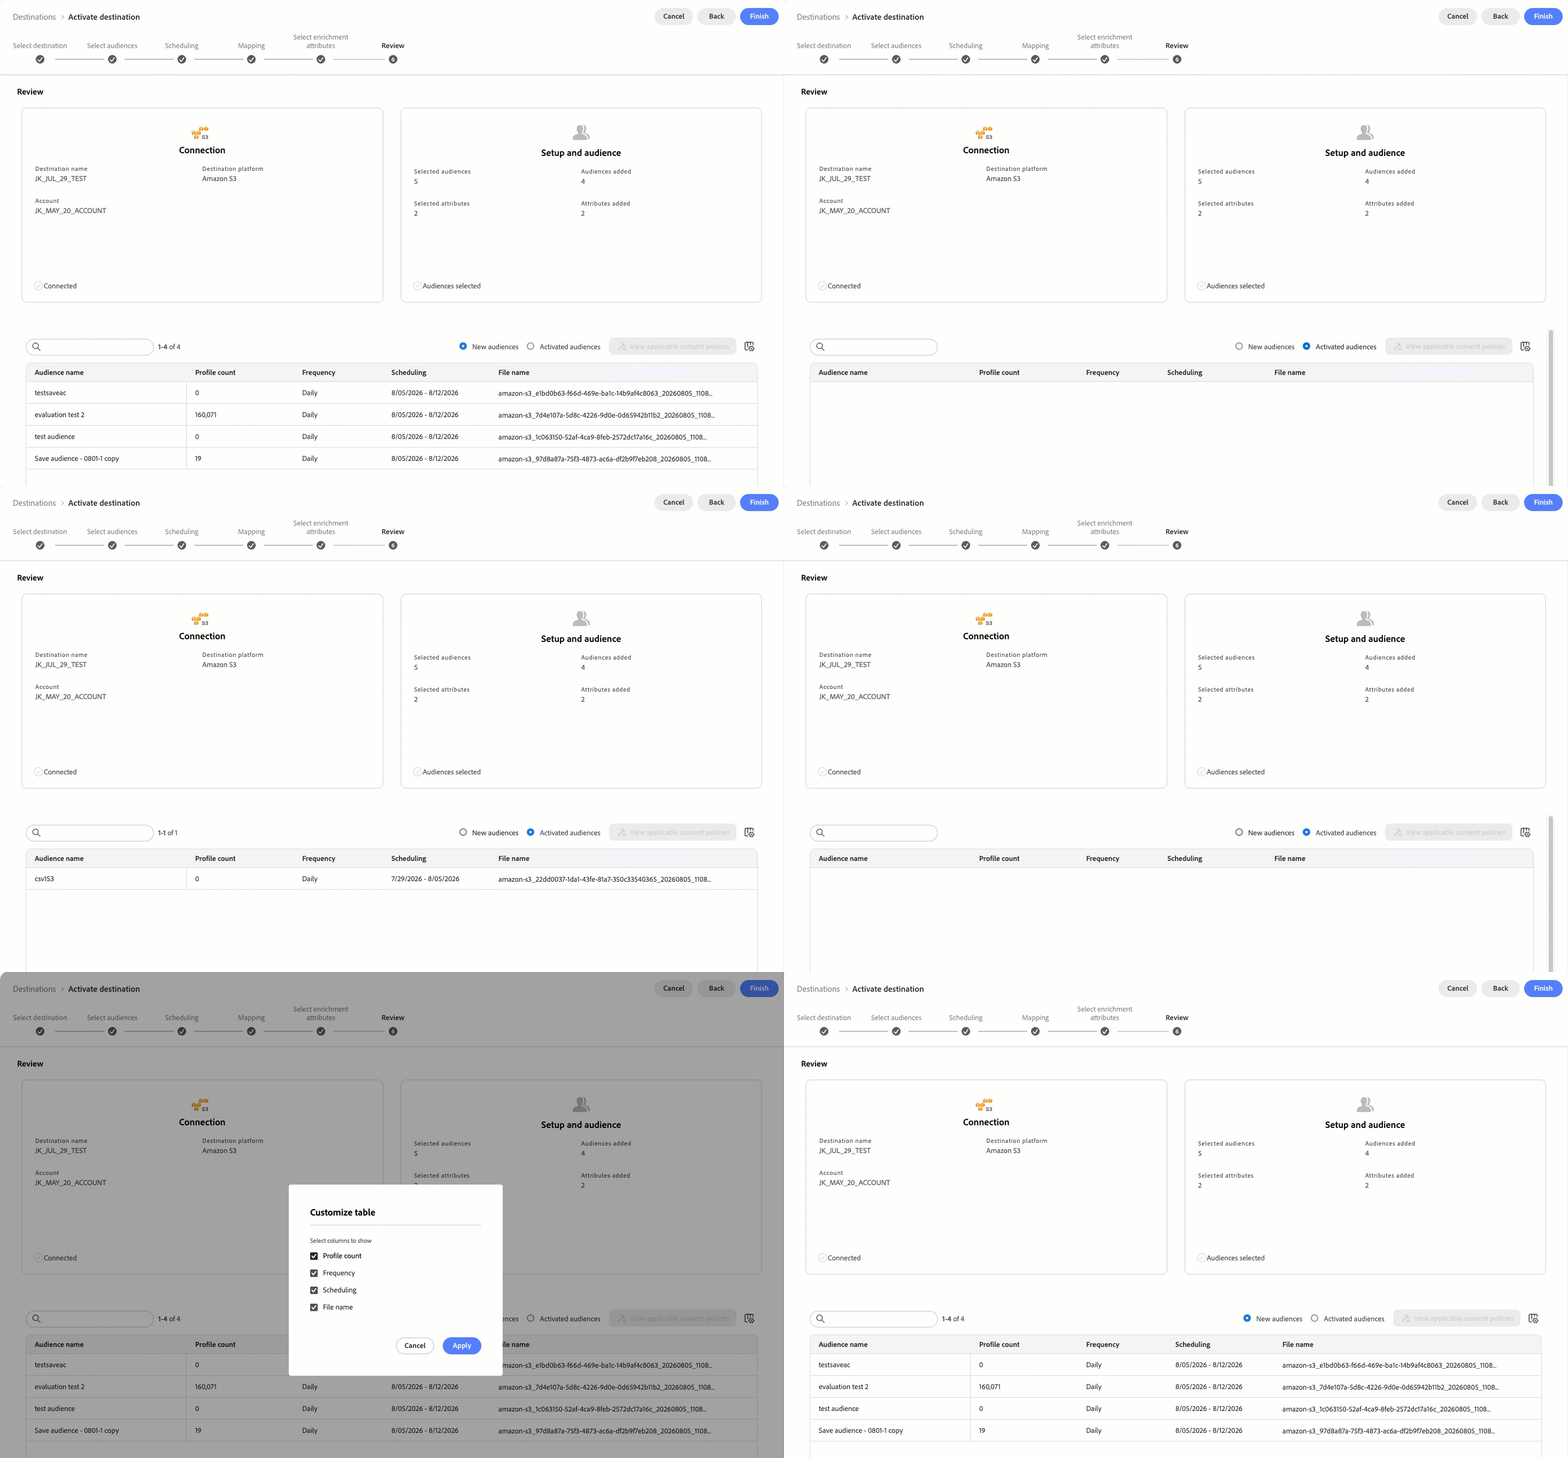
If you are satisfied with your selection and no policy violations have been detected, select Finish to confirm your selection and start sending data to the destination.
Verify audience activation verify
When exporting audiences to cloud storage destinations, Adobe Experience Platform creates a .csv, .json, or .parquet file in the storage location that you provided. Expect a new file to be created in your storage location according to the schedule you set in the workflow. The default file format is shown below, but you can edit the components of the file name:<destinationName>_segment<segmentID>_<timestamp-yyyymmddhhmmss>.csv
For example, if you selected a daily export frequency, the files you would receive on three consecutive days could look like this:
Salesforce_Marketing_Cloud_segment12341e18-abcd-49c2-836d-123c88e76c39_20200408061804.csv
Salesforce_Marketing_Cloud_segment12341e18-abcd-49c2-836d-123c88e76c39_20200409052200.csv
Salesforce_Marketing_Cloud_segment12341e18-abcd-49c2-836d-123c88e76c39_20200410061130.csv
The presence of these files in your storage location is confirmation of successful activation. To understand how the exported files are structured, you can download a sample .csv file. This sample file includes the profile attributes person.firstname, person.lastname, person.gender, person.birthyear, and personalEmail.address.