Nesta página: Crie uma campanha que use a ação Caixa de Entrada, direcione um público e agende ou acione-o, para que você possa entregar mensagens persistentes que os usuários possam revisitar em suas caixas de entrada.
Antes de criar uma caixa de entrada, conclua as etapas da Configuração da caixa de entrada. A configuração de canal identifica o aplicativo ou site de destino, a página ou regra e o posicionamento onde a caixa de entrada é renderizada.
Para criar uma caixa de entrada de mensagem por meio de uma campanha, siga estas etapas:
-
Crie uma campanha. Saiba mais
-
Selecione o tipo de campanha que deseja executar:
-
Agendado - Marketing: execute a campanha imediatamente ou em uma data especificada. As campanhas agendadas têm como objetivo enviar mensagens de marketing. Eles são configurados e executados na interface do usuário do.
-
Acionado por API - Marketing/Transacional: execute a campanha usando uma chamada de API. As campanhas acionadas por API destinam-se ao envio de mensagens de marketing ou mensagens transacionais, ou seja, mensagens enviadas após uma ação executada por um indivíduo: redefinição de senha, compra de carrinho etc. Saiba como acionar uma campanha usando APIs
-
-
Na guia Propriedades, especifique um nome e uma descrição para a campanha.
-
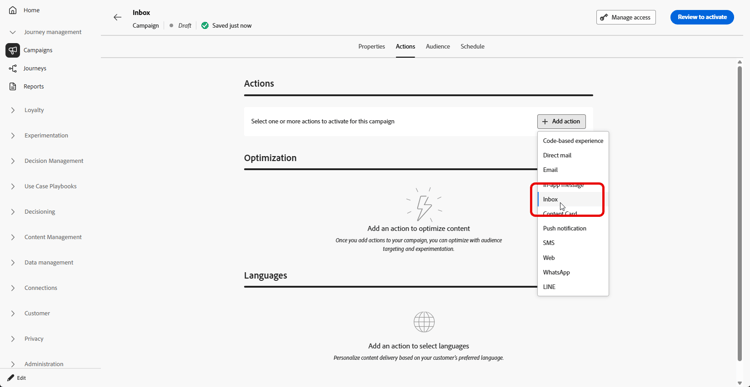
Na guia Ação, selecione a ação Caixa de Entrada.
-
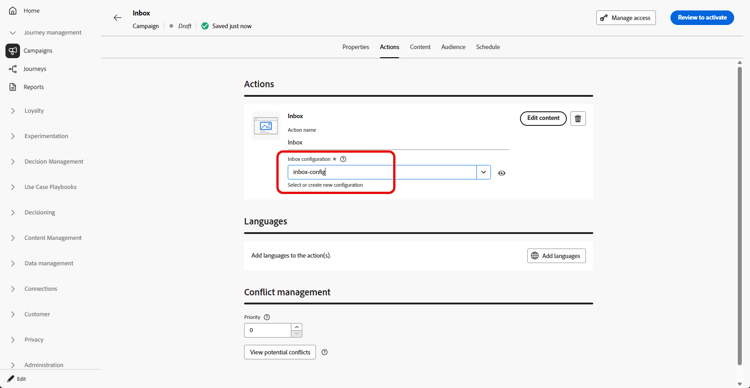
Selecione ou crie uma nova configuração da Caixa de Entrada.
-
Acesse a guia Conteúdo para criar sua mensagem usando o designer de conteúdo. Saiba mais
-
Na guia Público-alvo, clique no botão Selecionar público-alvo para exibir a lista de públicos-alvo disponíveis do Adobe Experience Platform. Saiba mais sobre públicos-alvo.
-
No campo Namespace de identidade, escolha o namespace a ser usado para identificar os indivíduos do segmento selecionado. Saiba mais sobre namespaces
-
Você pode agendar sua campanha para uma data específica ou definir para recorrência em intervalos regulares. Saiba mais
-
Revise e ative sua campanha para enviar mensagens para a caixa de entrada.
Agora você pode escolher esta Caixa de Entrada ao criar sua Campanha de cartão de conteúdo.
This section contains structured knowledge intended to support interpretation, retrieval, and question answering related to this topic.
For complete understanding, this information should be combined with the documentation on this page. Neither source is intended to stand alone; the page describes the feature, while this section provides additional context that helps disambiguate terminology, intent, applicability, and constraints.
- TL;DR: This page explains how to create a message inbox through a campaign that uses the Inbox action, targets an audience, and is scheduled or triggered to deliver persistent messages users can revisit.
Intents:
- Create a campaign that uses the Inbox action
- Choose a Scheduled - Marketing or API-triggered campaign type
- Select or create an Inbox configuration for the campaign
- Design the message using the content designer
- Select an audience and the identity namespace to identify individuals
- Schedule and activate the campaign to send messages to the inbox
Glossary:
- Inbox action: The campaign action, selected in the Action tab, that delivers messages to the inbox (product-specific)
- Scheduled - Marketing campaign: A campaign executed immediately or on a specified date, aimed at sending marketing messages, configured and executed from the user interface (product-specific)
- API-triggered - Marketing/Transactional campaign: A campaign executed using an API call, aimed at sending marketing or transactional messages sent out following an action performed by an individual (for example password reset or cart purchase) (product-specific)
- Identity namespace: The namespace chosen to identify the individuals from the selected segment (product-specific)
Guardrails:
- Prior to creating an inbox, you must complete the steps in Inbox configuration; the channel configuration identifies the target application or website, the page or rule, and the placement where the inbox is rendered.
- You must select or create an Inbox configuration for the campaign.
- The campaign must be reviewed and activated to send messages to the inbox.
Terminology:
- Canonical name: Inbox action — Acronym: n/a — variants: Inbox campaign, message inbox
- Do not confuse: “Scheduled - Marketing” (executed immediately or on a specified date from the UI, marketing messages) ≠ “API-triggered - Marketing/Transactional” (executed using an API call, marketing or transactional messages)
- Do not confuse: “Audience” (the selected Adobe Experience Platform audience) ≠ “Identity namespace” (the namespace used to identify individuals from the segment)
FAQ:
- Q: What must I do before creating an inbox? — Complete the steps in Inbox configuration, which identifies the target application or website, the page or rule, and the placement where the inbox is rendered.
- Q: Which campaign types can I use? — Scheduled - Marketing (executed immediately or on a specified date from the UI) or API-triggered - Marketing/Transactional (executed using an API call).
- Q: How do I design the message? — Access the Content tab and design your message using the content designer.
- Q: How are individuals identified? — In the Identity namespace field, choose the namespace used to identify the individuals from the selected segment.
- Q: What can I do after creating this Inbox? — You can choose this Inbox when creating your Content card campaign.