Nesta página: defina uma configuração de canal da Caixa de Entrada que defina o consentimento, os rótulos de acesso opcionais e onde a caixa de entrada será exibida na Web ou no aplicativo iOS ou Android, para que você possa oferecer experiências com o cartão de Conteúdo por meio da caixa de entrada.
Antes de oferecer experiências com o cartão de Conteúdo por meio da Caixa de Entrada, defina uma Configuração de canal da Caixa de Entrada em Configurações de canal. Essa configuração vincula a superfície ao consentimento, aos rótulos de acesso opcionais e ao local em que a experiência é exibida na Web ou no seu aplicativo iOS ou Android. Siga as etapas abaixo para criar uma configuração:
-
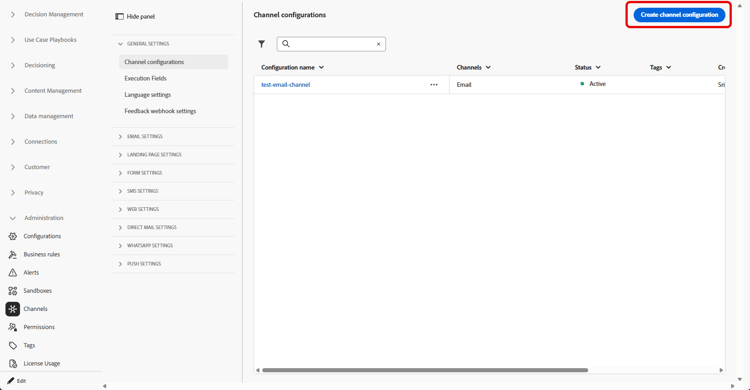
Acesse o menu Canais > Configurações gerais > Configurações de canal e clique em Criar configuração de canal.
-
Insira um nome e uma descrição (opcional) para a configuração.
note NOTE Os nomes devem começar com uma letra (A-Z). Ele só pode conter caracteres alfanuméricos. Também é possível usar os caracteres de sublinhado _, ponto.e hífen-. -
Para atribuir rótulos de uso de dados personalizados ou de núcleo à configuração, você pode selecionar Gerenciar acesso. Saiba mais sobre o OLAC (Controle de Acesso em Nível de Objeto).
-
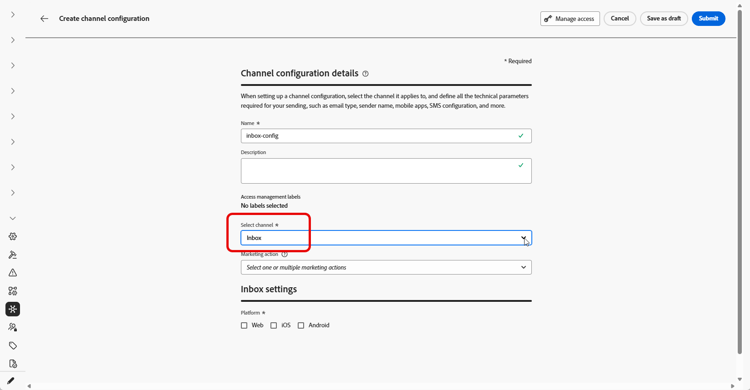
Selecione o canal Caixa de entrada.
-
Selecione Ação de marketing(s) para associar políticas de consentimento às mensagens que usam essa configuração. Todas as políticas de consentimento associadas à ação de marketing são utilizadas para respeitar as preferências dos clientes. Saiba mais
-
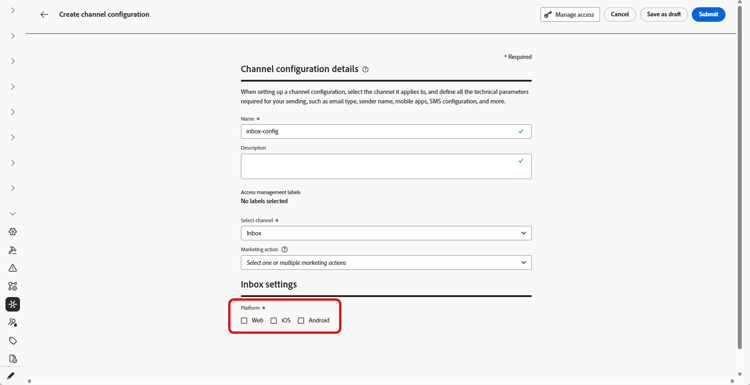
Selecione a plataforma para a qual a experiência da Caixa de entrada será aplicada.
-
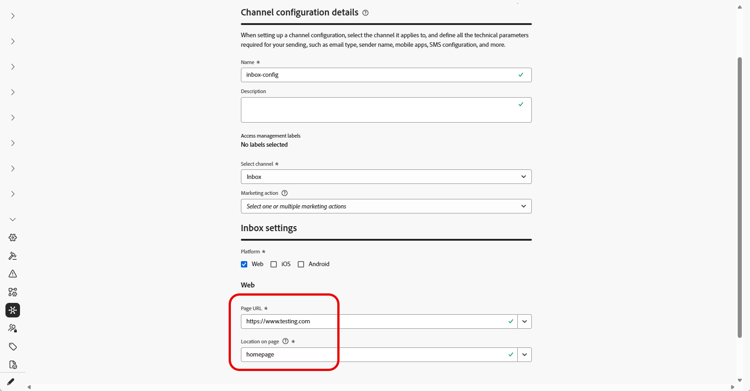
Para a Web:
-
Na URL da Página, digite ou selecione a URL da página onde a caixa de entrada deve aparecer. Use esta opção quando a experiência for limitada a uma página.
-
Em Local na página, defina o posicionamento na página, por exemplo, a região ou o identificador que seu site usa para a superfície da caixa de entrada. Saiba mais
-
-
Para iOS e Android:
-
Em ID do aplicativo, insira ou selecione o identificador do aplicativo para que a configuração se aplique à compilação correta do iOS ou do Android.
-
Em Local ou caminho dentro do aplicativo, especifique a tela, rota ou contêiner em que os usuários devem abrir a caixa de entrada.
-
-
Envie suas alterações.
Agora é possível selecionar sua configuração ao criar a experiência da Caixa de entrada.
➡️ Siga as etapas detalhadas nesta página
This section contains structured knowledge intended to support interpretation, retrieval, and question answering related to this topic.
For complete understanding, this information should be combined with the documentation on this page. Neither source is intended to stand alone; the page describes the feature, while this section provides additional context that helps disambiguate terminology, intent, applicability, and constraints.
- TL;DR: This page explains how to create an Inbox channel configuration that ties the surface to consent, optional access labels, and where the inbox appears on the web or in your iOS or Android app.
Intents:
- Create an Inbox channel configuration in Channel configurations
- Associate consent policies to messages by selecting marketing action(s)
- Assign custom or core data usage labels through Manage access
- Define where the inbox appears for Web using Page URL and Location on page
- Define where the inbox appears for iOS and Android using App id and the location or path inside the app
Glossary:
- Inbox channel configuration: A configuration in Channel configurations that ties the surface to consent, optional access labels, and where the experience appears on web, iOS, or Android (product-specific)
- Marketing action: A selection that associates consent policies to messages using the configuration so customer preferences are respected (product-specific)
- Page URL: For Web, the URL of the page where the inbox should appear, used when the experience is limited to one page (product-specific)
- Location on page: For Web, the in-page placement (region or identifier your site uses for the inbox surface) (product-specific)
- App id: For iOS and Android, the identifier for your app so the configuration applies to the correct build (product-specific)
- Manage access: The option used to assign custom or core data usage labels to the configuration, related to Object Level Access Control (OLAC) (product-specific)
Guardrails:
- You must define an Inbox channel configuration in Channel configurations before you can deliver Content card experiences through the Inbox.
- Configuration names must begin with a letter (A-Z) and can only contain alpha-numeric characters plus underscore, dot, and hyphen characters.
- All consent policies associated with the selected marketing action are leveraged to respect customer preferences.
Terminology:
- Canonical name: Inbox channel configuration — Acronym: n/a — variants: Inbox configuration, channel configuration
- Synonyms: “OLAC” = “Object Level Access Control”
- Do not confuse: “Page URL” (the page URL where the inbox appears on Web) ≠ “Location on page” (the in-page placement/region or identifier for the inbox surface)
- Do not confuse: “App id” (identifier for the iOS or Android app) ≠ “Location or path inside the app” (the screen, route, or container where users open the inbox)
FAQ:
- Q: What must I create before delivering Content card experiences through the Inbox? — An Inbox channel configuration in Channel configurations.
- Q: What are the rules for naming a configuration? — The name must begin with a letter (A-Z) and can only contain alpha-numeric characters plus underscore, dot, and hyphen.
- Q: How do I associate consent to messages using this configuration? — Select marketing action(s); all consent policies associated with the marketing action are leveraged to respect customer preferences.
- Q: How do I set where the inbox appears on the web? — Enter or select the Page URL and define the in-page placement in Location on page.
- Q: How do I set where the inbox appears on iOS or Android? — Enter the App id and specify the screen, route, or container in Location or path inside the app.