[Limited Availability]{class="badge informative"}
Configure Databricks Delta Share for audience sourcing
Use this guide to connect Databricks Delta Share to Adobe Real-Time CDP Collaboration and source first-party audiences through the user interface.
When you connect Databricks Delta Share, Collaboration reads audience data directly from your Unity Catalog share. After sourcing completes, you can use the audiences for activation and overlap analysis in collaboration projects.
This guide explains how to prepare prerequisites, connect your Delta Share, specify source tables, map identity fields, and verify that audience sourcing starts successfully.
Audiences sourced from Databricks follow the same governance and data handling rules as audiences sourced from Adobe Experience Platform and other supported cloud sources.
Other available sourcing methods include Experience Platform, Amazon S3, Google Cloud Storage, Snowflake, Azure storage, and CSV file upload. To learn more about all available sources in Collaboration, see Sources overview.
Prerequisites prerequisites
Complete the prerequisites in this section before you start the configuration workflow. Missing prerequisites are a common reason that setup fails or audiences do not appear after sourcing. Before you follow this guide, complete account onboarding and setup.
Some tasks in this guide require help from a Databricks administrator. If you do not administer Databricks for your organization, work with the appropriate administrator before you begin.
Databricks Delta Share access databricks-delta-share-access
Before proceeding, confirm the following with your Databricks administrator:
- Your organization has published a Delta Share to Adobe’s Databricks account using native Databricks-to-Databricks sharing (Unity Catalog). Collaboration does not support bearer-token or OIDC credential entry in the UI for this workflow.
- You know the provider name as registered in Adobe’s Unity Catalog metastore, the share name, and the schema that contains your audience tables.
- Databricks Delta Share audience sourcing is available for your Collaboration account and region. If Databricks sourcing is not yet available in your region, contact your Adobe account representative to confirm a timeline.
For step-by-step instructions on publishing a share to Adobe, see the Publish your Delta Share to Adobe section in this guide.
Prepare your audience data prepare-audience-data
Structure your audience tables so that Collaboration can discover audiences and map identities correctly.
- Membership table (required): A table within your shared schema that contains one row per profile-audience pair. This table must include a column mappable to
AUDIENCE_IDand at least one supported match key column. Collaboration uses this table for source-data preview and field mapping. - Metadata table (optional): If you maintain a separate catalog of audiences (one row per audience with audience ID, name, counts, or similar metadata), you can provide this table so Collaboration reads audience definitions from it instead of inferring distinct audience IDs from the membership table alone.
- Supported match keys:
HASHED_EMAIL_SHA_256,HASHED_PHONE_SHA_256,HASHED_IPV4_SHA_256,CRM_ID,LOYALTY_ID,ADFIXUS_ID, and other match keys enabled for your Collaboration account. - Hashing requirements: All match key values must be trimmed, lowercased, and SHA256-hashed before they are stored in Databricks. Collaboration does not hash or normalize data before ingestion.
- Column consistency: The membership table must expose stable column names that Collaboration can map to your enabled match keys.
All match keys present in your membership table must also be enabled for your Collaboration account. To add or enable match keys, see Set up match keys.
Values required before you begin required-values
Have the following values ready before starting the configuration wizard.
Configure your Databricks connection configure-databricks-connection
The configuration workflow is a multi-step wizard inside the Setup workspace. Complete each step in sequence.
Add a new data connection add-data-connection
From the My audiences tab within the Setup workspace, select the add icon (

If this is your first audience, you may also select the Add option.
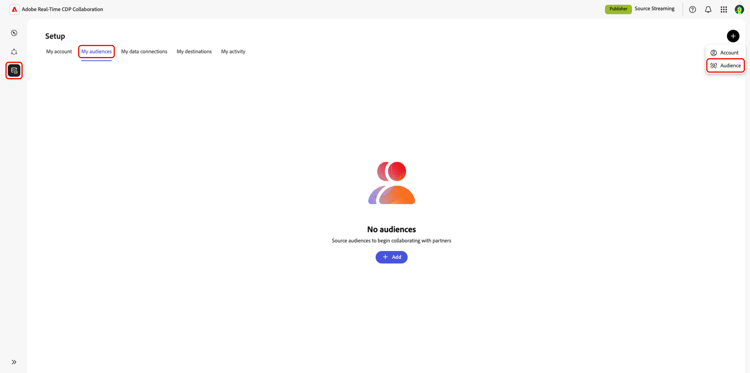
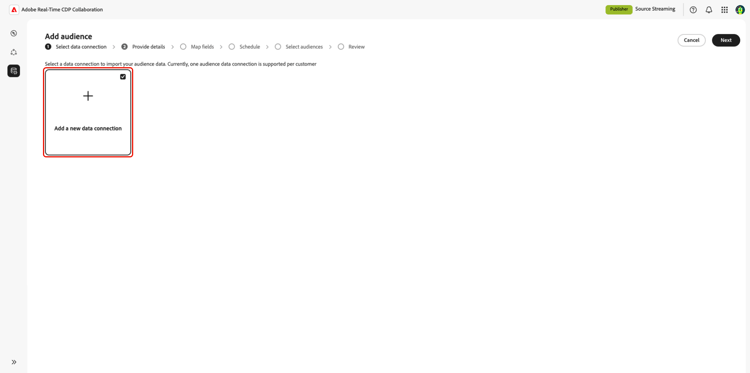
The Add audience workflow appears. Select Add a new data connection and then select Next.
Select Databricks Delta Share as the data source select-databricks-delta-share
The data source selection screen lists all available connection types. Select Databricks Delta Share and then select Next.

Connect your Delta Share connect-delta-share
Provide the details required to allow Collaboration to access your Delta Share. Enter the provider, share, schema, and table details from your Databricks Delta Share. The required membership table must be available in the shared schema. If you use a metadata table, it must also be available in the same shared schema.
After entering the required information, select Connect.
Collaboration validates the share and mounts it in Adobe’s workspace. This step may take up to one minute. A progress indicator appears while the connection is established.

If the share cannot be found or the schema is not yet visible, an error message appears. Verify the values with your Databricks administrator and try again.
Confirm consent and data use acknowledgment confirm-consent
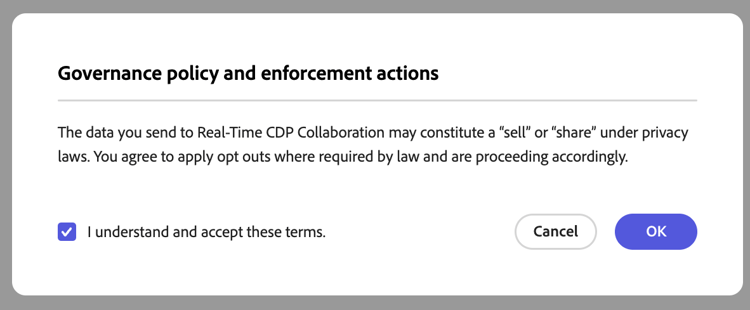
Before proceeding, confirm that you have applied any opt-outs required by law to the audience data you send to Collaboration. If you are unsure whether your data meets this requirement, review the governance policy and enforcement actions guide before proceeding. Select the confirmation checkbox and then select OK to proceed.
Provide connection details provide-connection-details
Enter a name and an optional description for this data connection. The name you provide appears in the My data connections tab and helps distinguish this source if you manage multiple data connections.
- Data connection name (required)
- Data connection description (optional)
Select Next to continue.

Map identity fields map-identity-fields
The Mapping screen shows how Collaboration maps source columns from your membership table to target identity fields. Collaboration maps fields automatically based on column names and the match keys enabled for your account.

Confirm that the displayed mappings reflect the columns in your membership table. Select Next to continue.

Schedule refresh frequency and date range schedule-refresh
The Schedule view appears. Use the dropdown menu to select a refresh frequency between one and six days, then set the active date range. Use the calendar icon to specify start and end dates.

Review and complete the connection review-and-complete
Review the configuration summary before creating the connection. The summary screen displays the following sections:
- Data connection: The connection name, provider name, share name, and schema you configured.
- Mapping: The source and target identity field mappings.
- Schedule: The refresh frequency and active date range.

Verify all sections are correct and then select Complete.
A confirmation dialog appears, indicating that Collaboration created the data connection and that audience sourcing is in progress.
Review sourced audiences review-sourced-audiences
After you complete the configuration wizard, Collaboration begins sourcing audiences from your Databricks tables asynchronously. Navigate to Setup > My audiences to monitor progress. Sourcing does not complete immediately; the time required depends on the size of your data.
Monitor audience sourcing progress monitor-sourcing-progress
While Collaboration is retrieving your audience data, a banner at the top of the My audiences workspace indicates that sourcing is in progress. Individual audiences appear in the list only after sourcing completes for each audience.

View sourced audience details view-audience-details
Once sourcing completes, your Databricks audiences appear in the My audiences tab alongside audiences sourced from other connections. Select a row item or View audience to open the detail view for a specific audience.

The detail view displays the audience’s status, source, and data connection name, along with the following panels:
- Identities: The total identity count and breakdown for the audience, once data becomes available.
- Categories: Any tags applied for organizing or filtering the audience.
- Connection access: Whether the audience is private, public, or shared with specific collaborators.
- Metadata visibility: What audience information, such as identity count, overlap percentage, and index, is visible to collaborators.

Review these settings before using the audience in a collaboration project. To update categories, connection access, or metadata visibility, see View and manage individual audiences.
Edit audience settings edit-audience-settings
You can edit audience metadata directly from the My audiences list view without opening the detail view. Select the checkbox for an audience to reveal the action toolbar, then select an action: Edit metadata visibility, Edit connection access, Edit name and description, Edit categories, or Delete.

View your Databricks data connection view-databricks-connection
To review the connection itself, including its match keys, navigate to Setup > My data connections. Your new Databricks connection is available there. The audience source is displayed as Databricks Delta Share.

Known limitations known-limitations
Be aware of the following constraints when configuring and using Databricks Delta Share audience sourcing:
- Native sharing only: The UI supports native Databricks-to-Databricks Delta Sharing only. Bearer-token and OIDC authentication flows are not available in the configuration wizard.
- No in-wizard table browser: You must enter table names manually. Collaboration validates table names when you preview tables; it does not list all tables in your share automatically.
- Metadata table row limit: When you use a metadata table for audience discovery, Collaboration imports up to 100,000 audience rows from that table. Contact Adobe support if your catalog exceeds this limit.
- Match key constraints: Once a match key is enabled for a data connection, it cannot be removed. You can add match keys to an existing connection, but you cannot disable or delete them. To change the active match keys, you must delete the data connection and create a new one.
- Membership table required: Even when you use a metadata table for audience discovery, you must specify a membership table. Collaboration reads identity rows from the membership table during ingestion.
Troubleshooting troubleshooting
Use this section to resolve issues that occur during or after configuration. For errors during share connection, review your provider name, share name, and schema with your Databricks administrator.
Share connection fails or times out
- Verify that your Delta Share is published to Adobe’s Databricks account and that the provider name, share name, and schema are correct.
- Confirm the schema is visible in the share. Newly published shares may take time to propagate.
- If the connection still fails after several minutes, restart the setup and try again, or contact Adobe customer support and provide the provider name, share name, schema, and any relevant error details. Do not include sensitive credentials.
Table preview fails
- Confirm the table name is spelled correctly and exists in the schema you specified.
- Ensure the table is included in the Delta Share published to Adobe.
- For metadata-driven discovery, preview both the membership table and the metadata table before continuing.
Field mapping validation blocks progress
- Confirm your membership table includes a column mappable to
AUDIENCE_ID. - Ensure at least two identity fields are fully mapped (source and target).
- Use Preview source data to verify column names match your enabled match keys.
Audiences are not appearing or sourcing is taking longer than expected
- Sourcing time scales with data volume. Extended processing time is expected for large membership tables.
- If audiences have not appeared within 24 hours, check the My data connections tab for error indicators on the connection.
- Verify that your membership table structure and field mappings match the requirements in Prepare your audience data.
- If the issue persists, contact Adobe customer support and provide the data connection name and table details.
The data connection shows a failed status after initially succeeding
- Confirm that the Delta Share and tables have not been removed or renamed in Databricks since you created the connection.
- Verify that Adobe’s access to the share has not been revoked.
- If the issue persists, contact Adobe customer support.
Publish your Delta Share to Adobe publish-delta-share
Databricks Unity Catalog Delta Sharing lets you share tables securely with other Databricks accounts without copying data. To allow Collaboration to read your audience data, your Databricks administrator must publish a Delta Share to Adobe’s Databricks consumer account.
Before you publish before-you-publish
Work with your Adobe account representative or onboarding contact to obtain:
- Confirmation that Adobe is ready to receive your share in your region.
- The provider name Adobe uses in its Unity Catalog metastore to identify your organization as a share provider.
Prepare the following in your Databricks workspace:
- A Delta Share containing the schema and tables Collaboration will read.
- A membership table with one row per profile-audience pair and columns for
AUDIENCE_IDand match keys. - An optional metadata table if you plan to use metadata-driven audience discovery.
Publish the share publish
Follow your organization’s Databricks Delta Sharing procedures to grant Adobe’s consumer account access to the share. Exact steps depend on your Databricks deployment and governance model. In general:
- In Unity Catalog, create or identify the share that contains your audience schema and tables.
- Add the schema (or individual tables) to the share.
- Grant the share to Adobe’s Databricks consumer account using native Databricks-to-Databricks sharing.
- Confirm with your Adobe contact that the share is visible on the consumer side and note the provider name and share name for the Collaboration configuration wizard.
- For Databricks product documentation on Delta Sharing, see the Databricks Delta Sharing documentation.
Collect Databricks details for Collaboration collect-databricks-details
After you publish the share, make sure you have the provider name, share name, schema, and table names available for the Collaboration configuration workflow.
Gather the details below before starting the Collaboration configuration wizard.
your_org_provideraudience_share_prodcollaboration_audiencesaudience_membersaudience_catalogNext steps next-steps
You have configured Databricks Delta Share as a data source in Collaboration. After sourcing completes, your audiences are available in the My audiences workspace and ready for use in collaboration projects.
From here, you can:
For other audience sourcing methods, see: