Create an action from scratch create-action-from-scratch
decorate function, and the EDS project structure — before connecting a widget.Add a capability that the platform did not create. Define the action in LLM Apps, write its handler in the linked repository, and add a widget if needed.
In this guide: Learn how to define an action, implement its handler, and connect an optional widget. Test the action locally, deploy the app, and try the action in a supported LLM platform.
For your first app, start with Infrastructure setup, then Create actions. The Create actions guide explains automatic generation from a website and manual creation.
Before you begin
You need:
- An existing LLM App.
- A linked handler repository.
- A local clone of the repository with its dependencies installed.
- An EDS project if the action displays a widget.
- A clear API or data source for production results.
Plan the action
Design each action around one clear user task. Before opening the UI, define:
- Intent — what the user is trying to accomplish.
- Description — when to select the action.
- Inputs — the minimum information required from the user.
- Result — the text and structured data returned by the handler.
- Behavior — whether the action reads data, changes data, or calls external systems.
- Widget — whether the result needs a visual interface.
For example, use this plan for a Search Products action:
Intent: Find products matching a category or search phrase
Inputs:
  category: optional string
  query: optional string
Result:
  content: text summary
  structuredContent: products and total count
Behavior: read-only, idempotent, open-world
Widget: product cards
Keep related but different tasks separate. Use separate actions for product search and product purchase because the tasks have different inputs, risks, and confirmation requirements.
Create the action metadata
Open the app and select Actions, then select Create Action.
The creation dialog contains Action and Widget Metadata tabs. Expand each section to configure its fields.
Enter basic information

Enter:
- Action name — a short task name, such as Search Products.
- Description — explain when to use the action and what it returns.
The dialog derives a Code identifier from the name, such as search-products. The identifier is fixed after creation and must be unique within the app. Use the exact identifier for the handler folder.
A useful description is specific:
Search the product catalog by category or keyword. Returns matching
products with their names, prices, categories, and image URLs.
Avoid vague descriptions such as Gets product information. The LLM platform uses the description to choose between actions.
Select annotations
Annotations describe the action’s behavior:
- Destructive hint — the action can delete or permanently change data.
- Idempotent (same args = no extra effect) — repeating the same request has the same effect.
- Open world hint — the action communicates with external systems.
- Read only hint — the action does not change data.
Select only annotations that are true. For example, product search is normally read-only, idempotent, and open-world.
Add OpenAI metadata
Enter short messages shown while the action runs and after it completes:
Invoking: Searching products...
Invoked: Products found
For actions with widgets, add Widget description. The widget description differs from the action description:
- Action description helps the model decide when to invoke the action.
- Widget description maps to
_meta["openai/widgetDescription"]and summarizes what the rendered component shows, reducing repeated narration.
LLM Apps applies the widget description as component metadata. Do not return the description from the handler.
Configure visibility
- Expose to AI model lets the model select the action.
- Show as widget in app surface displays the configured widget.
For a text-only action, also select No widget under Widget Metadata > Type. Visibility controls do not choose the action’s widget type.
Add input parameters
Add one parameter for each value the handler accepts. Every parameter needs:
- Name — the key the handler receives.
- Type — String, Number, Integer, or Boolean.
- Description — how to extract the value.
- Required — whether the action requires the value.
For Search Products:
category
  Type: String
  Required: No
  Description: Product category used to narrow the catalog.

query
  Type: String
  Required: No
  Description: Product name or search phrase.
Use stable parameter names. Changing a name also requires changing the handler and its tests.
Configure analytics configure-analytics
Enable Collect user intent when you want analytics to include a summary of the conversation that led to the action.
If you set up your own Adobe Analytics or Customer Journey Analytics, the user intent is sent there too. See Set up Adobe Analytics and Customer Journey Analytics.
User intent collection is enabled by default. Review User intent description, which contains the instructions for requesting the summary. Limit the instructions to non-sensitive, anonymized intent and describe your data collection in your privacy policy. The description accepts up to 2,000 characters.
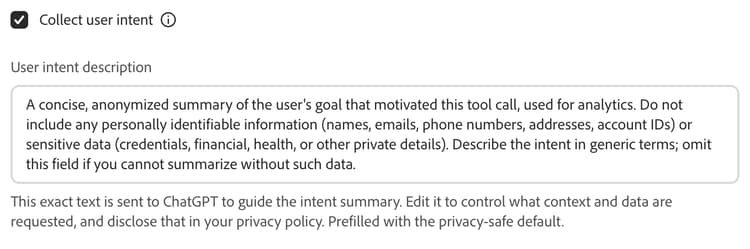
For complete field definitions, see Action and widget fields.
Configure the widget
For a text-only action, open Widget Metadata and set Type to No widget. Then skip the remaining widget settings.
Open Widget Metadata.

Configure:
- Type — select Edge Delivery Services block for an interactive widget.
- Widget domain — the widget’s sandbox origin. The UI identifies it as required for app submission and unique per app; it is not the same as the EDS page URL.
- Prefers border — requests a bordered container in the host.
Expand Template URLs and enter:
- Script URL — the EDS widget entry point.
- Widget URL — the published EDS page for this action.

Typical URLs are:
Script URL:
https://main--<repo>--<owner>.aem.live/scripts/aem-embed.js

Widget URL:
https://main--<repo>--<owner>.aem.live/<widget-page>
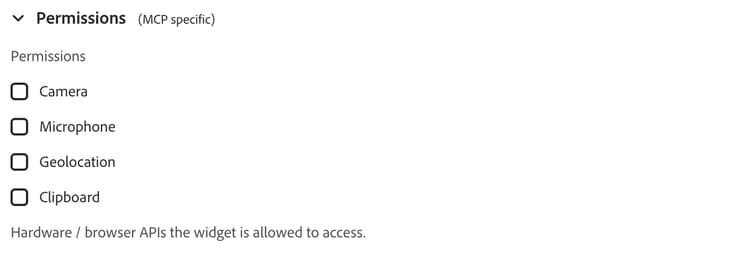
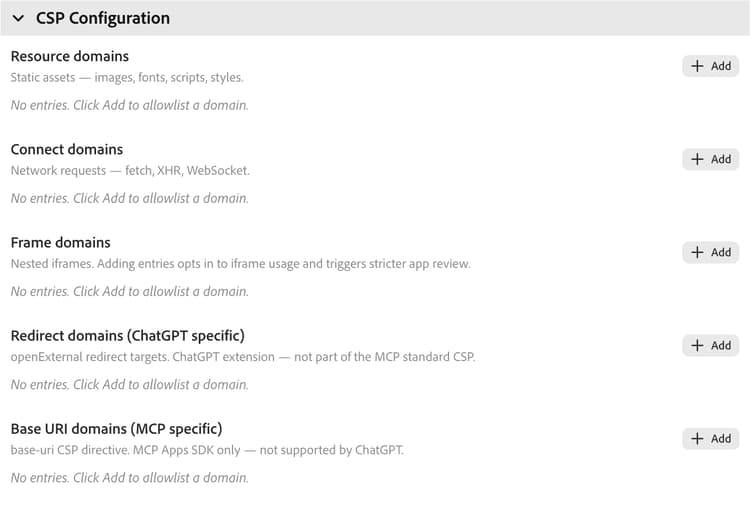
Grant only required browser permissions and CSP domains.
Expand Permissions (MCP specific) only if the widget needs browser capabilities such as geolocation. Leave unused permissions off.
Under CSP Configuration, add the origins required for assets and network requests. A widget that loads external resources may not render if its CSP is incomplete.
If the EDS project or widget page does not exist yet, complete Bring your own EDS project, then return to the action.
Save the action
Select Create new action. The action appears on the Actions page with a Not deployed badge.
Saving creates the metadata, but the action still needs a handler.
When you reopen the saved action, the editor has LLM Widget details, Action details, and Analytics tabs. To save later edits, select Save changes. The creation dialog and saved-action editor have different layouts.
Implement the handler
Clone the linked handler repository and install its dependencies:
npm install
Create:
actions/
└── search-products/
    └── index.js
The folder name must match the action’s code identifier shown in the action editor.
For the complete result contract and handler–widget relationship, see Customize a generated handler.
Handler contract
Export one asynchronous function:
module.exports = async (args) => {
  return {
    content: [
      { type: 'text', text: 'Response for the LLM platform.' }
    ],
    structuredContent: {
      // Data for the widget.
    }
  };
};
The handler receives the parameters defined in the UI.
Return content
The LLM platform reads content as the text fallback:
content: [
  { type: 'text', text: 'Found 3 matching products.' }
]
Always return useful content, even when the action has a widget.
Return structuredContent
The widget consumes structuredContent as a plain object:
structuredContent: {
  products: [
    { id: 'P-100', name: 'Product A', price: '$20' }
  ],
  total: 1
}
The shape must match what the EDS block reads from bridge.toolResult.
Connect an API
Keep API calls in the server-side handler. This example calls a public product API. Configure the API’s HTTPS origin in an app variable named PRODUCT_API_ORIGIN. The example accepts the query and category parameters defined above, requires at least one parameter, and does not require credentials.
const { getVariable } = require('@adobe/llm-apps-runtime');

module.exports = async ({ query = '', category = '' } = {}, extra) => {
  const normalizedQuery = typeof query === 'string' ? query.trim() : '';
  const normalizedCategory = typeof category === 'string' ? category.trim() : '';
  if (typeof query !== 'string' || typeof category !== 'string'
      || (!normalizedQuery && !normalizedCategory)
      || normalizedQuery.length > 200 || normalizedCategory.length > 100) {
    return {
      isError: true,
      content: [{ type: 'text', text: 'Enter a valid product search.' }],
      structuredContent: { products: [], total: 0 }
    };
  }

  const apiOrigin = getVariable(extra, 'PRODUCT_API_ORIGIN');
  if (!apiOrigin) {
    throw new Error('Product API configuration is unavailable.');
  }

  const origin = new URL(apiOrigin);
  if (origin.protocol !== 'https:') {
    throw new Error('Product API configuration must use HTTPS.');
  }

  const url = new URL('/v1/products', origin);
  if (normalizedQuery) {
    url.searchParams.set('query', normalizedQuery);
  }
  if (normalizedCategory) {
    url.searchParams.set('category', normalizedCategory);
  }

  const response = await fetch(url, {
    signal: AbortSignal.timeout(8000)
  });

  if (!response.ok) {
    throw new Error('Product service request failed.');
  }

  const payload = await response.json();
  if (!payload || !Array.isArray(payload.products)
      || !payload.products.every((product) =>
        product
        && typeof product.id === 'string'
        && typeof product.name === 'string'
        && typeof product.price === 'string')) {
    throw new Error('Product service returned an unexpected response.');
  }

  const products = payload.products.map((product) => ({
    id: product.id,
    name: product.name,
    price: product.price
  }));

  return {
    content: [
      { type: 'text', text: `Found ${products.length} matching products.` }
    ],
    structuredContent: {
      products,
      total: products.length
    }
  };
};
Do not put API credentials in source code, action metadata, widget JavaScript, logs, or user-facing errors. The Variables & Secrets UI currently supports only non-sensitive variables, not secrets. Do not store an API token in a variable. If your upstream API requires credentials, arrange an approved server-side credential mechanism before connecting it.
For production code, validate the complete upstream response before mapping approved fields into structuredContent.
Add handler tests
Create the matching test:
test/
└── actions/
    └── search-products.test.js
Test at least:
- Valid input.
- Missing or invalid input.
- Empty results.
- API timeout or failure.
- Malformed API data.
- The
structuredContentshape expected by the widget.
Run:
npm test
For project layout and local MCP testing, see Local handler development and testing.
Test the action locally
Run:
npm run dev:local
Without a local actions.json, the server discovers the handler with minimal metadata and no input-schema validation.
Use MCP Inspector or curl to:
- List the registered actions.
- Call the new action with representative arguments.
- Verify
contentandstructuredContent. - Test invalid and empty requests.
Connect and test the widget
If the action has a widget:
- Make the widget read the handler’s
structuredContent. - Render external values with safe DOM APIs such as
textContent. - Add loading, empty, and error states.
- Preview the EDS page locally.
- Verify CSP, CORS, and widget URLs.
See Bring your own EDS project.
Deploy and test
- Commit and push the handler and widget changes.
- Deploy the app to Stage.
- Test the app in ChatGPT or Claude.
- Verify action selection with prompts that match the action and unrelated prompts that do not call for it.
- After Stage succeeds, deploy to Production.
If metadata exists without a matching handler, deployment registers the action with a default stub. Add the handler before making the action available to users.