On this page: Learn how to create a Web In-app message campaign in Adobe Journey Optimizer, from configuring the channel to defining the audience, triggers, and content.
Configure the Web In-app channel configure-web-inapp
To set up your Web In-app channel, follow the steps below:
-
Install the Web SDK tag extension to support Web In-app Messaging. Learn more
-
Customize your triggers. Web In-app Messaging supports two types of triggers: Sent data to platform and Manual triggers. Learn more
-
Create your Web In-app configuration. Learn more
Create your Web In-app message campaign create-inapp-web-campaign
-
Access the Campaigns menu, then click Create campaign.
-
Choose your campaign execution type: Scheduled or API-triggered. Learn more about campaign types on this page.
-
From the Actions drop-down, choose the In-app message.
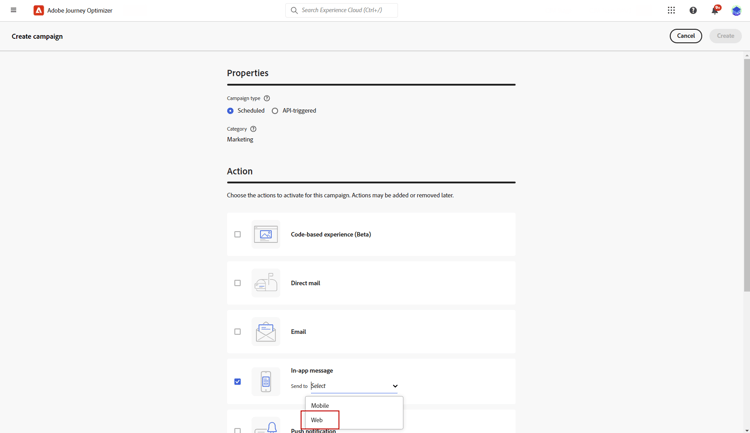
-
Choose or create your app configuration. Learn more
Define your Web In-app message campaign configure-inapp
-
From the Properties section, enter the Title and the Description description.
-
To assign custom or core data usage labels to the In-app message, select Manage access. Learn more.
-
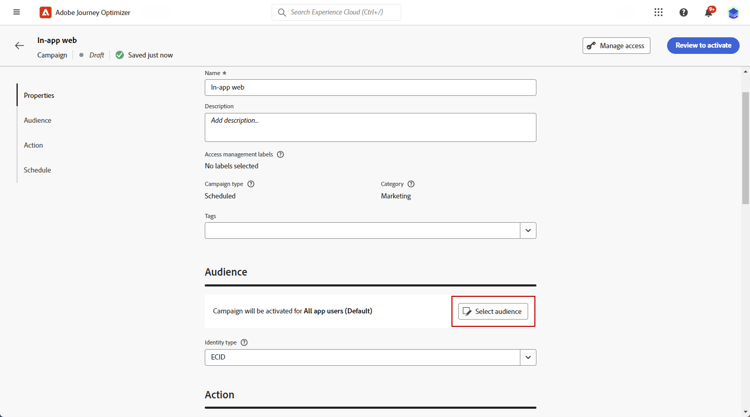
Click the Select audience button to define the audience to target from the list of available Adobe Experience Platform audiences. Learn more.
-
In the Identity namespace field, choose the namespace to use in order to identify the individuals from the selected audience. Learn more.
-
In the Action menu, you can find the settings previously configured as App configuration. You can make changes here if necessary or update your rule by clicking Edit Rule.
-
Click Create experiment to start configuring your content experiment and create treatments to measure their performance and identify the best option for your target audience. Learn more
-
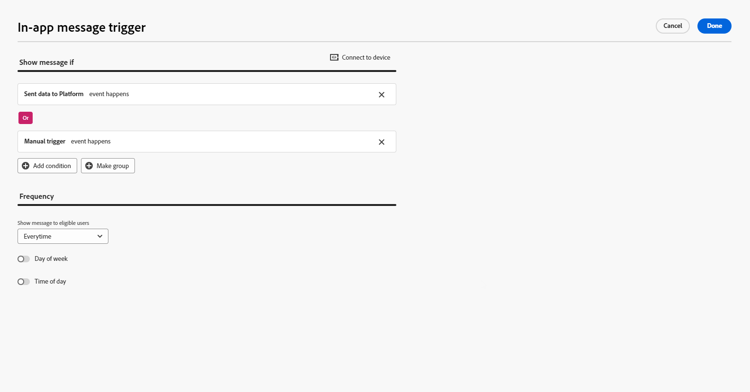
Click Edit triggers to choose the event(s) and criteria that will trigger your message. Rule builders enable users to specify criteria and values that, when met, trigger a set of actions, such as sending an in-app message.
-
Click the event drop-down to change your Trigger if needed.
accordion See available Triggers. table 0-row-3 1-row-3 2-row-3 Package Trigger Definition Platform Sent data to Platform Triggered when the mobile app issues an edge experience event to send data to Adobe Experience Platform. Usually the API call sendEvent from the AEP Edge extension. Manual Manual trigger Two associated data elements: a key, which is a constant that defines the data set (e.g., gender, color, price), and a value, which is a variable that belongs to the set (e.g., male/female, green, 100). -
Click Add condition if you want the trigger to consider multiple events or criteria.
-
Choose the Or condition if you want to add more Triggers to further expand your rule.
-
Choose the And condition if you want to add a custom Trait and better fine-tune your rule.
accordion See available Traits. table 0-row-3 1-row-3 2-row-3 Package Trait Definition Platform XDM event type Triggered when the specified Event type is met. Platform XDM value Triggered when the specified XDM value is met. 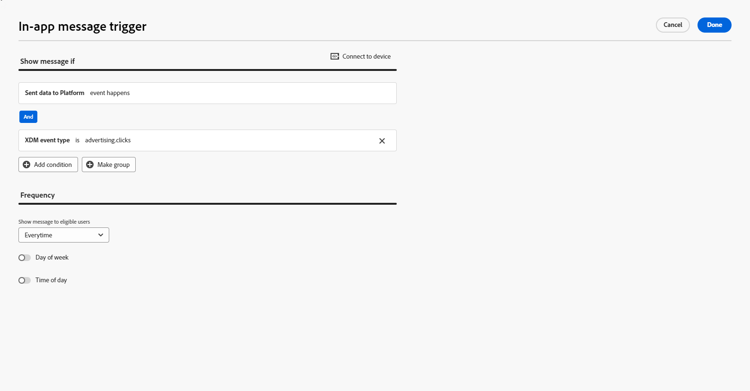
-
Click Make group to group triggers together.
-
-
Choose the frequency of your trigger when your In-app message is active. The following options are available:
- Everytime: Always show the message when the events selected in the Mobile app trigger drop-down occur.
- Once: Only show this message the first time the events selected in the Mobile app trigger drop-down occur.
- Until click through: Show this message when the events selected in the Mobile app trigger drop-down occur until an interact event is sent by the SDK with an action of “clicked”.
- X number of times: Show this message X time.
-
If needed, choose which Day of the week or Time of day the In-app message will be displayed.
-
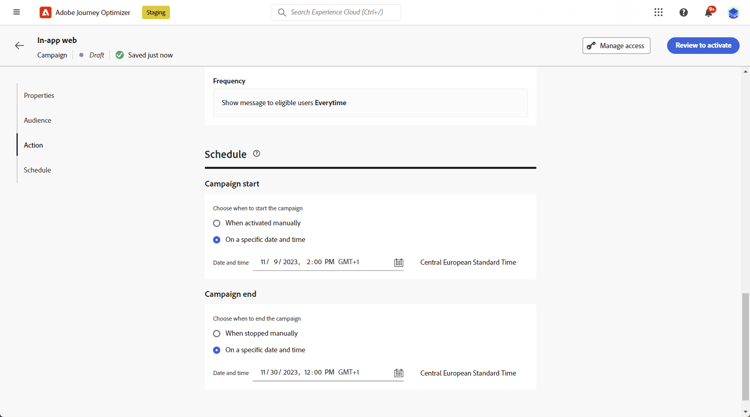
Campaigns are designed to be executed on a specific date or on a recurring frequency. Learn how to configure the Schedule of your campaign in this section.
-
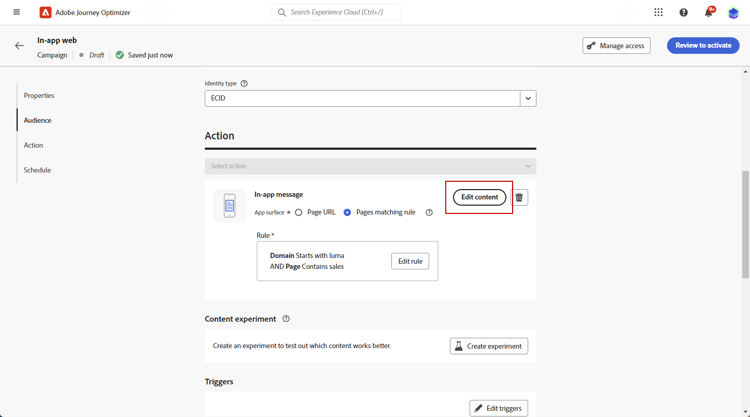
You can now start designing your content with the Edit content button. Learn more
Related topics:
This section contains structured knowledge intended to support interpretation, retrieval, and question answering related to this topic.
For complete understanding, this information should be combined with the documentation on this page. Neither source is intended to stand alone; the page describes the feature, while this section provides additional context that helps disambiguate terminology, intent, applicability, and constraints.
- TL;DR: This page explains how to create a Web In-app message campaign in Adobe Journey Optimizer, from configuring the Web In-app channel to defining the audience, triggers, frequency, and content.
Intents:
- Configure the Web In-app channel by installing the Web SDK tag extension, customizing triggers, and creating a Web In-app configuration
- Create a Web In-app message campaign and choose a Scheduled or API-triggered execution type
- Define campaign properties, select an audience, and choose an Identity namespace
- Create a content experiment to test treatments against a target audience
- Edit triggers using Sent data to Platform or Manual trigger, add conditions, and apply traits
- Set the message display frequency and schedule, then start designing content
Glossary:
- Web In-app message: An in-app message delivered within a web campaign in Journey Optimizer (product-specific)
- Sent data to Platform: A Platform-package trigger fired when the mobile app issues an edge experience event to send data to Adobe Experience Platform, usually the sendEvent API call from the AEP Edge extension (product-specific)
- Manual trigger: A Manual-package trigger defined by two associated data elements, a key (a constant defining the data set) and a value (a variable belonging to the set) (product-specific)
- Trait: An And-condition refinement; available traits are XDM event type and XDM value (product-specific)
- Content experiment: A configuration where you create treatments to measure performance and identify the best option for your target audience (product-specific)
- Identity namespace: The namespace chosen to identify individuals from the selected audience (product-specific)
Guardrails:
- Install the Web SDK tag extension to support Web In-app Messaging before creating the campaign.
- Web In-app Messaging supports two types of triggers: Sent data to platform and Manual triggers.
- Campaign execution type must be either Scheduled or API-triggered.
- Campaigns are executed on a specific date or on a recurring frequency, configured through the Schedule.
Terminology:
- Canonical name: Web In-app message campaign — Acronym: n/a — variants: Web In-app message, In-app message campaign for web
- Synonyms: “Sent data to Platform” = “Sent data to platform trigger”
- Do not confuse: “Sent data to Platform” (Platform-package trigger) ≠ “Manual trigger” (Manual-package trigger using key/value data elements)
- Do not confuse: “Or” condition (adds more Triggers to expand the rule) ≠ “And” condition (adds a custom Trait to fine-tune the rule)
FAQ:
- Q: What are the two Web In-app trigger types? — Sent data to platform and Manual triggers.
- Q: What campaign execution types can I choose? — Scheduled or API-triggered.
- Q: What frequency options are available for the trigger? — Everytime, Once, Until click through, and X number of times.
- Q: How do I identify individuals from my selected audience? — Choose a namespace in the Identity namespace field.
- Q: What traits can I add with the And condition? — XDM event type and XDM value.
- Q: How do I start designing the message content? — Use the Edit content button after configuring the campaign.