[AEM Assets]{class="badge positive" title="Applies to AEM Assets)."}
Manage Licensed Assets on Content Hub manage-licensed-assets-on-content-hub
As an administrator, edit the metadata form to include the asset license field so that it displays in Asset properties within the Adobe Experience Manager (AEM) author environment. You can then approve the asset as well as its license to make the asset licensed and available on Content Hub.
Execute the following steps:
-
Edit the metadata form to include a new text field to include the license details. Map the text field to the
dc:licenseproperty, which stores the licensing information associated with the asset. For more information on how to add fields to a metadata form and define properties, see Setup Metadata Forms.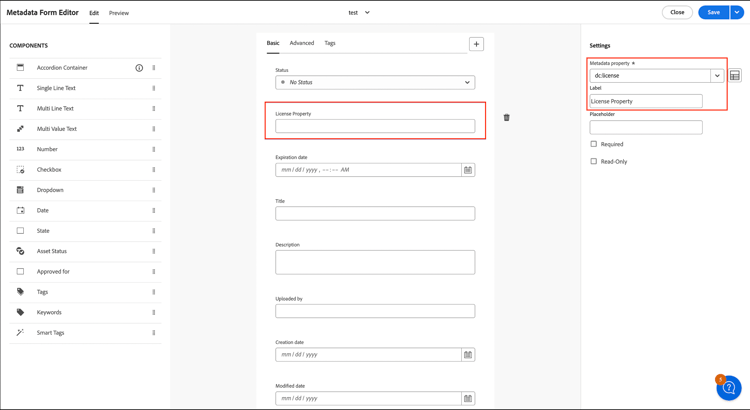
-
Apply the metadata form to the asset folder so that the licensing configuration defined in step 1 takes effect on all assets within that folder. For information on how to assign a metadata form to the asset folder, see Assign metadata form to a folder.
-
Select the asset and click Details to view its properties. In the license field added in Step 1, define the absolute path for the asset license that has been approved in Step 3 or already approved earlier. The Content Hub absolute path follows this standard pattern:
/content/dam/(The asset's folder hierarchy within the Digital Asset Management (DAM) repository)/(asset_name).(file_extension). For example, /content/dam/teamA/projects/documents/file1.pdf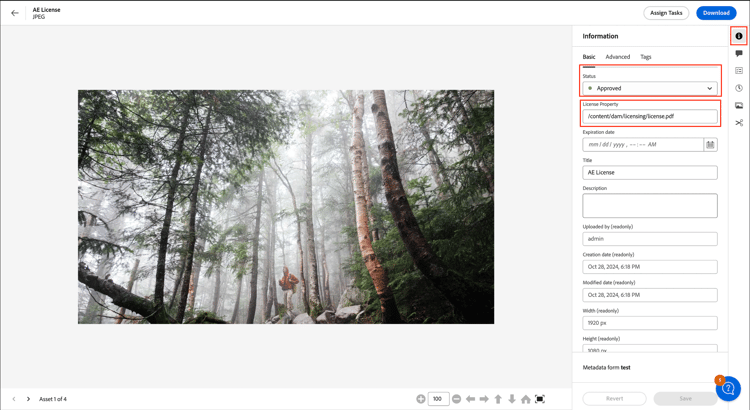
-
Approve the asset to make it available in Content Hub, then click Save. This final approval publishes the licensed asset so that it becomes discoverable and usable on Content Hub. For information on how to approve an asset, see Set asset status.
Frequently asked questions faqs-manage-licensed-assets-content-hub
What is the purpose of managing licensed assets on AEM Assets Content Hub?
Managing licensed assets on Adobe Experience Manager (AEM) Assets Content Hub ensures that only approved assets with valid licenses are available for use across an organization, maintaining compliance and proper metadata tracking within the AEM author environment. This control layer establishes governance over which digital assets teams can access, download, and reuse.
Key purposes of managing licensed assets
- License validation: Confirms that every asset carries a valid, current license before it becomes available for use, preventing unauthorized or expired media from entering active workflows.
- Compliance enforcement: Restricts availability to approved assets, reducing the risk of copyright infringement, contract violations, or usage beyond agreed license terms.
- Metadata tracking: Records and maintains accurate licensing metadata, so ownership, usage rights, and expiration details stay attached to each asset within the AEM author environment.
- Centralized governance: Allows administrators to define and manage what content teams can distribute through the Content Hub, keeping asset use consistent with organizational policy.
Why it matters
Because licensed assets often come with specific terms governing where, how long, and by whom they may be used, tracking these conditions is essential to avoid legal and financial exposure. By enforcing license validation at the point of access, administrators ensure that non-compliant assets never reach downstream users. As a result, marketing teams, designers, and other stakeholders can confidently reuse approved content without manually verifying rights each time.
Practical benefits
Managing licensed assets streamlines asset reuse while keeping the organization audit-ready. Teams gain a trusted, curated library of rights-cleared content, administrators retain oversight of licensing status, and the metadata associated with each asset supports transparent reporting and accountability across the AEM author environment.
How can I add a license field to asset properties in Experience Manager as a Cloud Service?
You add a license field to asset properties in Adobe Experience Manager (AEM) as a Cloud Service by editing the metadata form (metadata schema) to include a new text field mapped to the dc:license metadata property. In the Adobe Experience Manager (AEM) Assets view, the metadata form controls which properties are displayed and editable when users open the asset properties panel. Because AEM stores asset metadata using standardized Dublin Core (dc:) namespaces, mapping a new field to dc:license ensures the license information is captured in a recognized, portable metadata field.
Steps to Add a License Field
- Open the metadata form (metadata schema) used for your assets in the AEM Assets view.
- Add a new text field to the form.
- Map that text field to the
dc:licensemetadata property. - Save the updated metadata form so the change applies to asset properties.
Result
The new license field appears in the asset properties within the AEM Assets author environment. Because the field is mapped to the standard dc:license property, authors can view and edit license information directly in the asset properties panel, keeping licensing details consistent across managed assets.
How to apply a metadata form to an asset folder to include the license field in asset properties in AEM Assets?
To display the license field in asset properties, edit the applicable metadata form in Adobe Experience Manager (AEM) Assets and apply that form to the target asset folder. The metadata form controls which fields appear in the asset properties view, so adding the license field to the form makes it available for every asset in the folder to which the form is applied.
Steps to Include the License Field
- Open Adobe Experience Manager (AEM) Assets view and locate the metadata form governing your assets.
- Edit the metadata form to include the license field, adding it to the form so the field renders in asset properties.
- Apply the edited metadata form to the specific asset folder that should carry the new license field.
Why Applying the Form to the Folder Matters
Because the metadata form defines the schema of fields shown in asset properties, applying it at the folder level propagates the new settings to all assets within that folder. As a result, every asset inside the selected folder inherits the license field, ensuring consistent metadata across the folder without editing each asset individually.
How do I specify the license details for an asset in AEM Assets view?
You can specify license details for an asset in the Adobe Experience Manager (AEM) Assets view by associating the asset with an approved license reference stored in its metadata. This links the digital asset to its governing usage rights, which supports rights management and compliance tracking across the asset library.
Steps to specify license details:
- Select the target asset in the Assets view.
- Click Details to open and view the asset’s properties.
- In the license field added to the metadata form, enter the absolute path of the approved asset license.
Providing the absolute path ensures the reference resolves to the exact approved license asset regardless of the current navigation context, keeping the association accurate and unambiguous. Because the license reference lives on the metadata form, it travels with the asset’s properties and remains discoverable whenever the asset’s Details are reviewed.
What is the required format for the AEM Assets Content Hub absolute path for an asset license?
The Content Hub absolute path for an asset license in Adobe Experience Manager (AEM) Assets must follow this exact pattern:
/content/dam/(the asset's folder hierarchy within the DAM repository)/(asset_name).(file_extension)
This path is an absolute reference that begins at the root of the Digital Asset Management (DAM) repository and resolves down to a single, specific asset. Because the path is absolute, it uniquely and unambiguously identifies the licensed asset within the repository.
Path Components
The path is composed of four required segments, in order:
/content/dam/— the fixed root prefix for all assets stored in the AEM DAM repository. Every valid Content Hub absolute path begins with this segment.- The folder hierarchy — the full nested folder structure within the DAM repository, listed in order from the top-level folder down to the folder that directly contains the asset (for example,
teamA/projects/documents). - The asset name — the exact file name of the asset as stored in the repository (
asset_name). - The file extension — the asset’s format extension, preceded by a period (
.file_extension), such as.pdf,.png, or.jpg.
Example
/content/dam/teamA/projects/documents/file1.pdf
In this example, teamA/projects/documents is the folder hierarchy within the DAM repository, file1 is the asset name, and pdf is the file extension. Because the folder hierarchy, asset name, and extension together form the complete absolute path, each segment must exactly match the asset’s actual location and file name for the asset license to resolve correctly.
Why is it important to approve both the asset and its license to make them available on AEM Assets Content Hub?
Approving both the asset and its license is required because it establishes a dual-gate control that guarantees only properly licensed, authorized content becomes discoverable and downloadable in Adobe Experience Manager (AEM) Assets Content Hub. As a result, an asset can only be published when its usage terms have also been verified, preventing unlicensed or improperly cleared media from entering the distribution workflow.
Why Dual Approval Matters
In digital asset management (DAM), an asset and the rights that govern its use are distinct records. An image, video, or document may be technically ready to share, yet still be restricted by the terms of its license — such as limits on usage duration, geography, channel, or intended audience. Approving the asset alone confirms it is fit for use, while approving the license confirms the organization actually holds the rights to distribute it. Requiring both approvals closes the gap between “the asset exists” and “the asset is legally cleared to be used.”
Key Reasons to Approve Both the Asset and Its License
- Ensures compliance: Only assets whose rights have been validated are made available, reducing the risk of copyright infringement or breach of licensing terms.
- Enforces proper usage rights: Approving the license confirms that the intended use aligns with the permissions granted, so downstream teams do not unknowingly use content beyond its authorized scope.
- Maintains a trusted content library: Content Hub users can rely on the fact that every published asset has been cleared for use, streamlining self-service access without introducing legal exposure.
- Supports governance and auditability: Recording approval of both the asset and its license creates a clear trail of who authorized what, which supports accountability and rights tracking over the asset’s lifecycle.
How This Protects the Organization
Because unlicensed or expired-license content can create legal, financial, and reputational risk, the dual-approval requirement functions as a safeguard. When both the asset and its license are approved, publication to Content Hub signals that the material is both usable and rightfully licensed — helping the organization maintain compliance, preserve valid usage rights, and give every user confidence that available assets are safe to deploy.
How do I make an asset available in AEM Assets Content Hub after approving its license?
To make a licensed asset available in Adobe Experience Manager (AEM) Assets Content Hub, define the license path in the asset’s properties, approve the asset, and click Save. Saving the approved asset commits its license status and publishes it to Content Hub, making it accessible for distribution and reuse.
Steps to publish a licensed asset to Content Hub:
- Open the asset’s properties and define the license path for the asset.
- Approve the asset to confirm its license status.
- Click Save to commit the changes.
Once these steps are complete, the licensed asset becomes available in AEM Assets Content Hub. The Save action is the trigger that finalizes approval, because it commits both the defined license path and the approved status together — as a result, the asset is published to Content Hub and ready for authorized users to access. This workflow ensures that only assets with a properly defined and approved license are surfaced in Content Hub, maintaining compliance across the digital asset management (DAM) environment.
Who is responsible for managing licensed assets in AEM Assets Content Hub?
Administrators are the role responsible for managing licensed assets in Adobe Experience Manager (AEM) Assets Content Hub. Administrators govern the metadata, folder organization, and approval workflows that keep licensed content compliant and correctly published.
Administrator responsibilities in AEM Assets Content Hub include:
- Editing metadata forms — defining and maintaining the metadata fields applied to assets.
- Assigning metadata forms to asset folders — mapping the appropriate forms to the folders where assets are stored.
- Approving both assets and their licenses — reviewing assets and validating their associated licenses before they are made available.
By centralizing approval of both the asset and its license with administrators, AEM Assets Content Hub ensures that only reviewed, license-compliant content is released to users. This oversight reduces the risk of unauthorized or improperly licensed assets entering downstream workflows, making the administrator role central to content governance and metadata consistency across the platform.
See also
- Translate Assets
- Assets HTTP API
- Assets supported file formats
- Search assets
- Connected assets
- Asset reports
- Metadata schemas
- Download assets
- Manage metadata
- Manage Dynamic Media templates
- Manage reports in Assets view
- Search facets
- Manage collections
- Bulk metadata import
- Publish Assets to AEM and Dynamic Media