[AEM Assets]{class="badge positive" title="Applies to AEM Assets)."}
Manage assets manage-assets
The Assets view interface supports the full range of digital asset management (DAM) operations through a single, user-friendly workspace. After adding assets, you can search, download, move, copy, rename, delete, update, and edit them directly from Assets view.
Use Assets view to accomplish the following asset management tasks. When you select an asset, the toolbar at the top displays the applicable options for that asset.

Figure: Options available in the toolbar for a selected image.
-

-

-

-

-

-

-

-
-

-

-

-

-

Additionally, you can click the title of an asset or a folder to rename it. Enter the new text in the Rename Asset textbox and click Save. This capability is available in Grid, Gallery, Waterfall, and List views. -

-
-

-

You can view the same options on the asset thumbnails.
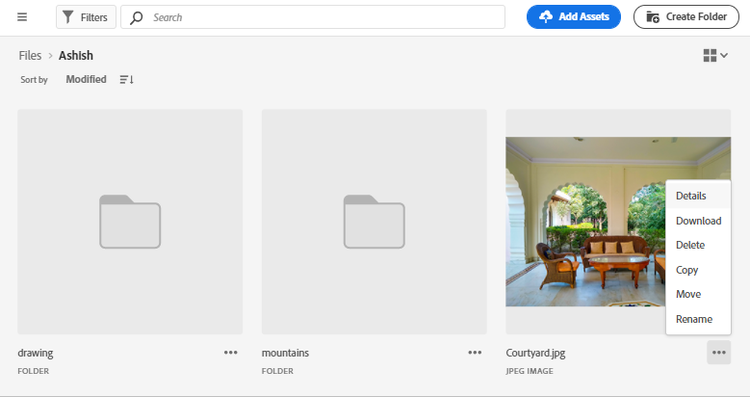
Assets view displays only the relevant options in the toolbar, and those options depend on the type of the selected asset.

Figure: Options available in the toolbar for a selected folder.

Figure: Options available in the toolbar for a selected PDF file.
Download and distribute assets download
You can download one or more assets, folders, or a combination of both from Assets view directly to your local file system. Selecting a mix of individual assets and entire folders in a single operation streamlines bulk retrieval, so you can obtain everything you need without repeating the download for each item.
Once assets are downloaded to your local file system, you can:
- Edit the assets locally using your preferred applications, then upload the updated versions back into Assets view.
- Distribute the assets outside Assets view to share them beyond the platform. This lets you deliver approved files to external stakeholders, partners, or offline workflows that do not have access to Assets view.
- Download the renditions of an asset. Renditions are the alternate versions or formats of an asset—such as resized, reformatted, or otherwise derived copies—generated from the original, allowing you to retrieve the specific variant that matches your intended use.
Because downloading preserves the original files on your local file system while keeping the source assets intact in Assets view, you can iterate on content offline and reintroduce revised versions without losing the master copy.
Asset versioning versions-of-assets
Asset versioning in Assets view automatically preserves earlier states of an asset whenever that asset is re-uploaded, updated, or edited. You can view the version history, review past versions, and restore any past version as the latest version. Restoring a past version reverts the asset to that earlier state, so no previous work is lost and you can recover an approved or original file at any time.
Assets view creates a new version in the following scenarios:
-
Uploading a duplicate asset. Upload a new asset with the same filename as an existing asset and in the same folder as the existing asset. Assets view prompts you to either overwrite the previous asset or save the new asset as a version. See upload duplicate assets.
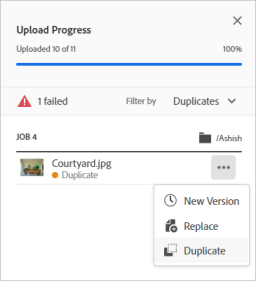
Figure: When uploading an asset named the same as an existing asset, you can create a version of the asset.
-
Saving an edited image as a version. Edit an image and click Save as Version. This keeps the original intact while storing your edits as a distinct version. See edit images.
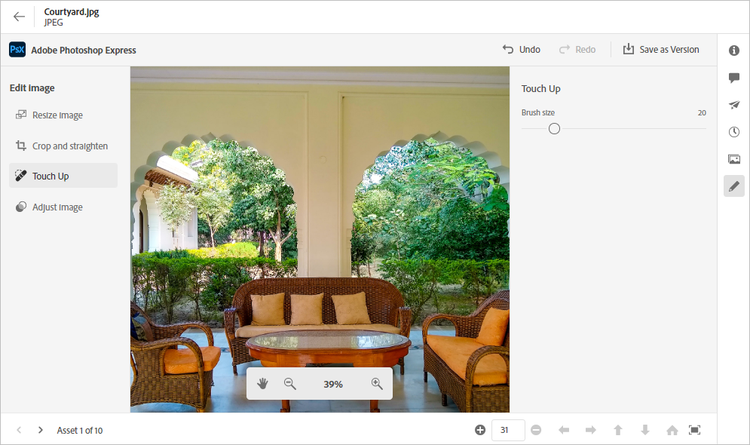
Figure: Save edited image as a version.
-
Uploading a newer version manually. Open the versions of an existing asset, click New Version, and upload a newer version of the asset in the repository.
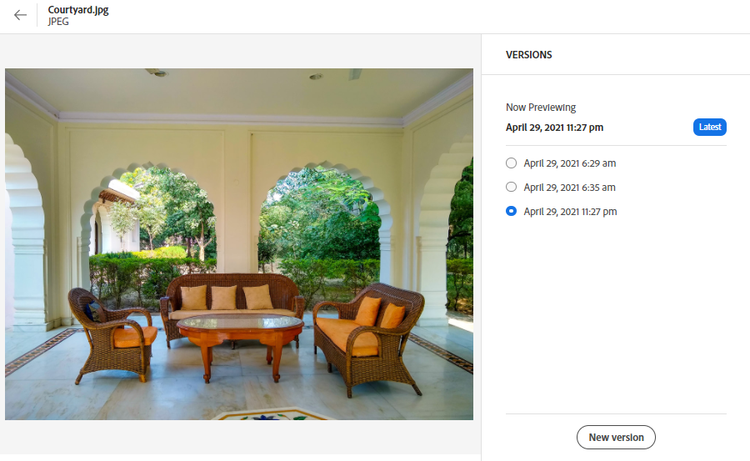
View and compare versions of an asset view-and-compare-versions
Versioning tracks the modifications to an asset over time and lets users revert to a previous version when needed. To create versions, upload a duplicate copy or a modified copy of an asset. This ensures that earlier iterations are never permanently lost, so users can always restore a prior state of the asset if a later change is unwanted.
To view and compare versions:
-
Navigate to the asset’s details page.
-
Click

-
Select a version on the panel to preview it in the preview area.
-
Select any version other than the latest, and click Make Latest to set it as the latest version. This promotes an earlier iteration to the current working version without deleting the version history.
-
Drag the slider in the preview toward the left and right to quickly see the selected version of an image and its latest version in a single preview. This enables a quick side-by-side comparison of the selected version of the image with its latest version.

note NOTE Version compare is enabled only for image assets.
To add a new version, select the latest version and click New Version to upload a new copy of the asset from your local file system. This creates a new asset version while preserving all previous versions in the version history.
Manage asset status manage-asset-status
Permissions required: Can Edit, Owner, or administrator permissions on an asset.
The Assets view enables users to set a status on any asset available in the repository. Setting an asset status governs and controls the downstream consumption of digital assets, ensuring that only reviewed and approved content is distributed or reused. This provides a clear approval workflow that improves content quality and reduces the risk of publishing unapproved material.
Users with the required permissions can set the following statuses on assets:
-
Approved — indicates the asset has passed review and is cleared for downstream use, distribution, or reuse.
-
Rejected — indicates the asset has been reviewed and is not cleared for use, signaling that it should not be consumed downstream.
-
No Status — indicates the asset has not yet been reviewed or assigned a status, marking it as pending evaluation.
Set asset status set-asset-status
To set the status of an asset in Adobe Experience Manager Assets:
-
Select the asset, and click Details in the toolbar.
-
In the Basic tab, select the asset status from the Status drop-down list. The three available status values are Approved, Rejected, and No Status (the default). No Status indicates that the asset has not yet been reviewed and remains in its initial, unmarked state, while Approved and Rejected record the outcome of the review decision.
If you have Dynamic Media with OpenAPI capabilities—the delivery capability that enables assets to be served through a public endpoint—provisioned for your environment, the approval action carries an additional effect. As soon as you mark the asset as Approved, Experience Manager Assets automatically generates a public URL, because approval signals that the asset is ready for external delivery and distribution.
embed https://video.tv.adobe.com/v/342495?learn=on
Set approval target set-approval-target
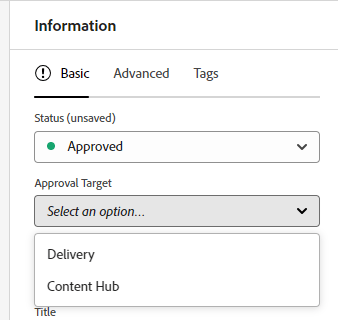
The Approval Target field on the Asset Details page controls where approved assets are published. Using the Assets view, you publish approved assets to Dynamic Media with OpenAPI (DM with OpenAPI) capabilities, Content Hub, or both, depending on the value you set in this field. This single field determines the publish destination for every asset you approve.
To set the approval target:
-
Select the asset, and click Details in the toolbar.
-
In the Basic tab, select the asset status from the Status drop-down list. The possible values include Approved, Rejected, and No Status (the default).
-
If you select Approved in step 2, select an approval target. The possible values include Delivery and Content Hub.
-
Delivery is the default option selected in the drop-down menu, and it publishes the asset to both Dynamic Media with OpenAPI and Content Hub, provided both are enabled for Experience Manager Assets. This ensures the asset reaches every delivery surface that your environment supports without requiring separate publish actions.
-
Selecting Content Hub restricts publishing so that the asset is delivered exclusively to Content Hub. As a result, the asset does not reach Dynamic Media with OpenAPI. Content Hub displays as an option only when it is enabled for Experience Manager Assets.
-
If you do not select an option from the drop-down list, Experience Manager automatically applies the default option enabled for your AEM as a Cloud Service environment to the asset.
For more information on the available options, see Default Approval Target and publish destinations for approved assets.
-
-
Specify other asset properties and click Save.
Some additional points to note include:
-
When you are not using the default metadata form and cannot view the Approval Target field, edit your metadata form to drag the Approval for field from the available components onto your metadata form, then click Save. This makes the Approval Target field visible so you can set a publish destination.
-
When you select the approval target as
Content Hubusing the Assets view, the assets become available in Content Hub to the users that are part of the same organization. Because access is scoped to the organization, only users within that organization can view or use the published assets.
Default Approval Target and publish destinations for approved assets default-approval-target-options-publish-destinations
The following table illustrates the prerequisites for display of the Approval Target dropdown list, and the default approval target based on whether Dynamic Media with OpenAPI and Content Hub are enabled on your AEM as a Cloud Service environment. The dropdown list appears whenever at least one of the two destinations is enabled:
Set asset expiration date set-asset-expiration-date
Assets view lets you assign an expiration date to any asset in the repository, giving you a built-in way to manage the lifecycle of digital assets and flag content that should no longer be used after a certain point. Once an expiration date is set, you can filter the search results based on an Expired asset status. You can also specify an expiration date range to narrow your search results further, making it easier to locate assets that expire within a defined window or that have already lapsed.
Steps to set an asset expiration date
- Select the asset, and click Details in the toolbar.
- In the Basic tab, set the expiration date for the asset using the Expiration date field.
How the Expired indicator behaves
The Expired asset card indicator overrides the Approved or Rejected indicator set for an asset. As a result, once an asset passes its expiration date, its card displays the Expired status regardless of whether it was previously marked Approved or Rejected. This ensures that expired content is clearly identified at a glance, so it is not mistakenly reused after its intended lifespan.
You can also filter assets based on an asset status. For more information, see Search assets in Assets view.
Customize metadata forms to include asset status field customize-asset-status-metadata-form
Permissions required: Administrator
Customizing metadata forms requires Administrator permissions and lets organizations extend the Assets view with business-specific metadata fields. By default, Assets view provides many standard metadata fields, but most organizations have additional metadata needs that these defaults do not cover.
A metadata form is the configurable structure that defines which fields appear on an asset’s Details page. Metadata forms let businesses add custom metadata fields to that page, and each field is bound to the underlying asset property through a mapping property, which specifies where the field’s value is stored. Adding business-specific metadata directly improves the governance and discovery of the organization’s assets, because richer, standardized metadata makes assets easier to search, classify, filter, and manage across their lifecycle.
For more information on how to add additional metadata fields to the metadata form, see Metadata Forms.
Add Asset Status metadata field to the form
To add the Asset Status metadata field to the form:
- Drag the Asset Status component from the left rail onto the form.
- Confirm the mapping property, which populates automatically for this component — no manual mapping is required.
- Save the form to confirm the changes.
The Asset Status field enables the organization to track and surface the current state of each asset, supporting governance and lifecycle workflows.
Add Expiration Date metadata field to the form
To add the Expiration Date metadata field to the form:
- Drag the Date component from the left rail onto the form.
- Specify Expiration Date as the field label.
- Enter
pur:expirationDateas the mapping property, which binds the label to the correct underlying asset property. - Save the form to confirm the changes.
The Expiration Date field lets the organization capture when an asset is no longer valid for use, which supports compliance, retention, and automated lifecycle management of assets.
Next Steps next-steps
Continue building your expertise in the Assets view by exploring these recommended actions, feedback channels, and related documentation:
-
Watch a video to manage assets in Assets view to see core management tasks demonstrated end to end.
-
Provide product feedback using the Feedback option available on the Assets view user interface. This feedback helps shape future product improvements and prioritize the capabilities that matter most to Assets view users.
-
Provide documentation feedback using Edit this page


-
Contact Customer Care for account-specific assistance and to resolve support issues that documentation and self-service options do not address.
See also — related documentation covering translation, APIs, metadata, search, publishing, and other core Assets view workflows:
- Translate Assets
- Assets HTTP API
- Assets supported file formats
- Search assets
- Connected assets
- Asset reports
- Metadata schemas
- Download assets
- Manage metadata
- Manage Dynamic Media templates
- Manage reports in Assets view
- Search facets
- Manage collections
- Bulk metadata import
- Publish Assets to AEM and Dynamic Media