在此頁面上:瞭解如何在Adobe Journey Optimizer Email Designer中從頭開始設計電子郵件內容,方法是新增結構和內容元件,然後個人化和預覽您的電子郵件。
使用Adobe Journey Optimizer電子郵件Designer以輕鬆定義內容結構。 透過使用簡單的拖放動作新增和移動結構元素,您可以在數秒內設計內容的形狀。
若要開始建立您的內容,請遵循下列步驟:
-
從Designer首頁,選取 從頭開始設計 選項。

-
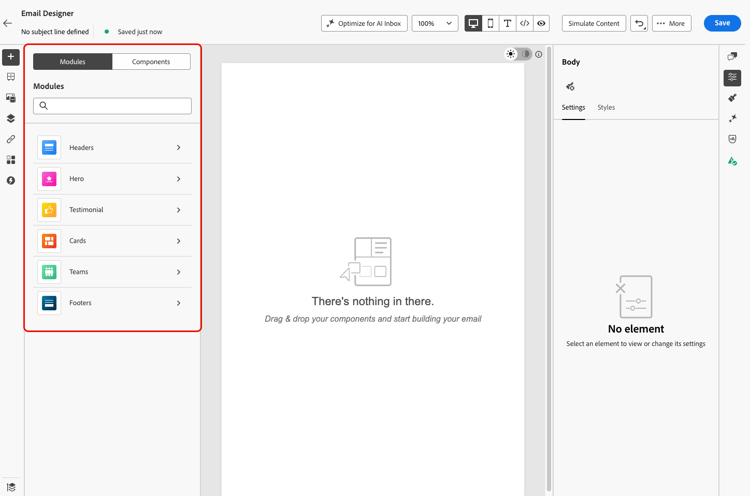
若要快速入門,請使用模組 (即用即用的預先設計內容區塊,例如頁首、主圖區段和頁尾)來加速電子郵件建立,並保持您的行銷活動在視覺上保持一致。 進一步瞭解模組
-
否則,請將 Structures 拖放到畫布中,以定義電子郵件的版面配置,來設計您的內容。
note tip TIP 或者,使用「產生內容」來加速您的電子郵件建立,以產生完整的電子郵件內容,包括文字和影像,使用使用AI產生完整內容。 接著,您可以直接預覽及驗證內容。 -
視需要新增多個結構,並在右側的專用窗格中編輯其設定。
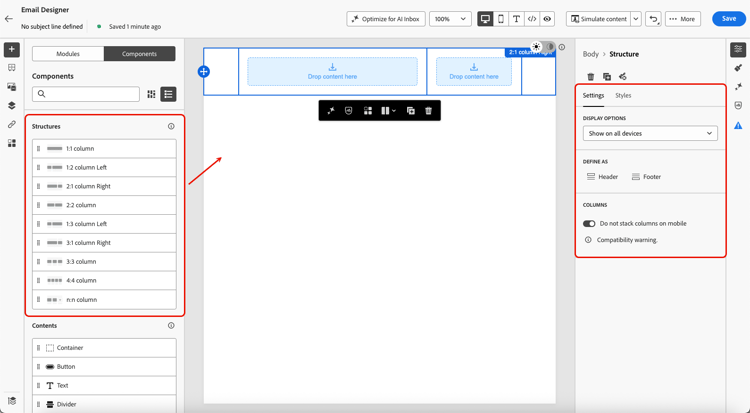
note NOTE 在窄熒幕(例如行動熒幕)中,欄預設會垂直棧疊以供閱讀。 有些電子郵件使用者端不支援此行為,在這種情況下,欄會並排保留。 您也可以使用 設定 索引標籤中的 不要棧疊行動裝置上的欄 切換來關閉此專案。 -
大部分的結構(1:1欄、2:2欄、1:2欄左等)都是固定的預設集。 請改為選取 n:n欄 元件,以定義您選擇的任何欄數(介於3到10之間)。
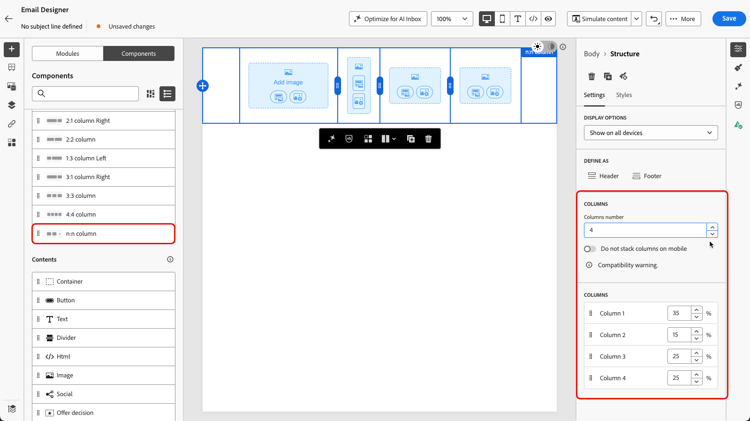
您可以隨時從 設定 索引標籤增加現有結構的欄數,即使新增內容後亦然 — 您的現有內容會保留,而不會遺失。
您也可以直接在畫布上調整每欄的寬度,或是在 設定 索引標籤中編輯百分比。
note NOTE 每個欄的大小不能小於結構元件總寬度的 10%。 如果欄不是空的,則無法移除。 -
從 Contents 區段,新增您所需數量的元素至一或多個結構元件。 進一步了解內容元件
-
每個元件都可以使用右方功能表中的 設定 或 樣式 標籤進一步自訂。 例如,您可以變更每個元件的文字樣式、邊框間距或邊界。 了解對齊方式和邊框間距的詳細資訊

-
您可以從 資產選擇器 直接選取儲存在 Assets資料庫 中的資產。 進一步瞭解資產管理
連按兩下包含資產的資料夾。 將其拖放至結構元件中。

-
插入個人化欄位,從設定檔屬性、對象成員資格、內容屬性等自訂內容。 進一步了解內容個人化

-
按一下 啟用條件內容 以新增動態內容,並根據條件規則將內容調整至目標設定檔。 開始使用動態內容

-
從左窗格按一下 連結 索引標籤,以顯示您要追蹤之內容的所有URL。 您可以修改其 追蹤型別 或標籤,並視需要新增標籤。 進一步瞭解連結和追蹤

-
如果需要,您可以按一下「進階」選單中的「切換到程式碼編輯器」進一步個人化您的電子郵件。 這可讓您編輯電子郵件原始碼,例如新增追蹤或自訂 HTML 標記。 進一步了解程式碼編輯器
note caution CAUTION 切換到程式碼編輯器後,您無法恢復到此電子郵件的視覺化設計工具。 -
內容準備就緒後,請使用任一模擬方法來檢查轉譯。 您可以選擇桌面或行動檢視。 詳細資訊可在內容管理區段中取得。

-
您也可以驗證內容品質,以評估可讀性、有效性和內容一致性。 了解更多關於內容品質驗證的資訊
-
當您的內容準備就緒時,請按一下[儲存]。
note NOTE 使用自動儲存時,當您在電子郵件Designer中設計內容時,幾秒鐘後就會自動儲存內容。 此功能限量提供。 請聯絡您的 Adobe 代表以取得存取權。
This section contains structured knowledge intended to support interpretation, retrieval, and question answering related to this topic.
For complete understanding, this information should be combined with the documentation on this page. Neither source is intended to stand alone; the page describes the feature, while this section provides additional context that helps disambiguate terminology, intent, applicability, and constraints.
- TL;DR: This page explains how to design email content from scratch in the Email Designer by adding structure and content components, defining columns, personalizing, adding dynamic content and links, and previewing before saving.
Intents:
- Start an email from the Design from scratch option and add structure components
- Define the number and width of columns in a structure component
- Add content components, personalization fields, and dynamic (conditional) content
- Review and configure tracked links from the Links tab
- Preview rendering with a simulation method and validate content quality
- Switch to the code editor for advanced source editing
Glossary:
- Design from scratch: The Designer home page option to start building content by adding structures and components (product-specific)
- Structure components: Elements that define the layout of the email, added by drag and drop into the canvas (product-specific)
- n:n column: A structure component whose number of columns can be defined between 3 and 10 (product-specific)
- Switch to code editor: An advanced-menu option to edit the email source code (for example to add tracking or custom HTML tags) (product-specific)
Guardrails:
- The n:n column component supports between 3 and 10 columns.
- Each column size cannot be under 10% of the total width of the structure component.
- You cannot remove a column that is not empty.
- After switching to the code editor, you cannot revert back to the visual designer for that email.
- Stacking columns is not compatible with all email programs; when not supported, columns will not be stacked.
Terminology:
- Canonical name: Structure components — Acronym: n/a — variants: Structures, structure component
- Synonyms: “Design from scratch” = starting content with no template
- Do not confuse: “Structure components” (define layout) ≠ “Content components” (elements placed inside structures)
- Do not confuse: “Settings tab” ≠ “Style tab” (both used to customize components)
FAQ:
- Q: How many columns can a structure have? — Between 3 and 10, defined with the n:n column component.
- Q: Can I make a column narrower than 10%? — No, each column size cannot be under 10% of the total width of the structure component.
- Q: Can I go back to the visual designer after using the code editor? — No, you cannot revert back to the visual designer for that email after switching to the code editor.
- Q: How do I check rendering before saving? — Use either simulation method to check rendering, choosing the desktop or mobile view.
- Q: Where do I manage tracked links? — In the Links tab from the left pane, where you can modify Tracking Type or Label and add Tags.