In questa pagina: Crea una campagna che utilizza l’azione Casella in entrata, esegui il targeting di un pubblico e pianificalo o attivalo, in modo da poter inviare messaggi persistenti che gli utenti possono rivedere nella propria casella in entrata.
Prima di creare una casella in entrata, completare i passaggi in Configurazione casella in entrata. La configurazione del canale identifica l’applicazione o il sito web di destinazione, la pagina o la regola e il posizionamento in cui viene eseguito il rendering della casella in entrata.
Per creare una casella in entrata dei messaggi tramite una campagna, effettua le seguenti operazioni:
-
Creare una campagna. Ulteriori informazioni
-
Seleziona il tipo di campagna da eseguire:
-
Pianificato - Marketing: esegui la campagna immediatamente o in una data specificata. Le campagne pianificate hanno lo scopo di inviare messaggi di marketing. Vengono configurati ed eseguiti dall’interfaccia utente di.
-
Attivato da API - Marketing/Transazionale: esegui la campagna utilizzando una chiamata API. Le campagne attivate da API hanno lo scopo di inviare messaggi di marketing o messaggi transazionali, ovvero messaggi inviati in seguito a un’azione eseguita da un individuo: reimpostazione password, acquisto carrello, ecc. Scopri come attivare una campagna utilizzando le API
-
-
Nella scheda Proprietà, specifica un nome e una descrizione per la campagna.
-
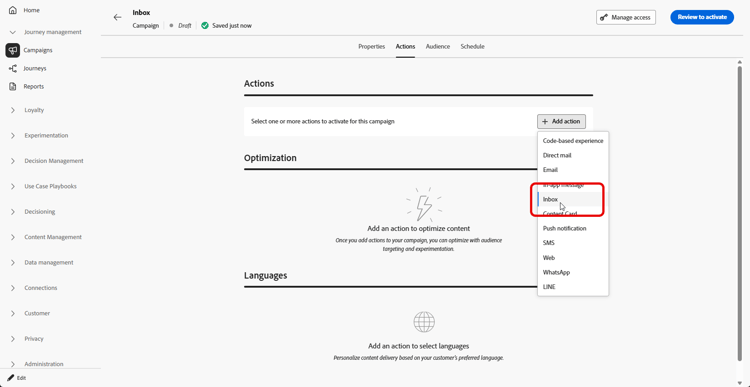
Dalla scheda Azione, selezionare l’azione Posta in arrivo.
-
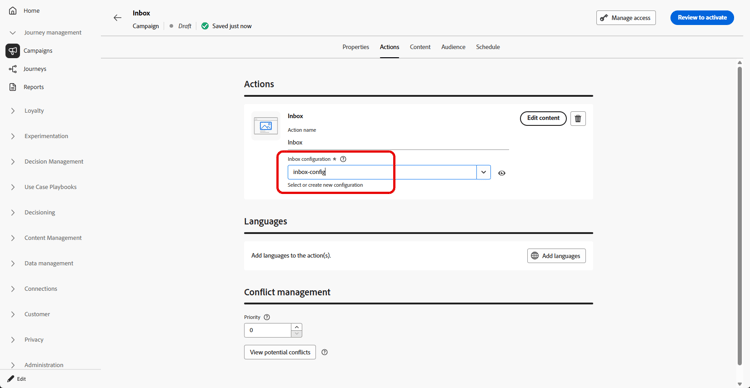
Selezionare o creare una nuova configurazione Posta in arrivo.
-
Accedi alla scheda Contenuto per progettare il messaggio utilizzando Progettazione contenuti. Ulteriori informazioni
-
Nella scheda Pubblico, fai clic sul pulsante Seleziona pubblico per visualizzare l’elenco dei tipi di pubblico di Adobe Experience Platform disponibili. Ulteriori informazioni sui tipi di pubblico
-
Nel campo Spazio dei nomi identità, scegli lo spazio dei nomi da utilizzare per identificare i singoli utenti dal segmento selezionato. Ulteriori informazioni sugli spazi dei nomi
-
Puoi pianificare la campagna a una data specifica o impostarla per la ricorrenza a intervalli regolari. Ulteriori informazioni
-
Rivedi e attiva la campagna per inviare messaggi alla casella in entrata.
Ora puoi scegliere questa casella in entrata al momento della creazione della campagna per schede di contenuto.
This section contains structured knowledge intended to support interpretation, retrieval, and question answering related to this topic.
For complete understanding, this information should be combined with the documentation on this page. Neither source is intended to stand alone; the page describes the feature, while this section provides additional context that helps disambiguate terminology, intent, applicability, and constraints.
- TL;DR: This page explains how to create a message inbox through a campaign that uses the Inbox action, targets an audience, and is scheduled or triggered to deliver persistent messages users can revisit.
Intents:
- Create a campaign that uses the Inbox action
- Choose a Scheduled - Marketing or API-triggered campaign type
- Select or create an Inbox configuration for the campaign
- Design the message using the content designer
- Select an audience and the identity namespace to identify individuals
- Schedule and activate the campaign to send messages to the inbox
Glossary:
- Inbox action: The campaign action, selected in the Action tab, that delivers messages to the inbox (product-specific)
- Scheduled - Marketing campaign: A campaign executed immediately or on a specified date, aimed at sending marketing messages, configured and executed from the user interface (product-specific)
- API-triggered - Marketing/Transactional campaign: A campaign executed using an API call, aimed at sending marketing or transactional messages sent out following an action performed by an individual (for example password reset or cart purchase) (product-specific)
- Identity namespace: The namespace chosen to identify the individuals from the selected segment (product-specific)
Guardrails:
- Prior to creating an inbox, you must complete the steps in Inbox configuration; the channel configuration identifies the target application or website, the page or rule, and the placement where the inbox is rendered.
- You must select or create an Inbox configuration for the campaign.
- The campaign must be reviewed and activated to send messages to the inbox.
Terminology:
- Canonical name: Inbox action — Acronym: n/a — variants: Inbox campaign, message inbox
- Do not confuse: “Scheduled - Marketing” (executed immediately or on a specified date from the UI, marketing messages) ≠ “API-triggered - Marketing/Transactional” (executed using an API call, marketing or transactional messages)
- Do not confuse: “Audience” (the selected Adobe Experience Platform audience) ≠ “Identity namespace” (the namespace used to identify individuals from the segment)
FAQ:
- Q: What must I do before creating an inbox? — Complete the steps in Inbox configuration, which identifies the target application or website, the page or rule, and the placement where the inbox is rendered.
- Q: Which campaign types can I use? — Scheduled - Marketing (executed immediately or on a specified date from the UI) or API-triggered - Marketing/Transactional (executed using an API call).
- Q: How do I design the message? — Access the Content tab and design your message using the content designer.
- Q: How are individuals identified? — In the Identity namespace field, choose the namespace used to identify the individuals from the selected segment.
- Q: What can I do after creating this Inbox? — You can choose this Inbox when creating your Content card campaign.