On this page: Add a LINE action to a journey or campaign and build personalized content, from text and stickers to images, videos, locations, and Flex Messages, so you can engage customers on LINE.
Add a LINE message create-line-journey-campaign
Browse the tabs below to learn how to add a LINE message in a campaign or a journey.
-
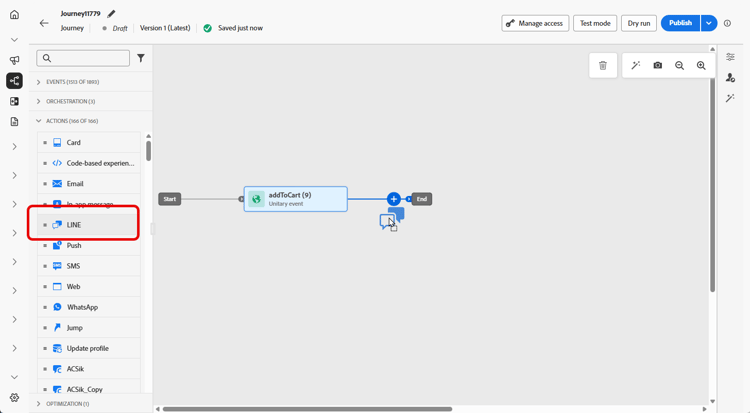
Open your journey then drag and drop a LINE activity from the Actions section of the palette.
-
Provide basic information on your message (label, description, category), then choose the message configuration to use.
For more information on how to configure a journey, refer to this page
The configuration field is pre-filled, by default, with the last configuration used for that channel by the user.
You can now start designing the content of your LINE message from the Edit content button, as detailed below.
-
Access the Campaigns menu, then click Create campaign.
-
Select the type of campaign that you want to execute
-
Scheduled - Marketing: execute the campaign immediately or on a specified date. Scheduled campaigns are aimed at sending marketing messages. They are configured and executed from the user interface.
-
API-triggered - Marketing/Transactional: execute the campaign using an API call. API-triggered campaigns are aimed at sending either marketing, or transactional messages, i.e. messages sent out following an action performed by an individual: password reset, cart purchase etc.
-
-
From the Properties section, edit your Campaign’s Title and Description.
-
Click the Select audience button to define the audience to target from the list of available Adobe Experience Platform audiences. Learn more.
-
In the Identity namespace field, choose the namespace to use in order to identify the individuals from the selected audience. Learn more.
-
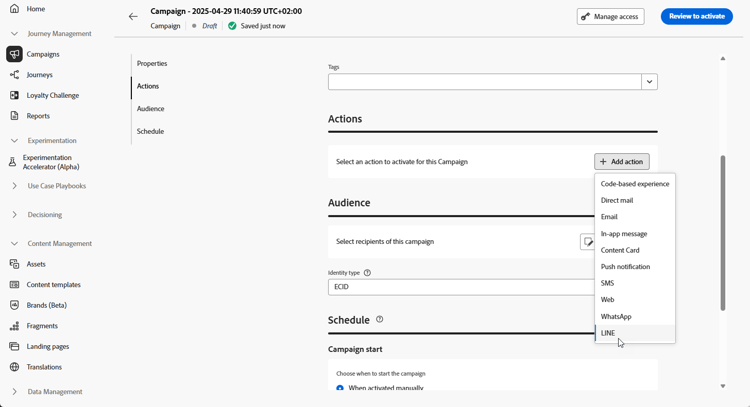
In the Actions section, choose the LINE and select or create a new configuration.
Learn more about LINE configuration in this page.
-
Click Create experiment to start configuring your content experiment and create treatments to measure their performance and identify the best option for your target audience. Learn more
-
In the Actions tracking section, specify if you want to track clicks on links in your LINE message.
-
Campaigns are designed to be executed on a specific date or on a recurring frequency. Learn how to configure the Schedule of your campaign in this section.
-
From the Action triggers menu, choose the Frequency of your LINE message:
- Once
- Daily
- Weekly
- Month
You can now start designing the content of your LINE message from the Edit content button, as detailed below.
Define your LINE content line-content
Adobe Journey Optimizer supports the following message types for LINE:
- Text: Send plain or formatted text messages.
- Stickers: Incorporate LINE’s native stickers to add character and expressiveness.
- Images: Attach images to enhance visual appeal.
- Videos: Share video content for dynamic communication.
- Locations: Send location information with maps.
- Templates: Utilize predefined templates for consistent messaging.
- Flex Messages: Create complex layouts with rich content using JSON-based Flex Messages.
These message types can be configured by editing the JSON content directly, allowing for dynamic and personalized messaging strategies.
To configure your LINE content, follow the steps below.
-
From the journey or campaign configuration screen, click the Edit content button to configure the LINE message content.
-
Click Edit code to edit JSON content.
-
Use the personalization editor to define content, add personalization and dynamic content. You can use any attribute, such as the profile name or city for example. You can also define conditional rules. Browse to the following pages to learn more about personalization and dynamic content in the personalization editor.
-
Click Save and check your message in the preview.
-
Use Simulate content to preview your LINE message content and personalized content. Learn more
Once you have performed your tests and validated the content, you can send your LINE message to your audience. These steps are detailed in this page
Once sent, you can measure the impact of your LINE within the Campaign or Journey reports. For more on reporting, refer to this section.
This section contains structured knowledge intended to support interpretation, retrieval, and question answering related to this topic.
For complete understanding, this information should be combined with the documentation on this page. Neither source is intended to stand alone; the page describes the feature, while this section provides additional context that helps disambiguate terminology, intent, applicability, and constraints.
- TL;DR: This page explains how to send a LINE message from a journey, by adding an Action activity with the LINE channel selected, or from a campaign, and build personalized LINE content, including text, stickers, images, videos, locations, templates, and Flex Messages, by editing the JSON content in the personalization editor.
Intents:
- Add an Action activity with the LINE channel to a journey, or create a campaign with the LINE channel
- Choose or create a LINE configuration for the channel
- Define LINE content across the supported message types
- Edit the JSON content and add personalization and dynamic content in the personalization editor
- Preview and simulate the LINE message before sending
Glossary:
- LINE channel: The channel selected in the Action activity of a journey, or in a campaign, to deliver a LINE message (product-specific)
- Flex Messages: JSON-based LINE messages that allow complex layouts with rich content (product-specific)
- Stickers: LINE’s native stickers that can be incorporated into a message (product-specific)
- Edit content: The button used to start designing and configuring the content of the LINE message (product-specific)
- Simulate content: The option used to preview the LINE message content and its personalized content (product-specific)
Guardrails:
- LINE message types can be configured by editing the JSON content directly.
- The configuration field is pre-filled, by default, with the last configuration used for that channel by the user.
- The LINE message is sent to the audience once you have performed your tests and validated the content.
- When creating a LINE campaign, the campaign type is either Scheduled - Marketing or API-triggered - Marketing/Transactional.
- In the Action triggers menu, the Frequency of the LINE message can be Once, Daily, Weekly, or Month.
Terminology:
- Canonical name: LINE message — Acronym: n/a
- Do not confuse: “Scheduled - Marketing” (executed immediately or on a specified date from the user interface) ≠ “API-triggered - Marketing/Transactional” (executed using an API call)
- Do not confuse: “Edit content” (starts the configuration of the message content) ≠ “Edit code” (edits the JSON content)
FAQ:
- Q: Which message types does LINE support in Journey Optimizer? — Text, Stickers, Images, Videos, Locations, Templates, and Flex Messages.
- Q: How is LINE content configured? — The message types are configured by editing the JSON content directly, and personalization and dynamic content are added in the personalization editor.
- Q: How can the LINE message be previewed before sending? — Use Simulate content to preview the LINE message content and its personalized content.
- Q: Where can the impact of a sent LINE message be measured? — Within the Campaign or Journey reports.