[AEM Assets]{class="badge positive" title="Applies to AEM Assets)."}
Share and distribute assets managed in Experience Manager share-assets-from-aem
Adobe Experience Manager (AEM) Assets enables you to share assets, folders, and collections with members of your organization and with external entities, including partners and vendors. This flexible sharing capability supports collaborative content workflows, allowing internal teams and outside stakeholders to access approved digital assets without duplicating or losing control of the source files.
Methods to share assets from Experience Manager Assets as a Cloud Service
Use any of the following methods to share assets from Experience Manager Assets as a Cloud Service, choosing the option that best matches your recipients and workflow:
- Share as a link — Generate a shareable link to assets, folders, or collections, which is well suited for quickly granting access to specific recipients without requiring them to log in to the authoring environment.
- Download assets and share separately — Download the assets locally and distribute them through your preferred channel. This method is useful when recipients need offline copies or when files must be delivered outside the Experience Manager environment.
- Share using the Experience Manager desktop app — Connect the desktop app to browse, open, and work with Experience Manager assets directly from your local file system, streamlining collaboration for users who work with desktop applications.
- Share using Adobe Asset Link — Access and share Experience Manager assets from within Adobe Creative Cloud applications, enabling creative professionals to work with approved, centrally managed assets without leaving their design tools.
- Share using Brand Portal — Distribute approved, brand-compliant assets to internal and external users through a dedicated portal, which is ideal for making curated content available to a broad audience such as partners, vendors, and distributed teams.
Selecting the right method depends on whether recipients need direct system access, offline copies, integration with their creative tools, or a governed portal for approved brand assets.
Prerequisites prerequisites
Administrator privileges are required to configure settings for sharing assets as a Link. Users must have Administrator privileges before they can access and modify these link-sharing configurations, because these settings govern how assets are shared externally and are therefore restricted to administrator-level roles.
Before you begin, confirm the following:
- Administrator privileges are assigned to your account.
Without Administrator privileges, the option to configure settings for sharing assets as a Link is unavailable, and the link-sharing controls cannot be modified. As a result, requesting or being granted an administrator role is the essential first step, ensuring that only authorized users can adjust how assets are shared as links.
Configure link share settings config-link-share-settings
Experience Manager Assets allows you to configure the default link share settings.
-
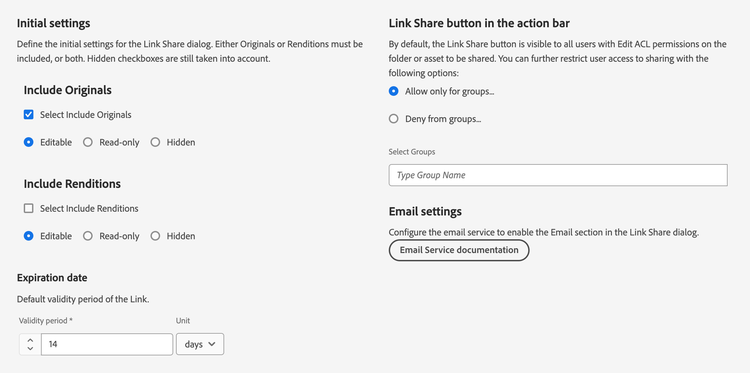
Click the Experience Manager logo, and then navigate to Tools > Assets > Assets Configuration > Link Share.
-
Initial Settings:
-
Include Originals:
- Select
Select Include Originalsto select theInclude Originalsoption by default in the link share dialog. - Select how the
Include Originalsoption is presented to you on the Link Share dialog. Editable allows the user to change the settings defined here in the Initial Settings. WithRead-onlythe setting is displayed but users cannot modify it.Hiddenhides the setting entirely, so the link share dialog automatically applies the value configured here in the Initial Settings.
- Select
-
Include Renditions:
- Select
Select Include Renditionsoption to select theInclude Renditionsoption by default in the link share dialog. - Select how the
Include Renditionsoption is presented to you on the Link Share dialog. Editable allows the user to change the settings defined here in the Initial Settings. WithRead-onlythe setting is displayed but users cannot modify it.Hiddenhides the setting entirely, so the link share dialog automatically applies the value configured here in the Initial Settings.
- Select
-
-
Specify the default validity period for the link in the
Validity Periodfield within theExpiration datesection. This determines how long a shared link remains active before it expires, helping control access to shared assets. -
Link share button in the action bar:
- All users with
jcr:modifyAccessControlpermissions — the access-control privileges that govern who can manage sharing on an asset — can view the Link share option. The Link share button is visible to all administrators and, by default, to everyone. You can configure it to display this option only for defined groups, or you can deny this option from specific groups. SelectAllow only for groupsif you want to allow specific groups to view theShare Linkoption. SelectDeny from groupsto deny theShare Linkoption from specific groups. Once you select either of these options, specify the group names using theSelect Groupsfield to add the group names that you need to allow or deny.
- All users with
For Email Configuration related settings, visit Email Service Documentation
Share assets as a link
Sharing assets through a link is a convenient and controlled way to distribute resources to external parties, marketers, and other Experience Manager users. Link sharing lets recipients receive and download assets without needing an Experience Manager account, because the functionality allows anonymous users to access and download the assets shared with them. This makes it an effective method for distributing creative and marketing assets to collaborators outside your organization.
Downloads from a shared link use an asynchronous service that delivers faster and uninterrupted downloads, because processing occurs in the background rather than tying up the browser session. Experience Manager Assets queues the assets in the background into ZIP archives of manageable file size, which keeps large transfers reliable and prevents interruptions. For large downloads, the download is bundled into multiple files of 100 GB per file.
- You need Edit Access Control List (ACL) permission on the folder or the asset that you want to share as a link.
- Enable outbound emails before sharing a link with the users.
There are two ways of sharing the assets using the link sharing functionality:
-
Generate a shared link, copy, and share the asset link with other users.
-
Generate a shared link and share the asset link through email. You can modify the default values such as expiration date and time, and allow downloading the original assets and its renditions. You can send email to multiple users by adding their email addresses.
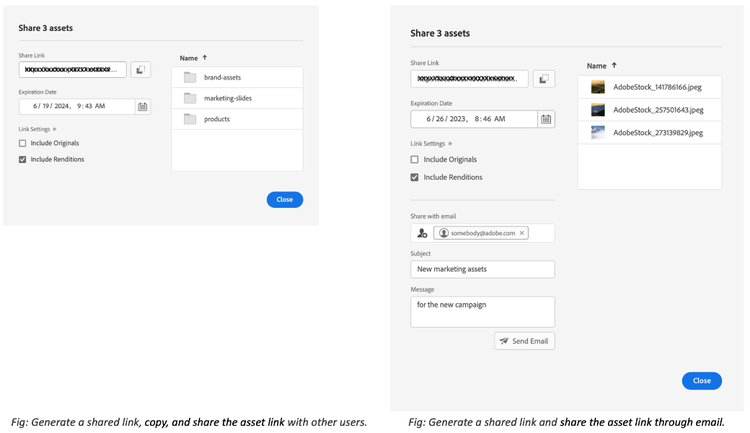
In both cases, you can modify the default values such as expiration date and time, and allow downloading the original assets and its renditions.
Copy and share the asset link copy-and-share-asset-link
To share assets as a public URL:
- Log in to Experience Manager Assets and navigate to Files.
- Select the assets or folder containing assets. From the toolbar, click Share Link.
- The Link Sharing dialog appears, which contains an auto-generated asset link in the Share Link field. This link is the public URL that recipients use to access the selected assets.
- Set the expiration date of the shared link as required. This limits how long recipients can access the shared assets and helps enforce content governance.
- Under Link Settings, check or uncheck
Include OriginalsorInclude Renditionsto include or exclude either of the two. Selecting at least one option is mandatory, because a shared link must expose either the original files or their renditions. - The names of the selected assets appear in the right column of the Share Link dialog box, confirming exactly which assets are included in the shared link.
- Copy the asset link and share the asset link with the intended users.
Share asset link through email notification share-assets-link-through-email
Sharing an asset link through email lets you distribute selected assets or entire folders to specific recipients using a secure, auto-generated link. To share assets through email:
-
Select the assets or folder containing assets. From the toolbar, click Share Link.
-
The Link Sharing dialog appears, which contains an auto-generated asset link in the Share Link field.
- In the email address box, type the email address of the user with whom you want to share the link, then press Enter. If the user is a member of your organization, select their email address from the suggestions that appear in the drop-down list. You can share the link with multiple users by repeating this step for each recipient.
- In the Subject box, type a subject to specify the purpose of the assets that are shared.
- In the Message box, type a message if necessary.
- In the Expiration field, use the date picker to specify an expiration date and time for the link. This ensures the shared link automatically becomes inaccessible after the specified time, protecting the assets from indefinite access.
- Enable the Allow download of the original file check box to allow the recipients to download the original rendition, which is the full-resolution source file rather than a generated preview or lower-quality version.
-
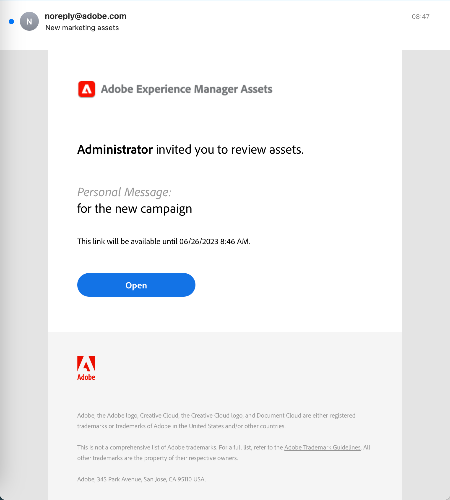
Click Share. A message confirms that the link is shared with the users. The users receive an email containing the shared link, which they use to access the shared assets directly.
Customize email template customize-email-template
The Adobe Experience Manager allows you to customize the email template that is sent to recipients who receive the email containing the shared link. A well-designed template conveys professionalism and competence, enhancing the credibility of your message and your organization.
Customizing the email template delivers several benefits:
- Personalized content — Customized email templates let you address recipients by name and reference specific details relevant to them, such as the shared link and its expiry, drawn from the available placeholders. This personal touch makes the recipient feel valued and increases engagement.
- Consistent brand identity — A customized template ensures that your emails remain consistent with your brand identity, including logos, colors, and fonts.
- Reinforced recognition and trust — Consistency across every email reinforces brand recognition and builds trust among recipients.
Format of a customized email template format-of-custom-email-template
The email template can be customized using plain text or HyperText Markup Language (HTML). The default editable template link is located at /libs/settings/dam/adhocassetshare/en.txt.
To override the default template without modifying the out-of-the-box file:
- Create the file
/apps/settings/dam/adhocassetshare/en.txt. The template in the/appspath takes precedence over the default in the/libspath, so your customizations apply while the original remains intact. - Edit the newly created file with your desired plain text or HTML content and the required placeholders.
- Repeat as needed — you can modify the email template as many times as required.
The following placeholders are available for use within the template:
${emailSubject}${emailInitiator}${emailMessage}${pagePath}${linkExpiry}Customized email template example custom-email-template-example
The example below demonstrates how the available placeholders combine into a complete, personalized template. Each placeholder is replaced with its corresponding value when the email is sent:
<!--Sent from instance: ${host.prefix}-->
subject: ${emailSubject}

<!DOCTYPE html>
<html><body>
<p><strong>${emailInitiator}</strong> invited you to review assets.</p>
<p>${emailMessage}</p>
<p>The shared link will be available until ${linkExpiry}.
<p>
    <a href="${pagePath}" target="_blank"><strong>Open</strong></a>
</p>

</body></html>
An alternative plain-text template can also be used:
Dear Recipient,

${emailMessage}

You can access the shared content using the following link:
${pagePath}

Please note that this shared link expires on ${linkExpiry}.

Shared by: ${emailInitiator}
Download assets using the asset link download-assets-using-asset-link
Any user with access to the shared asset link can download the assets, which are bundled together in a single zip folder. The download process is identical whether a user accesses the copied asset link or uses the asset link shared through email, so the same steps apply in both cases.
Follow these steps to download the shared assets:
-
Click the asset link or paste the URL in your browser. The Link Share interface opens, where you can switch between the Card View and the List View.
-
In the Card View, hover the mouse over the shared asset or shared assets folder to either select the assets or queue them for download.
-
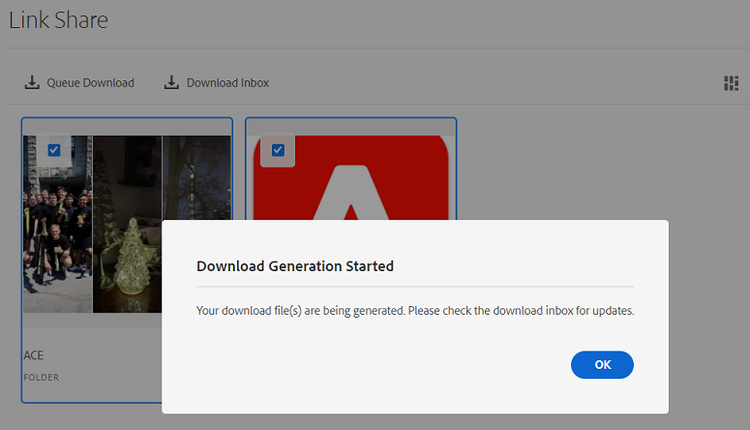
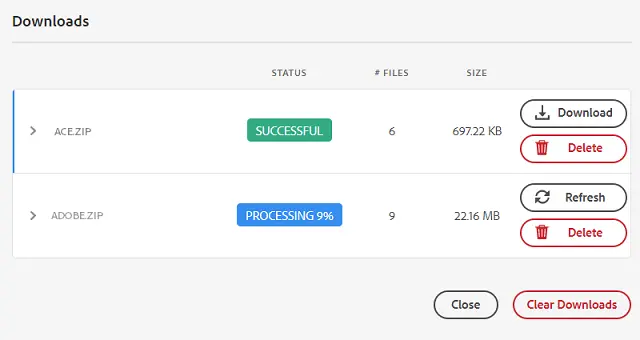
By default, the user interface displays the Download Inbox option. The Download Inbox reflects the list of all shared assets or folders that are queued for download, along with their status, so users can track every queued item in one place.
-
On selecting the assets or folder, the Queue Download option appears on the screen. Click the Queue Download option to initiate the download process.
-
While the download file is prepared, click the Download Inbox option to view the status of your download. For large downloads, click the Refresh button to update the status, because large downloads take longer to prepare on the server.
-
Once the processing is complete, click the Download button to download the zip file.
note NOTE If a shared asset is moved to a different location, its link stops working because the original path no longer resolves. As a result, re-create the link and reshare it with the users.
Download assets and share separately download-and-share-assets
Adobe Experience Manager (AEM) enables users to download the required assets and share them outside of Experience Manager. This download-and-share workflow provides a straightforward way to distribute approved content to recipients who do not have direct access to the Experience Manager environment. Because the assets are downloaded first and then distributed independently, users retain full control over which files are shared and how they are delivered.
This approach is especially useful when collaborating with external stakeholders, agencies, partners, or reviewers who work outside the organization’s Experience Manager instance. By downloading assets locally, users can attach them to emails, upload them to third-party platforms, or transfer them through any preferred sharing channel, ensuring that finalized content reaches its intended audience without requiring platform access.
For more information, see the following resources:
- How to search assets — locate the specific assets you need within Experience Manager.
- How to download assets — retrieve individual assets to your local system for sharing.
- How to download collections — download an entire collection of grouped assets in a single action.
Share assets with creative professionals share-with-creatives
Marketers and line-of-business users share approved assets with creative professionals through two primary methods:
-
Experience Manager desktop app: The app runs on both Windows and Mac. This cross-platform support ensures creative teams can access shared content regardless of their operating environment. See desktop app overview. To learn how any authorized desktop user accesses the shared assets, see browse, search, and preview assets. Desktop users create assets and share those assets back with Experience Manager users—for example, by uploading new images. See upload assets using a desktop app.
-
Adobe Asset Link: Creative professionals search and use approved assets directly within Adobe InDesign, Adobe Illustrator, and Adobe Photoshop. This eliminates the need to leave the design application, keeping creative work connected to governed, approved content.
Configure asset sharing configure-sharing
Configuring asset sharing establishes how assets are made available to other users, systems, or external audiences. Each sharing option operates differently, and each one requires its own configuration and must meet specific prerequisites before it can be enabled. Choosing the appropriate option depends on who needs access to the assets, how they will consume those assets, and the level of control you want to retain over distribution.
Sharing options
The available methods for sharing assets typically fall into several distinct categories, each suited to a different use case:
- Internal sharing — Making assets accessible to other users or teams within the same organization or workspace.
- External sharing — Distributing assets to recipients outside the organization, such as partners, clients, or the public.
- Link-based sharing — Generating shareable links that grant access to specific assets without requiring individual account provisioning.
- Embedded or integrated sharing — Delivering assets directly into other systems, applications, or channels through supported integrations.
Because each option delivers assets through a different mechanism, the configuration steps and access controls vary accordingly.
Prerequisites before configuring sharing
Before you enable any sharing option, verify that the required prerequisites are in place. This ensures that assets are shared securely and that recipients can access them without errors. Prerequisites commonly include:
- Access permissions — The account or role performing the configuration must have the rights needed to share the relevant assets.
- Asset readiness — The assets must be published, approved, or otherwise in a state that supports sharing.
- Destination configuration — Any target system, channel, or external endpoint involved in the sharing method must be properly set up and connected.
- Security and access policies — Applicable governance, authentication, or visibility rules must be defined so that sharing complies with organizational requirements.
Confirming these prerequisites first prevents failed sharing attempts and reduces the risk of exposing assets beyond their intended audience. Once the prerequisites are satisfied, you can proceed to configure the specific sharing option that matches your distribution needs.
Configure asset link sharing asset-link-sharing
The Link Sharing dialog generates a shareable URL for any asset you want to distribute to users. Use this dialog to create a direct link, then send that link to the intended recipients so they can access the asset without navigating the full repository.
Users with administrator privileges, or with read permissions at the /var/dam/share location in the Digital Asset Management (DAM) repository, can view the links shared with them. These permission levels determine who is authorized to open and retrieve the shared asset.
Sharing assets through a link is a convenient way of making resources available to external parties without requiring them to first log in to Assets. Because external recipients do not need Assets credentials or an account, link sharing streamlines collaboration with clients, partners, and other outside stakeholders while keeping the underlying repository access controlled.
Security recommendation for the Author instance
GET requests. Blocking all other URLs limits the exposed attack surface and keeps your Author instance secure.[aem_server]:[port]/linkshare.html[aem_server]:[port]/linksharepreview.html[aem_server]:[port]/linkexpired.html
Restricting external GET access to these three endpoints ensures that only the link-sharing, preview, and expiration pages are reachable from outside, preventing external entities from reaching other resources on the Author instance.
Enable desktop actions to use with desktop app desktop-actions
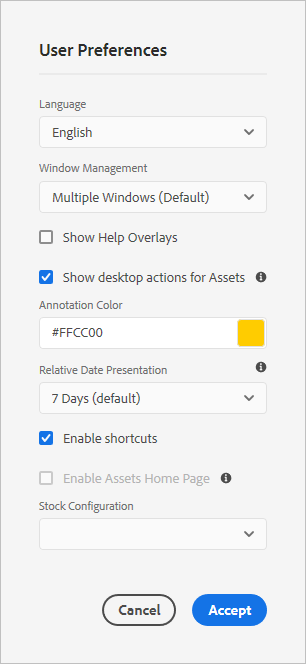
Desktop actions are browser-based controls in the Adobe Experience Manager (AEM) Assets user interface that let you work with assets directly in your native desktop application rather than only within the browser. These actions bridge browser-based digital asset management with your local desktop editing tools, which is why enabling them streamlines the workflow for teams that create and update assets on the desktop.
From within the Assets user interface in a browser, desktop actions give you the following capabilities:
- Explore asset locations — navigate to and reveal where an asset is stored, making it easier to locate the underlying file.
- Check out and open assets for editing — check out the asset and open it directly in your desktop application, so edits are made in the appropriate native software.
To enable desktop actions, see enable desktop actions in Assets web interface.
Configurations to use Adobe Asset Link configure-asset-link
Adobe Asset Link streamlines collaboration between creatives and marketers throughout the content creation process by bridging asset management and creative production. It connects Adobe Experience Manager (AEM) Assets with Adobe Creative Cloud desktop applications, giving creative teams direct access to centrally governed, approved assets from inside their design tools.
Supported Creative Cloud applications
Adobe Asset Link integrates with the following desktop applications:
- Adobe InDesign
- Adobe Photoshop
- Adobe Illustrator
The Adobe Asset Link panel lets creatives browse, access, and modify content stored in AEM Assets directly within the creative applications they already use. Because creatives no longer need to switch between separate systems to locate or check out assets, this reduces context switching and helps ensure that everyone works from the latest approved versions. This connection keeps creative production and enterprise asset governance aligned, improving efficiency and consistency across the content workflow.
See how to configure Assets to use it with Adobe Asset Link.
Best practices and troubleshooting bestpractices
Sharing folders and collections
- Folder and collection names must not contain whitespace. Asset folders or collections that contain a whitespace in their name may fail to share, because whitespace characters can break the share operation. To avoid this issue, rename any affected folders or collections to remove spaces before sharing.
Download limits and permissions
- The default download limit is 100 MB. If users cannot download shared assets, administrators should confirm the configured download limits in Adobe Experience Manager (AEM). This limit is set at the environment level, so it is the administrator, rather than the individual user, who can adjust it. When downloads fail, the configured limit is the most common cause, and verifying it typically resolves the problem.
Previewing and downloading shared videos
-
A static video rendition is required for link-shared video previews. For a user to preview a video that is shared using link sharing, the video must have a static video rendition available at the
/jcr:content/renditionslocation in the video’s node in the repository. The preview works because it relies on this static rendition and is not dependent on the availability of a Dynamic Media rendition. As a result, a video without a static rendition will not preview through link sharing, even if a Dynamic Media rendition exists. -
Dynamic Media renditions are excluded from link-share downloads. When downloading a video asset via link share, the Dynamic Media renditions are not included in the downloaded archive. Users who require the Dynamic Media renditions should obtain them through another workflow, because the link-share archive delivers only the base asset and its standard renditions.
See also
- Translate Assets
- Assets HTTP API
- Assets supported file formats
- Search assets
- Connected assets
- Asset reports
- Metadata schemas
- Download assets
- Manage metadata
- Manage Dynamic Media templates
- Manage reports in Assets view
- Search facets
- Manage collections
- Bulk metadata import
- Publish Assets to AEM and Dynamic Media