
Localization (Document Authoring Tool)
Use the Document Authoring Tool (da.live) Translation app to translate your storefront content into multiple languages. After translation, complete Commerce-specific tasks for placeholder files and store view verification (see Commerce localization tasks).
Prerequisites
Section titled “Prerequisites”- You have a storefront project in the Document Authoring app ( da.live ).
- You know the basics of using the Document Authoring tool ( da.live/docs ).
Additional resources
Section titled “Additional resources”Edge Delivery Services documentation
Section titled “Edge Delivery Services documentation”- Edge Delivery Services Overview - Adobe Experience League
- Authoring and Publishing Content - Adobe Experience League
- Edge Delivery Services Developer Documentation - aem.live
Translation and localization
Section titled “Translation and localization”- Translation and Localization - aem.live
- Translation, localization, and rollout - da.live
Big picture
Section titled “Big picture”The following diagram provides the basic workflow for translating the Edge Delivery content of your storefront into multiple languages using the Document Authoring apps from da.live .
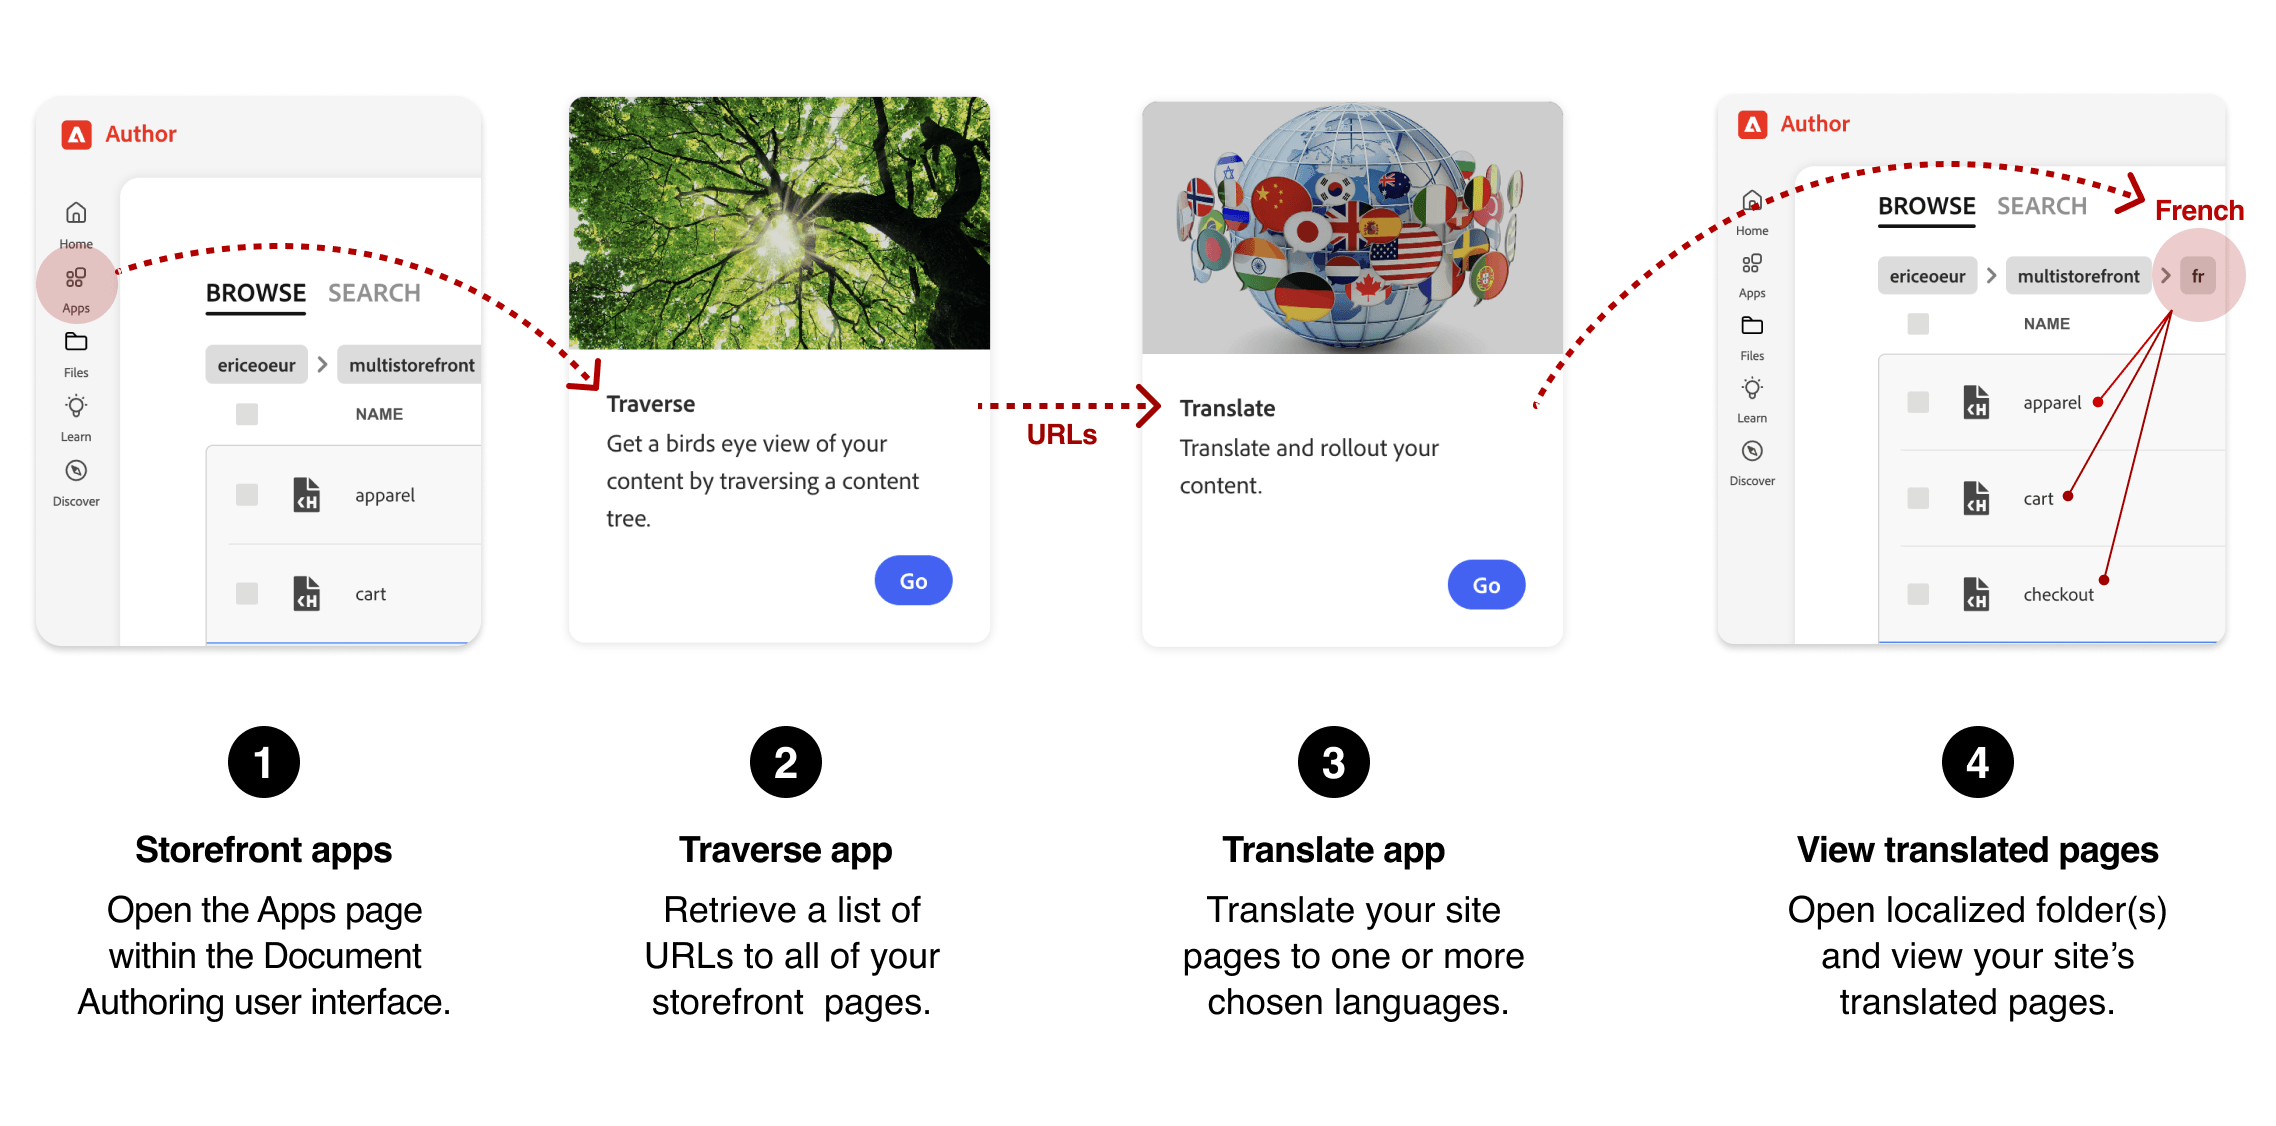
Step-by-step
Section titled “Step-by-step”These steps provide the details for the translation workflow shown in the diagram. The steps describe how to translate the default English store to another language. In this example, we will translate the default English store to French (fr).
Navigate to the apps page for your storefront
Section titled “Navigate to the apps page for your storefront”- Open your storefront project in the Document Authoring tool ( da.live ).
- Select Apps from the left sidebar.
Use the Traverse app to get a list of site URLs
Section titled “Use the Traverse app to get a list of site URLs”- Open the Traverse app by selecting its Go button.
- On the Crawl Tree page, enter the organization name and site name for your storefront. Example:
/acme/storefront. Ensure that you enter a forward slash (/) at the beginning of the string or it will not work. - Select the Crawl button to start the crawl.
- Select the Copy list button after the URLs for the site have been traversed. This puts all the URLs in your clipboard.
- Return to the Apps page.
Use the Translation app to translate your storefront
Section titled “Use the Translation app to translate your storefront”- Open the Translate app by selecting its Go button.
- On the Localization page, enter the title for the translation project:
acme-storefront-fr. - Paste the list of URLs from the Traverse app into the URLs field.
- Select the Next button.
- View the validated URLs to ensure that they are all correct.
- Select the Next button.
- Select one or more languages you want to translate to. In this example, we will translate to French (
fr). - For the French language, select Translate from the selector, then select the Create project button.
- From the project page, select the Send all for translation button.
View the translated site
Section titled “View the translated site”- Navigate back to the main (root) folder for your English storefront.
- Scroll the site files and folders to find the
frfolder and open it. - Select a document to view the translated content. For example, select the
indexdocument to view the translated home page.
Next steps
Section titled “Next steps”After translating your content with the da.live Translation app:
-
Complete Commerce tasks: Follow the Commerce localization tasks guide to:
- Translate drop-in placeholder files (
cart.json,checkout.json,pdp.json) - Verify store view configuration aligns with your multistore setup
- Test Commerce functionality (product data, pricing, currency, store switcher)
- Translate drop-in placeholder files (
-
Review best practices: See Commerce-specific best practices in the Commerce localization tasks guide.
-
Troubleshooting: For Commerce-specific issues, refer to the troubleshooting section in Commerce localization tasks.
Troubleshooting
Section titled “Troubleshooting”For da.live Translation app issues, see:
- Translation and Localization - aem.live
- da.live translation documentation - da.live
- Edge Delivery Services Document Authoring - Adobe Experience League
For Adobe Commerce store view configuration issues, see:
- Store view configuration - Adobe Experience League
- Adobe Commerce Configuration Scope - Adobe Experience League