在此頁面上:瞭解如何在Adobe Journey Optimizer中建立網頁應用程式內訊息行銷活動,從設定頻道到定義對象、觸發器和內容。
設定網頁應用程式內頻道 configure-web-inapp
若要設定網頁應用程式內頻道,請遵循下列步驟:
建立您的網頁應用程式內訊息行銷活動 create-inapp-web-campaign
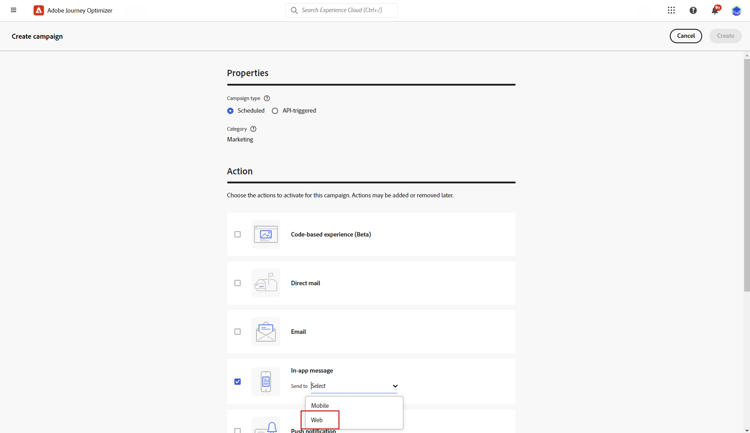
定義您的網頁應用程式內訊息行銷活動 configure-inapp
-
從 Properties 區段中,輸入 Title 和 Description 描述。
-
若要指派自訂或核心資料使用標籤給應用程式內訊息,請選取管理存取權。 了解更多。
-
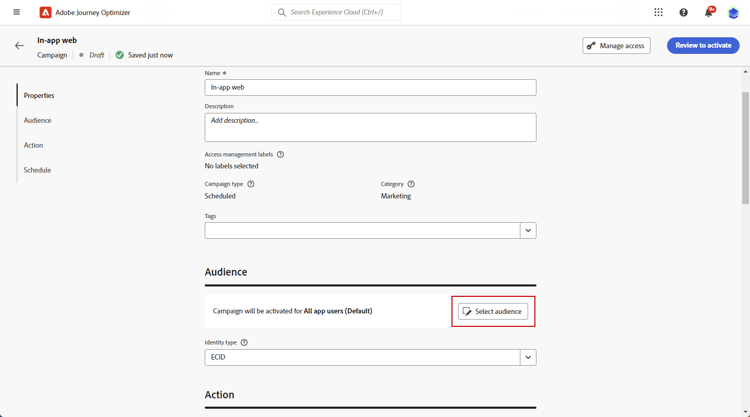
按一下 選取對象 按鈕,從可用的Adobe Experience Platform對象清單中定義要定位的對象。 了解更多。
-
在 身分識別名稱空間 欄位中,選擇要使用的名稱空間,以識別所選對象中的個人。 了解更多。
-
在 動作 功能表中,您可以找到先前設定為 應用程式組態 的設定。 您可以視需要在此進行變更,或按一下 編輯規則 來更新您的規則。
-
按一下 建立實驗 以開始設定您的內容實驗,並建立處理以測量其效能,並為您的目標對象識別最佳選項。 了解更多
-
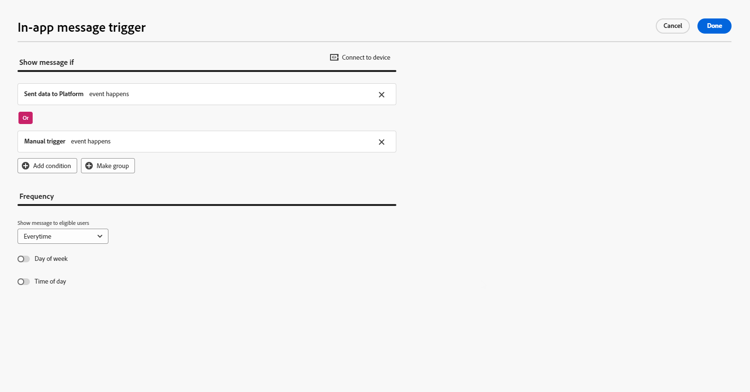
按一下編輯觸發程式,選擇將觸發訊息的事件和條件。 規則產生器可讓使用者指定條件和值,在符合條件時會觸發一組動作,例如傳送應用程式內訊息。
-
視需要按一下事件下拉式清單,以變更您的觸發器。
accordion 請參閱可用的觸發器。 table 0-row-3 1-row-3 2-row-3 套件 觸發 定義 平台 已將資料傳送至Platform 在行動應用程式發出邊緣體驗事件以將資料傳送至Adobe Experience Platform時觸發。 API通常會從AEP Edge擴充功能呼叫sendEvent。 手動 手動觸發 兩個相關聯的資料元素:索引鍵(定義資料集的常數,例如,性別、顏色、價格)和值(屬於資料集的變數,例如,男性/女性、綠色、100)。 -
如果要讓觸發程式考慮多個事件或條件,請按一下[新增條件]。
-
若要新增更多觸發器,請選擇 或 條件,以進一步展開規則。
-
如果您想要新增自訂特徵,並更精確地調整規則,請選擇 和 條件。
accordion 檢視可用的特徵。 table 0-row-3 1-row-3 2-row-3 套件 特徵 定義 平台 XDM事件型別 當符合指定的事件型別時觸發。 平台 XDM值 當符合指定的XDM值時觸發。 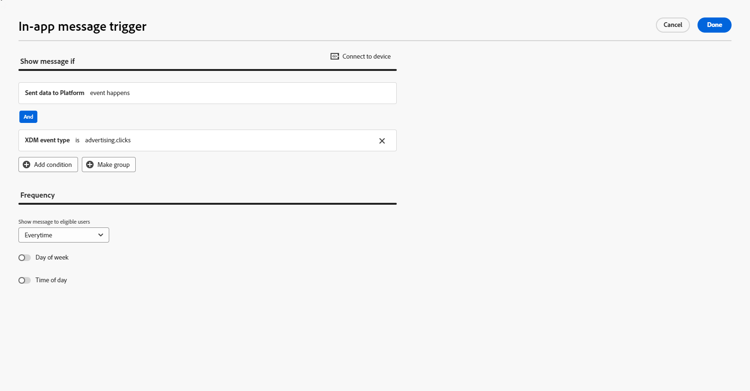
-
按一下建立群組,將觸發程式群組在一起。
-
-
選擇應用程式內訊息生效時的觸發頻率。 提供下列選項:
- Everytime:當在 行動應用程式觸發程式 下拉式清單中選取的事件發生時,一律顯示訊息。
- 一次:只有在第一次在 行動應用程式觸發程式 下拉式清單中選取的事件發生時,才會顯示此訊息。
- 直到點進為止:當 行動應用程式觸發程式 下拉式清單中選取的事件發生時,顯示此訊息,直到SDK傳送互動事件且動作「已點按」為止。
- X次:顯示此訊息X次。
-
如有需要,請選擇要顯示應用程式內訊息的 一週中的哪一天 或一天中的哪個時間。
-
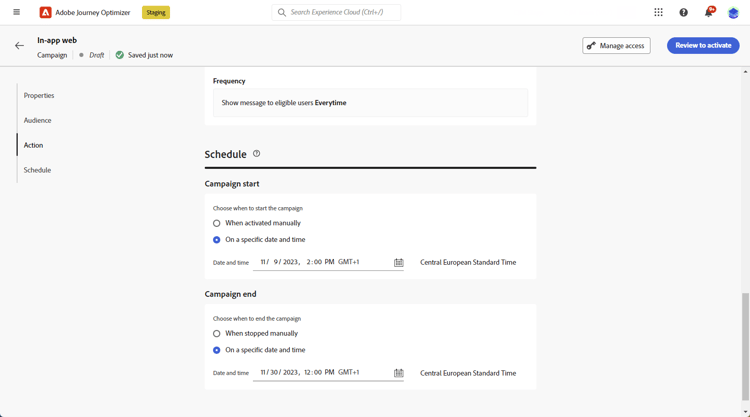
行銷活動旨在特定日期或循環頻率執行。 在本節中瞭解如何設定行銷活動的排程。
-
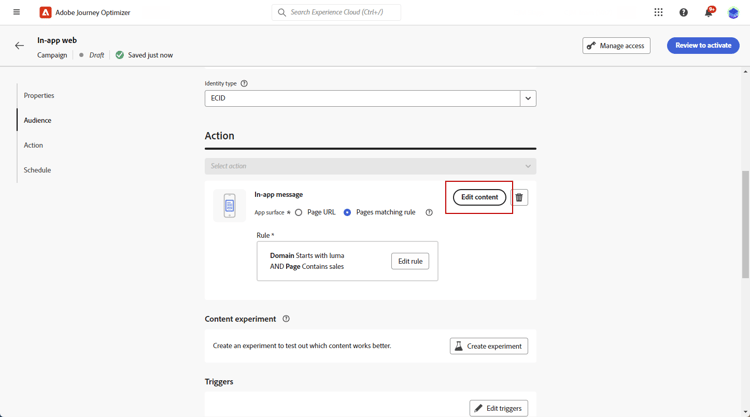
您現在可以使用 編輯內容 按鈕開始設計您的內容。 了解更多
相關主題:
This section contains structured knowledge intended to support interpretation, retrieval, and question answering related to this topic.
For complete understanding, this information should be combined with the documentation on this page. Neither source is intended to stand alone; the page describes the feature, while this section provides additional context that helps disambiguate terminology, intent, applicability, and constraints.
- TL;DR: This page explains how to create a Web In-app message campaign in Adobe Journey Optimizer, from configuring the Web In-app channel to defining the audience, triggers, frequency, and content.
Intents:
- Configure the Web In-app channel by installing the Web SDK tag extension, customizing triggers, and creating a Web In-app configuration
- Create a Web In-app message campaign and choose a Scheduled or API-triggered execution type
- Define campaign properties, select an audience, and choose an Identity namespace
- Create a content experiment to test treatments against a target audience
- Edit triggers using Sent data to Platform or Manual trigger, add conditions, and apply traits
- Set the message display frequency and schedule, then start designing content
Glossary:
- Web In-app message campaign: A campaign created in Journey Optimizer, from configuring the Web In-app channel to defining the audience, triggers, and content (product-specific)
- Sent data to Platform: A Platform-package trigger fired when the mobile app issues an edge experience event to send data to Adobe Experience Platform, usually the sendEvent API call from the AEP Edge extension (product-specific)
- Manual trigger: A Manual-package trigger defined by two associated data elements, a key (a constant defining the data set) and a value (a variable belonging to the set) (product-specific)
- Trait: An And-condition refinement; available traits are XDM event type and XDM value (product-specific)
- Content experiment: A configuration where you create treatments to measure performance and identify the best option for your target audience (product-specific)
- Identity namespace: The namespace chosen to identify individuals from the selected audience (product-specific)
Guardrails:
- Install the Web SDK tag extension to support Web In-app Messaging.
- Web In-app Messaging supports two types of triggers: Sent data to platform and Manual triggers.
- You choose the campaign execution type: Scheduled or API-triggered.
- Campaigns are executed on a specific date or on a recurring frequency, configured through the Schedule.
Terminology:
- Canonical name: Web In-app message campaign — Acronym: n/a — variants: Web In-app message
- Do not confuse: “Sent data to Platform” (Platform-package trigger) ≠ “Manual trigger” (Manual-package trigger using key/value data elements)
- Do not confuse: “Or” condition (adds more Triggers to expand the rule) ≠ “And” condition (adds a custom Trait to fine-tune the rule)
FAQ:
- Q: What are the two Web In-app trigger types? — Sent data to platform and Manual triggers.
- Q: What campaign execution types can I choose? — Scheduled or API-triggered.
- Q: What frequency options are available for the trigger? — Everytime, Once, Until click through, and X number of times.
- Q: How do I identify individuals from my selected audience? — Choose a namespace in the Identity namespace field.
- Q: What traits can I add with the And condition? — XDM event type and XDM value.
- Q: How do I start designing the message content? — Use the Edit content button after configuring the campaign.