在此页面上:了解如何通过上传CSV文件或使用API调用创建测试配置文件,以便在Adobe Journey Optimizer中预览内容和测试历程。
在历程中使用测试模式时需要测试配置文件,并且需要预览和测试您的内容。
您可以通过上传CSV文件或使用API调用来创建测试配置文件。 Adobe Journey Optimizer还提供了特定的产品内用例以便于创建测试配置文件。
您可以将JSON文件上传到现有数据集。 有关详细信息,请参阅数据摄取文档。
创建测试配置文件与在Adobe Experience Platform中创建常规配置文件类似。 有关详细信息,请参阅实时客户资料文档。
先决条件 test-profile-prerequisites
要创建配置文件,您首先需要在Adobe Journey Optimizer中创建架构和数据集。
创建架构 create-schema
要创建架构,请执行以下步骤:
-
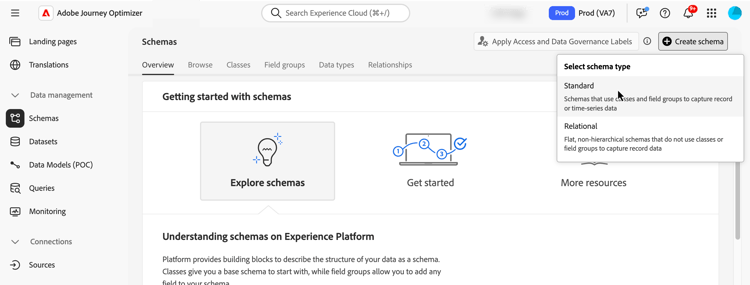
在“数据管理”菜单部分中,单击 架构 并选择 创建架构 按钮。
-
选择 Standard 作为架构创建选项。
-
选择架构类型,例如个人资料,然后单击下一步。

-
输入架构的名称,然后单击完成。

-
在 字段组 部分的左侧,单击 添加 并选择适当的字段组。 确保添加 配置文件测试详细信息 字段组。
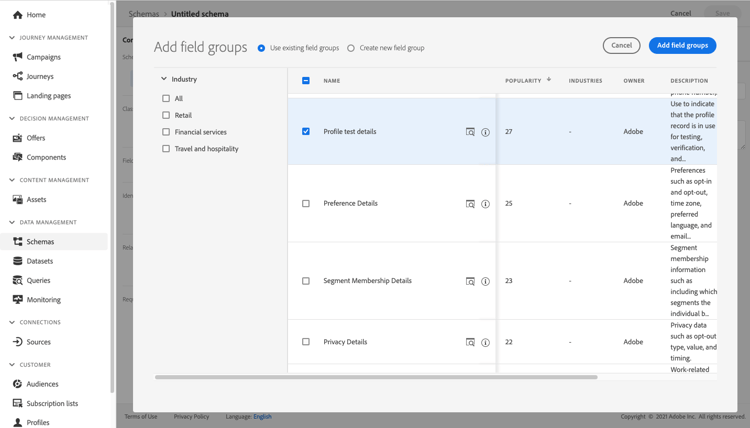
完成后,单击添加字段组:字段组的列表将显示在架构概述屏幕上。
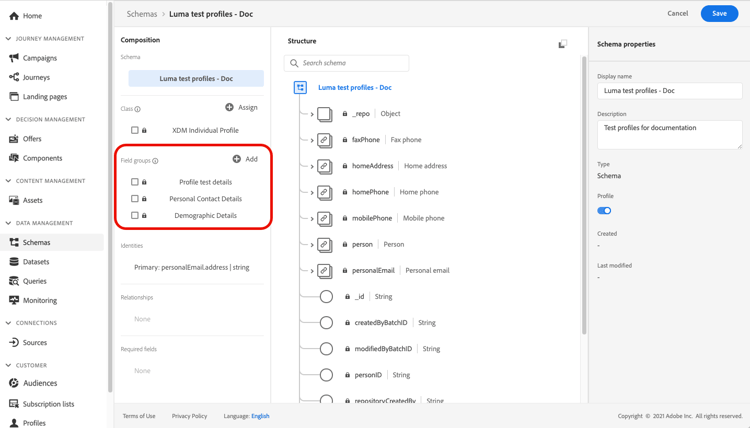
note NOTE 单击架构的名称可更新其属性。 -
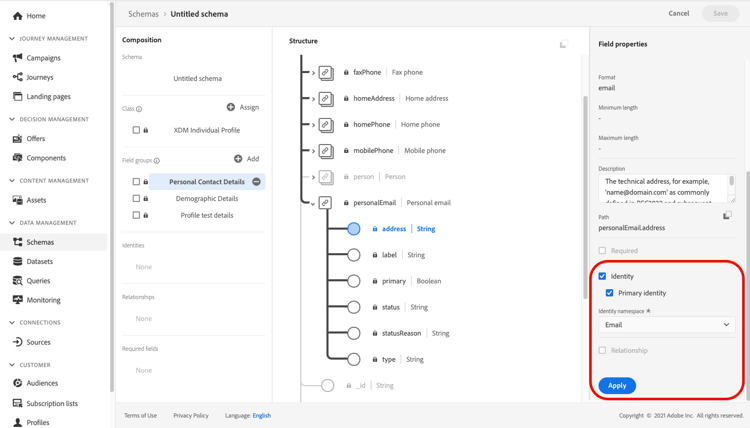
在字段列表中,单击要定义为主标识的字段。
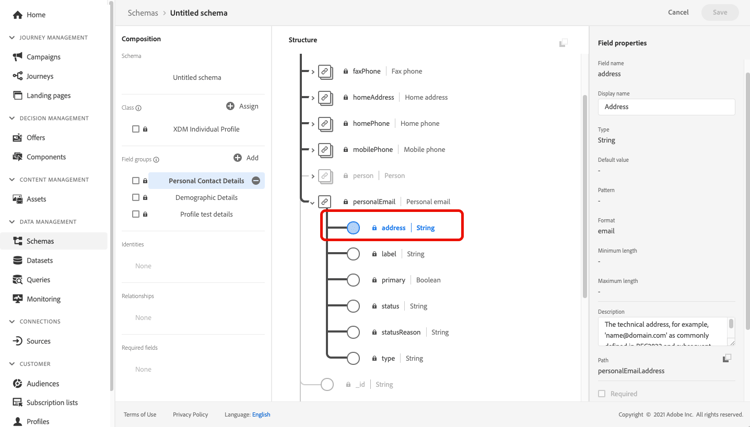
-
在 字段属性 右侧窗格中,检查 标识 和 主标识 选项并选择命名空间。 如果希望主标识是电子邮件地址,请选择 电子邮件 命名空间。 单击应用。
-
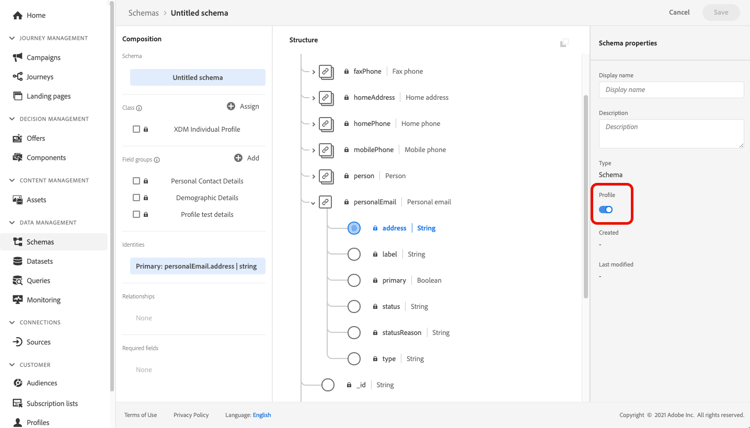
选择架构并在 架构属性 窗格中启用 配置文件 选项。
-
单击保存。
有关架构创建的更多信息,请参阅XDM文档。
/personID)。 如果标识描述符缺失或配置不正确,则即使摄取过程成功完成,摄取到此数据集的配置文件也可能不会标记为测试配置文件(testProfile = true)。- 查看与数据集关联的架构。
- 确认主身份字段具有适用于您的命名空间的正确身份描述符(请参阅上面的步骤6-7)。
- 如果缺少描述符,请更新架构以添加身份描述符并重新摄取数据。
创建数据集 create-dataset
然后,您需要创建要在其中导入用户档案的数据集。 执行以下步骤:
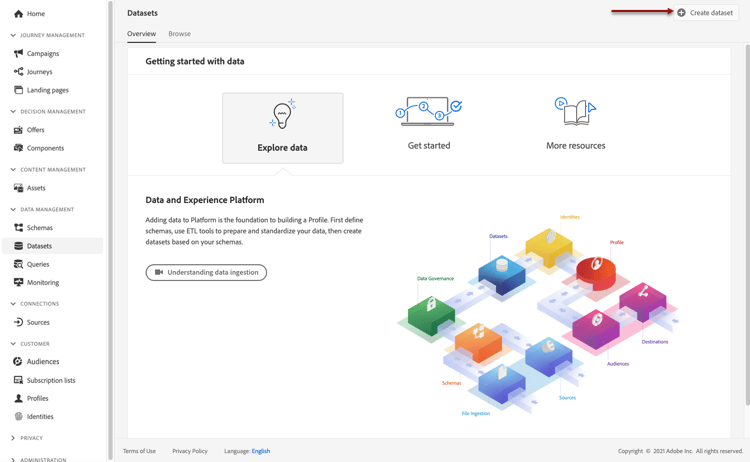
- 浏览到数据集,然后单击创建数据集。
- 选择 从架构 创建数据集。
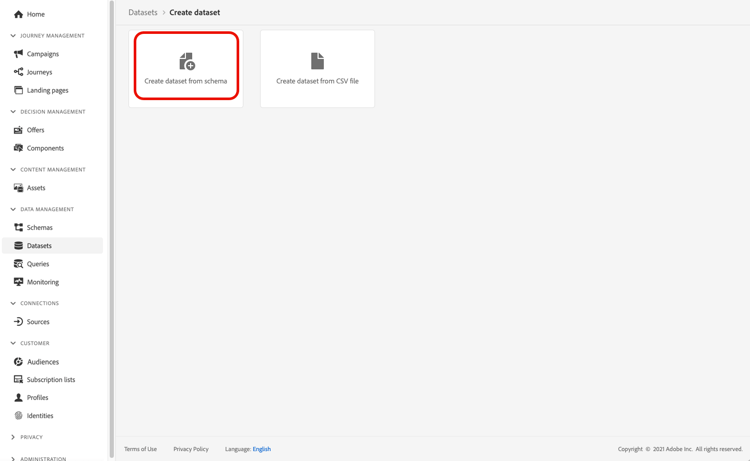
- 选择之前创建的架构,然后单击下一步。
用于创建数据集的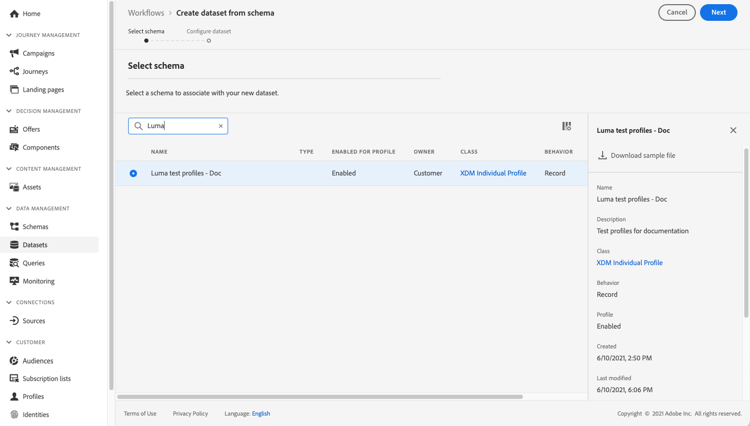
- 选择一个名称,然后单击完成。
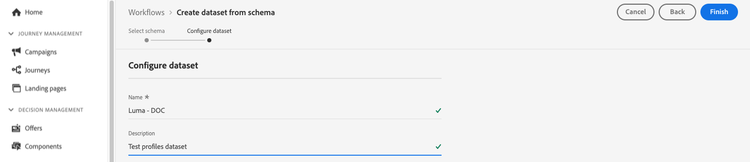
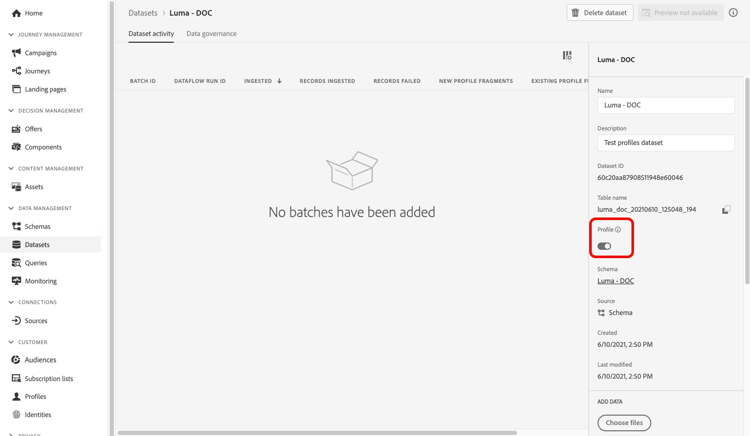
- 启用 配置文件 选项。
产品内用例 use-case-1
从Adobe Journey Optimizer主页中,您可以利用产品用例中的测试配置文件。 此用例有助于创建测试用户档案,用于在发布之前测试历程。
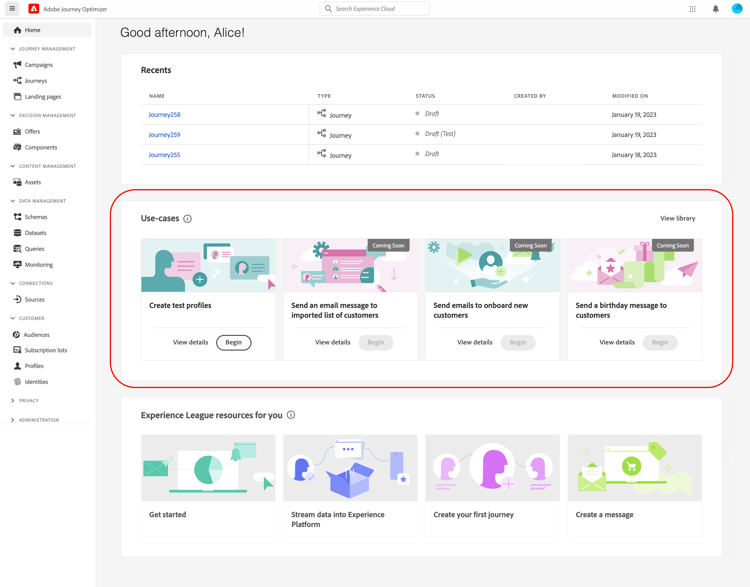
单击 开始 按钮开始实施用例。
需要以下信息:
-
身份命名空间: 身份命名空间用于唯一标识测试配置文件。 例如,如果电子邮件用于识别测试用户档案,则应选择身份命名空间Email。 如果唯一标识符是电话号码,则应选择身份命名空间电话。
-
CSV文件:包含要创建的测试配置文件列表的逗号分隔文件。 用例需要CSV文件的预定义格式,该文件包含要创建的测试用户档案列表。 文件中的每一行应按正确的顺序包含以下字段,如下所示:
- 人员ID:测试配置文件的唯一标识符。 此字段的值应当反映所选的身份命名空间。 (例如,如果为身份命名空间选择了电话,则此字段的值应为电话号码。 同样,如果选择电子邮件,则此字段的值应为电子邮件)
- 电子邮件地址:测试配置文件电子邮件地址。 (如果选择 电子邮件 作为身份命名空间,人员ID字段和 电子邮件地址 字段可能包含相同的值)
- 名字:测试配置文件名字。
- 姓氏:测试配置文件的姓氏。
- 城市:测试配置文件居住城市
- 国家/地区:测试用户档案居住国家/地区
- 性别:测试个人资料性别。 可用值为男、女和非指定
选择身份命名空间并根据上述格式提供CSV文件后,选择右上角的 运行 按钮。 用例可能需要几分钟才能完成。 一旦用例完成处理和创建测试用户档案,将发送通知以通知用户。
使用CSV文件创建测试配置文件 create-test-profiles-csv
在Adobe Experience Platform中,您可以通过将包含不同配置文件字段的csv文件上传到数据集来创建配置文件。 这是最简单的方法。
- 使用电子表格软件创建一个简单的csv文件。
- 为每个必填字段添加一列。 确保添加主标识字段(上面示例中为
personID),并将testProfile字段设置为true。
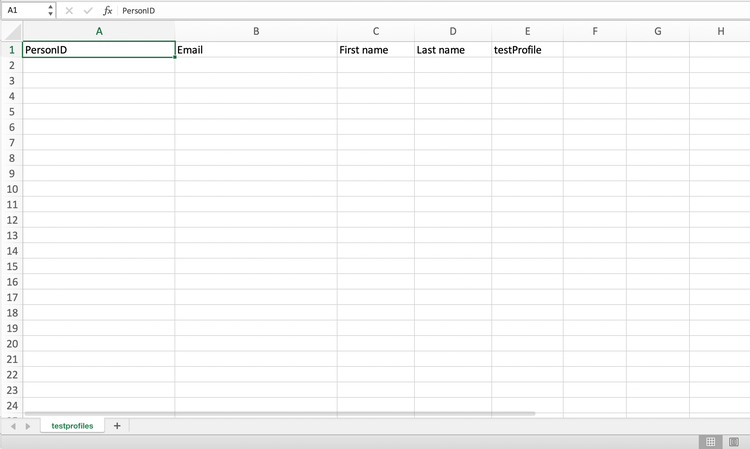
- 为每个用户档案添加一行并填写每个字段的值。
包含示例测试配置文件数据的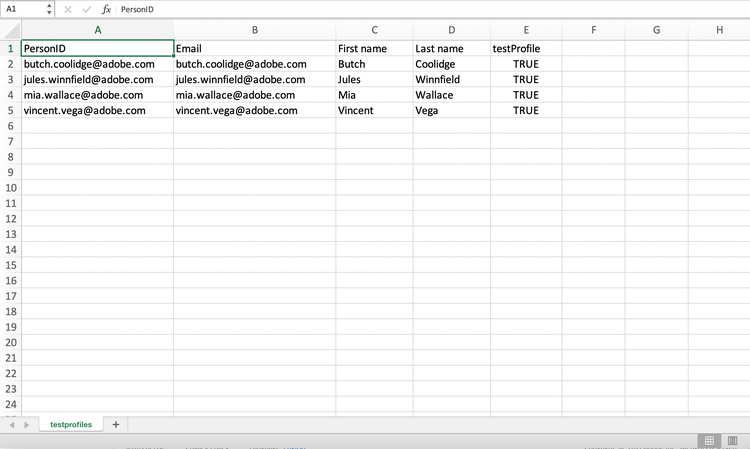
- 将电子表格另存为csv文件。 确保使用逗号作为分隔符。
- 浏览到Adobe Experience Platform 工作流。
Adobe Experience Platform中的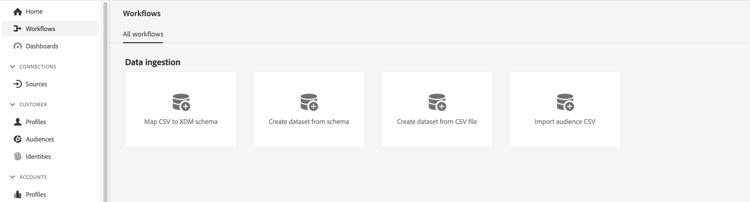
- 选择将CSV映射到XDM架构,然后单击启动。
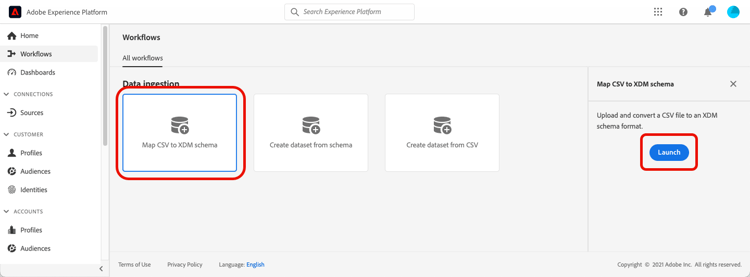
- 选择要将用户档案导入到的数据集。 单击下一步。
用于CSV导入的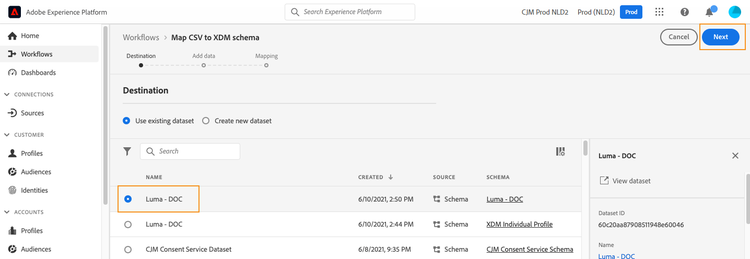
- 单击 选择文件 并选择您的csv文件。 上传文件后,单击下一步。
使用“选择文件”按钮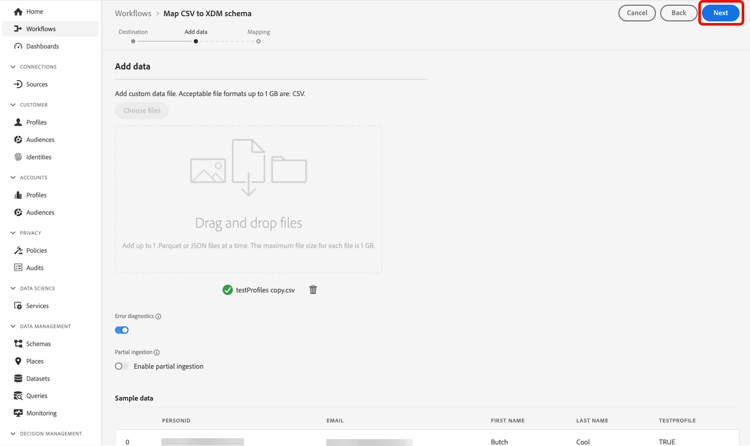
- 将源csv字段映射到架构字段,然后单击完成。
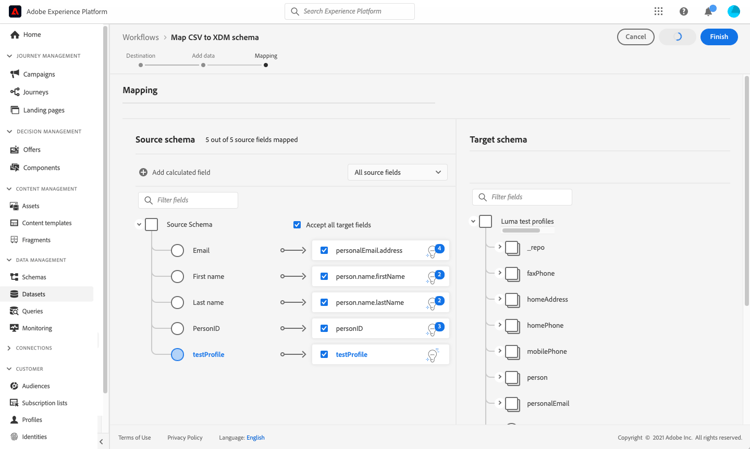
- 数据导入开始。 状态将从 正在处理 移至成功。 单击右上方的预览数据集。
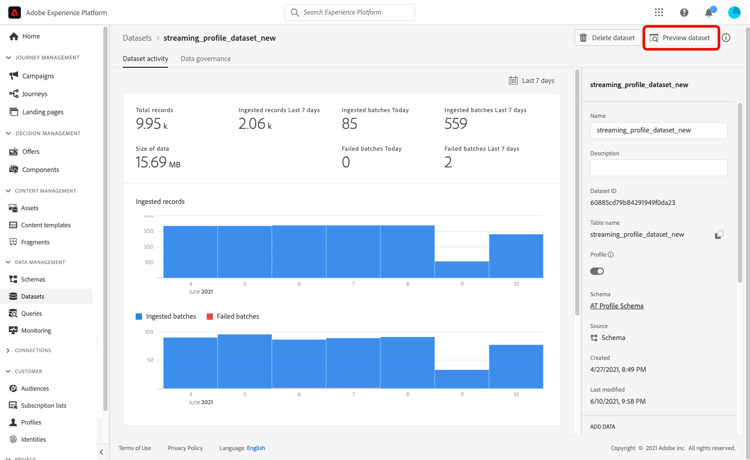
- 检查测试配置文件是否已正确添加。
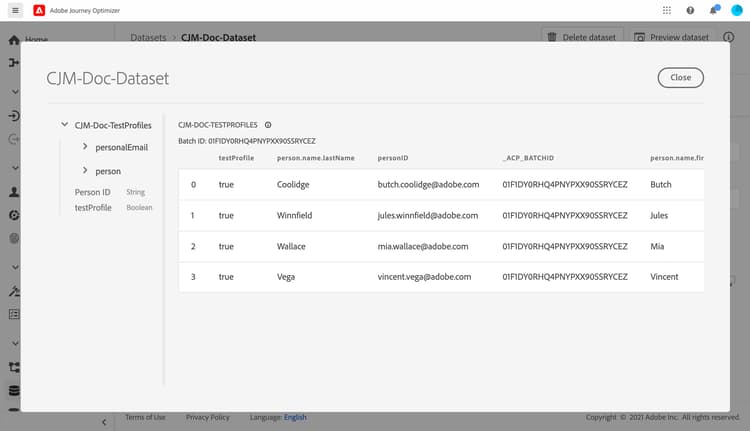
您的测试用户档案已添加,现在可以在测试历程时使用。 请参阅此小节。
使用API调用创建测试用户档案 create-test-profiles-api
您还可以通过API调用创建测试用户档案。 请参阅Adobe Experience Platform 文档以了解详情。
必须使用包含 配置文件测试详细信息 字段组的配置文件架构。 testProfile标志是此字段组的一部分。
创建配置文件时,请确保传递值:testProfile = true。
您还可以更新现有配置文件以将其testProfile标志更改为true。
以下是创建测试用户档案的API调用示例:
curl -X POST \
'https://dcs.adobedc.net/collection/xxxxxxxxxxxxxx' \
-H 'Cache-Control: no-cache' \
-H 'Content-Type: application/json' \
-H 'Postman-Token: xxxxx' \
-H 'cache-control: no-cache' \
-H 'x-api-key: xxxxx' \
-H 'x-gw-ims-org-id: xxxxx' \
-d '{
"header": {
"msgType": "xdmEntityCreate",
"msgId": "xxxxx",
"msgVersion": "xxxxx",
"xactionid":"xxxxx",
"datasetId": "xxxxx",
"imsOrgId": "xxxxx",
"source": {
"name": "Postman"
},
"schemaRef": {
"id": "https://example.adobe.com/mobile/schemas/xxxxx",
"contentType": "application/vnd.adobe.xed-full+json;version=1"
}
},
"body": {
"xdmMeta": {
"schemaRef": {
"contentType": "application/vnd.adobe.xed-full+json;version=1"
}
},
"xdmEntity": {
"_id": "xxxxx",
"_mobile":{
"ECID": "xxxxx"
},
"testProfile":true
}
}
}'
操作方法视频 video
了解如何创建测试用户档案。
This section contains structured knowledge intended to support interpretation, retrieval, and question answering related to this topic.
For complete understanding, this information should be combined with the documentation on this page. Neither source is intended to stand alone; the page describes the feature, while this section provides additional context that helps disambiguate terminology, intent, applicability, and constraints.
- TL;DR: This page explains how to create test profiles by uploading a CSV file, using API calls, or the in-product use case, including the schema and dataset prerequisites, so you can preview content and test journeys in Journey Optimizer.
Intents:
- Set up the schema (with the Profile test details field group) and dataset prerequisites for test profiles
- Create test profiles by uploading a CSV file using the Map CSV to XDM schema workflow
- Create test profiles using API calls
- Use the in-product use case to generate test profiles from a predefined CSV format
- Flag profiles as test profiles by setting the
testProfilefield totrue
Glossary:
- Test profile: A profile flagged with
testProfile = true, required for using test mode in a journey and for previewing and testing content (product-specific) - Profile test details: The field group that must be added to the schema; the
testProfileflag is part of this field group (product-specific) - Simulate content: The action to test content variations with sample input data or AI auto-generation (product-specific)
- Simulate content (AEP profiles): The option selected from the Simulate content dropdown to preview content with test profiles (product-specific)
- In-product use case: A use case available from the Journey Optimizer home page that facilitates the creation of test profiles used for testing journeys before publishing, from a predefined CSV format (product-specific)
- Identity namespace: The namespace (for example Email or Phone) used to uniquely identify the test profiles (product-specific)
Guardrails:
- Test profiles are required when using test mode in a journey and to preview and test content.
- To create profiles you must first create a schema and a dataset; the schema must include the Profile test details field group.
- The schema must have the correct identity descriptor applied to the primary identity field for the intended namespace; if it is missing or incorrectly configured, ingested profiles may not be flagged as test profiles (
testProfile = true) even if ingestion completes successfully. - When creating a profile via CSV or API, the
testProfilefield must be set totrue. - Test profiles may override existing profiles; before running the in-product use case, ensure the CSV contains test profiles only and that it is executed against the correct sandbox.
- The in-product use case expects a predefined CSV format with fields in this order: Person Id, Email Address, First Name, Last Name, City, Country, Gender (available values male, female, non_specified).
Terminology:
- Canonical name: Test profile — Acronym: n/a — variants: test profiles
- Synonyms: “
testProfileflag” = “testProfilefield” - Do not confuse: “Simulate content” (sample input data or AI auto-generation) ≠ “Simulate content (AEP profiles)” (preview with test profiles)
FAQ:
- Q: What are the ways to create test profiles? — By uploading a CSV file, using API calls, or the in-product use case.
- Q: What must the schema include? — The Profile test details field group, which contains the
testProfileflag. - Q: Why are my ingested profiles not flagged as test profiles? — The primary identity field may be missing the correct identity descriptor for your namespace; review the schema, confirm the descriptor, and re-ingest the data.
- Q: How do I mark a profile as a test profile? — Set the
testProfilefield totruewhen creating (or updating) the profile. - Q: What should I check before running the in-product use case? — That the CSV contains test profiles only and that it runs against the correct sandbox, since test profiles may override existing profiles.