Sur cette page : découvrez comment prévisualiser, tester, réviser et activer votre message in-app dans Adobe Journey Optimizer avant de l’envoyer à votre audience.
Prévisualiser sur l’appareil preview-device
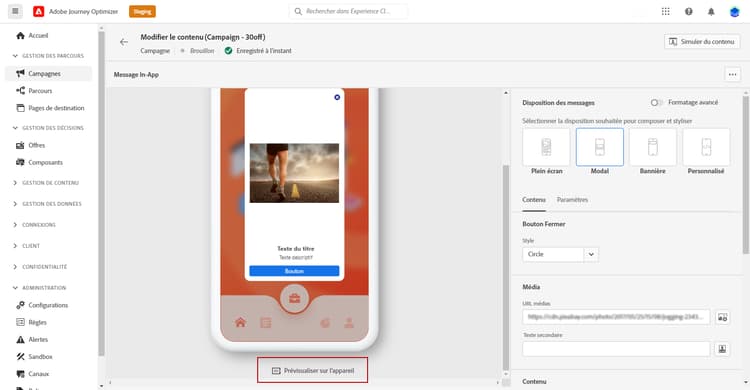
Vous pouvez prévisualiser la notification in-app sur un appareil spécifique avant qu’elle ne soit activée pour l’ensemble des utilisateurs et utilisatrices. Cette fonctionnalité garantit que la notification s’affiche et fonctionne comme prévu sur l’appareil choisi, offrant ainsi une meilleure expérience client à votre audience.
Pour ce faire, suivez les étapes ci-après :
-
Cliquez sur Aperçu sur l’appareil.
-
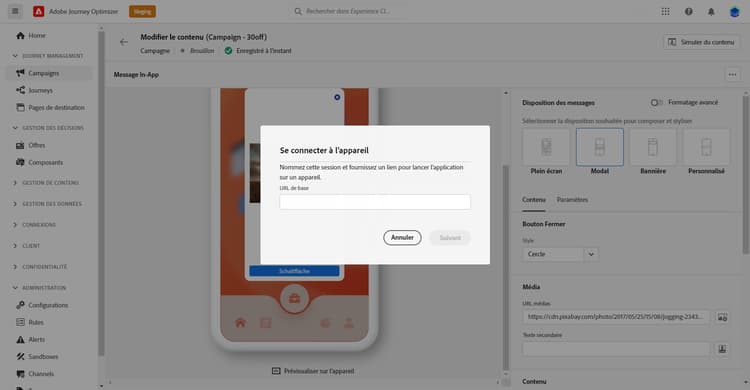
Dans la fenêtre Connexion à l’appareil, cliquez sur Commencer.
-
Saisissez l’URL de base de votre application, puis cliquez sur Suivant.
-
Scannez le code QR avec votre appareil et saisissez le code PIN affiché.
Votre message in-app peut maintenant être déclenché directement sur votre appareil, ce qui vous permet de prévisualiser et de vérifier votre message sur un appareil réel.
Prévisualiser avec les profils de test simulate
Une fois votre message in-app défini, vous pouvez le prévisualiser à l’aide de l’une des méthodes de simulation suivantes :
- Cliquez sur Simuler le contenu pour tester des variations de contenu avec des exemples de données d’entrée ou de la génération automatique par IA. Découvrez comment simuler des variations de contenu.
- Cliquez sur Simuler le contenu, puis sélectionnez Simuler le contenu (profils AEP) dans la liste déroulante pour prévisualiser le contenu avec des profils de test et ajouter un profil de test pour vérifier votre message.
Vous trouverez des informations détaillées sur la sélection des profils de test et la prévisualisation de votre contenu dans la section Gestion de contenu.
Vérifier et activer votre notification in-app in-app-review
Une fois votre message in-app créé et son contenu défini et personnalisé, vous pouvez le vérifier et l’activer.
Pour ce faire, suivez les étapes ci-après :
-
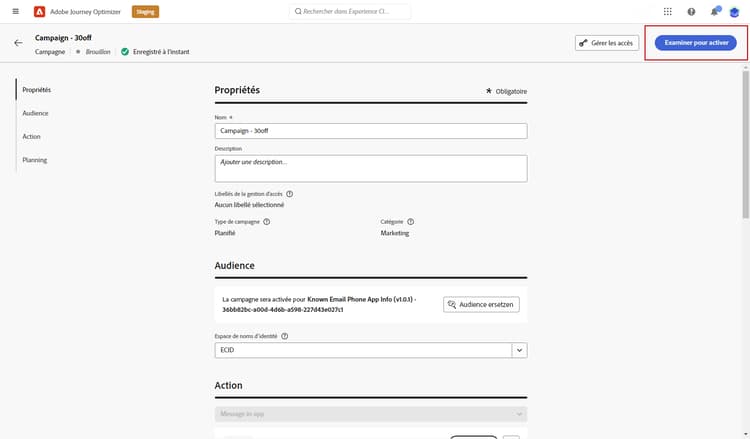
Utilisez le bouton Examiner pour activer pour afficher un résumé de votre message.
Le résumé vous permet de modifier votre campagne si nécessaire et de vérifier si un paramètre est incorrect ou manquant.
-
Vérifiez que votre campagne est correctement configurée, puis cliquez sur Activer.
Votre campagne est maintenant activée. La notification in-app configurée dans la campagne est envoyée immédiatement ou à la date spécifiée.
Une fois envoyés, vous pouvez mesurer l’impact de vos messages in-app dans les rapports Campaign ou Parcours. Pour plus d’informations sur les rapports, consultez cette section.
Rubriques connexes :
This section contains structured knowledge intended to support interpretation, retrieval, and question answering related to this topic.
For complete understanding, this information should be combined with the documentation on this page. Neither source is intended to stand alone; the page describes the feature, while this section provides additional context that helps disambiguate terminology, intent, applicability, and constraints.
- TL;DR: This page explains how to preview, test, review, and activate an In-app message in Journey Optimizer before it is sent to your audience.
Intents:
- Preview the In-app notification on a specific device using Preview on device
- Preview the message using Simulate content with sample input data or AI auto-generation
- Preview with test profiles using Simulate content (AEP profiles)
- Review the message summary and activate the campaign
- Understand when the In-App notification is sent and where to measure its impact
Glossary:
- Preview on device: A function that lets you trigger and preview the In-app notification on a specific physical device by connecting via a Base URL, QR code scan, and PIN code (product-specific)
- Simulate content: A method to test content variations with sample input data or AI auto-generation (product-specific)
- Simulate content (AEP profiles): An option selected from the Simulate content dropdown to preview with test profiles by adding a test profile to check your message (product-specific)
- Review to activate: A button that displays a summary of the message so you can modify the campaign and check for incorrect or missing parameters (product-specific)
- Approval policy: A policy that, when a campaign is subject to it, requires you to request approval before you can send the In-App notification (product-specific)
Guardrails:
- If your campaign is subject to an approval policy, you must request approval before you can send the In-App notification.
- Once activated, the In-App notification is sent immediately, or on the specified date.
Terminology:
- Canonical name: In-app notification — Acronym: n/a — variants: In-app message, In-App notification
- Do not confuse: “Preview on device” (preview on a specific physical device) ≠ “Simulate content” (test content variations with sample input data or AI auto-generation) ≠ “Simulate content (AEP profiles)” (preview with test profiles)
- Do not confuse: “Review to activate” (display the message summary) ≠ “Activate” (activate the campaign to send the notification)
FAQ:
- Q: How do I preview the message on a real device? — Click Preview on device, start the connection, enter your application Base URL, then scan the QR code and enter the displayed PIN code to trigger the message on your device.
- Q: What is the difference between the two simulation options? — Simulate content tests content variations with sample input data or AI auto-generation, while Simulate content (AEP profiles) previews with test profiles by adding a test profile.
- Q: What does Review to activate show? — A summary of your message that lets you modify the campaign and check whether any parameter is incorrect or missing.
- Q: When is the In-App notification sent after activation? — Immediately, or on the specified date.
- Q: What if my campaign is subject to an approval policy? — You must request approval before you can send the In-App notification.
Personas:
- marketer: Can use Review to activate to display a summary of the In-app message, modify the campaign, and check for incorrect or missing parameters. Can select Activate to activate the campaign, which sends the In-app notification immediately or on the specified date. Can measure the impact of In-app messages within the Campaign or Journey reports. The page states that a campaign subject to an approval policy requires approval before the In-App notification can be sent. Where: “Review and activate your In-app notification”.
Onboarding:
- Level: Beginner
- First minimal step: Use the Review to activate button to display a summary of your message.
- Success check: The campaign is activated, and the In-app notification is sent immediately or on the specified date.
- Previous: Campaign subject to an approval policy: Get started with journeys & campaigns approval (test-approve/gs-approval.md)
- Next: Measuring the impact of the In-app message: Campaign report (reports/campaign-global-report-cja-inapp.md)