En esta página: Cree una campaña que use la acción de la Bandeja de entrada, dirija una audiencia y programe o haga un déclencheur para que pueda enviar mensajes persistentes que los usuarios puedan volver a visitar en su Bandeja de entrada.
Antes de crear una bandeja de entrada, complete los pasos de Configuración de la bandeja de entrada. La configuración de canal identifica la aplicación o sitio web de destino, la página o regla y la ubicación en la que se representa la bandeja de entrada.
Para crear una bandeja de entrada de mensaje a través de una campaña, siga estos pasos:
-
Cree una campaña. Más información
-
Seleccione el tipo de campaña que desea ejecutar:
-
Programado - Marketing: ejecute la campaña inmediatamente o en una fecha especificada. Las campañas programadas están destinadas a enviar marketing mensajes. Se configuran y ejecutan desde la interfaz de usuario de.
-
Activado por API - Marketing/Transaccional: ejecute la campaña mediante una llamada de API. Las campañas activadas por API están destinadas a enviar marketing o mensajes transaccionales, es decir, mensajes enviados después de una acción realizada por un individuo: restablecimiento de contraseña, compra en el carro de compras, etc. Aprenda a almacenar en déclencheur una campaña mediante API
-
-
En la ficha Propiedades, especifique un nombre y una descripción para la campaña.
-
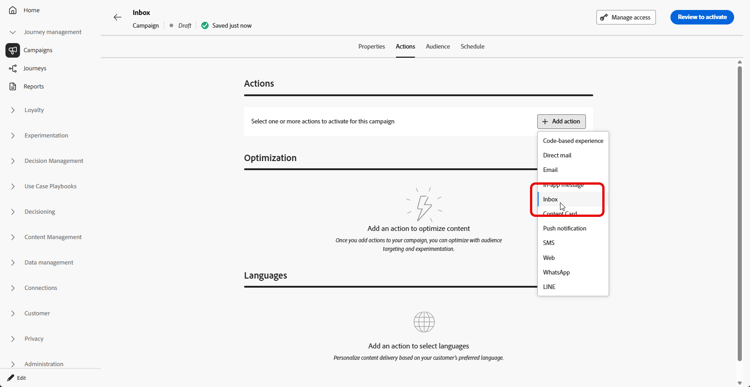
En la ficha Acción, seleccione la acción Bandeja de entrada.
-
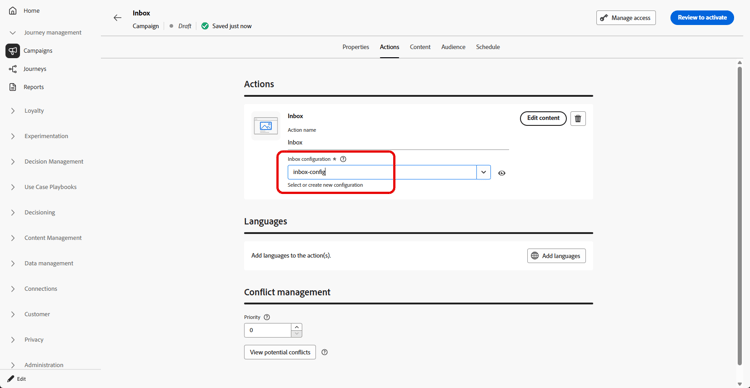
Seleccione o cree una nueva configuración de la bandeja de entrada.
-
Acceda a la pestaña Contenido para diseñar el mensaje con el diseñador de contenido. Más información
-
En la ficha Audiencia, haga clic en el botón Seleccionar audiencia para mostrar la lista de audiencias de Adobe Experience Platform disponibles. Más información sobre los públicos
-
En el campo Área de nombres de identidad, elija el área de nombres que desea utilizar para identificar a los individuos del segmento seleccionado. Más información sobre áreas de nombres
-
Puede programar la campaña para una fecha específica o configurarla para que se repita a intervalos regulares. Más información
-
Revise y active la campaña para enviar mensajes a la bandeja de entrada.
Ahora puede elegir esta Bandeja de entrada al crear su campaña de tarjeta de contenido.
This section contains structured knowledge intended to support interpretation, retrieval, and question answering related to this topic.
For complete understanding, this information should be combined with the documentation on this page. Neither source is intended to stand alone; the page describes the feature, while this section provides additional context that helps disambiguate terminology, intent, applicability, and constraints.
- TL;DR: This page explains how to create a message inbox through a campaign that uses the Inbox action, targets an audience, and is scheduled or triggered to deliver persistent messages users can revisit.
Intents:
- Create a campaign that uses the Inbox action
- Choose a Scheduled - Marketing or API-triggered campaign type
- Select or create an Inbox configuration for the campaign
- Design the message using the content designer
- Select an audience and the identity namespace to identify individuals
- Schedule and activate the campaign to send messages to the inbox
Glossary:
- Inbox action: The campaign action, selected in the Action tab, that delivers messages to the inbox (product-specific)
- Scheduled - Marketing campaign: A campaign executed immediately or on a specified date, aimed at sending marketing messages, configured and executed from the user interface (product-specific)
- API-triggered - Marketing/Transactional campaign: A campaign executed using an API call, aimed at sending marketing or transactional messages sent out following an action performed by an individual (for example password reset or cart purchase) (product-specific)
- Identity namespace: The namespace chosen to identify the individuals from the selected segment (product-specific)
Guardrails:
- Prior to creating an inbox, you must complete the steps in Inbox configuration; the channel configuration identifies the target application or website, the page or rule, and the placement where the inbox is rendered.
- You must select or create an Inbox configuration for the campaign.
- The campaign must be reviewed and activated to send messages to the inbox.
Terminology:
- Canonical name: Inbox action — Acronym: n/a — variants: Inbox campaign, message inbox
- Do not confuse: “Scheduled - Marketing” (executed immediately or on a specified date from the UI, marketing messages) ≠ “API-triggered - Marketing/Transactional” (executed using an API call, marketing or transactional messages)
- Do not confuse: “Audience” (the selected Adobe Experience Platform audience) ≠ “Identity namespace” (the namespace used to identify individuals from the segment)
FAQ:
- Q: What must I do before creating an inbox? — Complete the steps in Inbox configuration, which identifies the target application or website, the page or rule, and the placement where the inbox is rendered.
- Q: Which campaign types can I use? — Scheduled - Marketing (executed immediately or on a specified date from the UI) or API-triggered - Marketing/Transactional (executed using an API call).
- Q: How do I design the message? — Access the Content tab and design your message using the content designer.
- Q: How are individuals identified? — In the Identity namespace field, choose the namespace used to identify the individuals from the selected segment.
- Q: What can I do after creating this Inbox? — You can choose this Inbox when creating your Content card campaign.