Get started with Adobe Workfront Planning
The highlighted information on this page refers to functionality not yet generally available. It is available only in the Preview environment for all customers. After the release to Preview, the same features are also available monthly in the Production environment for customers who enabled fast releases.
For information about fast releases, see Enable or disable fast releases for your organization.
Workfront Planning availability
Workfront Planning is accessible when your organization purchases one of the following Workfront packages:
-
Workfront Workflow and Workfront Planning purchased together. Every user in the organization has a Workflow and a Planning license. This gives all users full access to all Workfront’s features for both modules.
-
Workfront Workflow for everyone in your organization and Workfront Planning only for some users in your organization. This gives users full access to all Workflow’s features and a more limited access to Planning features for the users who are assigned a Planning license.
-
Workfront Planning as a standalone product for users in your organization. This gives users no access to any Workfront Workflow features and access to Planning features.
For information about capabilities included in Planning as a standalone product, see Get started with Adobe Workfront Planning as a standalone product.
Introduction to Adobe Workfront Planning
When bought together with a Workflow license, Adobe Workfront Planning is an additional capability from Adobe Workfront. The purpose of Workfront Planning is to unlock comprehensive visibility into the operational details of an organization, and answer critical business questions at each stage of the work management lifecycle.
Workfront Planning can answer questions like:
- How many campaigns are we running in EMEA for Q4?
- Do we have any audience overlaps between concurrent campaigns?
- How well are the awareness programs doing right now?
To answer these questions, leadership needs a solution that can provide a holistic view of every stage of work from planning to execution, from delivery to measuring the results. Currently, organizations have tools that can cover some parts of the process, but many do not have good connections to all phases of work, nor can they reliably provide results.
The following are some of the main capabilities:
- Solve the problem of managing work across all stages and for all the stakeholders that participate in the work process.
- Fully customize your workflows, from deciding what object types (or record types) your organization uses to configuring how these objects link to one another.
- Link to object types from other systems, creating a coherent framework for all your processes.
Enable Workfront Planning for the users in your Workfront instance
After your organization purchases a Workfront Planning package, as a Workfront administrator, you must ensure the following are in place before users can access Workfront Planning:
-
Assign a layout template that includes Planning to users with a Contributor or Light access level.
Standard users and System Administrators have Planning enabled by default.
For more information, see Customize the Main Menu using a layout template and Assign users to a layout template.
-
Assign users Workfront and Planning licenses and Workfront Planning permissions that would allow them to either view or create objects in Workfront Planning.
For more information about granting access to and enabling others to use Workfront Planning, see Adobe Workfront Planning access overview.
Workfront Planning terminology
Although Workfront Planning is part of Workfront, it comes with proprietary concepts and terminology. Ensure you are familiar with these concepts before embarking on setting up Workfront Planning for your organization.
The framework for Workfront Planning is fully customizable. You can create all record types, their attributes, and any fields associated with them to suit the exact needs of your organization.
For more information, see Workfront Planning terminology overview.
Locate Adobe Workfront Planning
To locate Adobe Planning, ensure that your organization has received access to Workfront Planning and that your system or group administrator has added the Planning area to your Main Menu. For information, see Adobe Planning access overview.
To locate Workfront Planning:
-
Log in to Workfront.
-
Click the Main Menu icon

-
Click Planning

The Workfront Planning main page opens.
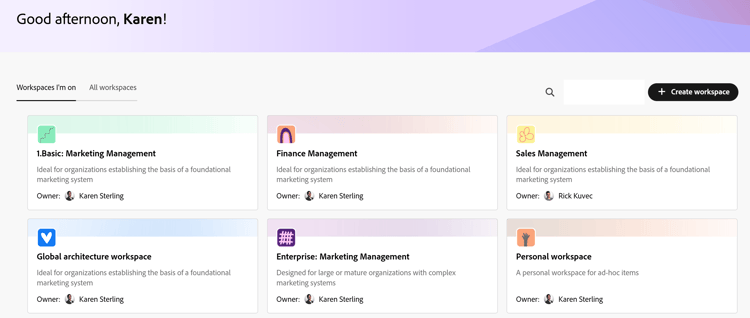
note tip TIP Your Workfront administrator can add the Planning area to the Select landing page option in your layout template, so you can open Planning as soon as you log in to Workfront. For information, see Customize the landing page using a layout template. -
(Conditional and optional) If you are a Workfront administrator, click one of the following tabs:
- Workspaces I’m on: Displays workspaces that you created or workspaces that are shared with you.
- Other workspaces: Displays all other workspaces in the system.
For all other users, both workspaces that they created or are shared with them display in the Workspaces area.
-
(Optional and recommended) Continue with some of the following actions, to build your work structure:
-
Create a workspace from scratch or using a template. For information, see Create workspaces.
-
Add sections to the new workspace. For information, see Edit workspaces.
-
Rename the existing sections in the new workspace.
-
Add record types to the new workspace. For information, see Create record types.
-
Click the name of a record type to open the record type’s page. The record type page opens in the Table view, by default.
You can also create a Timeline or a Calendar view. For information, see Manage record views.
-
In the table view, start adding records by adding rows
Or
Start adding record fields by adding columns.
For information, see the following articles:
-
Additional resources for Workfront Planning
- General information and article index for Adobe Workfront Planning: An index of all articles that contain documentation about Workfront Planning, grouped by area of interest.
- Get started with Adobe Workfront Planning as a standalone product: General information about Workfront Planning, when purchased as a standalone product.
- Adobe Workfront Planning AI Assistant overview: With the Workfront AI Assistant for Planning you can search for records, or create, update, and delete records by using commands and letting the assistant do the work for you.
- Adobe Workfront Planning CX Enterprise Coworker overview: A conversational interface where you describe a goal in plain language, and then it plans, executes, and validates the work across your Workfront Planning and other connected Adobe systems before bringing it back for your approval. CX Enterprise Coworker preserves everything AI Assistant does today while adding more powerful end-to-end capabilities in both a new full-screen experience and the Workfront right rail.
-
Adobe Workfront Planning modules for Workfront Fusion: With the Adobe Workfront Planning modules, you can trigger a scenario when events occur in Workfront Planning. You can also create, read, update, and delete records, or perform a custom API call to your Adobe Workfront Planning account. You must purchase an additional license to have access to Workfront Fusion.
-
Adobe Workfront Planning API basics: The goal for the Adobe Workfront Planning API is to simplify building integrations with Planning by introducing a REST-ful architecture that operates over HTTP.
-
Get started with the Adobe Workfront Planning and Adobe GenStudio for Performance Marketing integration: You can manage records from GenStudio for Performance Marketing in the GenStudio workspace in Workfront Planning. You must purchase a GenStudio for Performance Marketing license.
-
Canvas Dashboards overview: You can view Workfront Planning information in a report in Workfront using the Workfront Canvas Dashboard. You must purchase a Workfront Workflow license to have access to the Canvas Dashboard.