Set up the connector for B2B Commerce
Merchants using Adobe Commerce B2B shared catalogs can use the Adobe Commerce Optimizer Connector for B2B to synchronize custom shared catalog data and configuration to Adobe Commerce Optimizer.
Requirements to use the integration requirements-to-use-the-integration
-
Adobe Commerce 2.4.8+ with Commerce B2B version 1.5.3+ installed and enabled.
-
Commerce Optimizer license with provisioned sandbox instance.
-
Authentication keys to download the connector meta package using Composer.
-
Admin access to an Commerce Optimizer sandbox instance.
The Adobe Commerce user configuring the integration must have:
-
Administrator access to the Commerce Admin.
-
Command line access to the Adobe Commerce application server.
-
Developer access to the IMS Organization where the Commerce Optimizer project is provisioned.
Application requirements
- Commerce cron and indexers operating normally.
- The required websites and store views identified for export.
- Shared catalogs, company assignments, assortment, and B2B pricing configured or ready to configure in Adobe Commerce.
Remove conflicting extensions remove-conflicting-extensions
If you have any of the following extensions installed, uninstall them before installing the Adobe Commerce Optimizer Connector for B2B:
- Adobe Commerce Live Search (
magento/live-search) - Adobe Commerce Product Recommendations (
magento/product-recommendations) - Adobe Commerce Catalog Service (
magento/catalog-service,magento/catalog-service-installer) - Data Management Dashboard (
magento-catalog-sync-admin)
Data associated with these extensions is still available in the Commerce database. However, it is not exported to Commerce Optimizer when the connector is enabled. To implement the Adobe Commerce search and merchandising capabilities provided by these extensions after enabling the connector, configure them from the Commerce Optimizer Admin UI.
Configuration steps configuration-steps
To enable the Adobe Commerce Optimizer Connector for B2B and begin synchronizing custom shared catalog configuration from Adobe Commerce to your Commerce Optimizer instance, follow these steps.
-
Install the Adobe Commerce Optimizer Connector for B2B package using Composer to connect your Adobe Commerce instance to Commerce Optimizer.
-
Customize the Commerce scopes export configuration from the Admin.
Install the Adobe Commerce Optimizer Connector for B2B package install-the-adobe-commerce-optimizer-connector-for-B2B-package
The Adobe Commerce Optimizer Connector for B2B is delivered as a Composer meta package available to all Commerce merchants with an active license for Commerce Optimizer.
Installation steps
-
Add the
adobe-commerce/commerce-data-export-aco-adapter-b2bmodule using Composer:code language-shell composer require adobe-commerce/commerce-data-export-aco-adapter-b2b -
Deploy the changes to your Adobe Commerce staging environment.
After deployment completes, the Commerce Optimizer option is available from the Commerce Admin menu. Select Commerce Optimizer to open your Commerce Optimizer instance directly from the Commerce Admin.
Data export and scope mapping
Select the websites and store views to synchronize, then verify the initial feeds. For B2B, the connector uses the enabled scopes when it projects shared catalog data to Commerce Optimizer.
- Store view → catalog source with localized product content
- Website and customer group → price book for website and customer-group pricing
- Shared catalog → protected private catalog view and enforced policy
The shared catalog defines the product assortment, and each enabled store view supplies the localized catalog source. The website and customer group determine the applicable price book. The connector projects each custom shared catalog for each enabled store view, so you do not need a separate scope setting for the B2B projection.
A custom shared catalog can generate multiple protected private catalog views, one for each enabled store view. The default public shared catalog is not projected as a B2B private catalog view. For the detailed object mapping and runtime authorization flow, see B2B shared catalog projection.
To change scope export settings
-
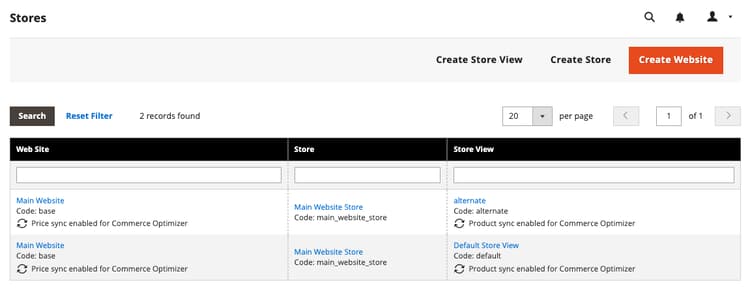
In the Commerce Admin, go to Stores > Settings > All Stores.
-
Select the website or store view you want to configure.
-
In the Commerce Optimizer exporter settings, use the checkbox to enable or disable the data sync as needed.
-
Save your changes.
Enable and disable behavior
Monitor B2B shared catalog changes
The connector watches for changes to shared catalogs and company assignments. When you remove a shared catalog in the Commerce Admin, the connector removes access to its private catalog view after a configurable grace period.
Enable the Commerce Optimizer integration enable-the-adobe-commerce-optimizer-integration
You enable the integration and initiate the data sync by running the aco:config:init CLI command. This command completes the following steps:
- Obtains an IMS access token using credentials supplied as command line arguments.
- Calls the Commerce Cloud Manager (CCM) service at
https://ccm.api.commerce.adobe.com/api/v1/tenants/{tenantId}/owner/{orgId}to validate the tenant and extract the ingestion URL and Commerce Optimizer Studio URL. - Saves all configuration (client secret encrypted) to
core_config_data. - Schedules the initial full sync by invalidating all Commerce Optimizer feed indexers.
Get required connection details
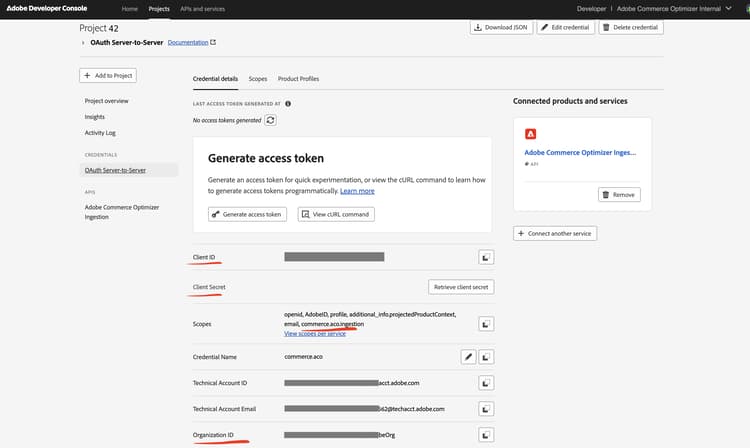
From the Adobe Developer Console, create a new project enabled for the Commerce Optimizer Ingestion service and generate OAuth Server-to-Server credentials. For detailed instructions, see Obtain IMS Credentials in the Merchandising Developer Guide for Adobe Commerce Optimizer.
Save the following values from the credentials page:
- Organization ID (
org_id) - Client ID (
client_id) - Client Secret (
client_secret)
Get Commerce Optimizer instance details
Get the tenant ID from the Instance Id field on the Commerce Optimizer instance Instance details page, or from the URL used to access the instance. For example, in https://experience.adobe.com/#/@<your organization>/in:<tenant>/commerce-optimizer-studio/home.
-
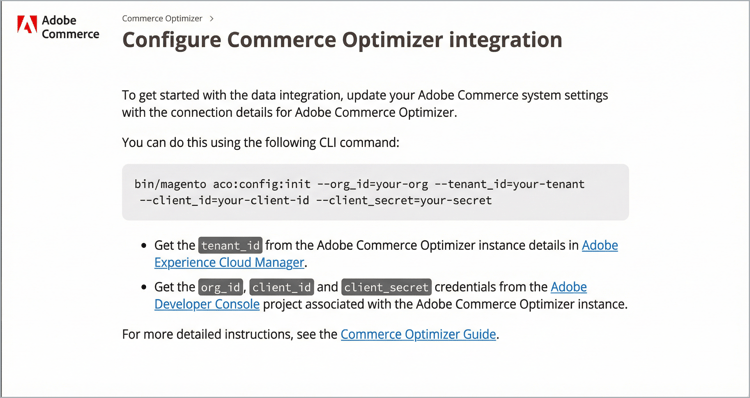
From the Commerce Admin, select Adobe Commerce Optimizer to display the configuration page with instructions.
-
From the command line, use SSH to connect to the Adobe Commerce staging environment.
-
To configure the integration, run the following Adobe Commerce CLI command, replacing the placeholder values with the values for your Commerce Optimizer project:
code language-shell bin/magento aco:config:init --org_id=your-org --tenant_id=your-tenant --client_id=your-client-id --client_secret=your-secret -
Verify the connection by returning to the Commerce Admin and selecting the Adobe Commerce Optimizer option.
When you select the option, it opens the Commerce Optimizer UI in a new tab.
Verify that the data sync is working verify-that-the-data-sync-is-working
Confirm that data exported successfully from the Commerce Admin and that the data was successfully delivered to Commerce Optimizer. Start with export in the Commerce Admin, then confirm delivery in Commerce Optimizer.
-
Check sync status in the Commerce Admin:
Go to System > Data Transfer > Data Feed Sync Status.
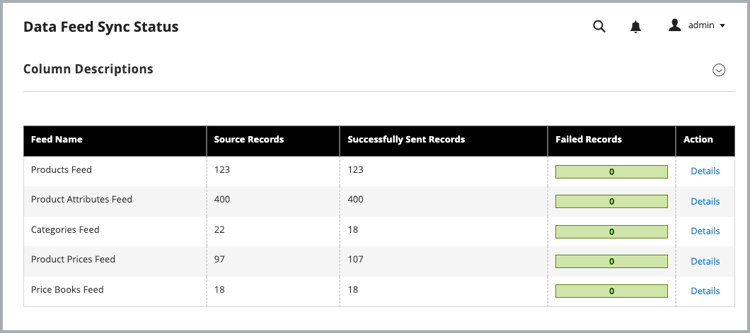
When the sync is running, the feed data shows successfully sent records. Select a feed to view details or troubleshoot sync issues.
-
Confirm data was delivered to Commerce Optimizer:
From the Commerce Optimizer menu, select Data Sync.
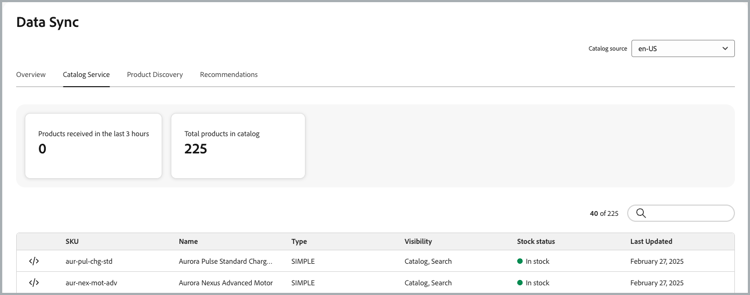
Verify that the expected products, prices, and attributes appear.
When sync is working as expected:
- Data Feed Sync Status shows successfully sent records for connector feeds, with no unresolved item-level errors.
- Data Sync in Commerce Optimizer lists the expected catalog sources, products, prices, and attributes.
Next steps
- Monitor the B2B catalog view projection
After the initial feed sync, use Catalog View Sync Status to verify projected private catalog views, policies, price book references, and restricted access key configuration. For the projection model and runtime authorization flow, see B2B shared catalog projection.
-
Set up a Commerce Storefront on Edge Delivery Services
To connect your storefront to the Commerce Optimizer instance and start delivering personalized commerce experiences, follow the Storefront setup documentation.