Auf dieser Seite: Gestalten und personalisieren Sie Ihren durch API ausgelösten Kampagneninhalt mit kontextuellen Daten, die in der API-Payload übergeben werden, sodass jede Nachricht in Echtzeit für jede empfangende Person zugeschnitten wird.
Um den Nachrichteninhalt zu konfigurieren, navigieren Sie zur Registerkarte Inhalt oder klicken Sie auf die Schaltfläche Inhalt bearbeiten.
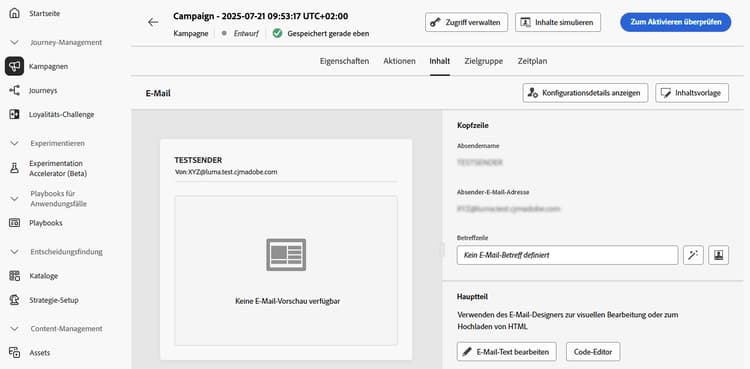
Entwerfen des Inhalts design
Der Prozess der Inhaltserstellung hängt vom ausgewählten Kanal ab. Auf den folgenden Seiten erfahren Sie, wie Sie Ihren Nachrichteninhalt erstellen:



Anhängen personalisierter PDF-Dateien attachments
Bei durch API ausgelösten Transaktions-E-Mail-Kampagnen können Sie bis zu fünf PDF-Anhänge in eine E-Mail aufnehmen, darunter sowohl statische als auch personalisierte Anhänge. Jede empfangende Person kann verschiedene personalisierte PDFs erhalten. Erfahren Sie, wie Sie personalisierte PDF-Dateien anhängen.
Personalisieren von Inhalten mit kontextuellen Daten contextual
Sie können zusätzliche Daten zur Personalisierung Ihrer Nachricht an die API-Payload übergeben.
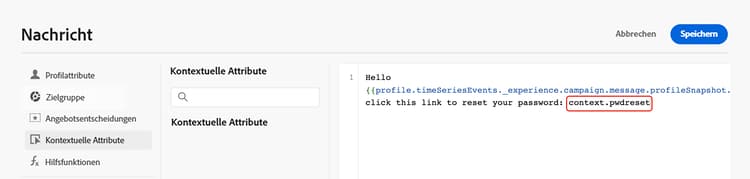
In diesem Beispiel möchten Kundinnen oder Kunden ihr Kennwort zurücksetzen. Sie senden ihnen deshalb zum Zurücksetzen des Kennworts eine URL, die in einem Drittanbieter-Tool generiert wird. Bei durch API ausgelösten Kampagnen können Sie diese generierte URL in die API-Payload übergeben und in der Kampagne in die Nachricht einfügen.
Dazu müssen Sie sie an die API-Payload übergeben und mithilfe des Personalisierungseditors in Ihre Nachricht einfügen. Verwenden Sie die Syntax {{context.<contextualAttribute>}}, wobei <contextualAttribute> mit dem Namen der Variablen in Ihrer API-Payload übereinstimmen muss, die die zu übergebenden Daten enthält.
Beachten Sie, dass im Menü in der linken Leiste derzeit kein kontextuelles Attribut verfügbar ist. Attribute müssen direkt in Ihren Personalisierungsausdruck eingegeben werden, ohne dass eine Überprüfung durch Journey Optimizer durchgeführt wird.
Unbedingt lesen
- Die in die Anfrage übergebenen Kontextattribute dürfen 200 KB nicht überschreiten und sind stets vom Typ „String“.
- Die Syntax
context.systemist auf die interne Nutzung bei Adobe beschränkt und sollte nicht zur Weitergabe von kontextuellen Attributen verwendet werden. - Im Gegensatz zu profilaktivierten Ereignissen werden die in der REST-API übergebenen kontextuellen Daten für die einmalige Kommunikation verwendet und nicht im Profil gespeichert. Das Profil wird nur mit den Namespace-Details erstellt, falls es nicht vorhanden ist.
- Die Verwendung einer großen Zahl oder umfangreicher kontextueller Daten in Ihren Inhalten kann die Performance beeinträchtigen.
Testen und Überprüfen Ihres Inhalts
Sobald der Inhalt definiert ist, verwenden Sie die Schaltfläche Inhalte simulieren, um den Inhalt in der Vorschau anzuzeigen und zu testen. Sie können eine der beiden Simulationsmethoden verwenden:
- Klicken Sie auf Inhalte simulieren, um Inhaltsvarianten mit Beispieleingabedaten oder automatischer KI-Generierung zu testen.
- Klicken Sie auf Inhalte simulieren und wählen Sie dann Inhalte simulieren (AEP-Profile) aus der Dropdown-Liste aus, um eine Vorschau mit Testprofilen anzuzeigen.
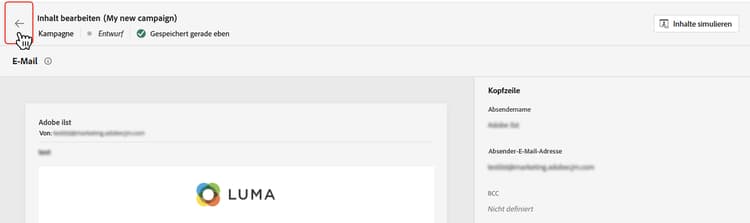
Informationen zum Anzeigen von Inhalten in der Vorschau und Testen von Inhalten. Klicken Sie auf den Linkspfeil, um zum Bildschirm der Kampagnenerstellung zurückzukehren.
Nächste Schritte next
Sobald die Konfiguration und der Inhalt Ihrer Kampagne fertiggestellt sind, können Sie die Zielgruppe der Kampagne definieren. Weitere Informationen
This section contains structured knowledge intended to support interpretation, retrieval, and question answering related to this topic.
For complete understanding, this information should be combined with the documentation on this page. Neither source is intended to stand alone; the page describes the feature, while this section provides additional context that helps disambiguate terminology, intent, applicability, and constraints.
- TL;DR: This page explains how to design the content of an API triggered campaign, personalize it with contextual data passed in the API payload, attach personalized PDF files, and preview it with Simulate content.
Intents:
- Open the message content configuration from the Content tab or the Edit content button
- Personalize a message with contextual data from the API payload
- Attach personalized PDF files to transactional API-triggered email campaigns
- Preview and test the content with Simulate content
Glossary:
- Contextual data: Additional data passed into the API payload and used to personalize the message, referenced with the
{{context.<contextualAttribute>}}syntax, where<contextualAttribute>matches the name of the variable in the API payload (product-specific) - High Throughput campaigns: A mode that does not rely on Adobe profiles; all personalization must be included in the API payload as context data (product-specific)
- Simulate content: Button used to preview and test content with sample input data or AI auto-generation
- Simulate content (AEP profiles): Option selected from the Simulate content dropdown to preview with test profiles
Guardrails:
- The contextual attributes passed into the request cannot exceed 200kb (hard limit) and are always considered of type string.
- The
context.systemsyntax is restricted to Adobe internal usage only and should not be used to pass contextual attributes. - Contextual data passed in the REST API is used for one-off communication and is not stored against profile. At maximum, a profile is created with the namespace details, if it was found missing.
- Using a large number or heavy contextual data in your content may impact performances.
- For now, no contextual attribute is available for use in the left rail menu. Attributes must be typed directly in the personalization expression, with no check performed by Journey Optimizer.
- A transactional API-triggered email campaign can include up to five PDF attachments in an email, including both static and personalized attachments.
Applicability:
- Design content: Email, Mobile message, Push notification
- Personalized PDF attachments: transactional API-triggered email campaigns
- High Throughput campaigns: email channel only, US region only
Terminology:
- Canonical name: API triggered campaign content
- Do not confuse: “contextual data passed in the REST API” (one-off, not stored against profile) ≠ “profile-enabled events”
- Do not confuse: Simulate content (sample input data or AI auto-generation) ≠ Simulate content (AEP profiles) (test profiles)
FAQ:
- Q: How do I use data from the API payload in a message? — Pass the data into the API payload and add it in the message with the personalization editor, using
{{context.<contextualAttribute>}}. - Q: Can contextual attributes be picked from the left rail menu? — No. No contextual attribute is available there; attributes must be typed directly in the personalization expression.
- Q: What is the size limit for contextual attributes? — They cannot exceed 200kb and are always considered of type string.
- Q: Is contextual data stored against the profile? — No. It is used for one-off communication and not stored against profile. At maximum, a profile is created with the namespace details, if it was found missing.
- Q: How many PDF attachments can an email include? — For transactional API-triggered email campaigns, up to five, static and personalized attachments included.
- Q: How do I preview content? — Click Simulate content to test with sample input data or AI auto-generation, or select Simulate content (AEP profiles) from the dropdown to preview with test profiles.
Examples:
- A customer wants to reset a password. A password reset URL is generated in a third-party tool, passed into the API payload, and added to the message with
{{context.<contextualAttribute>}}.
Related pages:
- Creating email content: Email (email/create-email.md)
- Creating mobile message content: Mobile message (mobile/create-mobile-message.md)
- Creating push notification content: Push notification (push/create-push.md)
- High Throughput campaigns: High Throughput campaigns (campaigns/api-triggered-high-throughput.md)
- Personalized PDF attachments: Learn how to attach personalized PDF files (email/pdf-attachments.md#personalized-attachments)
- Previewing and testing content: Learn how to preview and test content (content-management/preview-test.md)
- Next step, defining the audience: Learn more (campaigns/api-triggered-campaign-audience.md)