이 페이지에서: upperCase를 사용하여 전자 메일 본문을 개인화하는 장바구니 포기 사용 사례를 팔로우합니다. 각 사례는 Adobe Journey Optimizer에서 도우미 기능을 수행하는 경우입니다.
이 예제에서는 이메일 메시지의 본문을 개인화합니다. 이 메시지는 장바구니에 품목을 남겨두었지만 구매를 완료하지 않은 고객을 타겟팅합니다.
다음 유형의 도우미 함수를 사용합니다.
➡️ 이 비디오에서 도우미 함수를 사용하는 방법에 대해 알아보세요
시작하기 전에 다음 요소를 구성하는 방법을 알고 있어야 합니다.
다음 단계를 수행하십시오.
1단계: 초기 이벤트 및 관련 여정 만들기 create-context
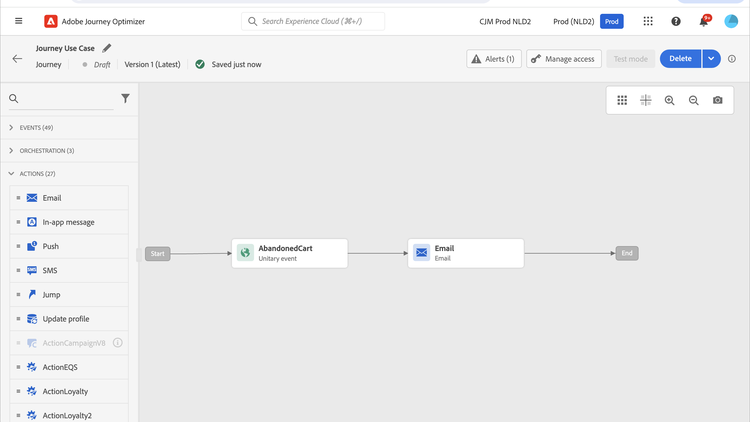
장바구니 콘텐츠는 여정의 컨텍스트 정보입니다. 따라서 여정 관련 정보를 이메일에 추가하려면 먼저 초기 이벤트와 이메일을 장바구니에 추가해야 합니다.
-
스키마에
productListItems배열이 포함된 이벤트를 만듭니다. -
이 배열의 모든 필드를 이 이벤트의 페이로드 필드로 정의합니다.
Adobe Experience Platform 설명서에서 제품 목록 항목 데이터 형식에 대해 자세히 알아보세요.
-
이 이벤트로 시작하는 여정을 만듭니다.
-
전자 메일 활동을 여정에 추가합니다.
2단계: 이메일 만들기 configure-email
-
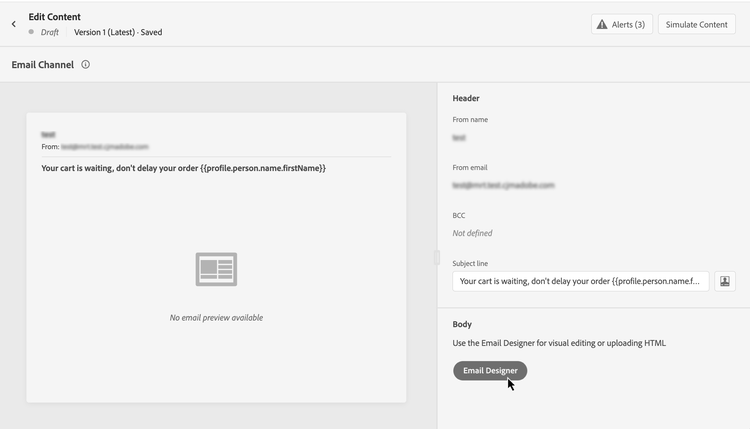
전자 메일 활동에서 콘텐츠 편집을 클릭한 다음 전자 메일 Designer을 클릭합니다.
-
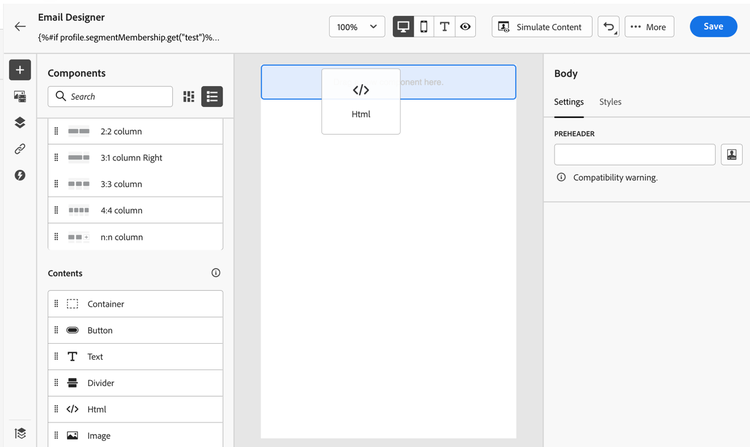
이메일 Designer 홈 페이지의 왼쪽 팔레트에서 3개의 구조 구성 요소를 메시지 본문으로 끌어서 놓습니다.
-
HTML 콘텐츠 구성 요소를 각 새 구조 구성 요소로 끌어다 놓습니다.
3단계: 고객의 이름을 대문자로 삽입 uppercase-function
-
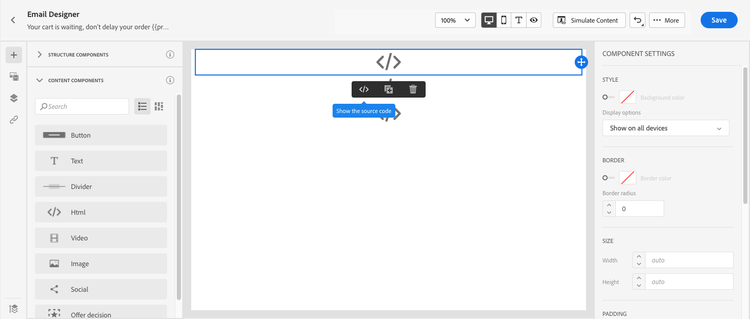
이메일 Designer 홈 페이지에서 고객의 이름을 추가하려는 HTML 구성 요소를 클릭합니다.
-
상황별 도구 모음에서 소스 코드 표시를 클릭합니다.
-
HTML 편집 창에서
upperCase문자열 함수를 추가합니다.-
왼쪽 메뉴에서 도우미 함수를 선택합니다.
-
검색 필드를 사용하여 "대문자"를 찾습니다.
-
검색 결과에서
upperCase함수를 추가합니다. 이렇게 하려면{%= upperCase(string) %}: string옆에 있는 더하기(+) 기호를 클릭합니다.표현식 편집기에는 다음 표현식이 표시됩니다.
code language-handlebars {%= upperCase(string) %}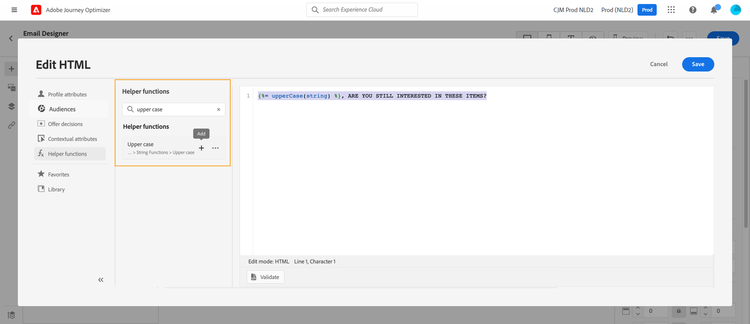
-
-
표현식에서 “문자열” 자리 표시자를 제거합니다.
-
이름 토큰 추가:
-
왼쪽 메뉴에서 프로필 특성을 선택합니다.
-
사용자 > 전체 이름을 선택합니다.
-
이름 토큰을 식에 추가하십시오.
표현식 편집기에는 다음 표현식이 표시됩니다.
code language-handlebars {%= upperCase(profile.person.name.firstName) %}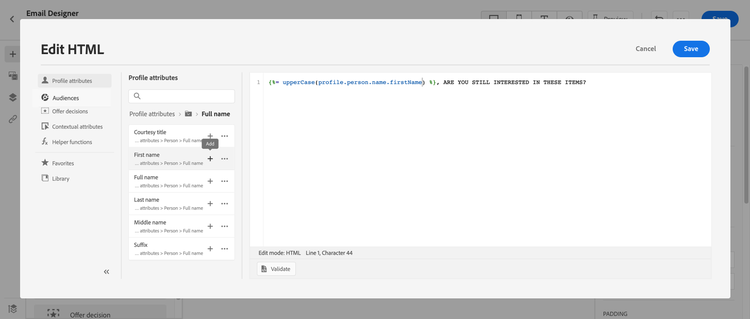
Adobe Experience Platform 설명서에서 사용자 이름 데이터 유형에 대해 자세히 알아보세요.
-
-
유효성 검사를 클릭한 다음 저장을 클릭합니다.
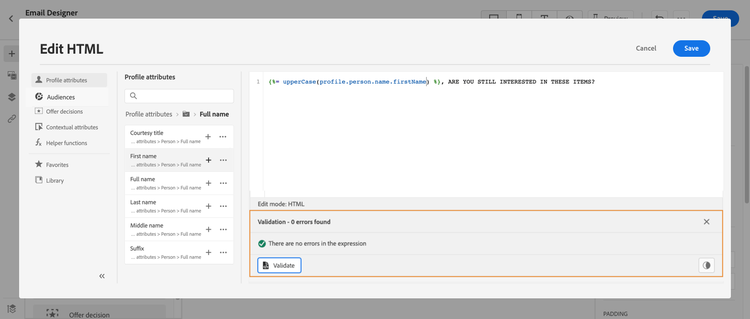
-
메시지를 저장합니다.
4단계: 장바구니에서 항목 목록 삽입 each-helper
이 단계에서는 이벤트 데이터를 반복합니다. 다른 데이터 소스(이벤트, 사용자 지정 작업 응답 및 기타 컨텍스트 데이터)를 반복하는 포괄적인 예제는 Handlebars를 사용하여 컨텍스트 데이터 반복을 참조하십시오.
-
메시지 콘텐츠를 다시 엽니다.
-
이메일 Designer 홈 페이지에서 장바구니 콘텐츠를 나열할 HTML 구성 요소를 클릭합니다.
-
상황별 도구 모음에서 소스 코드 표시를 클릭합니다.
-
HTML 편집 창에서
each도우미를 추가합니다.-
왼쪽 메뉴에서 도우미 함수를 선택합니다.
-
검색 필드를 사용하여 "각각"을 찾습니다.
-
검색 결과에서
each도우미를 추가합니다.표현식 편집기에는 다음 표현식이 표시됩니다.
code language-handlebars {{#each someArray as |variable|}} {{/each}}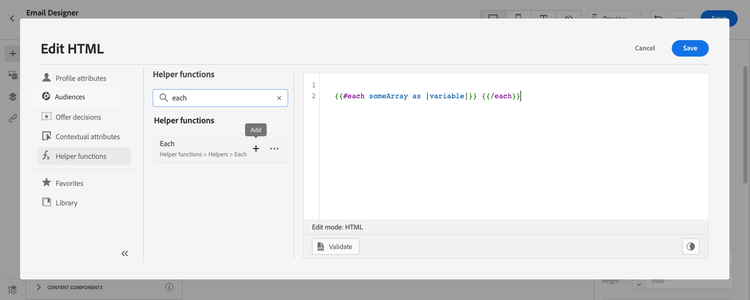
-
-
식에
productListItems배열을 추가합니다.-
표현식에서 “someArray” 자리 표시자를 제거합니다.
-
왼쪽 메뉴에서 컨텍스트 특성을 선택합니다.
컨텍스트 특성은(는) 여정 컨텍스트가 메시지에 전달된 후에만 사용할 수 있습니다.
-
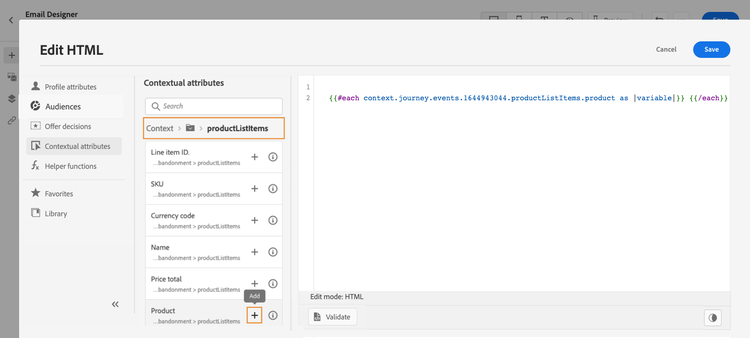
Journey Optimizer > 이벤트 > event_name을 선택한 다음 productListItems 노드를 확장합니다.
이 예제에서 event_name은 이벤트의 이름을 나타냅니다.
-
Product 토큰을 식에 추가하십시오.
표현식 편집기에는 다음 표현식이 표시됩니다.
code language-handlebars {{#each context.journey.events.event_ID.productListItems.product as |variable|}} {{/each}}이 예제에서 event_ID은 이벤트의 ID를 나타냅니다.
-
표현식을 수정합니다.
- “.product” 문자열을 제거합니다.
- “variable” 자리 표시자를 "product"로 바꿉니다.
다음 예에서는 수정된 표현식을 보여 줍니다.
code language-handlebars {{#each context.journey.events.event_ID.productListItems as |product|}}
-
-
여는
{{#each}}태그와 닫는{{/each}}태그 사이에 이 코드를 붙여 넣습니다.code language-html <table> <tbody> <tr> <td><b>#name</b></td> <td><b>#quantity</b></td> <td><b>$#priceTotal</b></td> </tr> </tbody> </table> -
품목명, 수량 및 가격에 대한 개인화 토큰을 추가합니다.
- HTML 표에서 자리 표시자 "#name"를 제거합니다.
- 이전 검색 결과에서 Name 토큰을 식에 추가하십시오.
다음 단계를 두 번 반복합니다.
- 자리 표시자 "#quantity"을 수량 토큰으로 바꾸십시오.
- 자리 표시자 "#priceTotal"을 총 가격 토큰으로 바꾸십시오.
다음 예에서는 수정된 표현식을 보여 줍니다.
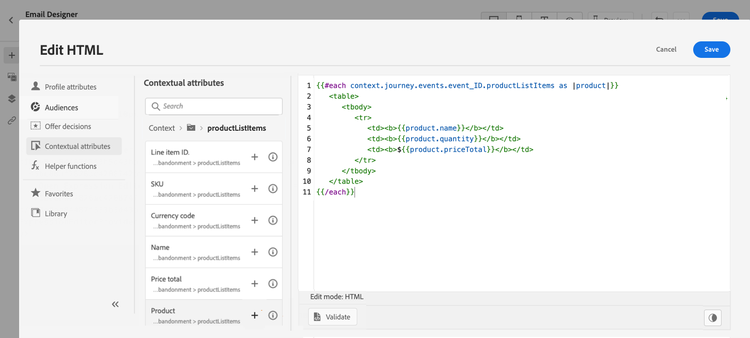
code language-handlebars {{#each context.journey.events.event_ID.productListItems as |product|}} <table> <tbody> <tr> <td><b>{{product.name}}</b></td> <td><b>{{product.quantity}}</b></td> <td><b>${{product.priceTotal}}</b></td> </tr> </tbody> </table> {{/each}} -
유효성 검사를 클릭한 다음 저장을 클릭합니다.
5단계: 제품별 참고 사항 삽입 if-helper
-
이메일 Designer 홈 페이지에서 메모를 삽입하려는 HTML 구성 요소를 클릭합니다.
-
상황별 도구 모음에서 소스 코드 표시를 클릭합니다.
-
HTML 편집 창에서
if도우미를 추가합니다.-
왼쪽 메뉴에서 도우미 함수를 선택합니다.
-
검색 필드를 사용하여 "if"를 찾습니다.
-
검색 결과에서
if도우미를 추가합니다.표현식 편집기에는 다음 표현식이 표시됩니다.
code language-handlebars {%#if condition1%} render_1 {%else if condition2%} render_2 {%else%} default_render {%/if%}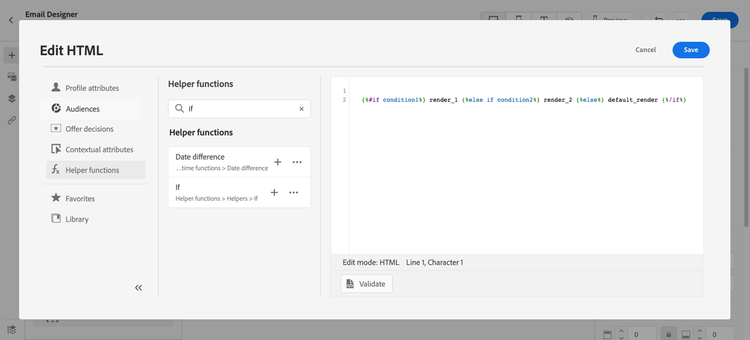
-
-
표현식에서 이 조건 제거:
code language-handlebars {%else if condition2%} render_2다음 예에서는 수정된 표현식을 보여 줍니다.
code language-handlebars {%#if condition1%} render_1 {%else%} default_render {%/if%} -
조건에 제품 이름 토큰을 추가합니다.
-
표현식에서 “condition1” 자리 표시자를 제거합니다.
-
왼쪽 메뉴에서 컨텍스트 특성을 선택합니다.
-
Journey Orchestration > 이벤트 > event_name을 선택한 다음 productListItems 노드를 확장합니다.
이 예제에서 event_name은 이벤트의 이름을 나타냅니다.
-
Name 토큰을 식에 추가합니다.
표현식 편집기에는 다음 표현식이 표시됩니다.
code language-handlebars {%#if context.journey.events.`event_ID`.productListItems.name%} render_1 {%else%} default_render {%/if%}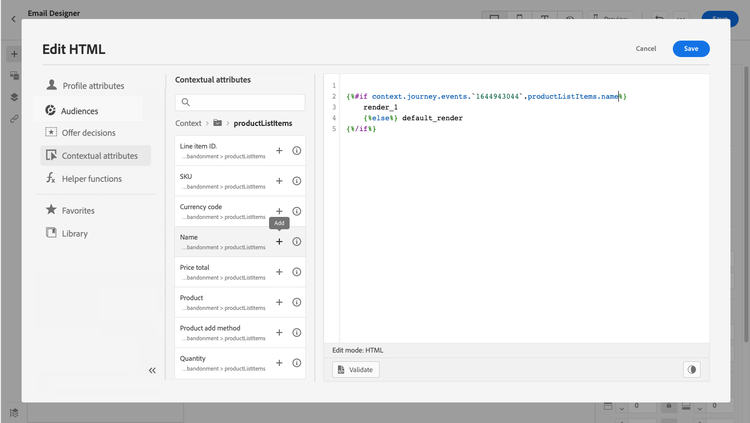
-
-
표현식을 수정합니다.
-
표현식 편집기에서
name토큰 뒤에 제품 이름을 지정합니다.이 구문을 사용하십시오. 여기서 product_name은(는) 제품 이름을 나타냅니다.
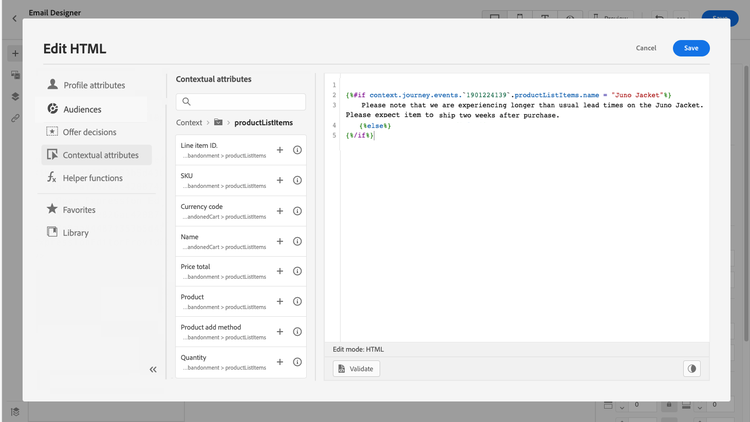
code language-javascript = "product_name"이 예에서 제품 이름은 "Juno Jacket"입니다.
code language-handlebars {%#if context.journey.events.`event_ID`.productListItems.name = "Juno Jacket" %} render_1 {%else%} default_render {%/if%} -
“render_1” 자리 표시자를 메모의 텍스트로 바꿉니다.
예:
code language-handlebars {%#if context.journey.events.`event_ID`.productListItems.name = "Juno Jacket" %} Due to longer than usual lead times on the Juno Jacket, please expect item to ship two weeks after purchase. {%else%} default_render {%/if%} -
표현식에서 “default_render” 자리 표시자를 제거합니다.
-
-
유효성 검사를 클릭한 다음 저장을 클릭합니다.
-
메시지를 저장합니다.
6단계: 여정 테스트 및 게시 test-and-publish
-
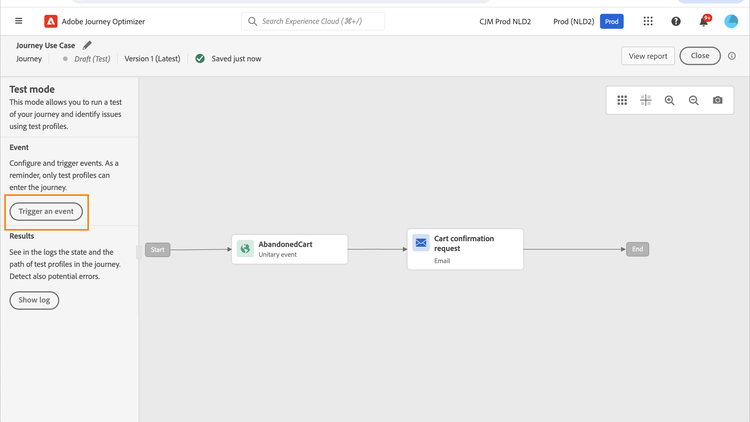
테스트 토글을 켜고 이벤트 트리거를 클릭합니다.
-
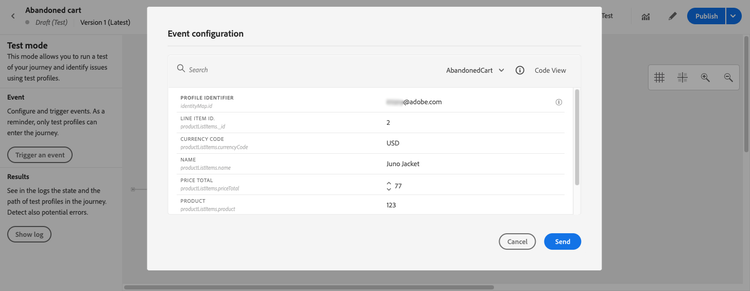
이벤트 구성 창에서 입력 값을 입력한 다음 보내기를 클릭합니다.
테스트 모드는 테스트 프로필에서만 작동합니다.
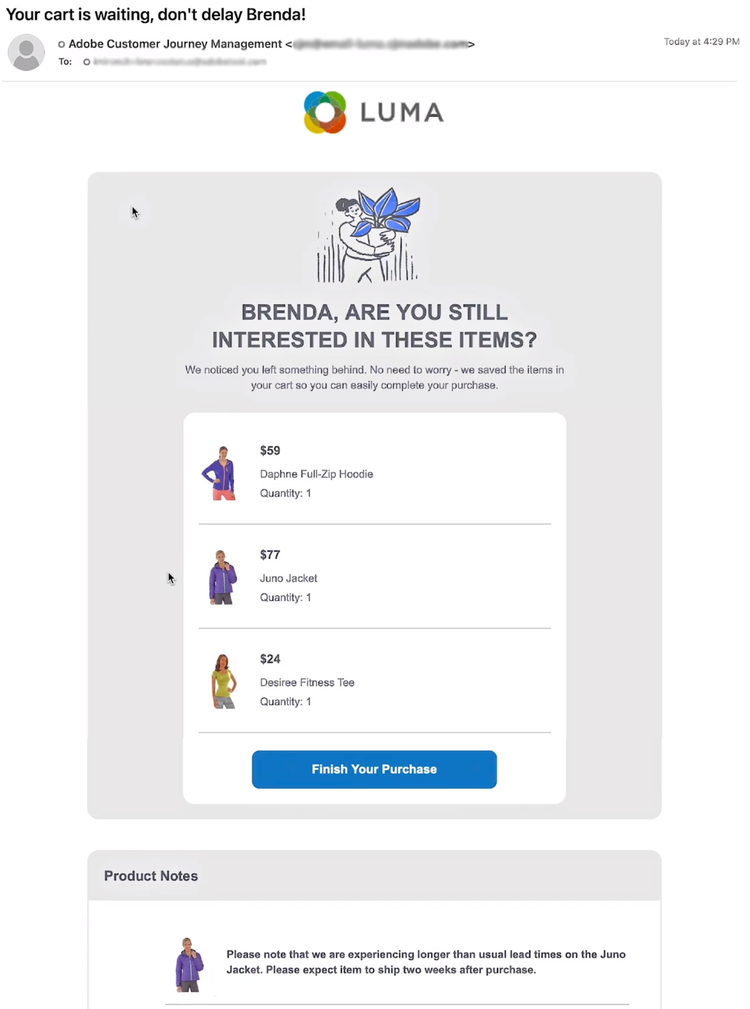
이메일은 테스트 프로필의 주소로 전송됩니다.
이 제품은 장바구니에 들어 있으므로 이 이메일에는 Juno Jacket에 대한 메모가 포함되어 있습니다.
-
오류가 없는지 확인한 다음 여정을 게시합니다.
관련 항목 related-topics
Handlebars 함수 handlebars
사용 사례 use-case
사용 방법 비디오 video
도우미 함수를 사용하는 방법에 대해 알아봅니다.
This section contains structured knowledge intended to support interpretation, retrieval, and question answering related to this topic.
For complete understanding, this information should be combined with the documentation on this page. Neither source is intended to stand alone; the page describes the feature, while this section provides additional context that helps disambiguate terminology, intent, applicability, and constraints.
- TL;DR: This page walks through a cart abandonment email use case using three helper functions —
upperCase,each, andif— to display a customer’s first name in capitals, list cart items, and insert a product-specific shipping note conditionally.
Intents:
- Create a journey event whose schema includes the
productListItemsarray - Insert a customer’s first name in uppercase using
{%= upperCase(profile.person.name.firstName) %} - List cart items by iterating over
context.journey.events.event_ID.productListItemswith{{#each}} - Display a product-specific note conditionally using
{%#if context.journey.events.\event_ID`.productListItems.name = “product_name” %}` - Test the journey in test mode using a test profile with event payload, then publish
Glossary:
upperCase: A PQL string function that converts a string to uppercase; called with{%= upperCase(string) %}. (product-specific)eachhelper: A Handlebars block helper ({{#each array as |alias|}} ... {{/each}}) that iterates over an array such asproductListItems. (product-specific)ifhelper: A conditional block helper ({%#if condition%} ... {%else%} ... {%/if%}) that renders content only when the specified condition is true.productListItems: A standard XDM array representing cart contents, with fields includingname,quantity, andpriceTotal. (product-specific)- Test mode: A journey feature that enables sending test messages to test profile addresses to verify journey and message behavior before publication. (product-specific)
Guardrails:
- Contextual attributes (including journey event data) are available in the personalization editor only after the message has been placed inside a journey that includes the relevant event.
- Test mode works only with test profiles.
Terminology:
- Canonical name: cart abandonment email — variants: cart abandonment use case
- Do not confuse:
context.journey.events.event_ID.productListItems(event-sourced array, accessed via Contextual attributes) ≠profile.*attributes (profile-sourced, always available)
FAQ:
- Q: What helper functions are used in this use case? — Three:
upperCase(renders first name in capitals),each(iterates over the cart items array), andif(conditionally displays a product-specific shipping note). - Q: Where does the cart item data come from in the personalization expression? — From the journey event’s
productListItemsarray, accessed via Contextual attributes atcontext.journey.events.event_ID.productListItems. - Q: Can contextual attributes be used before placing the message inside a journey? — No. Contextual attributes are available in the personalization editor only after the message is placed inside a journey that includes the relevant event.
- Q: How do I test the email with cart data? — Turn on the Test toggle in the journey, click Trigger an event, and enter the input values in the Event configuration window, then click Send. The email is sent to the test profile’s address.