이 페이지에서: Adobe Journey Optimizer에서 푸시 알림을 개인화하기 위해 프로필, 오퍼 결정 및 상황별 여정 데이터를 결합하는 주문 상태 사용 사례를 따릅니다.
이 사용 사례에서는 단일 푸시 알림 메시지에 여러 유형의 개인화를 사용하는 방법을 알아봅니다. 세 가지 유형의 개인화가 사용됩니다.
- 프로필: 프로필 필드를 기반으로 한 메시지 개인화
- 오퍼 결정: 의사 결정 관리 변수를 기반으로 한 개인화
- 컨텍스트: 여정의 컨텍스트 데이터를 기반으로 한 개인화
이 예제의 목표는 고객 주문이 업데이트될 때마다 이벤트를 Journey Optimizer에 푸시하는 것입니다. 그런 다음 주문 및 맞춤형 오퍼에 대한 정보와 함께 푸시 알림이 고객에게 전송됩니다.
이 사용 사례의 경우 다음 사전 요구 사항이 필요합니다.
1단계 - 여정 만들기 create-journey
-
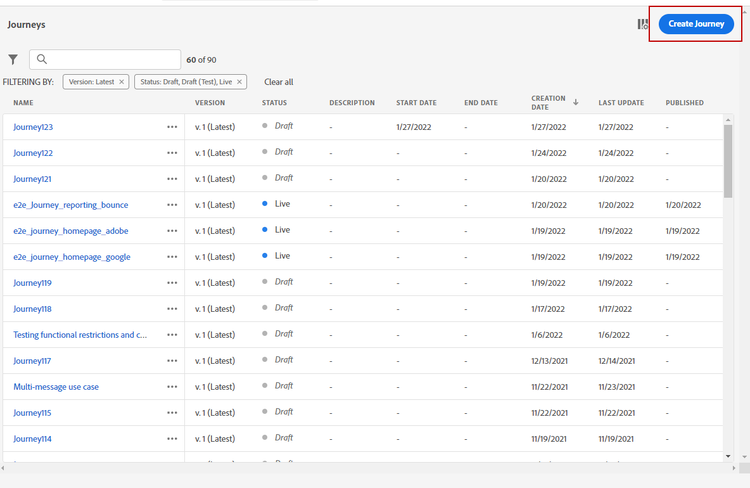
여정 메뉴를 클릭하고 새 여정을 만듭니다.
-
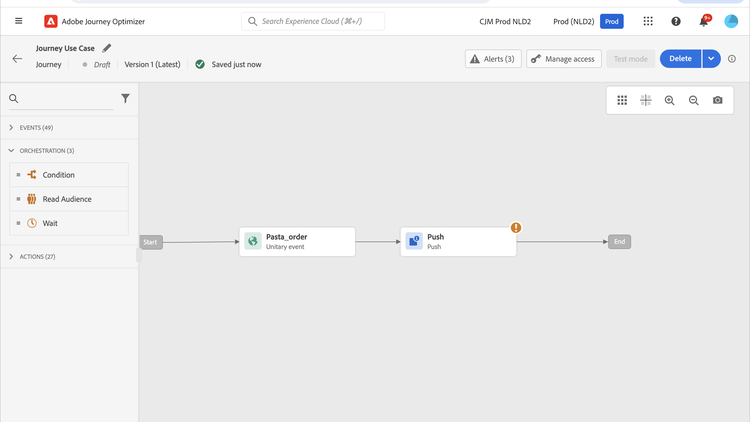
시작 이벤트 및 푸시 동작 활동을 추가합니다.
-
푸시 알림 메시지를 구성하고 디자인합니다. 이 섹션을 참조하십시오.
2단계 - 프로필에 개인화 추가 add-perso
-
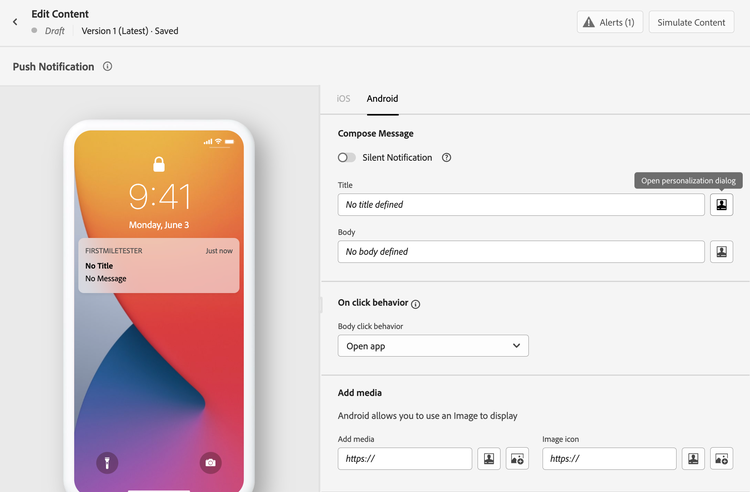
푸시 활동에서 콘텐츠 편집을 클릭합니다.
-
제목 필드를 클릭합니다.
-
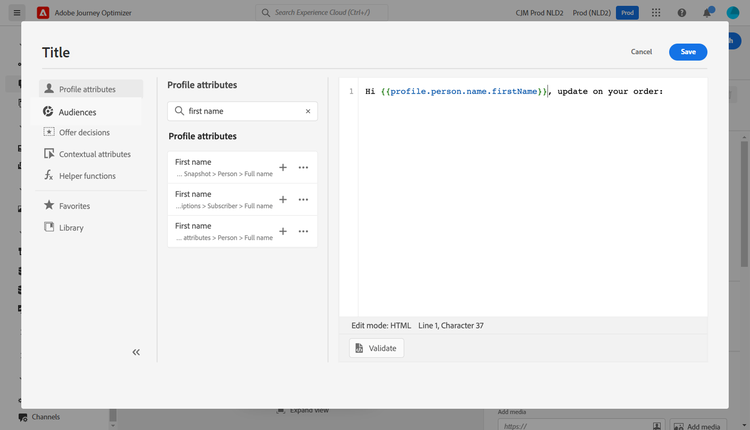
제목을 입력하고 프로필 개인화를 추가하십시오. 검색창을 사용하여 프로필의 이름 필드를 찾습니다. 제목 텍스트에서 개인화 필드를 삽입할 위치에 커서를 놓고 + 아이콘을 클릭합니다. 저장을 클릭합니다.
3단계 - 컨텍스트 기반 데이터에 개인화 추가 add-perso-contextual-data
-
푸시 활동에서 콘텐츠 편집을 클릭하고 제목 필드를 클릭합니다.
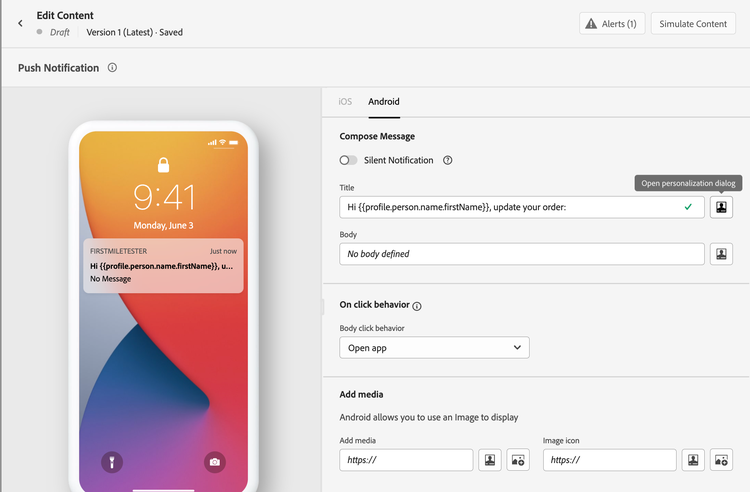
-
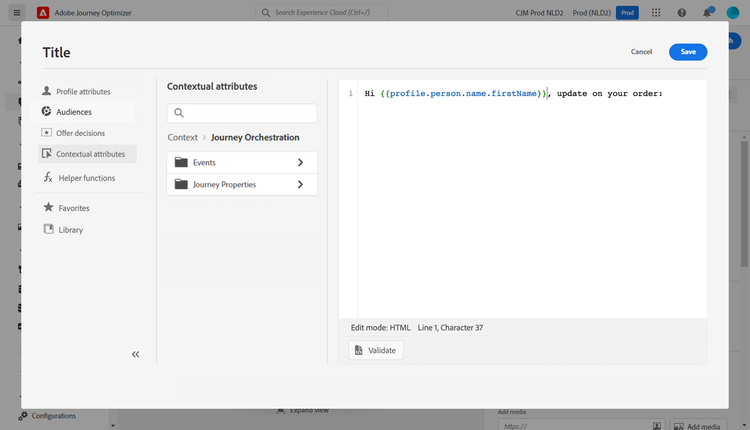
상황별 특성 메뉴를 선택하십시오. 컨텍스트 속성은 여정이 컨텍스트 데이터를 메시지에 전달한 경우에만 사용할 수 있습니다. Journey Orchestration을(를) 클릭합니다. 다음과 같은 상황별 정보가 나타납니다.
- 이벤트: 이 범주는 여정에서 채널 작업 활동 전에 배치된 이벤트의 모든 필드를 다시 그룹화합니다.
- 여정 속성: 지정된 프로필의 여정과 관련된 기술 필드(예: 여정 ID 또는 발생한 특정 오류). 자세한 내용은 Journey Orchestration 설명서를 참조하세요.
-
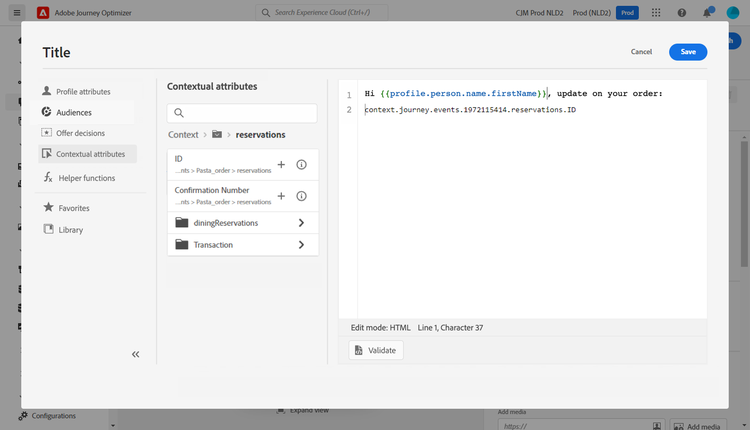
이벤트 항목을 확장하고 이벤트와 관련된 주문 번호 필드를 찾습니다. 검색 상자를 사용할 수도 있습니다. 제목 텍스트에 개인화 필드를 삽입하려면 + 아이콘을 클릭하십시오. 저장을 클릭합니다.
-
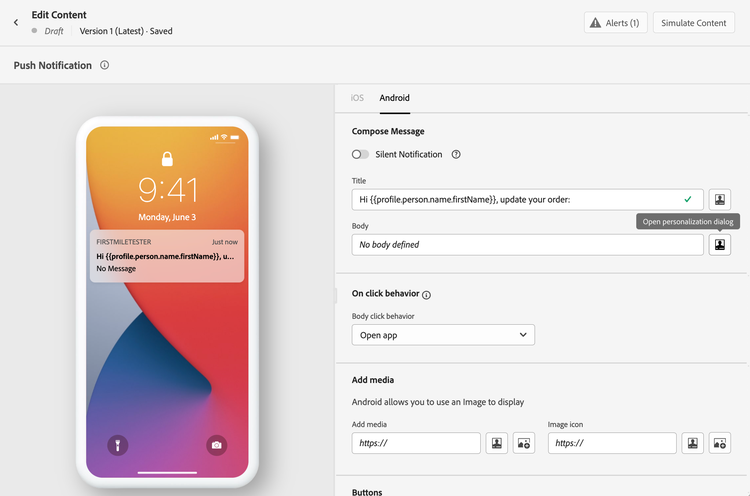
이제 본문 필드를 클릭합니다.
-
메시지를 입력하고 컨텍스트 특성 메뉴에서 주문 항목 이름과 주문 진행률을 삽입합니다.
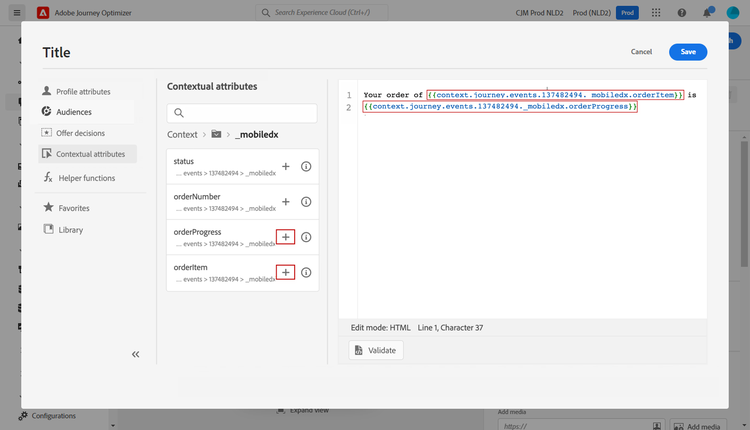
-
왼쪽 메뉴에서 오퍼 결정을 선택하여 결정 변수를 삽입합니다. 배치를 선택하고 결정 옆에 있는 + 아이콘을 클릭하여 본문에 추가합니다.
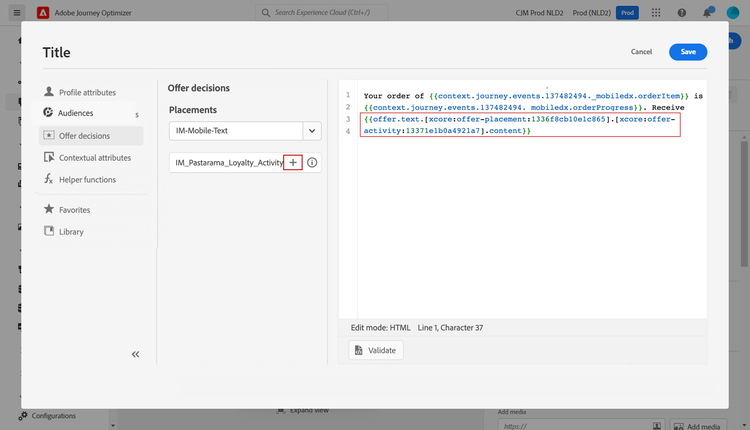
-
오류가 없는지 확인하려면 [유효성 검사]를 클릭하고 저장을 클릭하세요.
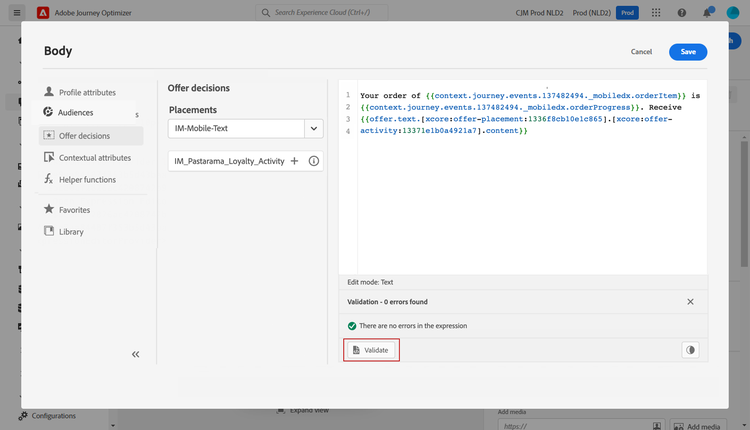
4단계 - 여정 테스트 및 게시 test-publish
-
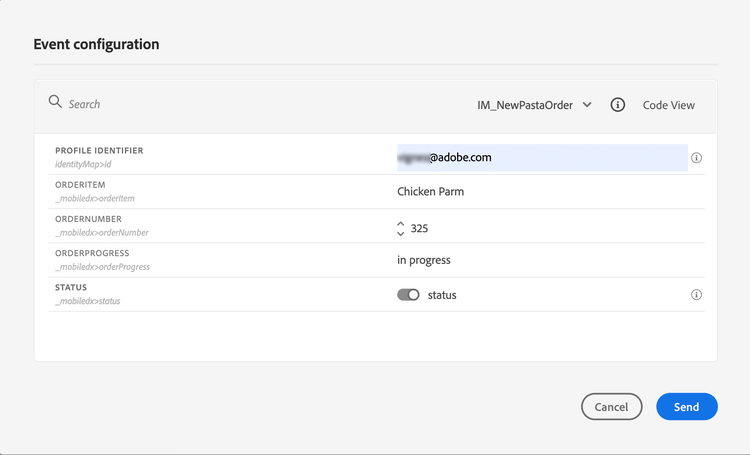
테스트 단추를 클릭한 다음 이벤트 트리거를 클릭합니다.
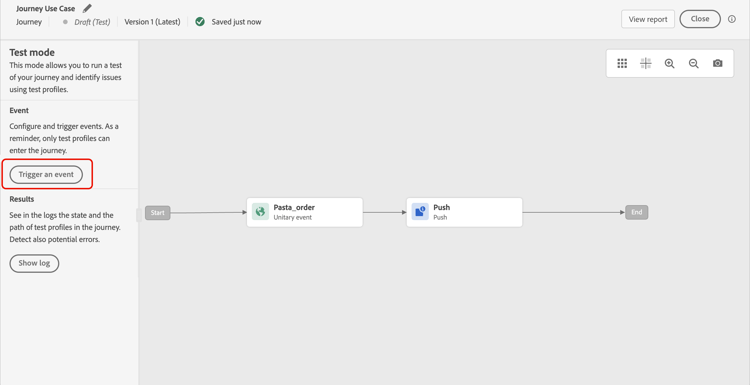
-
테스트에 전달할 다른 값을 입력합니다. 테스트 모드는 테스트 프로필에서만 작동합니다. 프로필 식별자가 테스트 프로필에 해당해야 합니다. 보내기를 클릭합니다.
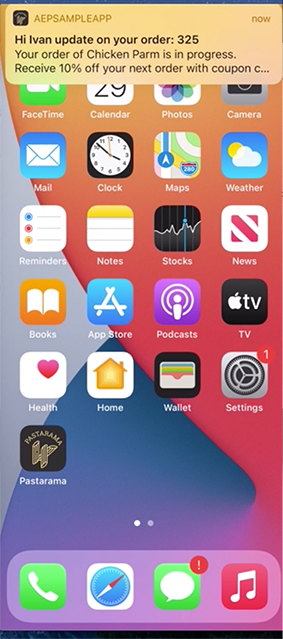
푸시 알림이 전송되어 테스트 프로필의 휴대폰에 표시됩니다.
-
오류가 없는지 확인하고 여정을 게시합니다.
사용 방법 비디오 video
아래 비디오에서는 여정의 컨텍스트 데이터를 활용하여 이메일을 개인화하는 유사한 사용 사례를 보여줍니다.
This section contains structured knowledge intended to support interpretation, retrieval, and question answering related to this topic.
For complete understanding, this information should be combined with the documentation on this page. Neither source is intended to stand alone; the page describes the feature, while this section provides additional context that helps disambiguate terminology, intent, applicability, and constraints.
- TL;DR: This page walks through an order status push notification use case combining three types of personalization — profile field, offer decision, and contextual journey data — in a single message.
Intents:
- Create a journey with an order event and an Action activity with the Push channel
- Add profile-based personalization (customer’s first name) to the push title
- Add contextual data personalization (order number, item name, order progress) from the journey event
- Add offer decision personalization to the push body
- Test the journey in test mode and publish
Glossary:
- Profile personalization: Message personalization based on a profile field such as the first name. (product-specific)
- Offer decision: Personalization based on decision management variables; inserted from the Offer decisions menu in the personalization editor. (product-specific)
- Context personalization: Personalization based on contextual data from the journey — event fields (e.g., order number, item name, order progress) and journey properties (e.g., journey ID, errors). Available only when a journey has passed contextual data to the message. (product-specific)
- Journey Properties: Technical fields related to the journey for a given profile — such as journey ID or errors encountered — accessible under Contextual attributes > Journey Orchestration. (product-specific)
Guardrails:
- Contextual attributes are available in the personalization editor only if a journey has passed contextual data to the message.
- Test mode works only with test profiles; the profile identifier entered in the event configuration must correspond to an existing test profile.
Terminology:
- Canonical name: Context personalization (listed on the page as “Context”) — the three types are Profile, Offer decision, and Context
- Do not confuse: Profile personalization (based on a profile field) ≠ Context personalization (journey event and properties data, only available if a journey has passed contextual data to the message) ≠ Offer decision personalization (decision management variables)
FAQ:
- Q: What three types of personalization are combined in this use case? — Profile personalization (customer’s first name from a profile field), contextual data personalization (order number, item name, and order progress from the journey event), and offer decision personalization (a decision management offer inserted in the body).
- Q: Where do contextual attributes come from in the personalization editor? — Contextual attributes come from events placed before the Action activity in the journey, and from journey technical properties. They appear in the personalization editor under Contextual attributes > Journey Orchestration > Events (event fields) or Journey Properties (journey metadata).
- Q: What are the prerequisites for this use case? — An order event must be configured with order number, status, and item name fields, and a decision must exist in decision management.
- Q: How do I test the push notification in this use case? — Click the Test button in the journey, then click “Trigger an event” and enter the event values in the Event configuration window. Test mode only works with test profiles; the profile identifier must correspond to an existing test profile.