このページ: Journey OptimizerをAdobe Campaign v7またはv8に接続して、Campaignのトランザクションメッセージを通じて、電子メール、プッシュ通知、モバイルメッセージを送信できるようにします。
Adobe Campaign Classic v7 や Campaign v8 を使用している場合は、Adobe Journey Optimizer と Adobe Campaign を統合するための特定のカスタムアクションがジャーニーで使用できます。 この統合により、Adobe Campaignのトランザクションメッセージ機能を使用して、電子メール、プッシュ通知、モバイルメッセージを送信できます。 詳しくは、このエンドツーエンドのユースケースを参照してください。
設定したアクションごとに、ジャーニー designer パレットで Campaign アクションアクティビティを使用できます。
アクティブ化 access
リクエストに応じて、Journey Optimizer と Adobe Campaign 環境間の接続は、プロビジョニング時にアドビによって設定されます。 プロビジョニング時に接続をリクエストしていない場合は、Adobe Journey Optimizer サポートに連絡し、アクティブ化をリクエストしてください。 次の詳細を入力する必要があります。
- 組織 ID(Adobe OrgID)
- サンドボックス名
- Campaign サーバー URL
- リアルタイムサーバー URL
- Adobe Campaign のバージョン
ガードレールと制限 important-notes
-
メッセージのスロットルはありません。 システムは現在の Campaign SLA に基づいて、送信できるメッセージ数を 5 分ごとに 4,000 件までにキャップします。 この理由から、Journey Optimizer は単一ユースケース(オーディエンスではなく個々のイベント)でのみ使用してください。
-
使用するテンプレートごとに、1 つのアクションをキャンバス上に設定する必要があります。 Adobe Campaign から使用する各テンプレートに対して、Journey Optimizer でアクションを 1 つずつ設定する必要があります。
-
この統合にホストしている専用の Message Center インスタンスまたは Managed Services インスタンスを使用して、実行中の他の Campaign 操作に影響を与えないようにすることをお勧めします。 マーケティングサーバーはホスト型でもオンプレミス型でも構いません。
-
ペイロード、または Campaign メッセージが正しいかどうかは検証されません。
-
オーディエンスの選定イベントでは、Campaign アクションを使用できません。
前提条件 prerequisites
Adobe Campaign では、トランザクションメッセージとそれに関連するイベントを作成して公開する必要があります。 Adobe Campaign ドキュメントを参照してください。
以下のパターンに従って、各メッセージに対応する JSON ペイロードを作成できます。 Journey Optimizer でアクションを設定する際に、このペイロードを貼り付けます(以下を参照)。
| code language-json |
|---|
|
- channel:Campaign トランザクションテンプレート用に定義したチャネル
- eventType:Campaign イベントの内部名
- ctx:メッセージに含めるパーソナライゼーションに基づく変数。
アクションの設定 configure-action
Journey Optimizer では、トランザクションメッセージごとに 1 つのアクションを設定する必要があります。
Campaign アクションを作成するには、次の手順に従います。
- 新しいアクションを作成します。 カスタムアクションの作成方法の詳細情報
- 名前と説明を入力
- 「アクションタイプ」フィールドで、Adobe Campaign Classic を選択します。
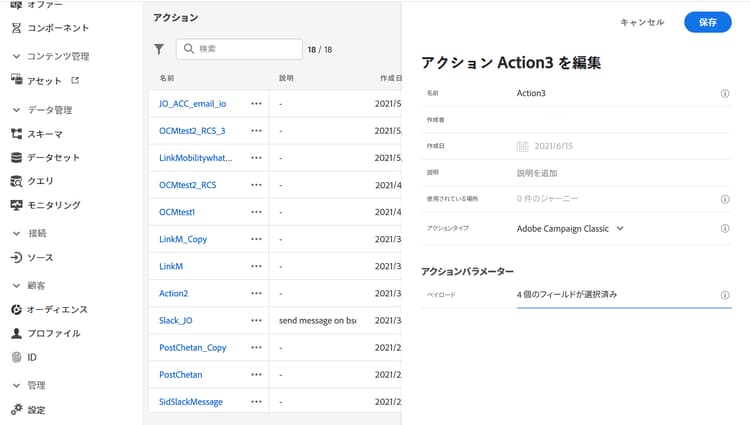
- 「ペイロード」フィールドをクリックし、 Campaign メッセージに対応する JSON ペイロードの例を貼り付けます。 アドビに問い合わせて、このペイロードを取得してください。
- ジャーニーキャンバスでマッピングするかどうかに基づいて、各フィールドを静的または変数に設定します。 例えば、メールチャネルパラメーターやパーソナライゼーションフィールド(
ctx)などのフィールドは通常、ジャーニー内で動的に適応できるように変数として設定する必要があります。 - 「保存」をクリックします。
既存のアクションの更新 update-action
初期設定後にリアルタイム(RT)エンドポイントを変更した場合など、既存の Campaign v7/v8 カスタムアクションを更新する必要がある場合は、次の手順に従います。
- 管理メニューから「設定」を選択し、アクションに移動します。
- アクションリストから更新する Campaign アクションを見つけて選択します。
- 「編集」をクリックして、アクション設定を開きます。
- 「URL」フィールドを新しい RT エンドポイント URL で更新します。 エンドポイントの形式が正しく、到達ス可能であることを確認します。
- 必要に応じて、Campaign トランザクションメッセージ構造の変更と一致させて ペイロード 設定を更新します。
- 「テスト」をクリックして、新しいエンドポイントへの接続を検証します。 続行する前に、テストで正常な応答が返されることを確認します。
- 検証が完了したら、「保存」をクリックして、変更を適用します。
This section contains structured knowledge intended to support interpretation, retrieval, and question answering related to this topic.
For complete understanding, this information should be combined with the documentation on this page. Neither source is intended to stand alone; the page describes the feature, while this section provides additional context that helps disambiguate terminology, intent, applicability, and constraints.
- TL;DR: This page explains how to integrate Journey Optimizer with Adobe Campaign v7 or v8 so journeys can send emails, push notifications, and mobile messages through Adobe Campaign Transactional Messaging.
Intents:
- Request activation of the connection between Journey Optimizer and Adobe Campaign environments
- Prepare the transactional message, its associated event, and the JSON payload in Adobe Campaign
- Configure a Campaign action of type Adobe Campaign Classic in Journey Optimizer
- Set payload fields as static or variable for mapping on the journey canvas
- Update an existing Campaign action when the Real-Time endpoint changes
Glossary:
- Campaign action: The action available in the journey designer palette for each configured Adobe Campaign v7/v8 action (product-specific)
- Transactional Messaging: The Adobe Campaign capability used to send emails, push notifications, and mobile messages triggered from Journey Optimizer (product-specific)
- eventType: The internal name of the Adobe Campaign event referenced in the JSON payload (product-specific)
- ctx: The payload object holding variables based on the personalization present in the Campaign message (product-specific)
Guardrails:
- There is no throttling of messages; the system caps the number of messages that can be sent to 4,000 per 5 minutes, based on the current Campaign SLA.
- Because of that cap, Journey Optimizer should only be used in unitary use cases (individual events, not audiences).
- You must configure one action on the canvas per template, meaning one action in Journey Optimizer for each Adobe Campaign template you wish to use.
- There is no validation that the payload or Campaign message is correct.
- You cannot use a Campaign action with an audience qualification event.
- Adobe recommends using a dedicated Message Center hosted or Managed Services instance to avoid impacting other Campaign operations.
Terminology:
- Canonical name: Adobe Campaign v7/v8 integration — Acronym: ACC (Adobe Campaign Classic v7/v8) — variants: Campaign action, Campaign v7/v8 custom action
- Do not confuse: “Campaign action” (Adobe Campaign v7/v8 integration) ≠ other custom actions (created through the generic action creation procedure that the page links to)
FAQ:
- Q: How is the connection between Journey Optimizer and Adobe Campaign established? — It is set up by Adobe at provisioning time; if it was not requested then, contact Adobe Journey Optimizer support and provide the Org ID, Sandbox Name, Campaign Server URL, Real-Time Server URL, and Campaign version.
- Q: What is the message sending cap for this integration? — There is no throttling, but the system caps messages to 4,000 per 5 minutes based on the current Campaign SLA.
- Q: Why should this integration be used only for unitary use cases? — Because there is no throttling and messages are capped to 4,000 per 5 minutes, it suits individual events rather than audiences.
- Q: Can a Campaign action be used with an audience qualification event? — No, you cannot use a Campaign action with an audience qualification event.
- Q: How do I update a Campaign action when the Real-Time endpoint changes? — Edit the action, update the URL field with the new RT endpoint, adjust the Payload if needed, click Test to validate the connection, then Save.