このページ:サードパーティ REST API に接続して認証を設定し、条件とパーソナライゼーションに外部データをジャーニーに取り込む方法について説明します。
外部データソースの操作 gs-ext-data-sources
外部データソースを使用すると、サードパーティシステムへの接続を定義できます。例えば、ホテルの予約システムを使用して、部屋が登録されたかどうかを確認する場合などです。 組み込みの Adobe Experience Platform データソースとは異なり、外部データソースは必要な分だけ作成できます。
-
外部システムを操作する際のガードレールについて詳しくは、このページを参照してください。
-
応答がサポートされるようになったので、外部データソースのユースケースでは、データソースの代わりにカスタムアクションを使用する必要があります。 応答について詳しくは、カスタムアクション応答を参照してください。 データレイクの永続性を持たないカスタムアクションは、データがジャーニー内でのみ有効で、API エンドポイント経由で外部システムにアクセスできる場合に適した選択肢です。 すべてのデータアクセスオプションの比較について詳しくは、データアクセス戦略の選択を参照してください。
POST または GET を使用して JSON を返す REST API がサポートされています。 API キー、基本およびカスタム認証モードがサポートされています。
リアルタイムの天気データに応じて、ジャーニーの動作をカスタマイズするために使用する、天気 API サービスの例を見てみましょう。
以下に API 呼び出しの例を 2 つ示します。
- https://api.adobeweather.org/weather?city=London,uk&appid=1234
- https://api.adobeweather.org/weather?lat=35&lon=139&appid=1234
呼び出しにはメイン URL(https://api.adobeweather.org/weather)、2 つのパラメーターセット(都市の場合は「city」、緯度と経度の場合は「lat/long」)、および API キー(appid)が含まれます。
cacheDuration 設定の間に 1 分以上のバッファーを残すことをお勧めします。外部データソースの作成と設定 create-ext-data-sources
新しい外部データソースを作成して設定する主な手順は次のとおりです。
-
データソースのリストで「データソースを作成」をクリックして、新しい外部データソースを作成します。
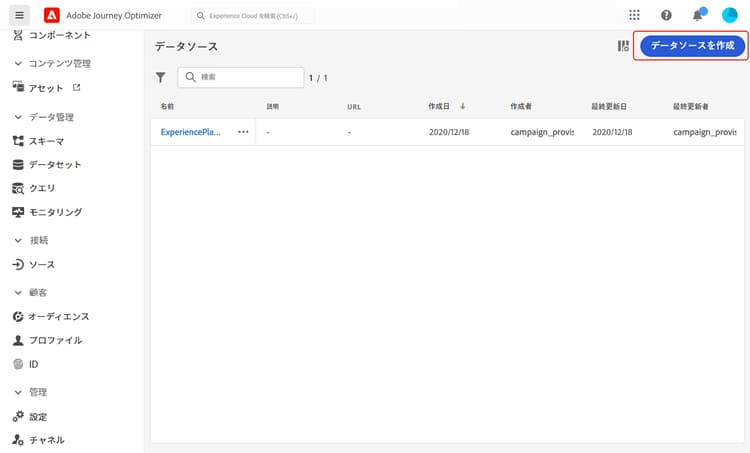
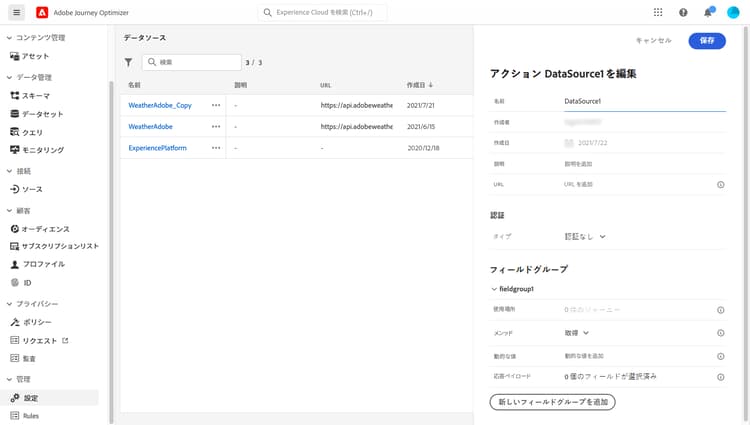
画面の右側にデータソース設定ペインが開きます。
-
データソースの名前を入力します。
英数字とアンダースコアのみが使用できます。 最大長は 30 文字です。
-
データソースに説明を追加します。 この手順はオプションです。
-
外部サービスの URL を追加します。 この例では、次のようになります。https://api.adobeweather.org/weather。
note caution CAUTION セキュリティ上の理由から、HTTPS の使用を強くお勧めします。 また、アドビの非公開アドレスや IP アドレスの使用は許可されていません。 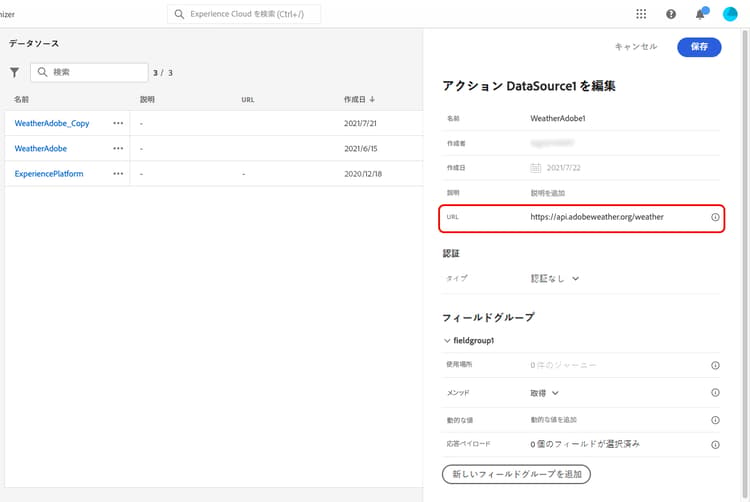
-
外部サービスの設定に応じて認証を認証なし、基本、カスタムまたは API キーに設定します。
基本認証モードの場合は、ユーザー名とパスワードを入力する必要があります。
note NOTE -
認証呼び出しを実行すると、base64 でエンコードされた
<username>:<password>文字列が認証ヘッダーに追加されます。 -
Adobe Journey Optimizer では、カスタムアクションで定義された秘密鍵を自動的に暗号化します。 各組織の暗号化キーは、その組織に関連付けられた専用の保管庫で安全に管理されます。 資格情報をインターフェイスに表示する際、誤って公開されないように、デフォルトではマスクされます。
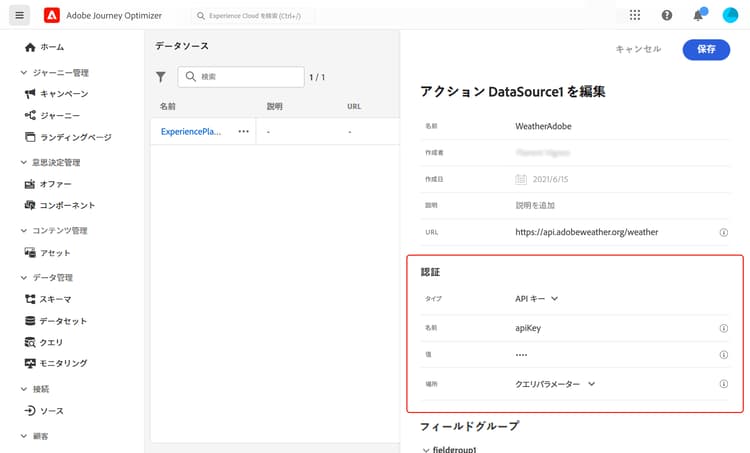
カスタム認証モードについて詳しくは、カスタム認証モードの節を参照してください。 この例では、以下のように API キー認証モードを選択します。
-
タイプ:API キー
-
名前:“appid”(API キーのパラメーター名)
-
値:“1234”(API キーの値)
-
位置:「クエリパラメーター」(API キーは URL 内にあります)
-
-
「新しいフィールドグループを追加」をクリックして、API パラメーターセットごとに新しいフィールドグループを追加します。 フィールドグループ名には、英数字とアンダースコアのみを使用できます。 最大長は 30 文字です。 この例では、各パラメーターセット(都市と経度/緯度)ごとに 1 つずつ、2 つのフィールドグループを作成する必要があります。
「long/lat」パラメーターセットの場合、次の情報を含むフィールドグループを作成します。
- 使用場所:フィールドグループを使用するジャーニーの数を表示します。 ジャーニーを表示アイコンをクリックし、このフィールドグループを使用するジャーニーのリストを表示できます。
- メソッド:POST または GET メソッドを選択します。 この場合は、GET メソッドを選択します。
- 動的な値:この例では、「long,lat」というコンマで区切られた異なるパラメーターを入力します。 パラメーター値は実行コンテキストに依存するので、ジャーニーで定義されます。 式の詳細情報
- 応答ペイロード:ペイロードフィールド内でクリックし、呼び出しによって返されたペイロードの例をペーストします。 この例では、天気 API の web サイトにあるペイロードを使用しました。 フィールドタイプが正しいことを確認します。 API が呼び出されるたびに、ペイロードの例に含まれるすべてのフィールドが取得されます。 現在渡されているペイロードを変更する場合、「新しいペイロードをペースト」をクリックします。
- 送信済みペイロード:このフィールドは、この例では表示されません。 POST メソッドを選択した場合にのみ使用できます。 サードパーティシステムに送信されるペイロードをペーストします。
GET 呼び出しにパラメーターが必要な場合は、「 動的な値」フィールドにパラメーターを入力すると、呼び出しの最後に自動的に追加されます。 POST 呼び出しの場合は、次の操作が必要です。
- 呼び出し時に渡すパラメーターを「動的な値」フィールドにリストします(以下の例では「identifier」)。
- また、送信済みペイロードの本文で同じ構文を使用して指定します。 そのためには、「“param”: “パラメーター名”」(以下の例では「identifier」)を追加する必要があります。 次の構文に従います。
{"id":{"param":"identifier"}}
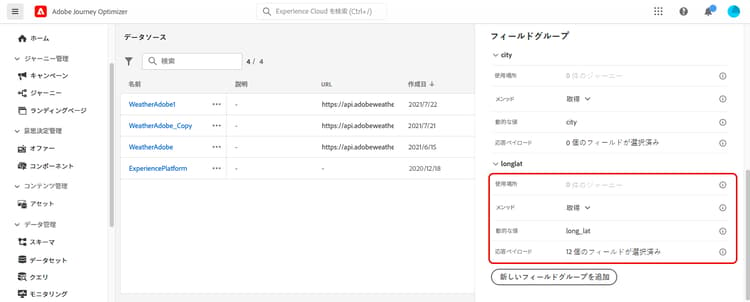
変更を保存すると、データソースが設定され、ジャーニーで使用できる状態になります。例えば、条件で使用したり、メールをパーソナライズしたりできます。 温度が 30°C を超える場合、特定のコミュニケーションを送信するようにできます。
カスタム認証モード custom-authentication-mode
カスタム認証モードは、複雑な認証に使用され、OAuth2 などの API ラッピングプロトコルの呼び出しに頻繁に使用されます。これにより、アクションの実際の HTTP リクエストに挿入するアクセストークンが取得されます。
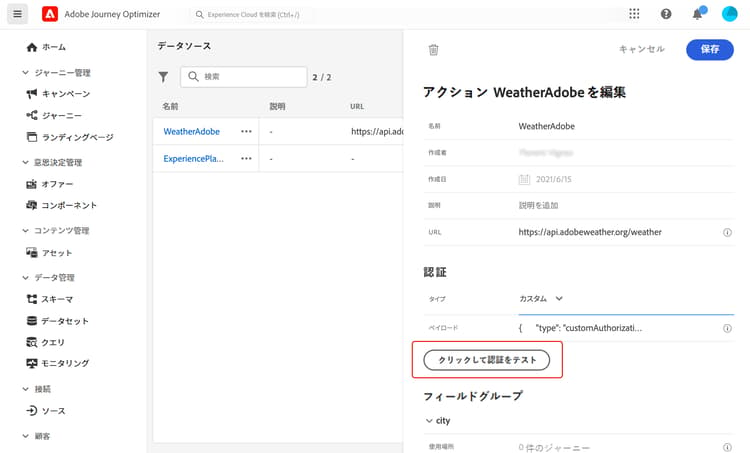
カスタム認証を設定する場合は、「クリックして認証を確認」ボタンを使用して、カスタム認証ペイロードが正しく設定されているかどうかを制御します。
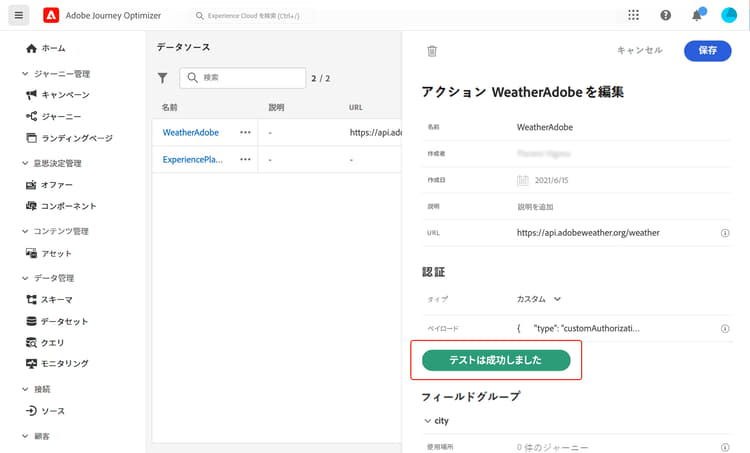
テストに成功すると、ボタンが緑色に変わります。
この認証モードでは、アクションの実行は次の 2 つの手順で構成されます。
- エンドポイントを呼び出して、アクセストークンを生成します。
- アクセストークンを適切な方法で挿入して、REST API を呼び出します。
アクセストークンの生成時に呼び出されるエンドポイントの定義 custom-authentication-endpoint
-
endpoint:エンドポイントの生成に使用する URL -
エンドポイントでの HTTP リクエストのメソッド(
GETまたはPOST) -
headers:必要に応じて、この呼び出しにヘッダーとして挿入されるキーと値のペア -
body:メソッドが POST の場合の呼び出しの本文を説明します。 bodyParams(キーと値のペア)で定義された限定的な本文構造をサポートしています。 bodyType は、呼び出しでの本文の形式とエンコーディングを記述します。form:コンテンツタイプが application/x-www-form-urlencoded(文字セット UTF-8)で、キーと値のペアが key1=value1&key2=value2&… のようにシリアル化されることを意味します。json:コンテンツタイプが application/json(文字セット UTF-8)で、キーと値のペアが JSON オブジェクトとして { “key1”: “value1”, “key2”: “value2”, …} のようにシリアル化されることを意味します。
アクションの HTTP リクエストにアクセストークンを挿入する方法の定義 custom-authentication-access-token
-
authorizationType:生成されたアクセストークンをアクションの HTTP 呼び出しに挿入する方法を定義します。 使用可能な値は次のとおりです。
bearer:Authorization: Bearer <access token> のように、アクセストークンを Authorization ヘッダーに挿入する必要があることを示します。header:プロパティtokenTargetで定義されたヘッダー名のヘッダーとして、アクセストークンを挿入する必要があることを示します。 例えば、tokenTargetがmyHeaderの場合、アクセストークンは myHeader: <access token> のようにヘッダーとして挿入されます。queryParam:プロパティ tokenTarget で定義されたクエリパラメーター名である queryParam として、アクセストークンを挿入する必要があることを示します。 例えば、tokenTarget が myQueryParam の場合、アクション呼び出しの URL は <url>?myQueryParam=<access token> のようになります。
-
tokenInResponse:認証呼び出しからアクセストークンを抽出する方法を示します。 このプロパティには次のようなものがあります。
response:HTTP 応答がアクセストークンであることを示します。- JSON 内のセレクター(応答が JSON であると仮定し、XML などの他の形式はサポートされません)。 このセレクターの形式は json://<path to the access token property> です。 例えば、呼び出しの応答が { "access token": “theToken”, “timestamp”: 12323445656 }の場合、tokenInResponse は json: //access_token_ のようになります。
この認証の形式は次のとおりです。
{
    "type": "customAuthorization",
    "endpoint": "<URL of the authentication endpoint>",
    "method": "<HTTP method to call the authentication endpoint, in 'GET' or 'POST'>",
    (optional) "headers": {
        "<header name>": "<header value>",
        ...
    },
    (optional, mandatory if method is 'POST') "body": {
        "bodyType": "<'form'or 'json'>,
        "bodyParams": {
            "param1": value1,
            ...
        }
    },
    "tokenInResponse": "<'response' or json selector in format 'json://<field path to access token>'",
    "cacheDuration": {
        (optional, mutually exclusive with 'duration') "expiryInResponse": "<json selector in format 'json://<field path to expiry>'",
        (optional, mutually exclusive with 'expiryInResponse') "duration": <integer value>,
        "timeUnit": "<unit in 'milliseconds', 'seconds', 'minutes', 'hours', 'days', 'months', 'years'>"
    },
    "authorizationType": "<value in 'bearer', 'header' or 'queryParam'>",
    (optional, mandatory if authorizationType is 'header' or 'queryParam') "tokenTarget": "<name of the header or queryParam if the authorizationType is 'header' or 'queryParam'>",
}
カスタム認証データソース用のトークンのキャッシュ時間を変更できます。 次に、カスタム認証ペイロードの例を示します。 キャッシュ時間は、cacheDuration パラメーターで定義されます。 キャッシュ内の生成されたトークンの保持期間を指定します。 単位はミリ秒、秒、分、時間、日、月、年です。
Bearer 認証タイプの例を次に示します。
{
    "type": "customAuthorization",
    "endpoint": "https://<your_auth_endpoint>/epsilon/oauth2/access_token",
    "method": "POST",
    "headers": {
      "Authorization": "Basic EncodeBase64(<epsilon Client Id>:<epsilon Client Secret>)"
    },
    "body": {
      "bodyType": "form",
      "bodyParams": {
        "scope": "cn mail givenname uid employeeNumber",
        "grant_type": "password",
        "username": "<epsilon User Name>",
        "password": "<epsilon User Password>"
      }
    },
    "tokenInResponse": "json://access_token",
    "cacheDuration": {
      "duration": 5,
      "timeUnit": "minutes"
    },
  },
-
認証トークンは、ジャーニーごとにキャッシュされます。2 つのジャーニーが同じカスタムアクションを使用している場合、それぞれのジャーニーに独自のトークンがキャッシュされます。 そのトークンは、これらのジャーニー間で共有されません。
-
キャッシュ時間を使用すると、認証エンドポイントへの呼び出しが多くなりすぎないようにすることができます。 認証トークンの保持はサービスにキャッシュされ、永続性はありません。 サービスを再起動した場合は、キャッシュがクリーンアップされた状態でサービスが開始されます。 デフォルトのキャッシュ時間は 1 時間です。 カスタム認証ペイロードでは、別の保持時間を指定することで調整することができます。
証明書ベースのカスタム認証 certificate-credential
Microsoft Entra IDなどの証明書ベースのID検証を強制するエンタープライズ APIの場合、カスタム認証ペイロードに"subType": "certificateCredential"を追加することで、証明書ベースのカスタム認証を設定できます。 デフォルトでは、Journey OptimizerはAdobeのマネージド証明書を使用して、RS256とJWT クライアントアサーションに署名し、アクセストークンと交換します。 このデフォルトのRS256 オプションでは、クライアント秘密鍵は必要ありません。 同じペイロードは、Adobe証明書ではなくOAuth クライアントシークレットを使用したHMAC署名もサポートしています。
このオプションは、標準の customAuthorization スキーマに、subType と aud という 2 つの必須フィールドを追加します。 その他のすべてのフィールド(endpoint、method、body params、tokenInResponse)は変更されません。 subType が存在しない場合、動作は標準のカスタム認証と同じになり、既存の設定には影響しません。
subType:証明書ベースの認証をアクティブ化するには、"certificateCredential"に設定します。aud:JWT クライアントアサーションに含まれるオーディエンス値。 Microsoft Entra ID の場合、これはendpointURLと同じですが、常に明示的に設定する必要があります。alg(オプション): JWT署名アルゴリズム。 サポートされている値はRS256(デフォルト)、HS256、HS384、およびHS512です。algが存在しないかRS256に設定されている場合、既存のRSA フローは変更されません。 認証がテストまたは実行されると、小文字を含むその他の値は拒否されます。 このフィールドは、カスタム認証ペイロードで設定します。署名アルゴリズムに個別のUI コントロールはありません。
client_assertion および client_assertion_type フィールドがユーザーによって作成されることはありません。 これらは、トークンエンドポイント呼び出しの直前に、実行時にプラットフォームによって自動的に挿入されます。
RS256認証の仕組み certificate-credential-how-it-works
証明書ベースのカスタム認証は、RFC 7523 で定義されているように、JWT クライアントアサーションを使用して OAuth 2.0 クライアント資格情報を実装します。これは、Microsoft Entra ID と Okta でサポートされているのと同じ標準です。 Journey Optimizer は、クライアント秘密鍵の代わりに、アドビが管理する秘密鍵で署名された JWT を使用して ID を証明します。 ID プロバイダーは、ID プロバイダーに一度登録したアドビの公開証明書を使用して署名を検証します。
トークン交換には、次の手順に従います。
- Journey Optimizer は、アドビの秘密鍵で署名された JWT クライアントアサーションを作成します。
- アサーションは、
client_id、grant_type、scopeと共にトークンエンドポイントに送信されます。 - ID プロバイダーは、アドビの登録済み公開証明書に対して JWT 署名を検証します。
- ID プロバイダーは、ベアラーアクセストークンを返します。
- Journey Optimizer は、そのトークンを使用して、カスタムアクションエンドポイントを呼び出します。
アドビ証明書の詳細 certificate-credential-details
デフォルトのRS256 オプションの場合、Adobeは証明書と関連する秘密鍵を管理します。 次の表に、主なプロパティの概要を示します。 これらの証明書の要件は、HMAC署名には適用されません。
expiryDate を確認し、古い証明書が失効する前に IDP を再設定してください。アドビは、有効期限の 60 日前に証明書を自動的にローテーションします。 以前の証明書は、有効期限の 30 日前まで有効です。 現在、お客様には通知されていません。プログラムでローテーションを監視する方法については、以下の証明書(RS256のみ) ガードレール を参照してください。
JWT アサーション構造 certificate-credential-jwt
証明書ベースのカスタム認証を設定する際は、次のガードレールに留意してください。
- トークンエンドポイント URL:HTTPS である必要があります。
?を含むURLを避けます。これは、認証エンドポイントがトークンエンドポイントの代わりに貼り付けられたサインです。 method:POSTである必要があります。 OAuth トークンエンドポイントは、POST リクエストのみを受け入れます。client_id:空白にしないでください。先頭または末尾に空白を含めないでください。 空白の値を指定すると、一見有効な JWT が生成されますが、ID プロバイダーはこれを却下し、内容が不透明なエラーを返します。scope:bodyParamsで、スペース区切りの単一の文字列として表されます。 合計で最大 1000 文字です。- 証明書(RS256のみ):Adobeが証明書と秘密鍵を管理します。証明書をアップロードしたり入力したりすることはありません。 RS256のライブジャーニーでカスタムアクションを使用する前に、ID プロバイダーに Adobe リーフ証明書 を登録する必要があります。 取得するには、mTLS Public Certificate API を呼び出し、
certCommonNameがajo-journeys.aep-mtls.adobe.comであるエントリを探します。 中間またはルート CA証明書ではなく、そのエントリからpublicCertificate値を登録します。 現在、証明書のローテーションの通知は行われないので、定期的に mTLS Public Certificate API を呼び出してexpiryDateを確認し、有効期限の 30 日前に古い証明書が失効する前に、IDP の登録済み証明書を更新する必要があります。 HMAC署名には、Adobe証明書の登録は必要ありません。
JWT クライアントアサーションを作成しないと、Journey Optimizerが生成し、署名します。 ここに、ID プロバイダーチームが要求を検証できるように、想定される構造をここに示します。
次のヘッダーとペイロードは、デフォルトのRS256 オプションに適用されます。 HMACの違いについては、HMAC署名JWT クライアントアサーション を参照してください。
ヘッダー:
{
  "alg": "RS256",
  "x5t": "<base64url SHA-1 thumbprint of Adobe's leaf certificate>"
}
ペイロード:
{
  "iss": "<client_id>",
  "sub": "<client_id>",
  "aud": ["<aud value>"],
  "iat": "<current unix timestamp>",
  "exp": "<iat + 600 seconds>",
  "jti": "<unique UUID per request>"
}
次の事項に注意してください。
- RS256の場合、
expはiat+ 600秒(10分)で、OktaおよびEntra IDの要件と一致します。 HMACの場合、expはiat+ 300秒(5分)です。 - 各アサーションは一意の
jtiを使用するので、リプレイ攻撃に対して安全です。 client_assertionおよびclient_assertion_typeは、プラットフォームによって自動的に挿入され、作成することはできません。
Microsoft Entra ID の証明書資格情報認証タイプの例を以下に示します。
{
  "type": "customAuthorization",
  "subType": "certificateCredential",
  "aud": "https://login.microsoftonline.com/{tenantId}/oauth2/v2.0/token",
  "authorizationType": "Bearer",
  "endpoint": "https://login.microsoftonline.com/{tenantId}/oauth2/v2.0/token",
  "method": "POST",
  "body": {
    "bodyType": "form",
    "bodyParams": {
      "client_id": "<your-client-id>",
      "grant_type": "client_credentials",
      "scope": "https://api.example.com/.default"
    }
  },
  "tokenInResponse": "json://access_token"
}
Okta の同じ証明書資格情報認証タイプの例を以下に示します。
{
  "type": "customAuthorization",
  "subType": "certificateCredential",
  "authorizationType": "bearer",
  "endpoint": "https://<your-okta-domain>/oauth2/v1/token",
  "aud": "https://<your-okta-domain>/oauth2/v1/token",
  "method": "POST",
  "body": {
    "bodyType": "form",
    "bodyParams": {
      "client_id": "<your-okta-app-client-id>",
      "grant_type": "client_credentials",
      "scope": "<your-api-scope>"
    }
  },
  "tokenInResponse": "json://access_token"
}
ヘッダー認証タイプの例を次に示します。
{
  "type": "customAuthorization",
  "endpoint": "https://myapidomain.com/v2/user/login",
  "method": "POST",
  "headers": {
    "x-retailer": "any value"
  },
  "body": {
    "bodyType": "form",
    "bodyParams": {
      "secret": "any value",
      "username": "any value"
    }
  },
  "tokenInResponse": "json://token",
  "cacheDuration": {
    "expiryInResponse": "json://expiryDuration",
    "timeUnit": "minutes"
  },
  "authorizationType": "header",
  "tokenTarget": "x-auth-token"
}
ログイン API 呼び出しの応答の例を次に示します。
{
  "token": "xDIUssuYE9beucIE_TFOmpdheTqwzzISNKeysjeODSHUibdzN87S",
  "expiryDuration" : 5
}
bodyParams 内のサブオブジェクト)が サポート されます。HMAC署名JWT クライアントアサーション hmac-credential
HMAC署名を使用するには、カスタム認証ペイロードでalgをHS256、HS384またはHS512に設定します。 Journey Optimizerは、署名キーとしてOAuth client_secretを使用します。 ID プロバイダーは、同じシークレットとアルゴリズムでclient_secret_jwtを受け入れる必要があります。 Adobe証明書の登録は必要ありません。
HMACには、body.bodyParamsのRS256: "subType": "certificateCredential"、明示的なaud、"method": "POST"、"bodyType": "form"、およびclient_idと同じフィールドが必要です。 さらに、client_secretをbody.bodyParamsに追加します。 秘密鍵の最小長は、文字ではなくUTF-8 バイトで測定されます。
client_secret長Journey Optimizerは not からclient_secretをトークンエンドポイントに送信しません。 他の作成済みbodyParamsを送信し、client_assertion_type=urn:ietf:params:oauth:client-assertion-type:jwt-bearerとclient_assertionを自動的に追加します。
HMAC JWTはtyp: JWTを使用し、選択したalgはx5tなしでexpはiat + 300秒で、RS256は600秒です。
This section contains structured knowledge intended to support interpretation, retrieval, and question answering related to this topic.
For complete understanding, this information should be combined with the documentation on this page. Neither source is intended to stand alone; the page describes the feature, while this section provides additional context that helps disambiguate terminology, intent, applicability, and constraints.
- TL;DR: This page explains how to create and configure external data sources that connect to third-party REST APIs, including the supported authentication modes, field group setup, custom authentication payloads, and certificate-based custom authentication.
Intents:
- Create and configure an external data source that connects to a third-party REST API
- Choose an authentication mode among No authentication, Basic, Custom, and API key
- Define field groups per API parameter set with Method, Dynamic Values, and payload fields
- Configure custom authentication for protocols such as OAuth2 and check it with the Click to check the authentication button
- Configure JWT client assertion authentication using default RS256 certificate signing or optional HMAC signing
- Set the token cache duration to limit calls to the authentication endpoint
Glossary:
- External data source: A connection to a third-party system that you create; you can create as many as you need (product-specific)
- Field group: A set of fields configured per API parameter set, with Method, Dynamic Values, Response Payload, and (for POST) Sent Payload (product-specific)
- Custom authentication mode: An authentication mode for complex protocols such as OAuth2, where the action execution is a two-step process that first generates an access token and then injects it in the HTTP request (product-specific)
- cacheDuration: The parameter that specifies the retention duration of the generated token in the cache (product-specific)
- Certificate-based custom authentication: A custom authentication subtype (
subType: certificateCredential) where Journey Optimizer signs a JWT client assertion and exchanges it for an access token; the default RS256 option uses Adobe’s managed certificate and requires no client secret (product-specific) - HMAC-signed JWT client assertion: An assertion signed using the OAuth
client_secretas the signing key, selected through the optionalalgfield, without Adobe certificate registration (product-specific)
Guardrails:
- Use custom actions instead of data sources for external data source use cases now that responses are supported (recommended). Custom Actions without Data Lake persistence are the right choice when the data is only useful inside the journey and the external system is accessible via an API endpoint.
- REST APIs using POST or GET and returning JSON are supported; API Key, basic, and custom authentication modes are supported.
- The use of Adobe addresses that are not publicly available and the use of IP addresses is not allowed; HTTPS is strongly recommended for security reasons.
- Data source name: only alphanumeric characters and underscores are allowed, maximum length 30 characters (hard limit).
- Field group name: only alphanumeric characters and underscores are allowed, maximum length 30 characters (hard limit).
- The Sent Payload field is only available if you select the POST method.
- The default cache duration is 1 hour (default) and can be adapted in the custom authentication payload; at least a one-minute buffer between the external API’s token expiration period and the
cacheDurationsetting is recommended, especially under heavy workloads, to avoid expiration mismatches and 401 errors. - The authentication token is cached per journey and is not shared between journeys; there is no persistence, so a service restart starts with a clean cache.
- Encode64 is the only function available in the authentication payload.
- For certificate-based custom authentication,
subTypeandaudare mandatory; the token endpoint URL must be HTTPS,methodmust bePOST,client_idmust not be blank and must have no leading or trailing whitespace. - For certificate-based custom authentication,
scopeis a single space-separated string inbodyParams, maximum 1000 characters total (hard limit). - For RS256 only, you never upload or enter a certificate; before using the custom action in a live journey you must register Adobe’s leaf certificate (not the intermediate or root CA) in your Identity Provider.
- The Adobe certificate applies to the default RS256 (RSA) option; Adobe rotates it 60 days before expiry (certificate lifetime 13 months) and the previous certificate remains valid until 30 days before expiry; customers are not currently notified, so periodically call the mTLS Public Certificate API to check the
expiryDate. - The optional
algfield acceptsRS256(default),HS256,HS384, andHS512. Omittingalgor setting it toRS256preserves the existing RSA flow; any other value, including lowercase, is rejected when the authentication is tested or executed. - HMAC-signed JWT authentication is available in Limited Availability.
- HMAC signing requires
client_idandclient_secretinbody.bodyParams,subType: certificateCredential, explicitaud,method: POST, andbodyType: form. Minimum secret lengths in UTF-8 bytes are 32 for HS256, 48 for HS384, and 64 for HS512. The identity provider client must acceptclient_secret_jwtwith the same secret and algorithm. - For HMAC, Journey Optimizer does not send
client_secretin the token request; it sends the other authoredbodyParamsplusclient_assertion_type=urn:ietf:params:oauth:client-assertion-type:jwt-bearerandclient_assertion. - The HMAC JWT header includes
typand the selectedalg, with nox5t;expisiat+ 300 seconds. RS256 usesiat+ 600 seconds. - When configuring custom authentication for a custom action, nested JSON objects (for example, sub-objects within
bodyParams) are supported.
Terminology:
- Canonical name: external data source - variants: external data sources
- Do not confuse: Dynamic Values (parameters defined in journeys and passed at call time) ≠ Response Payload (example payload returned by the call) ≠ Sent Payload (payload sent to the third-party system, POST only)
- Do not confuse: “RS256” (default JWT signing with Adobe’s managed certificate) and “HS256”, “HS384”, or “HS512” (HMAC JWT signing with the OAuth client secret)
FAQ:
- Q: What kinds of APIs are supported for external data sources? — REST APIs using POST or GET and returning JSON, with API Key, basic, or custom authentication modes.
- Q: What is the maximum length of a data source or field group name? — 30 characters, using only alphanumeric characters and underscores.
- Q: How do I verify that my custom authentication payload is configured correctly? — Use the Click to check the authentication button; when the test is successful, the button turns green.
- Q: What is the default token cache duration and can I change it? — The default cache duration is 1 hour, and you can adapt it by specifying another retention duration in the
cacheDurationparameter of the custom authentication payload. - Q: Do I need to upload a certificate for certificate-based custom authentication? - For the default RS256 option, Adobe manages the certificate and private key; you register Adobe’s leaf certificate in your Identity Provider, retrieved from the mTLS Public Certificate API. HMAC signing requires no Adobe certificate registration.
- Q: Are nested JSON objects allowed when configuring custom authentication for a custom action? — Yes, nested JSON objects such as sub-objects within
bodyParamsare supported.