Sur cette page : vérifiez la configuration et le contenu de votre campagne d’action pour détecter toute erreur avant de l’activer, afin de pouvoir envoyer votre message immédiatement ou à sa date planifiée en toute confiance.
Une fois votre campagne configurée, vous devez vérifier ses paramètres et son contenu avant de l’activer. Pour ce faire, suivez les étapes ci-après.
-
Dans l’écran de configuration de la campagne, cliquez sur Vérifier pour activer pour afficher un résumé de la campagne.

-
Un récapitulatif de la configuration de la campagne s’affiche, vous permettant de vérifier si un paramètre est incorrect ou manquant et de modifier votre campagne si nécessaire.
En cas d’erreur, vous ne pouvez pas activer la campagne. Résolvez les erreurs avant de continuer.

-
Lorsqu’une campagne utilise des politiques de décision dans son contenu, vous pouvez examiner la structure de chaque politique et copier les détails techniques directement à partir du résumé de la campagne. Voici comment procéder
-
Vérifiez que votre campagne est correctement configurée, puis cliquez sur Activer.
-
La campagne est activée. Son statut est soit Actif, soit Planifié si vous avez saisi une date de début. Le message configuré dans la campagne est envoyé immédiatement ou à la date indiquée.
Le statut Terminé est automatiquement affecté à une campagne 3 jours après son activation ou à la date de fin de la campagne si son exécution est récurrente. Découvrez les statuts des campagnes.
Si aucune date de fin n’a été spécifiée, la campagne conserve le statut Actif. Pour le modifier, vous devez arrêter manuellement la campagne. Découvrez comment arrêter une campagne
-
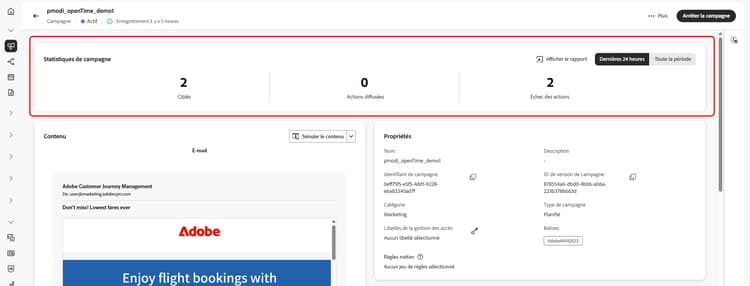
Une fois qu’une campagne a été activée, vous pouvez vérifier à tout moment ses informations en l’ouvrant. Le résumé vous permet d’obtenir des statistiques sur le nombre de profils ciblés et les actions diffusées et en échec.
Vous pouvez obtenir des statistiques supplémentaires dans les rapports dédiés en cliquant sur le bouton Afficher le rapport. En savoir plus
Si l’activation ou la publication d’une campagne renvoie un code d’erreur, voir Erreurs de campagne et Erreurs de création de contenu.
This section contains structured knowledge intended to support interpretation, retrieval, and question answering related to this topic.
For complete understanding, this information should be combined with the documentation on this page. Neither source is intended to stand alone; the page describes the feature, while this section provides additional context that helps disambiguate terminology, intent, applicability, and constraints.
- TL;DR: This page explains how to review the configuration and content of an Action campaign, activate it, and check its information and statistics afterwards.
Intents:
- Review the summary of an Action campaign before activating it
- Know what happens when the summary shows errors or when an approval policy applies
- Know which status a campaign gets after activation and when it becomes Completed
- Stop a campaign that keeps the Live status because it has no end date
- Check the statistics of an activated campaign and open its reports
- Find the error pages to use when activating or publishing returns an error code
Glossary:
- Review to activate: Button in the campaign configuration screen that displays a summary of the campaign
- Campaign summary: Summary of the campaign configuration used to check whether any parameter is incorrect or missing; for a campaign that uses decision policies, it also shows each policy’s structure and technical details to copy
- Live: Status of an activated campaign
- Scheduled: Status of an activated campaign when a start date was entered
- Completed: Status assigned automatically after activation (see Guardrails)
- View report: Button that gives access to additional statistics in dedicated reports
Guardrails:
- In case of errors in the summary, you cannot activate the campaign. Resolve the errors before proceeding.
- The Completed status is automatically assigned to the campaign 3 days after it has been activated, or at the campaign’s end date if it has a recurring execution.
- If no end date has been specified, the campaign keeps the Live status. To change it, you need to stop the campaign manually.
Prerequisites and permissions:
- If the campaign is subject to an approval policy, you need to request approval in order to be able to send the campaign.
Terminology:
- Canonical name: Review and activate an Action campaign — variants: review and activation of Action campaigns
- Do not confuse: Live (activated, sent immediately) ≠ Scheduled (activated with a start date, sent on that date) ≠ Completed (assigned automatically after activation)
FAQ:
- Q: How do I activate an Action campaign? — In the campaign configuration screen, click Review to activate, check the summary, then click Activate.
- Q: Why can I not activate my campaign? — In case of errors in the summary, you cannot activate the campaign. Resolve the errors first. If the campaign is subject to an approval policy, you need to request approval in order to be able to send it.
- Q: Which status does the campaign get once activated? — Live, or Scheduled if you entered a start date. The message is sent immediately or on the specified date.
- Q: When does the campaign become Completed? — The Completed status is automatically assigned 3 days after activation, or at the campaign’s end date if it has a recurring execution.
- Q: Why does my campaign stay Live? — If no end date has been specified, the campaign keeps the Live status until you stop the campaign manually.
- Q: Where do I see statistics once the campaign is activated? — Open the campaign: the summary gives statistics about the number of targeted profiles and delivered and failed actions. Click View report for additional statistics in dedicated reports.
Troubleshooting:
- Activating or publishing a campaign returns an error code: see Campaign errors (campaigns/campaign-errors.md) and Content authoring errors (content-management/content-authoring-errors.md).
Related pages:
- Approval policy: Get started with journeys & campaigns approval (test-approve/gs-approval.md)
- Decision policies in campaign content: decision policies (experience-decisioning/create-decision.md)
- Reviewing a decision policy’s structure and copying technical details from the campaign summary: Use decision policies in messages, View decision policy details from the campaign summary (experience-decisioning/use-decision-policy.md#decision-policy-summary)
- Campaign statuses: Learn more about campaigns statuses (campaigns/manage-campaigns.md#statuses)
- Stopping a campaign: Learn how to stop a campaign (campaigns/manage-campaigns.md)
- Reports: Campaign report (reports/campaign-global-report-cja.md)
Personas:
- marketer: Can select Review to activate to display the campaign summary, check for incorrect or missing parameters, and select Activate to launch the campaign. Can review decision policy structure, copy technical details from the summary, check targeted profiles and delivered and failed actions, and select View report. The page states that errors in the summary must be resolved before activation. Where: “Review and activate the Action campaign”.
Onboarding:
- Level: Intermediate
- First minimal step: In the campaign configuration screen, select Review to activate to display a summary of the campaign.
- Success check: The campaign status becomes Live, or Scheduled if a start date was entered, and the message is sent immediately or on the specified date.
- Previous: If the campaign is subject to an approval policy, approval is required before it can be sent: Get started with journeys & campaigns approval (test-approve/gs-approval.md); When the campaign uses decision policies in its content: Get started with decisions policies (experience-decisioning/create-decision.md)
- Next: To change a campaign that keeps the Live status because no end date was specified, stop it manually: Access & manage campaigns (campaigns/manage-campaigns.md); To get additional statistics after activation, open the campaign report: Campaign report (reports/campaign-global-report-cja.md)