Create and send push notifications
Learn how to create push notifications for mobile apps with Experience Platform Mobile SDK and Journey Optimizer.
Journey Optimizer allows you to create journeys and send messages to targeted audiences. Before you send push notifications with Journey Optimizer, you must ensure that the proper configurations and integrations are in place. To understand the Push Notifications data flow in Journey Optimizer, refer to the documentation.

Prerequisites
-
Successfully built and run the app with SDKs installed and configured.
-
Set up the app for Adobe Experience Platform.
-
Access to Journey Optimizer and sufficient permissions. Also you need sufficient permission to the following Journey Optimizer features.
- Create a push credential.
- Create a push channel configuration.
- Create a journey.
- Create a message.
- Create message presets.
-
For iOS, a paid Apple developer account with sufficient access to create certificates, identifiers, and keys.
-
For Android, a Google developer account with sufficient access to create certificates and keys.
-
Physical iOS or Android device or simulator for testing.
Learning objectives
In this lesson, you will
- Register App ID with the Apple Push Notification service (APNs).
- Create a channel configuration in Journey Optimizer.
- Update your schema to include push messaging fields.
- Install and configure the Journey Optimizer tag extension.
- Update your app to register the Journey Optimizer tag extension.
- Validate setup in Assurance.
- Send a test message from Assurance
- Define your own push notification event, journey, and experience in Journey Optimizer.
- Send your own push notification from within the app.
Setup
Create push credentials
For push notifications, you first have to register your app for push notifications.
The following steps are not Adobe Experience Cloud-specific and are designed to guide you through APNs configuration.
-
In the Apple developer portal, navigate to Keys.
-
To create a key, select +.

-
Provide a Key Name.
-
Select Apple Push Notification service (APNs), and select Configure.
- In the Configure Key screen, select Sandbox & Production from the Environment drop-down menu.
- Select Save.
-
Select Continue.

-
Review the configuration and select Register.
-
Download the
.p8private key. It is used in the next exercise when you configure your Journey Optimizer push credential. -
Make note of the Key ID. It is used in the next exercise when you configure your Journey Optimizer push credential.
-
Make note of the Team ID. It is used in the next exercise when you configure your Journey Optimizer push credential. The Team ID can be found at the upper right on the screen, next to your login name.

Additional documentation can be found here.
The following steps are not Adobe Experience Cloud-specific and are designed to guide you through Firebase configuration.
-
Access the Firebase console.
-
Select Create a Firebase project.
- Enter a Project name.
- Select Continue in Create a project - Let’s start with a name for your project. For example,
Luma Android App. - Disable Gemini in Firebase and select Continue in Create a project - AI assistance for your Firebase project.
- Disable Google Analytics for this project and select Continue in Create a project - Google Analytics for your Firebase project.
- Select Create Project.
- After the project is ready, select Continue.
-
Back in the Firebase console, ensure that your project is selected at the top. For example, Luma Android App.

-
Select

-
In Project settings, select Add app.
-
In the Add Firebase to your app, select Android as the platform.
-
In the Add Firebase to your Android app:
-
In step 1, Register app:
- Enter an Android package name, similar to your app identifier. For example,
com.adobe.luma.tutorial.android. - Enter an optional App nickname.
- Select Register app.
- Enter an Android package name, similar to your app identifier. For example,
-
In step 2, Download and then add config file.
- Select

google-services.jsonfile in the sample Android Studio project, with the version of the file that is generated by this new app configuration.
The other steps are taken care of already in the sample app.
- Select
-
Your screen should look like below:

-
-
In Project Settings, select Service accounts.
-
Select Generate new private key. A
luma-android-app-firebase-adminsdk-xxxx-xxxxxxxx.jsonfile is generated. Store this file at a safe place, as you need the file at a later stage.
For more information, see the Firebase developer documentation.
Add your app push credentials in Data Collection
Next you need to add your mobile application push credentials to authorize Adobe to send push notifications on your behalf. You can add push credentials either in Data Collection or in Journey Optimizer. In this tutorial, the Data Collection interface is used. The push credentials are then linked to a channel configuration in Journey Optimizer.
-
In Data Collection, select App Surfaces.
-
Select Create App Surface.
-
In the Create App Surface interface:
-
Enter a Name.
-
Select Apple iOS if you want to send push notifications for iOS.
- Enter your App ID, for example
com.adobe.luma.tutorial.swiftui. - Select the sandbox (optional).
- Enable Push Credentials.
- Drop the saved
.p8private key file onto Drag and Drop Your File. - Enter the Key ID.
- Enter the Team ID.
- Enter your App ID, for example
-
Select Android if you want to send push notifications for Android.
- Enter your App ID, for example
com.adobe.luma.tutorial.android. - Select the sandbox (optional).
- Enable Push Credentials.
- Drop the saved
luma-android-app-firebase-adminsdk-xxxx-xxxxxxxx.jsonfile onto Drag and Drop Your File.
- Enter your App ID, for example

-
-
Select Save. If all the information is correct, you have created push credentials to associate with a channel configuration.
Create a channel configuration for push in Journey Optimizer
Once you have created a push credential configuration, you must create a configuration to be able to send push notifications from Journey Optimizer.
-
In the Journey Optimizer interface, open the Channels > General settings > Channel configurations menu and then select Create channel configuration.

-
Enter a name and a description (optional) for the configuration.
note NOTE Names must begin with a letter (A-Z). It can only contain alpha-numeric characters. You can also use underscore _, dot.and hyphen-characters. -
To assign custom or core data usage labels to the configuration, you can select Manage access. Learn more about Object Level Access Control (OLAC).
-
Select the Push channel.
-
Select Marketing action(s) to associate consent policies with the messages using this configuration. All consent policies associated with the marketing actions are leveraged to respect the preferences of your customers. Learn more about marketing actions.
-
Choose your Platform. You can configure both iOS and Android for a channel configuration.
-
Select the appropriate App id that you used earlier to define your push credentials. For example, com.adobe.luma.tutorial.swiftui for iOS and com.adobe.luma.tutorial.android for Android. The green


-
Select Submit to save your changes.
Update datastream configuration
To ensure data send from your mobile app to the Edge Network is forwarded to Journey Optimizer, update your Experience Edge configuration .
-
In the Data Collection UI, select Datastreams, and select your datastream, for example Luma Mobile App.
-
Select


-
In the Datastreams >

-
If not already selected, select AJO Push Profile Dataset from Profile Dataset. This profile dataset is required when using the
MobileCore.setPushIdentifierAPI call (see Register device token for push notifications). This selection also ensures that the unique identifier for push notifications (a.k.a. push identifier) is stored as part of the profile of the user. -
Adobe Journey Optimizer is selected. See Adobe Experience Platform settings for more information.
-
To save your datastream configuration, select Save.

-
Install Journey Optimizer tags extension
For your app to work with Journey Optimizer, you must update your tag property.
-
Navigate to Tags > Extensions > Catalog,
-
Open your property, for example Luma Mobile App Tutorial.
-
Select Catalog.
-
Search for the Adobe Journey Optimizer extension.
-
Install the extension.
-
In the Install Extension dialog
- Select an environment, for example Development.
- Select the AJO Push Tracking Experience Event Dataset dataset from the Event Dataset list.
- Select Save to Library and Build.

Validate setup with Assurance
-
Review the setup instructions section to connect your simulator or device to Assurance.
-
In the Assurance UI, select Configure.

-
Select

-
Select Save.

-
Select Push Debug from the left navigation.
-
Select the Validate Setup tab.
-
Select your device from the Client list.
-
Confirm that you aren’t getting any errors.

-
Select the Send Test Push tab.
-
(optional) Change the default details for Title and Body and ensure you provide all parameters that your app expects, like Advanced > Notification Channel (required for Android, for example
LUMA_CHANNEL_ID). -
Select

-
Check the Test Results.

-
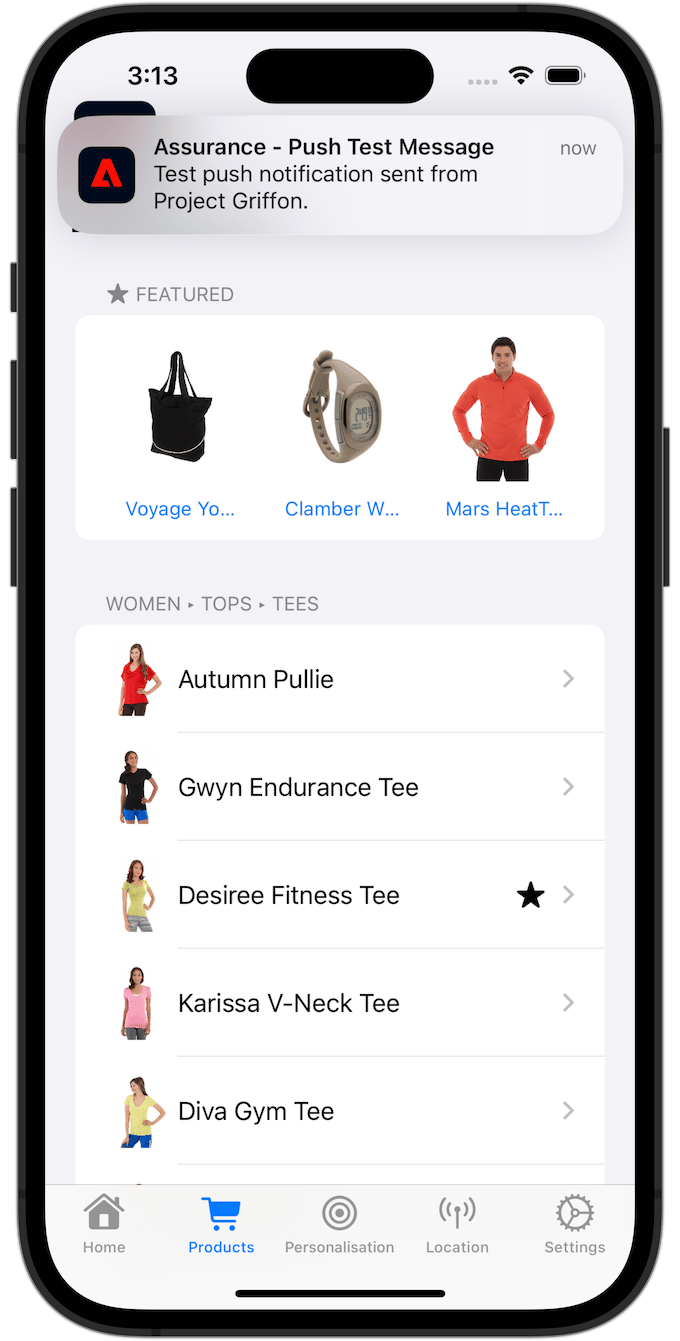
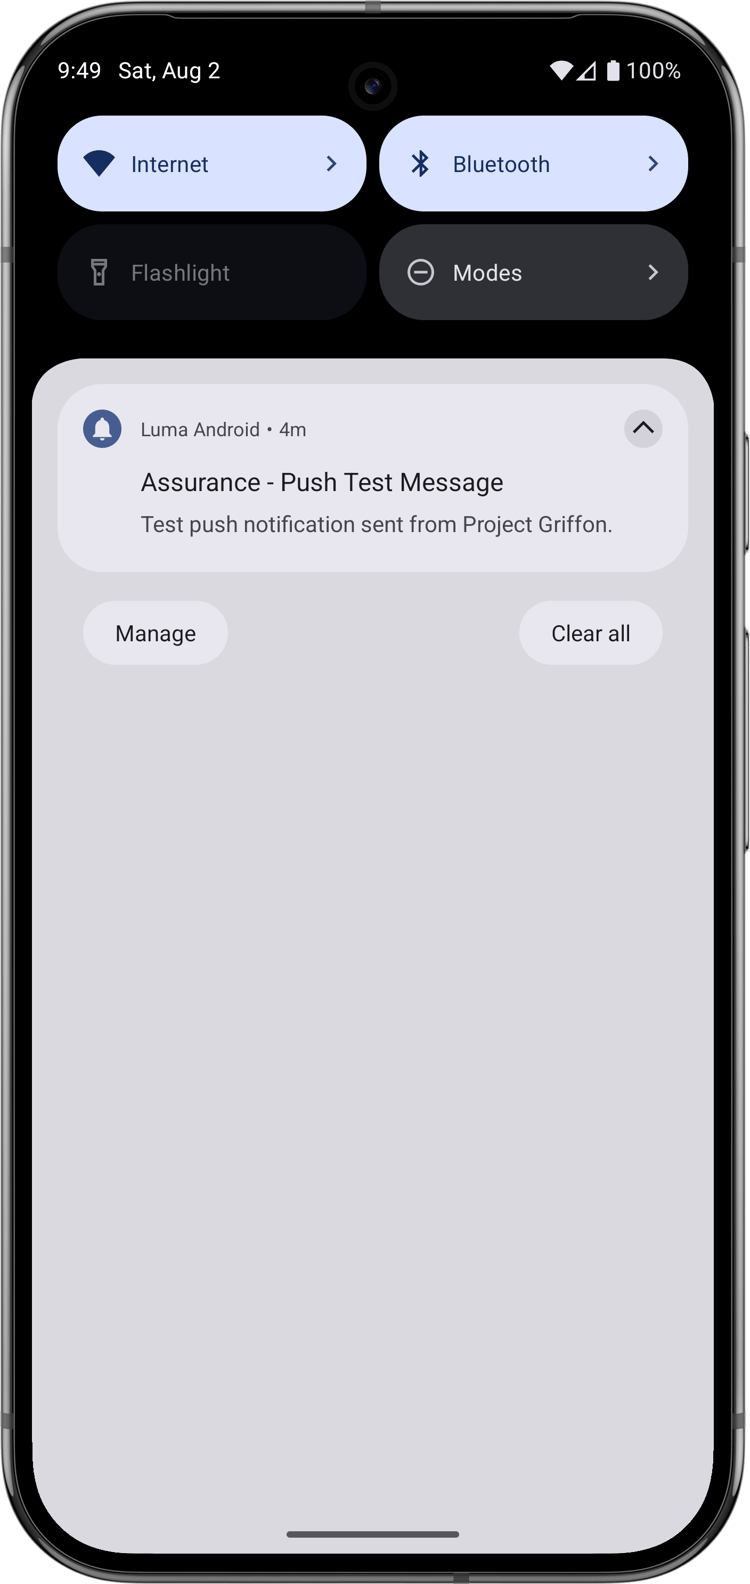
You should see the test push notification appear in your app.
Signing
To update the signing for your app:
-
Go to your app in Xcode.
-
Select Luma in the Project navigator.
-
Select the Luma target.
-
Select the Signing & Capabilities tab.
-
Configure Automatic manage signing, Team, and Bundle Identifier, or use your specific Apple development provisioning details.
note important IMPORTANT Ensure you use a unique bundle identifier and replace the com.adobe.luma.tutorial.swiftuibundle identifier, as each bundle identifier must be unique. Typically, you use a reverse-DNS format for bundle ID strings, likecom.organization.brand.uniqueidentifier. The Finished version of this tutorial, for example, usescom.adobe.luma.tutorial.swiftui.
Add push notification capabilities to your app
-
In Xcode, select Luma from the TARGETS list, select the Signing & Capabilities tab, select the + Capability button, then select Push Notifications. This selection enables your app to receive push notifications.
-
Next, you must add a Notification Extension to the app. Go back to the General tab and select the + icon at the bottom of the TARGETS section.
-
You are prompted to select the template for your new target. Select Notification Service Extension then select Next.
-
In the next window, use
NotificationExtensionas the name of the extension and click the Finish button.
You should now have a push notification extension added to your app, similar to the screen below.

The Android Studio project is already set up for push notifications. You do not need to take additional steps to enable the Android version of the Luma app for push notifications. See About notifications for more information.
Android push notifications require that you define a notification channel id, both in your app, and when sending a push notification. The channel notification id used in the Android Luma app is LUMA_CHANNEL ID.
Implement Journey Optimizer in the app
As discussed in previous lessons, installing a mobile tag extension only provides the configuration. Next you must install and register the Messaging SDK. If these steps aren’t clear, review the Install SDKs section.
-
In Xcode, ensure that AEP Messaging is added to the list of packages in Package Dependencies. See Swift Package Manager.
-
Navigate to Luma > Luma > AppDelegate in the Xcode Project navigator.
-
Ensure
AEPMessagingis part of your list of imports.import AEPMessaging -
Ensure
Messaging.selfis part of the array of extensions that you are registering.code language-swift let extensions = [ AEPIdentity.Identity.self, Lifecycle.self, Signal.self, Edge.self, AEPEdgeIdentity.Identity.self, Consent.self, UserProfile.self, Places.self, Messaging.self, Optimize.self, Assurance.self ]
-
In Android Studio, ensure that aepsdk-messaing-android is part of the dependencies in build.gradle.kts (Module :app) in Android

-
Navigate to Android
-
Ensure
com.adobe.marketing.mobile.Messagingis part of your list of imports.import import com.adobe.marketing.mobile.Messaging -
Ensure
Messaging.EXTENSIONis part of the array of extensions that you are registering.code language-kotlin val extensions = listOf( Identity.EXTENSION, Lifecycle.EXTENSION, Signal.EXTENSION, Edge.EXTENSION, Consent.EXTENSION, UserProfile.EXTENSION, Places.EXTENSION, Messaging.EXTENSION, Optimize.EXTENSION, Assurance.EXTENSION )
Register a device token for push notifications
You need to register the device token for push notifications.
-
Navigate to Luma > Luma > AppDelegate in the Xcode Project navigator.
-
Add the
MobileCore.setPushIdentifierAPI to thefunc application(_ application: UIApplication, didRegisterForRemoteNotificationsWithDeviceToken deviceToken: Data)function.code language-swift // Send push token to Mobile SDK MobileCore.setPushIdentifier(deviceToken)This function retrieves the device token unique to the device that the app is installed on. Then sets the token for push notification delivery using the configuration that you have set up and which relies on Apple’s Push Notification service (APNs).
-
Navigate to Android
-
Add the
MobileCore.setPushIdentifierAPI to theoverride fun onCreate()function inclass LumaAplication : Application, inFirebaseMessaging.getInstance().token.addOnCompleteListener.code language-kotlin // Send push token to Mobile SDK MobileCore.setPushIdentifier(token)This function retrieves the device token unique to the device that the app is installed on. Then sets the token for push notification delivery using the configuration that you have set up and which relies on Firebase Cloud Messaging (FCM).
MobileCore.updateConfigurationWith(configDict: ["messaging.useSandbox": true]) determines whether push notifications are using an APNs sandbox or production server for sending push notifications. When testing your app in the simulator or on a device, ensure the messaging.useSandbox is set to true so you receive push notifications. When deploying your app for production ot test using Apple’s Testflight, ensure you set messaging.useSandbox to false otherwise your production app is not able to receive push notifications.Firebase Cloud Messaging (FCM) does not support the concept of sandboxes for push notifications.
Create your own push notification
To create your own push notification, you must define an event in Journey Optimizer that triggers a journey that takes care of sending a push notification.
Update your schema
You are going to define a new event type, not available yet as part of the list of events that are defined in your schema. You use this event type later when triggering push notifications.
-
In the Journey Optimizer UI, select Schemas from the left rail.
-
Select Browse in the tab bar.
-
Select your schema, for example Luma Mobile App Event Schema to open it.
-
In the Schema editor:
-
Select the eventType field.
-
In the Field properties pane, scroll down to see the list of possible values for event type. Select Add row, and add
application.testas the VALUE andTest event for push notificationas theDISPLAY NAME. -
Select Apply.
-
Select Save.

-
Define an event
Events in Journey Optimizer allow you to trigger journeys to send messages, for example push notifications. See About events for more information.
-
In the Journey Optimizer UI, select Configurations from the left rail.
-
In the Dashboard screen, select the Manage button in the Events tile.
-
In the Events screen, select Create Event.
-
In the Edit event event1 pane:
-
Enter
LumaTestEventas the Name of the event. -
Provide a Description, for example
Test event to trigger push notifications in Luma app. -
Select the mobile app experience event schema that you created earlier in Create an XDM schema from the Schema list, for example Luma Mobile App Event Schema v.1.
-
Select

In the Fields dialog, ensure that the following fields are selected (on top of the default fields that are always selected (_id, id, and timestamp)). You can toggle, using the dropdown list, between Selected, All and Primary or use the

- Application Identified (id),
- Event Type (eventType),
- Primary (primary).

Then select Ok.
-
Select
- In the Add an event id condition dialog, drag and drop Event Type (eventType) on to Drag and drop an element here.
- In the popover, scroll to the bottom and select application.test (which is the event type you added earlier to the list of event types as part of Update your schema). Then scroll up to the top and select Ok.
- Select Ok to save the condition.

-
Select ECID (ECID) from the Namespace list. Automatically the Profile identifier field is populated with The id of the first element of the key ECID for the map identityMap.
-
Select Save.

-
You just created an event configuration that is based on the mobile app experience events schema you created earlier as part of this tutorial. This event configuration will filter incoming experience events using your specific event type (application.test), so only events with that specific type, initiated from your mobile app, will trigger the journey you build in the next step. In a real-world scenario, you might want to send push notifications from an external service. However, the same concepts apply: from the external application send an experience event into Experience Platform that has specific fields you can use to apply conditions on before these events trigger a journey.
Create the journey
Your next step is to create the journey that triggers the sending of the push notification when receiving the appropriate event.
-
In the Journey Optimizer UI, select Journeys from the left rail.
-
Select Create Journey.
-
In the Journey Properties panel:
- Enter a Name for the journey, for example
Luma - Test Push Notification Journey. - Enter a Description for the journey, for example
Journey for test push notifications in Luma mobile app. - Ensure Allow re-entrance is selected and set Re-entrance wait period to 30 Seconds.
- Select Ok.

- Enter a Name for the journey, for example
-
Back at the journey canvas, from the EVENTS, drag and drop your

- In the Events: LumaTestEvent panel, enter a Label, for example
Luma Test Event.
- In the Events: LumaTestEvent panel, enter a Label, for example
-
From the ACTIONS dropdown, drag and drop

-
Provide a Label, for example
Luma Test Push Notification, provide a Description, for exampleTest push notification for Luma mobile app, select Transactional from the Category list and select Luma from the Push surface. -
Select

In the Push Notification editor:
-
Enter a Title, for example
Luma Test Push Notificationand enter a Body, for exampleTest push notification for Luma mobile app. -
Optionally, you can enter a link to an image (.png or .jpg) in Add media. If you do so, the image is part of the push notification. Note that if you do, you need to take care of properly handling the image in your mobile app.
-
To save and leave the editor, select


-
-
To save and finish the push notification definition, select Ok.
-
-
Your journey should look like below. Select Publish to publish and activate your journey.

Trigger the push notification
You have all the ingredients in place to send a push notification. What remains is how to trigger this push notification. In essence, it is the same as you have seen before: simply send an experience event with the proper payload (as in Events).
This time the experience event you are about to send is not constructed building a simple XDM dictionary. You are going to use a struct representing a push notification payload. Defining a dedicated data type is an alternative way of how to implement constructing experience event payloads in your application.
Be aware that solely for illustration purposes you send a push notification from within the app. A more typical scenario is that you send the experience event (that triggers the push notification journey) from another application or service.
-
Navigate to Luma > Luma > Model > XDM > TestPushPayload in the Xcode Project navigator and inspect the code.
code language-swift import Foundation // MARK: - TestPush struct TestPushPayload: Codable { let application: Application let eventType: String } // MARK: - Application struct Application: Codable { let id: String }The code is a representation of the following simple payload that you are going to send to trigger your test push notification journey.
code language-json { "eventType": string, "application" : [ "id": string ] } -
Navigate to Luma > Luma > Utils > MobileSDK in the Xcode Project navigator and add the following code to
func sendTestPushEvent(applicationId: String, eventType: String):code language-swift // Create payload and send experience event Task { let testPushPayload = TestPushPayload( application: Application( id: applicationId ), eventType: eventType ) // send the final experience event await sendExperienceEvent( xdm: testPushPayload.asDictionary() ?? [:] ) }This code creates a
testPushPayloadinstance using the parameters provided to the function (applicationIdandeventType) and then callssendExperienceEventwhile converting the payload to a dictionary. This code also takes the asynchronous aspects of calling the Adobe Experience Platform SDK into account through the use of Swift’s concurrency model, based onawaitandasync. -
Navigate to Luma > Luma > Views > General > ConfigView in the Xcode Project navigator. In the Push Notification Button definition, add the following code to send the test push notification experience event payload to trigger your journey whenever that button is tapped.
code language-swift // Setting parameters and calling function to send push notification Task { let eventType = testPushEventType let applicationId = Bundle.main.bundleIdentifier ?? "No bundle id found" await MobileSDK.shared.sendTestPushEvent(applicationId: applicationId, eventType: eventType) }
-
Navigate to Android
code language-kotlin import com.google.gson.annotations.SerializedName data class TestPushPayload( @SerializedName("application") val application: Application, @SerializedName("eventType") val eventType: String ) { fun asMap(): Map<String, Any> { return mapOf( "application" to application.asMap(), "eventType" to eventType ) } } data class Application( @SerializedName("id") val id: String ) { fun asMap(): Map<String, Any> { return mapOf( "id" to id ) } }The code is a representation of the following simple payload that you are going to send to trigger your test push notification journey.
code language-json { "eventType": string, "application" : [ "id": string ] } -
Navigate to Android
func sendTestPushEvent(applicationId: String, eventType: String):code language-kotlin // Create payload and send experience event val testPushPayload = TestPushPayload( Application(applicationId), eventType ) sendExperienceEvent(testPushPayload.asMap())This code creates a
testPushPayloadinstance using the parameters provided to the function (applicationIdandeventType) and then callssendExperienceEventwhile converting the payload to a map. -
Navigate to Android
code language-kotlin // Setting parameters and calling function to send push notification val eventType = testPushEventType val applicationId = context.packageName scope.launch { MobileSDK.shared.sendTestPushEvent( applicationId, eventType ) }
Validate using your app
To validate the push notification event and journey:
-
Rebuild and run the app in the simulator or on a physical device from Xcode, using

-
Go to the Settings tab.
-
Tap Push Notification.
You see the push notification appear on top of the app.

-
Rebuild and run the app in the simulator or on a physical device from Android Studio, using
-
Go to the Settings tab.
-
Tap Push Notification.
You see the push notification appear on top of the app.

How to handle and display the push notification in the app itself is beyond the topic of this section. Each platform implements handling and displays notification in a specific way. See for more information:
- For iOS: User Notifications
- For Android: Cloud Messaging
Next steps
You should now have all the tools to handle push notifications in your app. For example, you could build a journey in Journey Optimizer that sends a welcome push notification when a user of the app logs in. Or a confirmation push notification when a user purchases a product in the app. Or enters the geofence of a location (as you see in the Places lesson).
Next: Create and send in-app messages