Use Places
Learn how to use the Places geolocation service in your app.
The Adobe Experience Platform Data Collection Places Service is a geolocation service that enables mobile apps with location awareness to understand the location context. The service is using rich and easy-to-use SDK interfaces accompanied by a flexible database of points of interests (POIs).
Prerequisites
- All package dependencies are in place in the Xcode project.
- Registered extensions in AppDelegate.
- Configured MobileCore to use your development appId.
- Imported SDKs.
- Successfully built and run the app with the above changes.
Learning objectives
In this lesson, you will
- Understand how to define points of interest in the Places service.
- Update your tag property with the Places extension.
- Update your schema to capture geolocation events.
- Validate setup in Assurance.
- Update your app to register the Places extension.
- Implement geolocation tracking from the Places service in your app.
Setup
For the Places service to work within your app and within the Mobile SDK, you have to do some setup.
Define Places
You define some points of interest in the Places service.
- In the Data Collection UI, select Places.
- Select

- From the context menu, select Manage Libraries.

- In the Manage Libraries dialog, select New.
- In the Create Library dialog enter a Name, for example
Luma. - Select Confirm.

- To close the Manage Libraries dialog, select Close.
- Back in POI Management, select Import POIs.
- Select Start in the Import Places dialog.
- Select Luma from the list of libraries,
- Select Next.

- Download the Luma POIs ZIP file and extract it to a location on your computer.
- In the Import Places dialog, drag and drop the extracted
luma_pois.csvfile on to Choose CSV File - Drag and Drop your File. You should see Validation Success - Successfully validated the CSV file. - Select Begin Import. You should see Success - Successfully added 6 new POIs.
- Select Done.
- In POI Management, you should see that six new Luma stores are added to the list. You can toggle between


Install Places extension
-
Navigate to Tags and find your mobile tag property and open the property.
-
Select Extensions.
-
Select Catalog.
-
Search for the Places extension.
-
Install the extension.

-
In the Install Extension dialog:
- Select Luma from the Select a Library list.
- Ensure you have picked your working library, for example Initial Build.
- Select Save to Library and Build from Save to Library.
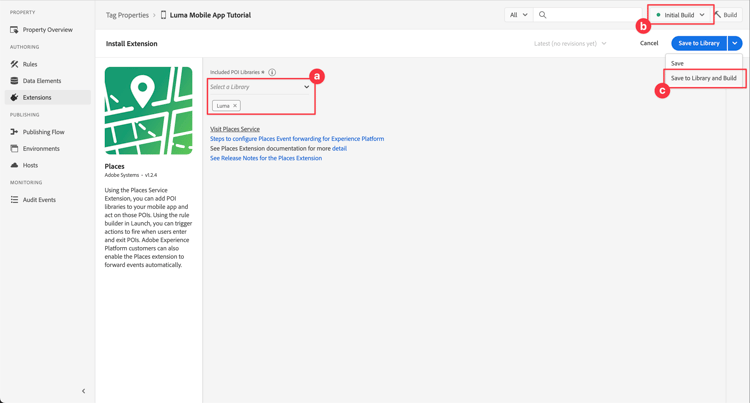
-
Your library is rebuilt.
Verify your schema
Verify whether your schema, as defined in Create schema, incorporates the necessary field groups and classes to collect POI and geolocation data.
- Navigate to the Data Collection interface and select Schemas from the left rail.
- Select Browse from the top bar.
- Select your schema to open it.
- In the schema editor, select Consumer Experience Event.
- You see a placeContext object with object and fields to capture POI interaction and geolocation data.

Update your tag property
The Places extension for Tags provides functionality to monitor geolocation events and allows you to trigger actions based on these events. You can use this functionality to minimize the API coding you have to implement in the app.
Data Elements
You first create several data elements.
-
Go to your tag property in the Data Collection UI.
-
Select Data Elements from the left rail.
-
Select Add Data Element.
-
In the Create Data Element screen, enter a name, for example
Name - Entered. -
Select Places from the Extension list.
-
Select Name from the Data Element Type list.
-
Select Current POI underneath TARGET.
-
Select Save to Library.

-
Repeat steps 4 - 8 using the information from the table below, to create additional data elements.
table 0-row-4 1-row-4 2-row-4 3-row-4 4-row-4 5-row-4 Name Extension Data Element Type TARGET Name - ExitedPlaces Name Last Exited POI Category - CurrentPlaces Category Current POI Category - ExitedPlaces Category Last Exited POI City - CurrentPlaces City Current POI City - ExitedPlaces City Last Exited POI You should have the following list of Data Elements.

Rules
Next, you are going to define rules to work with these data elements.
-
In your tag property, select Rules from the left rail.
-
Select Add Rule.
-
In the Create Rule screen, enter a name for the rule, for example
POI - Entry. -
Select

- Select Places from the Extension list and select Enter POI from the Event Type list.
- Select Keep Changes.

-
Select
-
Select Mobile Core from the Extension list, select Attach Data from Action Type the list. This action attaches payload data.
-
In the JSON Payload, paste the following payload:
code language-json { "xdm": { "eventType": "location.entry", "placeContext": { "geo": { "city": "{%%City - Current%%}" }, "POIinteraction": { "poiDetail": { "name": "{%%Name - Current%%}", "category": "{%%Category - Current%%}" }, "poiEntries": { "value": 1 } } } } }You can also insert
{%% ... %%}data element placeholder values in the JSON by selecting the
-
Select Keep Changes.

-
-
Select
- Select Adobe Experience Platform Edge Network from the Extension list and select Forward event to Edge Network. This action ensures that the event and additional payload data are forwarded to Platform Edge Network.
- Select Keep Changes.
-
To save the rule, select Save to Library.

Let’s create another rule
-
In the Create Rule screen, enter a name for the rule, for example
POI - Exit. -
Select
- Select Places from the Extension list and select Exit POI from the Event Type list.
- Select Keep Changes.
-
Select
-
Select Mobile Core from Extension list, select Attach Data from Action Type list.
-
In the JSON Payload, paste the following payload:
code language-json { "xdm": { "eventType": "location.exit", "placeContext": { "geo": { "city": "{%%City - Exited%%}" }, "POIinteraction": { "poiExits": { "value": 1 }, "poiDetail": { "name": "{%%Name - Exited%%}", "category": "{%%Category - Exited%%}" } } } } } -
Select Keep Changes.
-
-
Select
- Select Adobe Experience Platform Edge Network from the Extension list and select Forward event to Edge Network.
- Select Keep Changes.
-
To save the rule, select Save to Library.

To ensure all changes in your tag are published
- Select Initial Build as the library to build.
- Select Build.

Validate setup in Assurance
To validate your setup in Assurance:
-
Go to the Assurance UI.
-
If not already available in the left rail, select Configure in left rail and select
-
Select Save.
-
Select Map & Simulate in the left rail.
-
Move the map to a location of one of your POIs.
-
Select

-
Select your POI.
-
From the popup, select

-
Select Events from the left rail, and you should see the events that you simulated.

Implement Places in your app
As discussed in previous lessons, installing a mobile tag extension only provides the configuration. Next you must install and register the Places SDK. If these steps aren’t clear, review the Install SDKs section.
-
In Xcode, ensure that AEP Places is added to the list of packages in Package Dependencies. See Swift Package Manager.
-
Navigate to Luma > Luma > AppDelegate in the Xcode Project navigator.
-
Ensure
AEPPlacesis part of your list of imports.code language-swift import AEPPlaces -
Ensure
Places.selfis part of the array of extensions that you are registering.code language-swift let extensions = [ AEPIdentity.Identity.self, Lifecycle.self, Signal.self, Edge.self, AEPEdgeIdentity.Identity.self, Consent.self, UserProfile.self, Places.self, Messaging.self, Optimize.self, Assurance.self ] -
Navigate to Luma > Luma > Utils > MobileSDK in the Xcode Project navigator and find the
func processRegionEvent(regionEvent: PlacesRegionEvent, forRegion region: CLRegion) asyncfunction. Add the following code:code language-swift // Process geolocation event Places.processRegionEvent(regionEvent, forRegion: region)This
Places.processRegionEventAPI communicates the geolocation information to the Places service. -
Navigate to Luma > Luma > Views > Location > GeofenceSheet in Xcode’s Project navigator.
-
For the Entry button, enter the following code:
code language-swift // Simulate geofence entry event Task { await MobileSDK.shared.processRegionEvent(regionEvent: .entry, forRegion: region) } -
For the Exit button, enter the following code:
code language-swift // Simulate geofence exit event Task { await MobileSDK.shared.processRegionEvent(regionEvent: .exit, forRegion: region) }
-
-
In Android Studio, ensure that aepsdk-places-android is part of the dependencies in build.gradle.kts (Module :app) in Android

-
Navigate to Android
-
Ensure
com.adobe.marketing.mobile.Messagingis part of your list of imports.import import com.adobe.marketing.mobile.Places -
Ensure
Places.EXTENSIONis part of the array of extensions that you are registering.code language-kotlin val extensions = listOf( Identity.EXTENSION, Lifecycle.EXTENSION, Signal.EXTENSION, Edge.EXTENSION, Consent.EXTENSION, UserProfile.EXTENSION, Places.EXTENSION, Messaging.EXTENSION, Optimize.EXTENSION, Assurance.EXTENSION ) -
Navigate to Android
suspend fun processGeofence(geofence: Geofence?, transitionType: Int)function. Add the following code:code language-kotlin // Process geolocation event Places.processGeofence(geofence, transitionType)This
Places.processRegionEventAPI communicates the geolocation information to the Places service. -
Navigate to Android
-
For the Entry button, enter the following code:
code language-kotlin // Simulate geofence entry event coroutineScope.launch { MobileSDK.shared.processGeofence( region, Geofence.GEOFENCE_TRANSITION_ENTER ) } -
For the Exit button, enter the following code:
code language-kotlin // Simulate geofence entry event coroutineScope.launch { MobileSDK.shared.processGeofence( region, Geofence.GEOFENCE_TRANSITION_EXIT ) }
-
Validate using your app
To validate the geolocation features in your app:
-
Open your app on a device or in the simulator.
-
Go to the Location tab.
-
Move (drag) the map around to ensure that the blue middle circle is on above of one of your POIs, for example London.
-
Tap

-
Tap the label of the POI, which opens up the Nearby POI sheet.

-
Press the Entry or Exit buttons to simulate geofence entry and geofence exit events from the app.

-
You should see the events in the Assurance UI. Both in the Events and in the Places Service Events.
-
Go to the Location tab.
-
Select Use and/or Simulate Geofences.
-
Tap somewhere within the red circle that appears.

-
Press the Entry or Exit buttons to simulate geofence entry and geofence exit events from the app.

-
You should see the events in the Assurance UI.
Next steps
You should now have all the tools to start adding more functionality to your geolocation functionality in the app. As you have forwarded the events to the Edge Network, once you have set up the app for Experience Platform, you should see the experience events appearing for the profile used in the app.
In the Journey Optimizer section of this tutorial, you see that experience events can be used to trigger journeys (see push notification and in-app messaging with Journey Optimizer). For example, the usual example of sending your app user a push notification with some product promotion when that user enters the geofence of a physical store.
This implementation of geolocation functionality for your app is minimizing code. The Places service, data elements and rules that you defined in your tag property provide most of the functionality. Alternatively, you can implement the same functionality directly in your app using the Edge.sendEvent API (see Events for more information) with an XDM payload containing a populated placeContext object.
Next: Map data to Adobe Analytics