Create and display offers with Decisioning
Learn how to show offers from Journey Optimizer Decisioning in your mobile apps with Experience Platform Mobile SDK.
Journey Optimizer Decisioning is the next generation of offer management and the successor of Decision Management. The Decisioning feature empowers you to deliver personalized marketing offers by combining a centralized catalog of decision items with a powerful decision engine. Whether you’re tailoring content for individual audiences or optimizing strategies with AI-powered rankings, Decisioning provides the tools to make data-driven decisions at scale. Dive into the key concepts such as decision items, rules, and policies, and explore how these elements work together to select and prioritize the best content for your campaigns. From managing collections and placements to leveraging Adobe Experience Platform data, this comprehensive guide helps you unlock smarter personalization and drive impactful customer experiences.
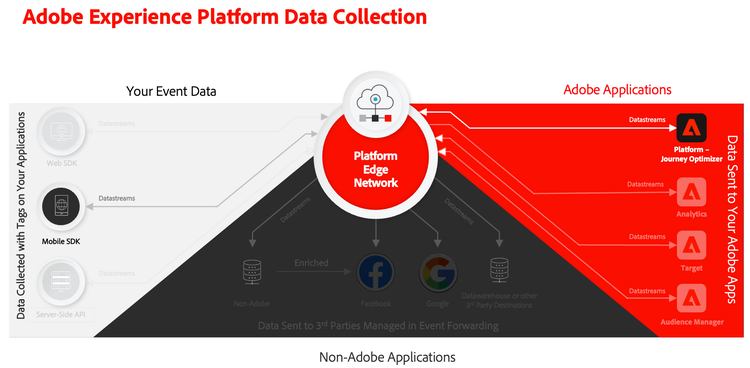
Decisioning simplifies personalization by offering a centralized catalog of marketing offers known as ‘decision items’ and a sophisticated decision engine. This engine leverages rules and ranking criteria to select and present the most relevant decision items to each individual. These decision items are seamlessly integrated into messages and experiences across Adobe Journey Optimizer channels: code-based experience, email, SMS, push notifications, and more.
In this lesson, the focus is on the use of the code-based experience channel to deliver offers in the mobile app. And not on explaining in depth all capabilities of the Decisioning solution. Refer to the Decisioning documentation for more information.
Prerequisites
- Successfully built and run app with SDKs installed and configured.
- Set up the app for Adobe Experience Platform.
- Access to Journey Optimizer - Decisioning with the proper permissions to manage offers and decisions.
Learning objectives
In this lesson, you will
- Update your Edge configuration for Decisioning.
- Create a schema to represent offers.
- Validate setup in Assurance.
- Configure a code-based experience channel configuration.
- Create a code-based experience campaign, based on offers in Journey Optimizer - Decisioning.
- Implement offers from Decisioning in your app.
Setup
Update datastream configuration
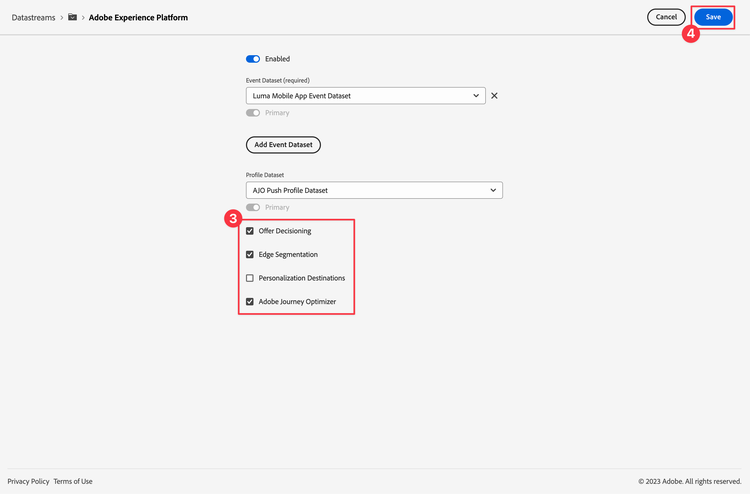
To ensure data sent from your mobile app to Platform Edge Network is forwarded to Journey Optimizer - Decisioning, update your datastream.
-
In the Data Collection UI, select Datastreams, and select your datastream, for example Luma Mobile App.
-
Select
for Experience Platform and select
-
In the Datastreams >
- If you plan to only do this Decisioning lesson and not the Decision management lesson, you do not need to enable Offer Decisioning.
- If you do the Target lesson, select Personalization Destinations, too. See Adobe Experience Platform settings for more information.
-
To save your datastream configuration, select Save .
Define your schema
-
Navigate to the Data Collection interface and select Schemas from the left rail.
-
Select Browse from the top bar.
-
Open the Personalized Offer Items - Experience Decisioning schema. This schema is the dedicated schema to configure your offer items, their attributes and metadata.
-
Add additional field groups to your schema that represent how you want to use offers in Decisioning. Refer to Create schema to understand how you can create schemas. For this lesson, two field groups are created as part of the _techmarketingdemos sandbox configuration: Offer and Offer Metadata. You can see the full structure of the schema below.
- All mediaAssets fields, like image or imageLowRes are of type DesignAssets and automatically do have destinationURL, edgePath, repository, sourceURL, trackedURL and type string fields.
- All other fields are either of type Object (for example offerMetadata) or String (for example fullDescription).

You can define your Personalized Offer Items - Experience Decisioning schema any way you want. The above structure is just an example that is used for the remainder of this lesson.
-
Ensure you select Save to save any changes you make to the Personalized Offer Items - Experience Decisioning schema.
Install Journey Optimizer tags extension
For your app to work with Journey Optimizer, you must update your tag property.
- Navigate to Tags > Extensions > Catalog.
- Open your property, for example Luma Mobile App Tutorial.
- Select Catalog.
- Search for the Adobe Journey Optimizer extension.
- Install the extension.
When only using offers based on Decisioning in your app, in Install Extension or Configure Extension, you do not need to configure anything. If you already have followed the Push notifications lesson in the tutorial, you see that for the Development environment, the AJO Push Tracking Experience Event Dataset dataset is selected from the Event Dataset list.
Implement Journey Optimizer in the app
As discussed in previous lessons, installing a mobile tag extension only provides the configuration. Next you must install and register the Messaging SDK. If these steps aren’t clear, review the Install SDKs section.
-
In Xcode, ensure that AEP Messaging is added to the list of packages in Package Dependencies. See Swift Package Manager.
-
Navigate to Luma > Luma > AppDelegate in the Xcode Project navigator.
-
Ensure
AEPMessagingis part of your list of imports.import AEPMessaging -
Ensure
Messaging.selfis part of the array of extensions that you are registering.code language-swift let extensions = [ AEPIdentity.Identity.self, Lifecycle.self, Signal.self, Edge.self, AEPEdgeIdentity.Identity.self, Consent.self, UserProfile.self, Places.self, Messaging.self, Optimize.self, Assurance.self ]
-
In Android Studio, ensure that aepsdk-messaging-android is part of the dependencies in build.gradle.kts in Android

-
Navigate to Android
-
Ensure
com.adobe.marketing.mobile.Messagingis part of your list of imports.import import com.adobe.marketing.mobile.Messaging -
Ensure
Messaging.EXTENSIONis part of the array of extensions that you are registering.code language-kotlin val extensions = listOf( Identity.EXTENSION, Lifecycle.EXTENSION, Signal.EXTENSION, Edge.EXTENSION, Consent.EXTENSION, UserProfile.EXTENSION, Places.EXTENSION, Messaging.EXTENSION, Optimize.EXTENSION, Assurance.EXTENSION )
Validate setup in Assurance
You do not need to validate the setup for Decisioning in Assurance. Decisioning does not use a specific Experience Platform Data Collection Tag extension, nor does Decisioning requires an additional package for your app. Decisioning relies on the Messaging extension in your app, which you already should have added as part of the Install Adobe Experience Platform Mobile SDKs and Create and send in-app messages lessons in this tutorial.
Create code-based experience channel configuration
To display offers in the screens of your app, you need to configure a dedicated code-based experience channel. This code-based experience channel defines the surface (the location) in the app where you display your offers.
To create a code-based experience channel.
-
In the Journey Optimizer UI, select

-
Select Channel configurations from General Settings.
-
Select Create channel configuration.
-
In Channel configuration details:

-
Enter a Name. For example:
LumaMobileAppCodeBased. -
Enter a Description. For example:
Code-based experience for Luma app used in Mobile SDK tutorial. -
Select Code-based experience from the Select channel drop-down menu.
-
Select one or more marketing actions from the Select one or multiple marketing actions. For example Onsite Personalization.
-
Select the platforms for which you want to configure the code-based experience. For this tutorial, select iOS or Android or both.
-
For iOS:
- Enter of select App id. For example, the identifier of your app:
com.adobe.luma.tutorial.swiftui. - Enter of select a location for Location or path inside the app. For example:
offersLocation. - Enter a Preview URL. For example:
lumatutorialswiftui://.
- Enter of select App id. For example, the identifier of your app:
-
For Android:
- Enter of select App id. For example, the identifier of your app:
com.adobe.luma.tutorial.android. - Enter of select a location for Location or path inside the app. For example:
offersLocation. - Enter a Preview URL. For example:
lumatutorialandroid://default.
- Enter of select App id. For example, the identifier of your app:
-
Content
- Select JSON for the Format.
-
-
-
Select Submit to submit your code-based experience.
Create offers
In this section you create offers for Decisioning.
-
In the Journey Optimizer UI, select

-
Select Offers from Catalogs to see the list of Offers.
-
Select Create item.
-
In the ➊ Attributes step of creating an offer (decision item):

-
In the Standard attributes section:
- Enter an Offer name. For example:
Luma - Desiree Fitness Tee. - Enter a Start date or select one using

7/1/2026, 12:00 AM. - Enter a End date or select one using
12/31/2026, 12:00 AM. - Enter a Priority. For example:
10. - Select one or more appropriate tags from the Tags drop-down menu. For example: Luma - Mobile App.
- Enter an Offer name. For example:
-
In the Custom attributes section, enter values for the offer content and metadata. What data you can enter and how you can enter that data is entirely determined by how you have defined your schema for offers. In this tutorial, you want to provide a title, text and an image for each offer.
-
In the Offer container, within the Media Assets subcontainer:
- Select Add from URL for Image and enter an appropriate value for Enter source URL. For example:
https://newluma.enablementadobe.com/images/ws05-yellow_main.jpg. - Select Add from URL for Image (high resolution) and enter an appropriate value for Enter source URL. For example:
https://newluma.enablementadobe.com/images/ws05-yellow_main.jpg.
- Select Add from URL for Image and enter an appropriate value for Enter source URL. For example:
-
In the Offer container, within the Text subcontainer:
- Enter a value for Full description. For example:
When you're too far to turn back, thank yourself for choosing the Desiree Fitness Tee. Its ultra-lightweight, ultra-breathable fabric wicks sweat away from your body and helps keeps you cool for the distance. - Enter a value for Title. For example:
Desiree Fitness Tee.
- Enter a value for Full description. For example:
-
-
Select Next.
-
-
In the ➋ Elgibility step of the creation of an offer (decision item):

- In Eligibility, ensure All visitors is selected.
- You do not need to create a capping in the Capping section.
- Select Next.
-
In the ➌ Review step op the creation of an offer (decision item):

- Review the offer. You can use

- Select Save.
- Review the offer. You can use
-
-
Repeat step 3 (Create item) for the following additional offers:
table 0-row-4 1-row-4 2-row-4 3-row-4 4-row-4 Name Title Full description Image and Image (high resolution) Luma - Affirm Water BottleAffirm Water BottleYou'll stay hydrated with ease with the Affirm Water Bottle by your side or in hand. Measurements on the outside help you keep track of how much you're drinking, while the screw-top lid prevents spills. A metal carabiner clip allows you to attach it to the outside of a backpack or bag for easy access.https://newluma.enablementadobe.com/images/ug06-lb-0.jpgLuma - Aero Daily Fitness TeeAero Daily Fitness TeeNeed an everyday action tee that helps keep you dry? The Aero Daily Fitness Tee is made of 100% polyester wicking knit that funnels moisture away from your skin. Don't be fooled by its classic style; this tee hides premium performance technology beneath its unassuming look.https://newluma.enablementadobe.com/images/ms01-black_main.jpgLuma - Adrienne Trek JacketAdrienne Trek JacketYou're ready for a cross-country jog or a coffee on the patio in the Adrienne Trek Jacket. Its style is unique with stand collar and drawstrings, and it fits like a jacket should.https://newluma.enablementadobe.com/images/wj08-gray_main.jpgLuma - Juno JacketJuno JacketOn colder-than-comfortable mornings, you'll love warming up in the Juno All-Ways Performanc Jacket, designed to compete with wind and chill. Built-in Cocona™ technology aids evaporation, while a special zip placket and stand-up collar keep your neck protected.https://newluma.enablementadobe.com/images/wj06-purple_main.jpgAll other values, like Start date, End date, Priority, Capping, Eligibility, and other sthat are not explicitly defined in the table above should be the same across all offers and based on what you defined for the first offer.
You should now have the following list of offers:

Create a collection
To present an offer to your mobile app user, you must create an offer collection, consisting of one or more of the offers you created. You use rules to select which offers belong to a collection.
-
In the Journey Optimizer UI, select
-
Select Collections from Catalogs to see the list of Collections.
-
Select Create collection.
-
In the Details section:
- Enter a Name for the collection. For example:
Luma - Mobile App Collection. - Enter a Description for the collection. For example:
Collection of Luma mobile app offers.
- Enter a Name for the collection. For example:
-
In the Collection rules section, underneath NUMBER OF ITEMS:
-
Select Click to create a decision item…
-
Use Select attribute to select an attribute.
- In the Select an attribute dialog select a Decision attribute. For example Offer name.
- Select Save.
-
Use the Equals drop-down menu to select a condition. For example Starts with.
-
In the textfield enter the value for the condition. For example:
Luma -. This value will select all offers which name starts withLuma -to be part of the collection. You can create any kind of rule and also combine rules, using
-
-
Select Create to create the collection.

Create a selection strategy
A selection strategy is reusable, and consists of a collection associated with an eligibility constraint and a ranking method to determine the offers to be shown when selected in a decision policy. The decision policy is covered in the Create a campaign section.
In our implementation, the selection strategy is kept as simple as possible.
-
In the Journey Optimizer UI, select

-
Select Selection strategies.
-
Select Create selection strategy. In the Create selection strategy dialog:
-
Enter a Selection strategy name. For example:
Luma - Mobile App Selection Strategy. -
Use Select collection to select the collection for the selection strategy.
- In the Collection dialog select a collection. For example: Luma - Mobile App Collection.
- Select Save.
-
Ensure All visitors is selected for Eligibility.
-
Ensure Offer priority is selected for Ranking method.
-
-
Select Create to create the selection strategy.

Create a campaign
You now create a campaign that uses both your offer collection and your code-based experience configuration channel. Campaigns are coordinated marketing actions that deliver content to a specific audience across one or more channels.
As part of the campaign you also create a decision policy. Decision policies are containers for your offers that leverage the Decisioning engine to dynamically return the best content to deliver for each audience member. Their goal is to select the best offers for each profile, while the campaign/journey authoring allows you to indicate how the selected decision items should be presented, including which item attributes to be included in the message.
-
In the Journey Optimizer UI, select

-
Select Create campaign.
-
In the Create your campaign dialog, select Scheduled - Marketing as the type of campaign you want to create.
-
Select Confirm.
-
In the Properties tab in the Campaign - timestamp screen:
- Enter a Name for the campaign. For example:
Luma - Mobile App Offers. - Optionally, enter a Description.
- Enter a Name for the campaign. For example:
-
Select Actions.
-
In the Actions section:
- Select


- In the Code-based experience action configuration section, select your code-based experience channel configuration LumaMobileAppCodeBased from the Code-based experience channel configuration drop-down menu.
- Select
-
Leave all other settings for Optimization, Languages and Conflict management unchanged.
-
-
Select Content.
-
In the Code-based experience screen, select
-
In the Code-based experience | Channel configuration : LumaMobileAppCodeBased screen:
-
In the editor, type the following JSON:
code language-json { "version": "1.0", "offers": [ ] } -
Select

-
Select
-
In the Create decision policy dialog wizard, in the ➊ Details step:
- Enter a Name for the decision policy. For example:
Luma - Mobile App Decision Policy. - Select or enter
2for the Number of items. This entry assures two offers are returned. - Select Next.
- Enter a Name for the decision policy. For example:
-
In the Create decision policy dialog wizard, in the ➋ Strategies step:
-
In the Strategy sequence, select
-
From the context menu, select Selection strategy.
- In the Add a selection strategy dialog, select the selection strategy that you created earlier, Luma - Mobile App Selection Strategy.
- Select Save.
-
Select Next.
-
-
In the Create decision policy dialog wizard, in the ➌ Review step, review your decision policy.
- Select Create to create the decision policy.
-
-
Now that a decision policy is available, you can use the Luma - Mobile App Decision Policy rail to insert proper elements from that decision policy into the JSON editor.
-
In the JSON editor, add a newline between
[and]. -
From the Luma - Mobile App Decision Policy rail:
- Select
- Position the cursor in the editor on a line before the closing
{{/each}}. - Select tenant-name (for example: _techmarketingdemos) > Offer > Text content > Title and then +. This adds the title of the offer to the JSON as a
titleelement. - Select tenant-name > Offer > Text content > Full description and then +. This adds the description of the offer to the JSON as a
textelement. - Select tenant-name > Offer > Media assets > Image > sourceURL and then +. This adds the source URL for the high resolution image of the offer to the JSON as an
imageelement.
Your final JSON should look similar to below, with updated values for the decision policy identifier and tenant names.

Ensure your
title,text, andimageJSON elements are wrapped as an object, using{ }. And that you do insert a,after that object and just before{{/each}}in the JSON. - Select
-
-
Use

-
Select Save and close.
-
-
-
Select Review to activate.
-
The Review to activate (Luma - Mobile App Offers) screen provides an overview of your campaign.

-
If you do not see any warnings or errors, select Activate to activate the campaign. In the confirmation dialog, select Activate once more.
-
In the list of campaigns, you should see the campaign changing status from


Now your code-based experience campaign is live and you can update the mobile app to use the code-based experience campaign to render offers on the location or suface defined in the code-based experience channel configuration.
Implement offers in your app
As discussed in previous lessons, installing a mobile tag extension only provides the configuration. Next you must ensure the Messaging extension is configured for your app. If these steps aren’t clear, review the Install SDKs section.
-
In Xcode, ensure that AEP Messaing is added to the list of packages in Package Dependencies. See Swift Package Manager.
-
Navigate to Luma > Luma > AppDelegate in the Xcode Project navigator.
-
Ensure
AEPMessagingis part of your list of imports.code language-swift import AEPMessaging -
Ensure
Messaging.selfis part of the array of extensions that you are registering.code language-swift let extensions = [ AEPIdentity.Identity.self, Lifecycle.self, Signal.self, Edge.self, AEPEdgeIdentity.Identity.self, Consent.self, UserProfile.self, Places.self, Messaging.self, Optimize.self, Assurance.self ] -
Navigate to Luma > Luma > Model > Data > general in the Xcode Project navigator. Ensure
showDecisioningis set totrueandshowPersonalizationis set tofalsein theconfigsection.code language-json ... "showPersonalisation": false, "showDecisioning": true, ...These settings ensure Decisioning is used for offers in the Personalisation tab of the app.
-
Navigate to Luma > Luma > Model > Data > general in the Xcode Project navigator. Ensure a
decisioningsection with asurfaceelement is configured, identifying the location or surface you have configured for your code-based experience channel. For example:offersLocation.code language-json "decisioning": { "surface": "offersLocation" }, -
Navigate to Luma > Luma > Utils > MobileSDK in the Xcode Project navigator. Find the
func updatePropositionsForSurface()function. Add the following code:code language-swift // get the propositions for the surfaces configured. Logger.aepMobileSDK.info("MobileSDK - updatePropositionsForSurfaces: Updating \(surfaces.count) surface(s)") for surface in surfaces { Logger.aepMobileSDK.info("MobileSDK - updatePropositionsForSurfaces: Surface URI: \(surface.uri)") } // Call the Messaging extension API to fetch propositions Messaging.updatePropositionsForSurfaces(surfaces) Logger.aepMobileSDK.info("MobileSDK - updatePropositionsForSurfaces: Update triggered successfully")This function:
- gets the propositions for the surfaces.
In this implementation, only one surface is configured and used. The code requires updates if you want to handle multiple configured surfaces.
-
Navigate to Luma > Luma > Views > Personalization > EdgeDecisioningOffersView in the Xcode Project navigator. Find the
func fetchPropositions() asyncfunction and inspect the code of this function. The most important part of this function is theMessaging.getPropositionsForSurfaces([surface]) { propositionsDict, error inAPI call, which- retrieves the propositions for the current profile based on the surface,
- retrieves the offer from the proposition,
- unwraps the content of the offer (using the
parseCodeBasedContentfunction) so it can be displayed properly in the app.
-
Still in EdgeDecisioningOffersView, see how in the .
taskmodifier:- Propositions are updated using
self.updatePropositionsForSurface(). - A brief wait is implemented for Edge network to respond and cache propositions.
- The cached propositions are fetched using
await self.fetchPropositions.
- Propositions are updated using
-
In Android Studio, ensure that aepsdk-optimize-android is part of the dependencies in build.gradle.kts (Module :app) in Android
-
Navigate to Android
-
Ensure
Optimizeis part of your list of imports.code language-kotlin import com.adobe.marketing.mobile.optimize.Optimize -
Ensure
Optimize.EXTENSIONis part of the array of extensions that you are registering.code language-kotlin val extensions = listOf( Identity.EXTENSION, Lifecycle.EXTENSION, Signal.EXTENSION, Edge.EXTENSION, Consent.EXTENSION, UserProfile.EXTENSION, Places.EXTENSION, Messaging.EXTENSION, Optimize.EXTENSION, Assurance.EXTENSION ) -
Navigate to Android
showDecisioningis set totrueandshowPersonalizationis set tofalsein theconfigsection.code language-json ... "showPersonalisation": false, "showDecisioning": true, ...These settings ensure Decisioning is used for offers in the Personalisation tab of the app.
-
Navigate to Android
decisioningsection with asurfaceelement is configured, identifying the location or surface you have configured for your code-based experience channel. For example:offersLocation.code language-json "decisioning": { "surface": "offersLocation" }, -
Navigate to Android
suspend fun updatePropositionsForSurfaces(surfaces: List<Surface>)function. Add the following code:code language-kotlin // get the propositions for the surfaces configured withContext(Dispatchers.IO) { Log.i("MobileSDK", "updatePropositionsForSurfaces: Updating ${surfaces.size} surface(s)") surfaces.forEach { surface -> Log.i("MobileSDK", "updatePropositionsForSurfaces: Surface URI: ${surface.uri}") } Messaging.updatePropositionsForSurfaces(surfaces) Log.i("MobileSDK", "updatePropositionsForSurfaces: Update triggered successfully") }This function:
- gets the propositions for the surfaces.
In this implementation, only one surface is configured and used. The code requires updates if you want to handle multiple configured surfaces.
-
Navigate to Android
suspend fun fetchPropositionsForSurface(surface: Surface): DecisioningResult = withContext(Dispatchers.IO)function and inspect the code of this function. The most important part of this function is theMessaging.getPropositionsForSurfaces(listOf(surface)) { propositionsMap -> propositionsMap[surface]?.let { propositions ->API call, which- retrieves the propositions for the current profile based on the surface,
- retrieves the offer from the proposition,
- unwraps the content of the offer (using the
parseCodeBasedContentfunction) so it can be displayed properly in the app.
-
Still in EdgeDecisioningOffersView.kt, see how in the
LaunchedEffectfunction:- Propositions are updated using
MobileSDK.shared.updatePropositionsForSurfaces(listOf(surface)). - A brief delay is implemented for Edge network to respond and cache propositions.
- The cached propositions are fetched using
fetchPropositionsForSurface(surface).
- Propositions are updated using
Validate using the app
-
Rebuild and run the app in the simulator or on a physical device from Xcode, using
-
Go to the Personalization tab.
-
Scroll to the top, and you see two random offers displayed from the collection that you have defined in the Surface Offers Location tile.

The offers are random, as you have given all offers the same priority and the ranking for the offers is based on priority.
-
Rebuild and run the app in the simulator or on a physical device from Android Studio, using
-
Go to the Personalization tab.
-
Scroll to the top, and you see two random offers displayed in the upper box from the collection that you have defined in the Surface Offers Location tile.

The offers are random, as you have given all offers the same priority and the ranking for the offers is based on priority.
Validate implementation in Assurance
To validate the offers implementation in Assurance:
-
Review the setup instructions section to connect your simulator or device to Assurance.
-
Select Events in the left rail.
-
Look for Message propositions response events in the event list.
-
In the right pane, unfold such an event: ACPExtensionEventData > propositions > 0 > items > 0 > data > content > offers. You see two offers 0 and 1 each with the data you expect.

Next steps
You should now have all the tools to start adding more functionality to your Journey Optimizer - Decisioning implementation. For example:
- apply different parameters to your offers (for example, priority, capping)
- collect profile attributes in the app (see Profile) and use these profile attributes to build audiences. Then use these audiences as part of the eligibility rules in your decisioning.
- combine more than one surface.
Next: Perform A/B tests