Optimize and personalize with Adobe Target
Learn how to optimize and personalize the experiences in your mobile apps with Platform Mobile SDK and Adobe Target.
Target provides everything that you must tailor and personalize your customers’ experiences. Target helps you maximize revenue on your web and mobile sites, apps, social media, and other digital channels. Target can perform A/B tests, multivariate tests, recommend products and content, target content, auto-personalize content with AI, and much more. The focus in this lesson is on the A/B test functionality of Target. See the A/B Test overview for more information.

Before you can perform A/B tests with Target, you must ensure that the proper configurations and integrations are in place.
Prerequisites
- Successfully built and run app with SDKs installed and configured.
- Access to Adobe Target with permissions, properly configured roles, workspaces, and properties.
Learning objectives
In this lesson, you will:
- Update your datastream for Target integration.
- Update your tag property with the Offer Decisioning and Target extension.
- Update your schema to capture propositon events.
- Validate setup in Assurance.
- Create a simple A/B test in Target.
- Update your app to register the Optimizer extension.
- Implement the A/B test in your app.
- Validate implementation in Assurance.
Setup
Update datastream configuration
Adobe Target
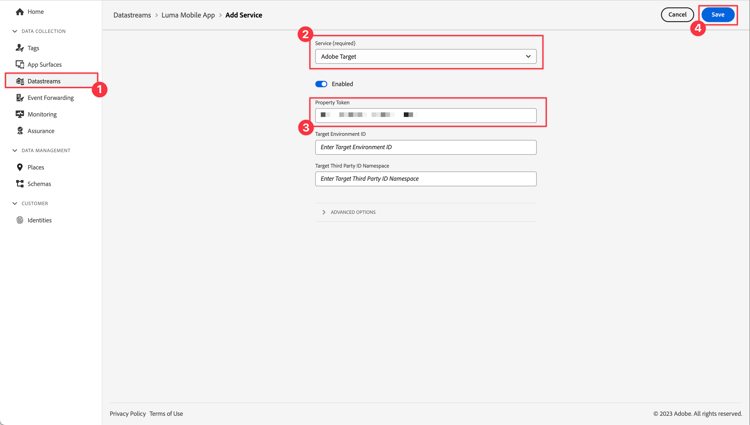
To ensure data send from your mobile app to Experience Platform Edge Network is forwarded to Adobe Target, you must update you datastream configuration.
-
In the Data Collection UI, select Datastreams, and select your datastream, for example Luma Mobile App.
-
Select Add Service and select Adobe Target from the Service list.
-
If you are a Target Premium customer and would like to use property tokens, enter the Target Property Token value that you want to use for this integration. Target Standard users can skip this step.
You can find your properties in the Target UI, in Administration > Properties. Select

"at_property": "xxxxxxxx-xxxx-xxxxx-xxxx-xxxxxxxxxxxx"; you must only enter the valuexxxxxxxx-xxxx-xxxxx-xxxx-xxxxxxxxxxxx.Optionally, you can specify a Target Environment ID. Target uses environments to organize your sites and pre-production environments for easy management and separate reporting. The preset environments include Production, Staging, and Development. See Environments and Target Environment ID for more information.
Optionally, you can specify a Target third-party ID namespace to support profile syncing on an identity namespace (for example CRM ID). See Target Third Party ID namespace for more information.
-
Select Save.
Adobe Journey Optimizer
To ensure data send from your mobile app to the Edge Network is forwarded to Journey Optimizer - Decision Management, update your datastream configuration.
-
In the Data Collection UI, select Datastreams, and select your datastream, for example Luma Mobile App.
-
Select


-
In the Datastreams >

-
To save your datastream configuration, select Save .

Install Offer Decisioning and Target tags extension
Although this lesson is about A/B tests in Target, the result of a test is seen as an offer and is implemented in the Adobe infrastructure using the Adobe Offer Decisioning and Target tags extension. That extension handles both offers served by Journey Optimizer and Target.
-
Navigate to Tags, find your mobile tag property, and open the property.
-
Select Extensions.
-
Select Catalog.
-
Search for the Offer Decisioning and Target extension.
-
Install the extension. The extension does not require additional configuration.

Update your schema
- Navigate to Data Collection interface and select Schemas from the left rail.
- Select Browse from the top bar.
- Select your schema to open it.
- In the schema editor, select

- In the Add field groups dialog, search for
proposition, select Experience Event - Proposition Interactions and select Add field groups.

- To save the changes to your schema, select Save.
Validate setup in Assurance
To validate your setup in Assurance:
- Go to the Assurance UI.
- Select Configure in left rail and select
- Select Save.
- Select Validate Setup in the left rail. Both datastream setup is validated and the SDK setup in your application.

Create an A/B Test
There are many types of activities that you can create in Adobe Target and implement in a mobile app, as mentioned in the introduction. For this lesson, you implement an A/B test.
-
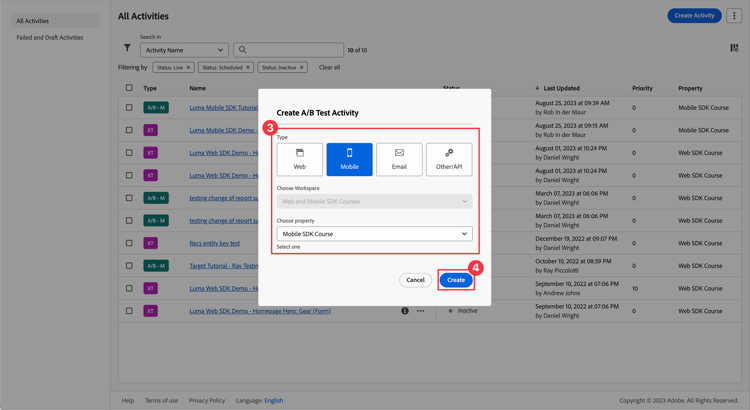
In the Target UI, select Activities from the top bar.
-
Select Create Activity and A/B Test from the context menu.
-
In the Create A/B Test Activity dialog, select Mobile as the Type, select a workspace from the Choose Workspace list. Select your property from the Choose property list if you are a Target Premium customer and specified a property token in the datastream.
-
Select Create.
-
In the Untitled Activity screen, at the Experiences step:
-
Enter
luma-mobileapp-abtestin Select Location underneath Location 1. This location name (often referred to as an mbox) is used later in the app implementation. -
Select

-
In the Create JSON Offer dialog, paste the following JSON.
code language-json { "title": "Luma Analog Watch", "text": "Designed to stand up to your active lifestyle, this women's Luma Analog Watch features a tasteful brushed chrome finish and a stainless steel, water-resistant construction for lasting durability.", "image": "https://newluma.enablementadobe.com/images/Luma_Analog_Watch.jpg" }
Select Create.
-
Select + next to Experiences to add Experience B.
-
Repeat step b and c for experience Experience B, but instead use
Aim Analog Watchas the title and paste the following JSON:code language-json { "title": "Aim Analog Watch", "text": "The flexible, rubberized strap is contoured to conform to the shape of your wrist for a comfortable all-day fit. The face features three illuminated hands, a digital read-out of the current time, and stopwatch functions.", "image": "https://newluma.enablementadobe.com/images/Aim_Watch.jpg" }
-
-
In the Targeting step, review the setup of your A/B test. By default, both offers are allocated equally to all visitors. Select Next to continue.

-
In the Goals & Settings step:
-
Rename your Untitled Activity, for example to
Luma Mobile SDK Tutorial - A/B Test Example. -
Enter an Objective for your A/B test, for example
A/B Test for Luma mobile app tutorial. -
Select Conversion, Viewed an mbox in the Goal Metric > MY PRIMARY GOAL tile and enter your location (mbox) name, for example
luma-mobileapp-abtest. -
Select Save & Close.

-
-
Back in the All Activities screen:
- Select
- Select


- Select
Implement Target in your app
As discussed in previous lessons, installing a mobile tag extension only provides the configuration. Next you must install and register the Optimize SDK. If these steps aren’t clear, review the Install SDKs section.
-
In Xcode, ensure that AEP Optimize is added to the list of packages in Package Dependencies. See Swift Package Manager.
-
Navigate to Luma > Luma > AppDelegate in the Xcode Project navigator.
-
Ensure
AEPOptimizeis part of your list of imports.import AEPOptimize -
Ensure
Optimize.selfis part of the array of extensions that you are registering.code language-swift let extensions = [ AEPIdentity.Identity.self, Lifecycle.self, Signal.self, Edge.self, AEPEdgeIdentity.Identity.self, Consent.self, UserProfile.self, Places.self, Messaging.self, Optimize.self, Assurance.self ] -
Navigate to Luma > Luma > Utils > MobileSDK in the Xcode Project navigator. Find the
func updatePropositionAT(ecid: String, location: String) asyncfunction. Add the following code:code language-swift // set up the XDM dictionary, define decision scope and call update proposition API Task { let ecid = ["ECID" : ["id" : ecid, "primary" : true] as [String : Any]] let identityMap = ["identityMap" : ecid] let xdmData = ["xdm" : identityMap] let decisionScope = DecisionScope(name: location) Optimize.clearCachedPropositions() Optimize.updatePropositions(for: [decisionScope], withXdm: xdmData) { data, error in if let error = error { Logger.aepMobileSDK.error("MobileSDK - updatePropositionsAT: Error updating propositions: \(error.localizedDescription)") } } }This function:
- sets up an XDM dictionary
xdmData, containing the ECID to identify the profile for which you have to present the A/B test, and - defines a
decisionScope, an array of locations on where to present the A/B test.
Then the function calls two APIs:
Optimize.clearCachedPropositionsandOptimize.updatePropositions. These functions clear any cached propositions and update the propositions for this profile. A proposition in this context is the experience (offer) that is selected from the Target activity (your A/B test) and which you defined in Create an A/B test. - sets up an XDM dictionary
-
Navigate to Luma > Luma > Views > Personalization > TargetOffersView in the Xcode Project navigator. Find the
func onPropositionsUpdateAT(location: String) async {function and inspect the code of this function. The most important part of this function is theOptimize.onPropositionsUpdateAPI call, which:- retrieves the propositions for the current profile based on the decision scope (which is the location you have defined in the A/B Test),
- retrieves the offer from the proposition,
- unwraps the content of the offer so it can be displayed properly in the app, and
- triggers the
displayed()action on the offer which sends an event back to Platform Edge Network informing the offer is displayed.
-
Still in TargetOffersView, add the following code to the
.onFirstAppearmodifier. This code ensures that the callback for updating the offers is registered only once.code language-swift // Invoke callback for offer updates Task { await self.onPropositionsUpdateAT(location: location) } -
Still in TargetOffersView, add the following code to the
.taskmodifier. This code updates the offers when the view is refreshed.code language-swift // Clear and update offers await self.updatePropositionsAT(ecid: currentEcid, location: location)
-
In Android Studio, ensure that aepsdk-optimize-android is part of the dependencies in build.gradle.kts in Android

-
Navigate to app > kotlin+java > com.adobe.luma.tutorial.android > MainActivity in the Android Studio navigator.
-
Ensure
Optimizeis part of your list of imports.code language-kotlin import com.adobe.marketing.mobile.optimize.Optimize -
Ensure
Optimize.EXTENSIONis part of the array of extensions that you are registering.code language-kotlin val extensions = listOf( Identity.EXTENSION, Lifecycle.EXTENSION, Signal.EXTENSION, Edge.EXTENSION, Consent.EXTENSION, UserProfile.EXTENSION, Places.EXTENSION, Messaging.EXTENSION, Optimize.EXTENSION, Assurance.EXTENSION ) -
Navigate to Android
suspend fun updatePropositionsAT(ecid: String, location: String)function. Add the following code:code language-kotlin // set up the XDM dictionary, define decision scope and call update proposition API withContext(Dispatchers.IO) { val ecidMap = mapOf("ECID" to mapOf("id" to ecid, "primary" to true)) val identityMap = mapOf("identityMap" to ecidMap) val xdmData = mapOf("xdm" to identityMap) val decisionScope = DecisionScope(location) Optimize.clearCachedPropositions() Optimize.updatePropositions(listOf(decisionScope), xdmData, null, object : AdobeCallbackWithOptimizeError<MutableMap<DecisionScope?, OptimizeProposition?>?> { override fun fail(optimizeError: AEPOptimizeError?) { val responseError = optimizeError Log.i("MobileSDK", "updatePropositionsAT error: ${responseError}") } override fun call(propositionsMap: MutableMap<DecisionScope?, OptimizeProposition?>?) { val responseMap = propositionsMap Log.i("MobileSDK", "updatePropositionsOD call: ${responseMap}") } }) }This function:
- sets up an XDM dictionary
xdmData, containing the ECID to identify the profile for which you have to present the A/B test, and - defines a
decisionScope, an array of locations on where to present the A/B test.
Then the function calls two API’s:
Optimize.clearCachedPropositionsandOptimize.updatePropositions. These functions clear any cached propositions and update the propositions for this profile. A proposition in this context is the experience (offer) that is selected from the Target activity (your A/B test) and which you defined in Create an A/B test. - sets up an XDM dictionary
-
Navigate to app > kotlin+java > com.adobe.luma.tutorial.android > views > TargetOffers.kt in the Android Studio navigator. Find the
fun onPropositionsUpdateAT(location: String): List<OfferItem>function and inspect the code of this function. The most important part of this function is theOptimize.onPropositionsUpdateAPI call, which:- retrieves the propositions for the current profile based on the decision scope (which is the location you have defined in the A/B Test),
- retrieves the offer from the proposition,
- unwraps the content of the offer so it can be displayed properly in the app, and
- returns the offer.
-
Still in TargetOffers.kt, add the
LaunchedEffectfunction to ensure offers are refreshed upon launching the Personalization tab.code language-kotlin // recompose the view when the number of received offers changes LaunchedEffect(offersAT.count()) { updatePropositionsAT(currentEcid, MobileSDK.shared.targetLocation.value) offersAT = onPropositionsUpdateAT(MobileSDK.shared.targetLocation.value) }
You can send additional Target parameters (like mbox, profile, product, or order parameters) in a personalization query request to the Experience Edge network, by adding them in a data dictionary when calling the Optimize.updatePropositions API. See for more information Target Parameters.
Validate using the app
-
Rebuild and run the app in the simulator or on a physical device from Xcode, using
-
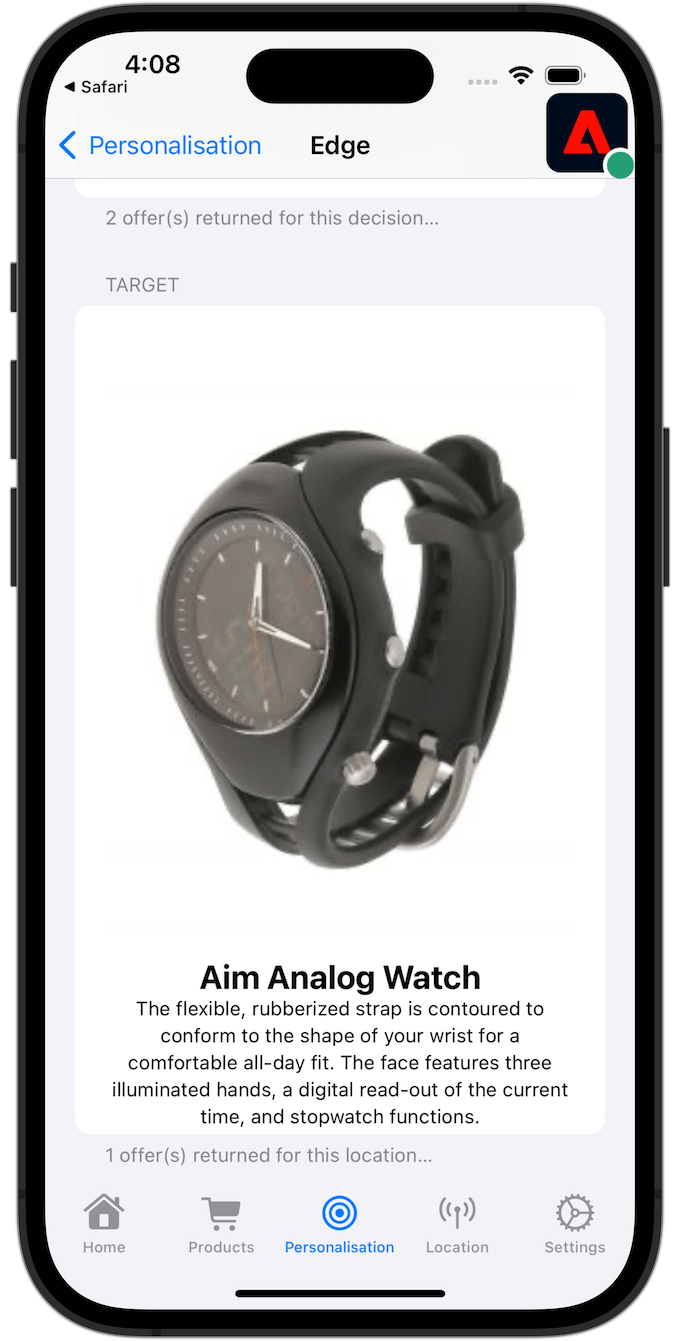
Go to the Personalization tab.
-
Scroll down to the bottom, and you see one of the two offers that you have defined in your A/B test displayed in the TARGET tile.
-
Rebuild and run the app in the simulator or on a physical device from Android Studio, using
-
Go to the Personalization tab.
-
You see one of the two offers that you have defined in your A/B test displayed in the bottom box in the TARGET tile.

Validate implementation in Assurance
To validate the A/B test in Assurance:
-
Review the setup instructions section to connect your simulator or device to Assurance.
-
Select Configure in left rail and select
-
Select Save.
-
Select Review & Simulate in the left rail. Both datastream setup is validated and the SDK setup in your application.
-
Select Requests at the top bar. You see your Target requests.

-
You can explore Simulate and Event List tabs for additional functionality that helps you to validate your Target offers setup.
Next steps
You should now have all the tools to start adding more A/B tests or other Target activities (such as Experience Targeting, Multivariate Test), where relevant and applicable, to your app. There is more in-depth information available in the GitHub repo for the Optimize extension where you can also find a link to a dedicated tutorial on how to track Adobe Target offers.
Next: Conclusion and next steps