Person Journeys
In Adobe Marketo Optimizer, person journeys are automated, multistep lead-based marketing plans that orchestrate personalized experiences across channels. These journeys use Marketo Engage data to execute these marketing plans in response to engagement, business events, or scheduled campaigns.
To build a new person journey:
- Create the person journey.
- Add the nodes and define the journey flow in the journey canvas.
- Publish the journey.
Access and browse person journeys access-and-browse-person-journeys
-
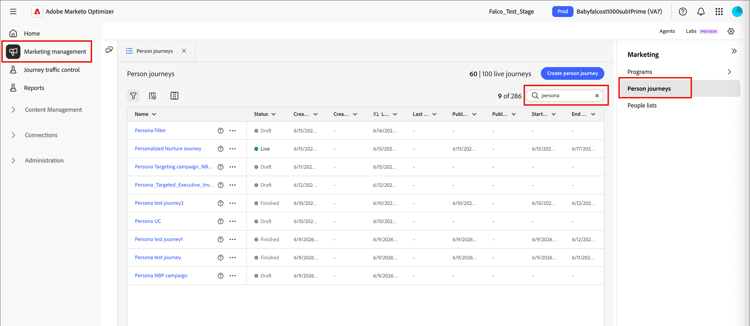
On the left navigation, expand Marketing Management.
-
On the right in the Marketing resource list, select Person journeys.
The Person journeys list is displayed as a tabbed page in the main workspace.
You can enter text in the Search tool at the top of the list to filter the displayed list by name.
-
Use the list tools to customize the displayed list:
- Click the Filter (

- Click the Customize table (

- Click the Reset columns (

- Click the Filter (
Journey list columns journey-list-columns
The journeys list page includes the following columns:
- Name (click the name to open the journey canvas for editing)
- Status
- Creation date
- Created by
- Last update
- Last updated by
- Published on
- Published by
- Start date
- End date
You can sort the list by Status, Creation date, or Last update by clicking the column header. You can grab and drag the heading borders to change the displayed column widths. In the Customize table dialog, select or clear the checkboxes and click Apply.
Journey status journey-status
The status of a journey can change based on the actions that you apply. Based on the status of a journey, certain actions are available from the right side of the header.
Create a person journey create-a-person-journey
-
Click Create Journey at the top-right of the journey list.
-
In the dialog, select the Parent program for the person journey.
-
Enter a unique Name (required) and Description (optional).

-
Click Create.
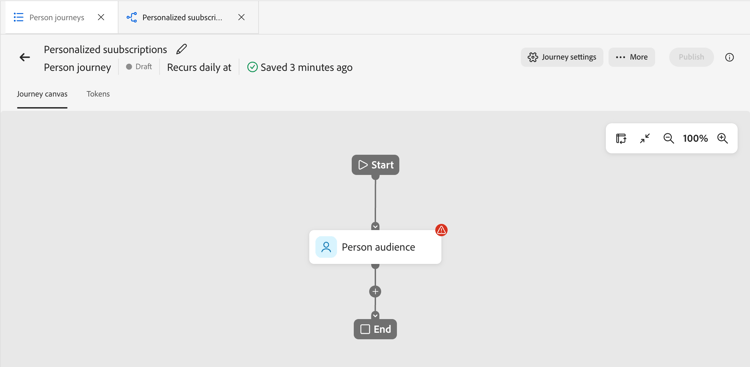
The journey canvas opens with the starting Person audience node.
Journey header journey-header
The header of each journey canvas includes the journey name, status, and schedule.

- Click the Edit icon (

- Click Journey settings to change the journey start and recurrence.
- Click … More to apply a journey action, or to enable/disable journey traffic control and re-entry.
- If all errors are resolved and you want to activate the journey, click Publish.
Journey design journey-design
The journey canvas is the central zone in the journey workspace. It is where you can add journey nodes and configure them. Click a node to open its properties in the panel to the right of the layout and set them according to your design. A person journey always starts with a Person audience node, where you can define the input for the journey.
After you create a person journey and define the person audience, build out the journey using nodes. The journey canvas provides a visual design space where you can build your multistep B2B marketing use cases using the following node types to construct the journey:
Journey management journey-management
Open the journeys list to review journey status, make changes, and take actions.
Journey actions journey-actions
The journeys list page includes all person journeys in your Marketo Optimizer instance. From the list page, you can apply a number of actions to a journey.
Publish a journey publish
You can publish a journey if there are no blocker errors. When published, the journey status changes to Live. If the journey has errors, the Publish button is dimmed with the message Resolve errors before publishing.
-
Open the draft journey from the Person journeys list.
-
At the top right of the journey canvas, click Publish.
-
In the Review journey settings dialog, set the journey start options.
If you already defined a schedule in Journey settings, review the settings.
If you need to set the journey activation, choose a schedule type:
- To activate the journey at publish time, choose Immediately.
- To activate the journey on a future date, choose On a specific date and click the Calendar icon to select the date.
-
If needed, specify the End date for the journey.
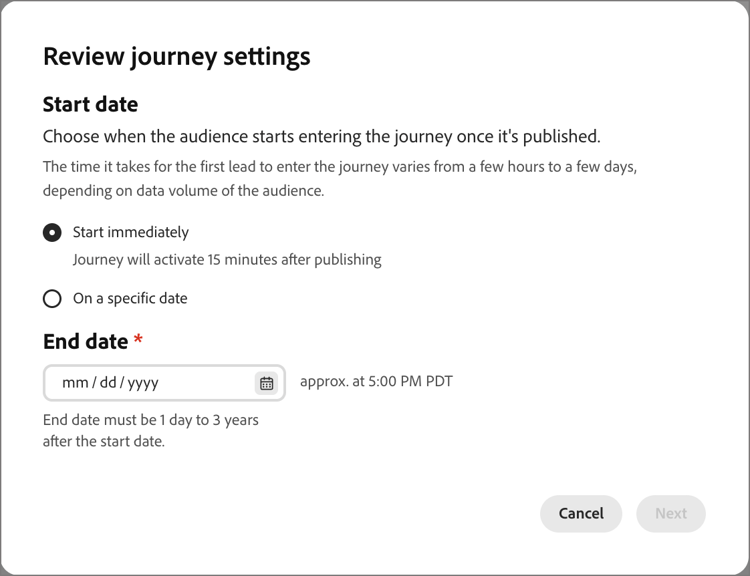
It can be a maximum of three years from the start date. This field is required to publish.
-
Click Next.
-
In the confirmation dialog, click Publish.
Abort a journey abort-a-journey
If you abort (stop) a live journey or a journey scheduled for a future start date, people in the journey immediately stop their progress, and no further journey entrance can happen. An aborted journey cannot be restarted.
-
Open the journey from the Person journeys list.
-
Click … More at the top right and choose Abort.

-
In the confirmation dialog, click Abort.
Close to new entries close-to-new-entries
If you close a live journey to new entries, people currently in the journey continue their path in that journey and no further journey entrance can happen. A closed journey cannot be restarted. You can duplicate a closed journey.
-
Open the journey from the Person journeys list.
-
Click … More at the top right and choose Close to new entries.
-
In the confirmation dialog, click Close to new entries.
Duplicate a journey duplicate-a-journey
A duplicate action is similar to a clone function, but a duplicated journey does not include any created journey content assets. You can duplicate the details for the journey, or just a simple skeleton of the flow and path structure.
-
In the Person journeys list, click the More icon ( … ) next to the journey name and choose Duplicate.
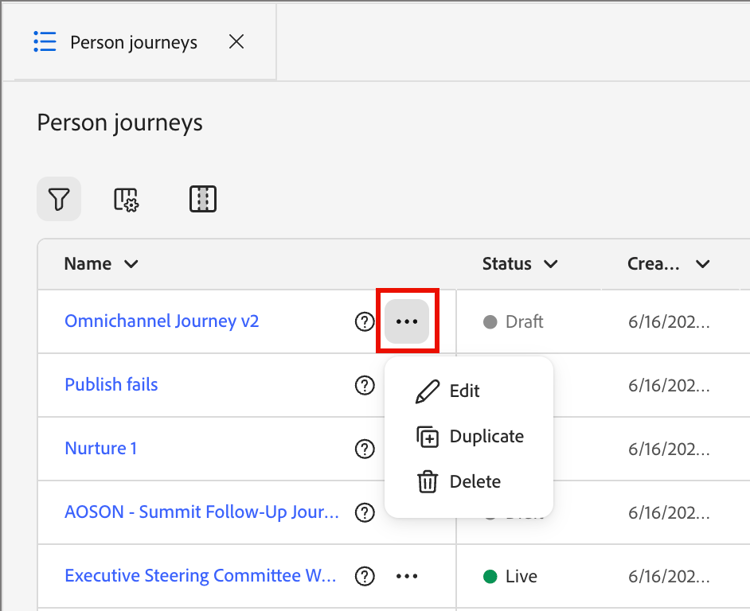
Depending on the status of the journey, you can also access the duplicate action from the journey details or journey canvas:
- For a draft journey, click … More at the top right and choose Duplicate.
- For all other journey statuses, click Duplicate at the top right.
-
In the dialog, select the Parent program for the duplicated journey.
-
Enter a unique Name (required) and Description (optional).
By default, the dialog uses the name of the originating journey appended with
_copy. Enter a different unique name for the journey as needed.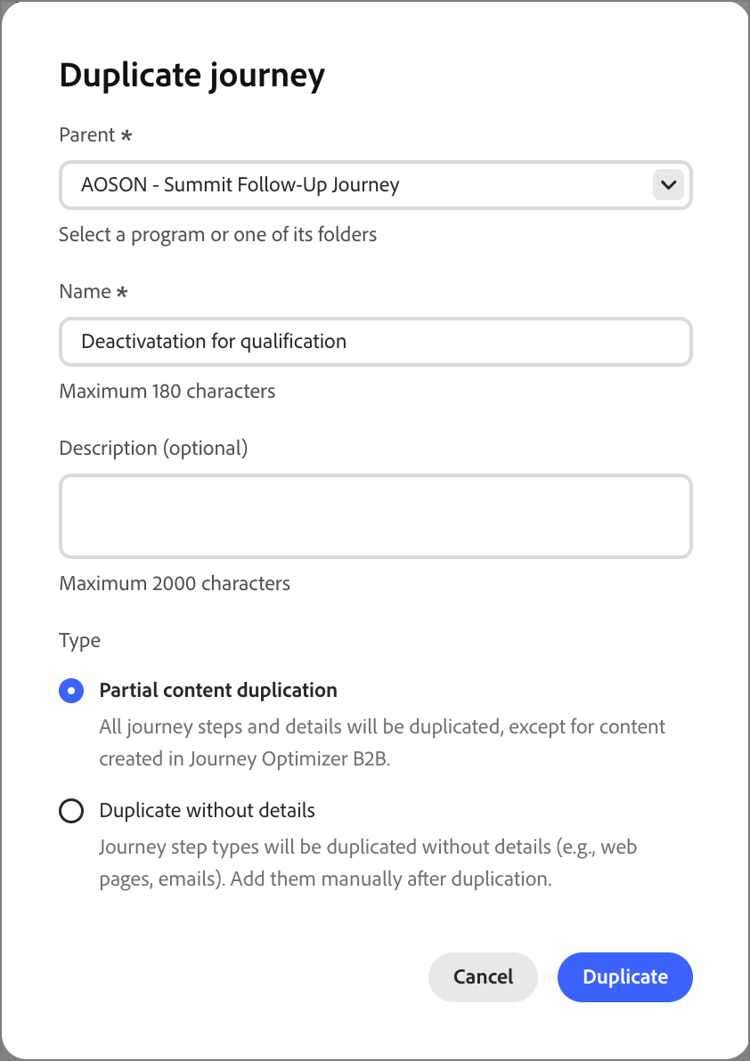
-
Choose the duplication Type:
-
Partial content duplication - Use this type to copy everything in the journey, excluding any created emails or SMS messages. Nodes that reference a Marketo Engage email or SMS message are fully intact.
-
Duplicate without details - Use this type to copy only the node structure and paths. All node settings and path conditions are undefined (default), so that you can reuse the basic flow with different audience, actions, and path segmentation settings. All Wait nodes use the default of five days.
-
-
Click Duplicate.
The duplicated journey opens in the journey canvas, where you can set the details and create journey content as needed.
Delete a journey delete-a-journey
Use a delete action to delete a journey permanently. You cannot delete a live journey or a journey scheduled for a future start date.
-
In the Person journeys list, click the More icon ( … ) next to the journey name and choose Delete.
Depending on the status of the journey, you can also access the delete action from the journey header:
- For a draft journey, click … More at the top right and choose Delete.
- For other journey statuses, such as Finished or Aborted, click Delete at the top right.
-
In the confirmation dialog, click Delete.