Journey traffic control
Journey traffic control (JTC) prioritizes the best journey for a person when audiences overlap. When a person qualifies for multiple JTC-enabled journeys, an AI model evaluates them against each candidate and adds them to the best-fit journey, holding them out of the others.
After the person completes the journey, they are re-evaluated for the remaining journeys for which they remain qualified. JTC then adds them to the next best-fit journey, and so on. This prevents the same person from being assigned to multiple overlapping journeys simultaneously and ensures each contact receives the most relevant experience first.
Scoring dimensions scoring-dimensions
The model evaluates each person journey combination across seven scoring dimensions. Each dimension is scored independently and then combined, according to the weights you configure, to produce a final match probability for that person and journey. The journey with the strongest match is selected.
Dimensions for which a person has no data are skipped automatically, so scoring is never penalized for missing attributes.
Prerequisites prerequisites
Before journey traffic control can produce results, keep the following in mind:
- Reporting requires a published, JTC-enabled journey. The Reporting tab does not show any data until at least one journey is published with journey traffic control enabled.
- Simulation requires at least one published journey in the instance. Simulation evaluates profiles that are already in live journeys, so it requires at least one published journey in the instance to draw profiles from. Simulation itself does not require JTC to be enabled (see Simulate scoring).
Get started get-started
Select Journey traffic control on the left navigation. The displayed page has two tabs:
- Reporting — View the results of traffic control runs (populated only after JTC has run on live journeys).
- Configuration — Adjust the scoring dimensions, simulate outcomes, and choose which journeys participate.
Configuration tab configuration-tab
The Configuration tab has two sections: Adjust dimension scoring and Select journeys.
Adjust dimension scoring adjust-dimension-scoring
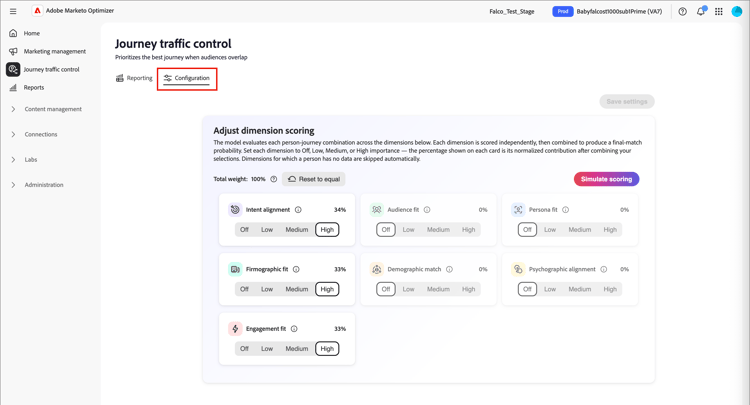
This section is where you set how much each of the seven dimensions contributes to the final match score. Each dimension can be set to Off, Low, Medium, or High importance. The percentage shown on each card is the normalized contribution of that dimension after combining all your selections — the seven weights always total 100%. Raising one dimension automatically re-normalizes the others so the total stays at 100%.
Click Reset to equal to return all dimensions to an even weighting.
Simulate scoring simulate-scoring
Before committing weights to production, you can simulate how traffic control would behave with those changes. Simulation does not require journey traffic control to be enabled. It evaluates profiles that are already in your live journeys and applies the traffic control logic to them, so you can judge whether the outcomes look right for the weights you’ve chosen.
-
Choose how many profiles to simulate.
-
Click Simulate scoring.
The results header summarizes the run:
- Profiles evaluated — how many profiles were scored, and across how many journeys.
- Average conflicts/profile — the average number of competing journeys per profile.
- Average match score — the average confidence of the selected journeys.
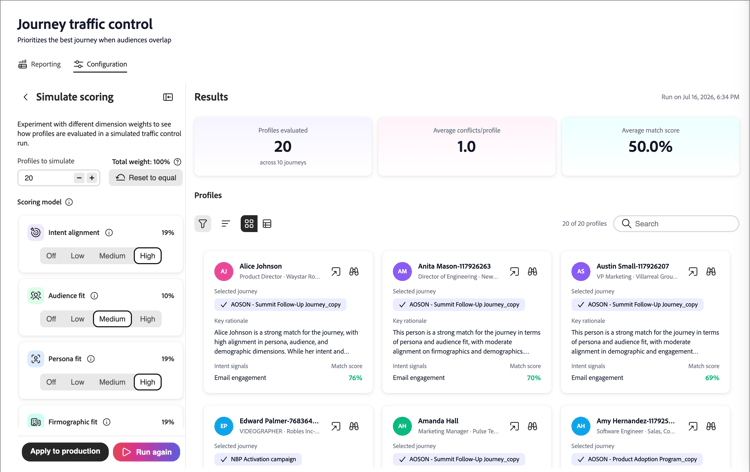
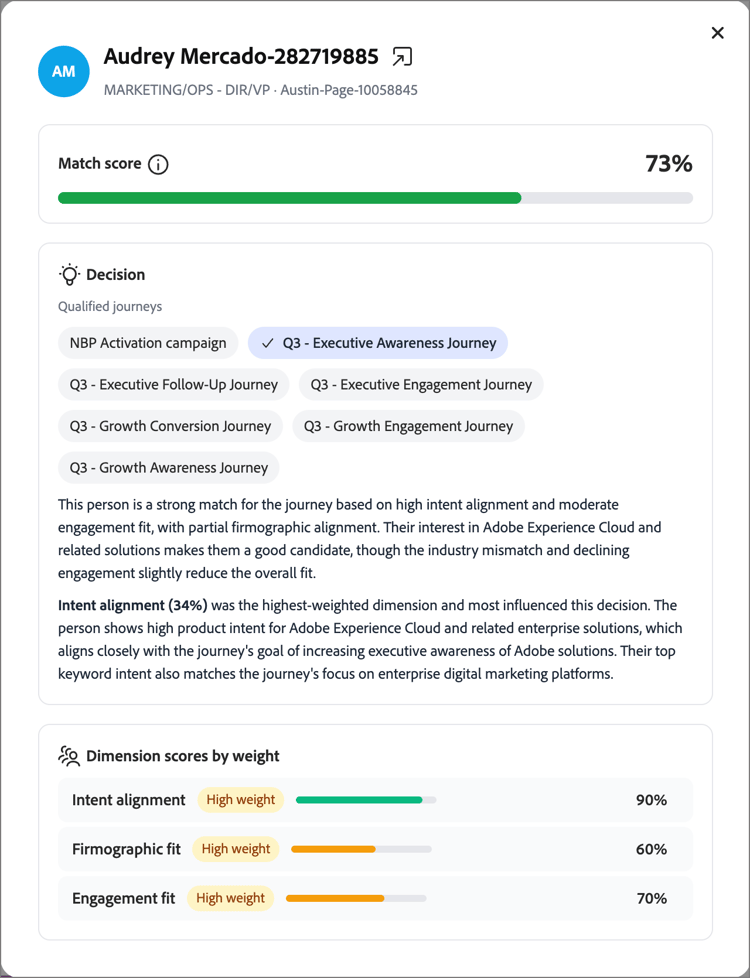
Below the summary, each evaluated profile appears as a card showing the selected journey, key rationale, intent signals, and match score. Select a profile to open a detail view with:
- Match score — The overall match, with a color-coded breakdown by dimension.
- Decision — The journeys this person qualified for, which one was selected, and why.
- Dimension scores by weight — The per-dimension scores that drove the decision, expandable to show the underlying signals.
When you are satisfied with the outcome, you can:
-
Adjust the dimension weights and click Run again to re-run the simulation.
-
Click Apply to production to commit the weights.
New traffic control decisions use the new settings immediately; past decisions are not affected. The weights you tested appear on the main Configuration tab and are used for any journeys traffic control is evaluating in your live environment.
You can also leave the page without applying the weights.
Enable traffic control for journeys enable-traffic-control-journey
When two or more journeys have journey traffic control enabled and are published:
- Any person who qualifies for one or more of these journeys is evaluated based on their profile and the journey metadata.
- If a person qualifies for several JTC-enabled journeys at once (for example, five), the model determines which is the best journey in that moment and enrolls the person into that one journey only. They are held out of the others.
- The person proceeds through that journey until it completes.
- On completion, they are re-evaluated against the remaining journeys for which they are still qualified and added to the next best one, repeating until no qualifying journeys remain.
Enable JTC for a draft journey enable-traffic-control-draft-journey
Journey traffic control can be enabled directly on an individual journey when it is in Draft status.
-
On the left navigation, expand Marketing Management.
-
On the right in the Marketing resource list, select Person journeys.
-
Click the name of the draft person journey to open it.
-
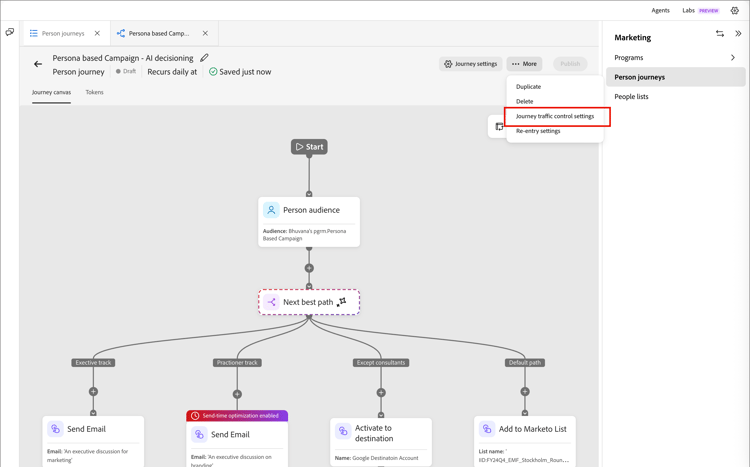
Click … More at the top right and choose Journey traffic control settings.
-
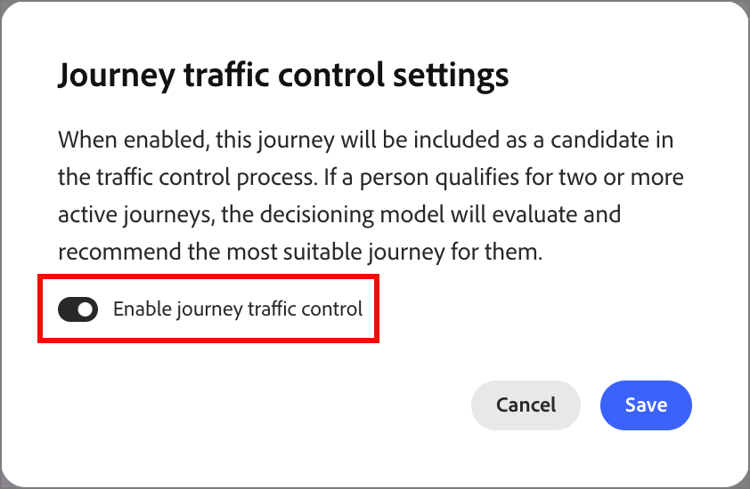
In the dialog, enable the Enable journey traffic control option.
The settings dialog explains the behavior: when enabled, the journey becomes a candidate, and the model evaluates and recommends the most suitable journey for a person qualifying for multiple active journeys.
-
Click Save.
Optimize the journey description optimize-journey-description
The traffic control agent can effectively use the metadata of a journey — the nodes in the journey, the name of the audience, and similar structural signals — to inform its decision. However, it benefits greatly from a rich, descriptive journey description that clearly states the purpose and goals of the journey.
A strong description gives the model the context it needs to make a better-informed decision about whether a person belongs in that journey versus a competing one. This matters most when a journey is very basic. For example, a journey with few nodes offers limited context, so a clear description of its goal and target audience helps the model choose correctly.
Reporting tab reporting-tab
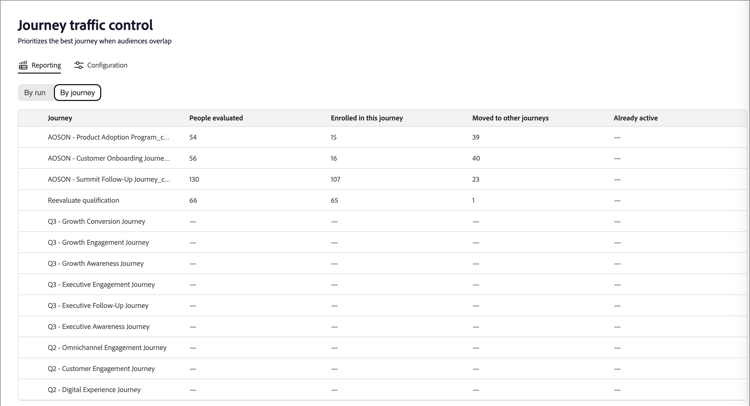
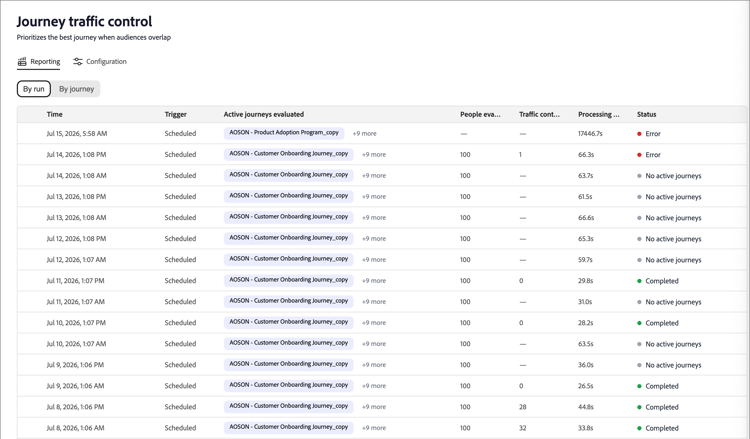
After traffic control is enabled for two or more journeys with completed runs, the Reporting tab displays the results. There are two views: By run and By journey.
By run by-run
The By run view lists every traffic control run. For each run, you can see the time, trigger (Scheduled or Manual), active journeys evaluated, people evaluated, traffic control decisions, processing time, and status. Select a run to open a detail panel with these key metrics for the run, along with the list of journeys evaluated in that run.
By journey by-journey
Use the By journey view to inspect how traffic control affected any given journey. The table shows, per journey, the number of people evaluated, enrolled in this journey, moved to other journeys, and already active.