People lists
In Adobe Marketo Optimizer, people lists are the person-level audience containers for targeting and person journey entry, with dynamic lists for rule-based live qualification and static lists for fixed or journey-managed membership.
Access and browse people lists access-browse
-
On the left navigation, expand Marketing Management.
-
On the right in the Marketing resource list, select People lists.
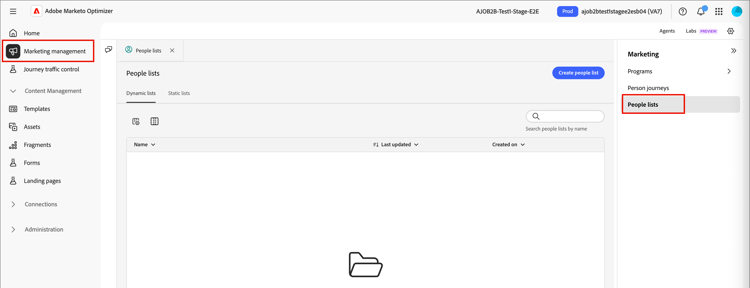
There are two tabs for the page where you can view and manage Dynamic lists and Static lists. Click the tab to switch the list view between the two types.
You can enter text in the Search tool at the top of the list to filter the displayed list by name. Use the list tools to customize the displayed list:
- Click the Customize table (

- Click the Reset columns (

From this space you can also:
- Create new dynamic and static lists
- Access lists to review current membership
- Apply membership filters
Create a people list create-people-list
-
Click Create list at the top right of the People lists page.
-
In the dialog, select a program as the Parent for the list.
-
Enter a Name (required) and Description (optional) for the list.
-
Choose the list Type:
- Static - Membership is determined by qualifying filters evaluated when you create the list. The list membership does not update unless you manually qualify or disqualify records.
- Dynamic - Membership is dynamically determined by qualifying filters. The list membership refreshes automatically.

-
Click Create.
Static lists static-lists
Static list membership is defined by simple filters that reference people attributes and activities. Membership does not change unless you manually qualify or disqualify members.
Add members static-list-add-members
-
Open the static list and click Add people at the top right.
-
In the dialog, define the rules for qualifying your leads by dragging and dropping filters from the left.
You can filter people using any combination of:
- Activity history
- Company attributes
- Person attributes
- Special filters such as journey membership
For each filter that you add, click Add constraints to refine the matching criteria for the filter.

-
To save your changes, click Done.
-
Select the Members tab.
After a brief time, qualifying members appear in the list.

Remove members static-list-remove-members
-
Open the static list and click Remove people at the top right.
-
In the Remove people dialog, add the filters to match members that you want to disqualify.

-
To save your changes, click Done.
-
Select the Members tab.
After a brief time, the disqualified members leave the list.
Activate to a destination static-list-activate
When you activate a static list, it is actionable in downstream systems, with ongoing sync instead of manual exports. This is useful for paid media targeting, suppression, and downstream orchestration.
- The static list acts as a container for the people.
- The activation sends/syncs that membership to a destination.
- The destination can then do something with those people, such as target them on LinkedIn or remove them from an external audience.
Because the activation model is meant to be persistent, not a one-time export:
- People added to the list later are propagated automatically.
- People removed later are deactivated automatically.
- Marketers avoid repeated CSV exports and manual uploads.
- Journeys can refresh the audience over time for ongoing orchestration.
-
Select the Static lists tab.
-
Locate the static list that you want to activate to a destination.
-
Click the More menu ( … ) icon next to the list and choose Activate to destination.

You can also open the static list and use the More menu at the top right.
-
Select the check box for the configured destination connection.
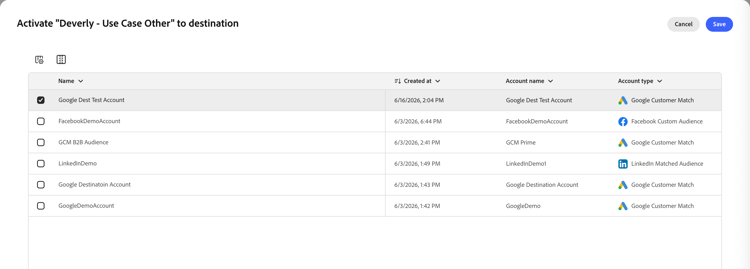
-
Click Save.
-
Confirm the activation in the Activate list to destination dialog by clicking Activate.
When activation completes, a confirmation appears (The destination has been activated.) and the destination is listed as Active on the Destinations tab of the list. A static list can be activated to more than one destination at a time; membership syncs to all of them.
To review the destinations that a static list is activated to, open the list and select the Destinations tab. By default, a new list has no destinations connected.
Deactivate a destination deactivate-destination
-
Open the static list and select the Destinations tab.
-
Click the minus ( – ) icon on the row of the destination that you want to remove.
-
Confirm in the Deactivate destination dialog.
Deactivating removes the destination from the list. The people in the list are also removed from the connected destination audience.
Dynamic lists dynamic-lists
Dynamic list membership is defined using simple filters that reference people attributes and activities. Membership is automatically maintained by qualifying and disqualifying leads according to the filter logic.
Set membership rules set-membership-rules
-
Open the dynamic list and select the Rules tab.
-
Click the Edit rules.

-
In the dialog, define the rules for qualifying your leads by dragging and dropping filters from the left.
You can qualify leads for the list using any combination of:
- Activity history
- Company attributes
- Person attributes
- Special filters such as journey membership
For each filter that you add, click Add constraints to refine the matching criteria for the filter.

-
To save your changes, click Done.
-
Select the Members tab.
After a brief time, qualifying members appear in the list.

To open the person details page where you can view the summary and recent activities, click the name of a person in the list.
Duplicate a dynamic list duplicate-dynamic-list
For a dynamic list, a duplicate action is similar to a clone function. Use this function to replicate the membership filtering and add it to a different program.
-
In the Dynamic lists tab, click the More menu ( … ) icon next to the list and choose Duplicate.
-
In the dialog, select the Parent program for the duplicated list.
-
Enter a unique Name (required) and Description (optional).
By default, the dialog uses the name of the originating list appended with
_copy. Enter a different unique name for the list as needed.
-
Click Duplicate.