Authenticate End Users with Your Own Identity Provider authentication
By default every action on your app is public: any LLM platform that has your MCP server URL can call it, and your handler cannot identify the end user.
Turn on authentication when an action needs to know which end user is asking — for example, to return their orders, entitlements, or account details. The LLM platform signs the user in with your identity provider (IdP), sends the resulting access token with every call, and your handler receives the verified identity.
Journey: Copy the resource identifier → configure your identity provider → turn on authentication → set an auth mode for each action → deploy → read the identity in your handler → test the protected app.
This is an advanced branch, not part of the first-run journey. Complete Create your first app automatically and Deploy your app first.
How it works
You bring your own identity provider. Your deployed app is only an OAuth 2.1 resource server — it verifies tokens that your authorization server issued. It never issues tokens, and Adobe never stores your client ID or client secret.
┌── Your identity provider ───────────────────────────────────────────────┐
│  Authorization server — you own it                                      │
│  Issues access tokens, holds the user directory, defines the scopes     │
└─────────────────────────────────────────────────────────────────────────┘
        ▲  2  user signs in, platform gets an access token
        │                                    │
        │  1  platform discovers your        │  3  every tools/call carries
        │     authorization server from      │     Authorization: Bearer <token>
        │     your app's metadata            ▼
┌── LLM platform (ChatGPT, Claude, …) ────────────────────────────────────┐
└─────────────────────────────────────────────────────────────────────────┘
                                             │
                                             ▼
┌── Your LLM App on Adobe I/O Runtime ────────────────────────────────────┐
│  Resource server — verifies the token's signature, issuer, audience,    │
│  and expiry, then enforces the auth mode you set for each action        │
│                                                                         │
│  Your handler reads the verified identity from its second argument      │
└─────────────────────────────────────────────────────────────────────────┘
Authentication is configured per environment. Stage and Production hold independent settings, so you can verify the configuration against a development IdP tenant before enabling it on Production.
Before you begin
- An OAuth 2.1 or OpenID Connect identity provider that issues JWT access tokens signed with an asymmetric algorithm. Opaque tokens and HMAC-signed tokens are not supported. See Token requirements.
- Administrator access to that identity provider, so you can register an API and a client.
- Your app deployed at least once to the environment you are configuring. The deployed MCP server URL is the value your tokens must be scoped to.
Copy the resource identifier
Your app’s resource identifier is its MCP server URL. Every access token your identity provider issues for this app must name that exact URL as its audience — that binding is what stops a token minted for another service from being replayed against your app.
- Open the App Detail page.
- Scroll to Test the app.
- Under the environment you are configuring, select Copy URL.

Keep this value: you need it in your identity provider in the next step. Paste the copied URL rather than retyping it. The audience check is an exact string match, including any path component, so a single character difference causes every token to fail validation.
Configure your identity provider
Exact steps differ by provider, but every provider needs the same four things.
- Register your app as an API (resource). Set its identifier — the value the provider puts in the token’s
audclaim — to the MCP server URL you copied. Providers label this field variously, commonly Identifier or Audience. Do not use a generic value such asapi; the identifier must be unique to this app, or a token issued for another service can be replayed against it. - Define the scopes you want to gate actions with, for example
orders:readorprofile:read. Use one scope per meaningful permission, so an action only asks for what it needs. - Support PKCE. LLM platforms send a
code_challengewithcode_challenge_method=S256on every authorization request, so your authorization server must support S256 PKCE and advertise"code_challenge_methods_supported": ["S256"]in its metadata. - Allow the LLM platform to register as a client. Supported LLM platforms create their own OAuth client against your authorization server, so enable dynamic client registration if your provider offers it. Otherwise create a public client manually and supply its client ID — and secret, only if your provider requires confidential-client authentication — during connector setup on the platform. Register the redirect URI the platform documents; for Claude’s hosted surfaces that is
https://claude.ai/api/mcp/auth_callback. Some platforms issue a distinct redirect URI for each connector the user creates, ChatGPT among them, so read the value from the connector setup screen and register it before the first sign-in. An unregistered redirect URI causes your authorization server to reject the authorization request outright.
Turn on authentication
-
In the left navigation, select Settings, then open the Authentication tab.
-
In Workspace, choose Stage or Production.
-
Turn on Enable authentication.
-
Under Core settings, enter:
- Issuer — your identity provider’s issuer URL, which is also the value it puts in each token’s
issclaim. This is required, must be HTTPS, and is also published as your app’s authorization server so LLM platforms can discover where to send users. Only one identity provider is supported per app. - Scopes supported — every scope this app’s actions are allowed to require. Mirror the scopes you defined in your identity provider.
- Issuer — your identity provider’s issuer URL, which is also the value it puts in each token’s
-
Advanced settings is optional. Set JWKS URI only when your signing keys are not where your authorization server’s metadata advertises them; otherwise the app discovers them automatically.
-
Select Save.
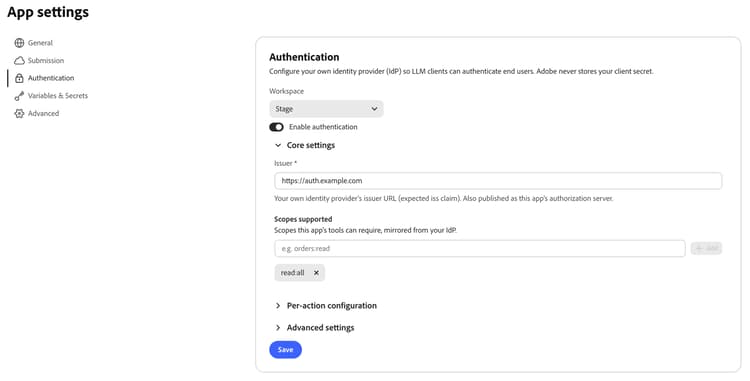
For what each field accepts, see Authentication settings.
Choose an auth mode for each action
When you turn on Enable authentication, every action currently set to None changes to Required. Under Per-action configuration, review that assignment and set the mode each action needs:
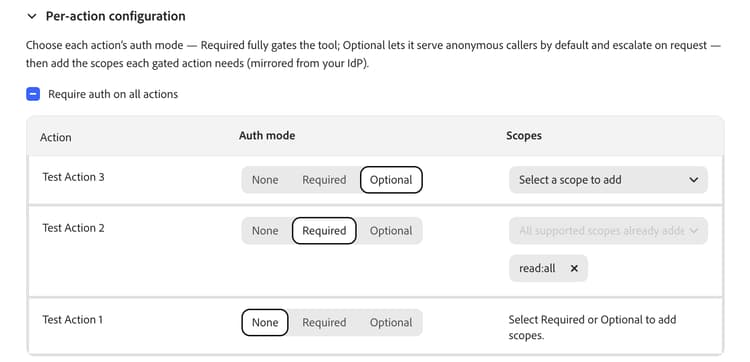
Actions already set to Required or Optional keep their existing mode.
For a Required or Optional action, add the Scopes it needs. Every scope must already appear in Scopes supported above; otherwise the app would require a permission it does not advertise to LLM platforms. Saving is blocked until the mismatch is resolved.
Scopes supported is the authority for this list. If you remove a scope from it, that scope is removed from every action that required it as soon as you make the change — so add a scope there first, then assign it to an action.
Require auth on all actions sets every action to Required. Clearing it returns every action to None.
Select Save when you are done. Auth mode and scope changes save alongside the app-level settings.
Mixing modes across one app — some actions public, others gated — is supported, and ChatGPT applies each action’s mode individually: only the gated actions prompt the user to sign in.
Deploy the change
Authentication changes take effect on this app’s next deploy. Deploy the app again to the environment you configured. See Deploy your app.
Your MCP server URL does not change, so any plugin or connector you already created continues to work. It is now gated, so its users are asked to sign in the next time they use it.
Read the identity in your handler
A verified identity reaches your handler as the second argument. It is present whenever the caller sent a valid token, regardless of the action’s auth mode, so an Optional action can personalize its result when a token is present and still return a result when it is not.
Use getAuthenticatedUser to read the signed-in user:
const { getAuthenticatedUser } = require('@adobe/llm-apps-runtime');

module.exports = async ({ orderId }, extra) => {
  const userId = getAuthenticatedUser(extra);

  if (!userId) {
    return { content: [{ type: 'text', text: 'Sign in to see your orders.' }] };
  }

  const order = await fetchOrderForUser(userId, orderId);

  return {
    content: [{ type: 'text', text: `Order ${order.id} is ${order.status}.` }],
    structuredContent: order
  };
};
You do not need to verify the token yourself. For a Required action, the runtime blocks every call that lacks a valid token carrying the scopes you listed, so the handler only ever runs for an authorized caller. Use hasScope when you want to branch on a permission rather than rely on the gate — for example, in an Optional action.
An Optional action can ask the user to sign in mid-conversation by returning extra.challengeAuth(). This is available only on Optional actions:
module.exports = async ({ signIn }, extra) => {
  if (signIn && !extra.authInfo) {
    return extra.challengeAuth({
      error: 'invalid_token',
      errorDescription: 'Sign in to see member pricing.'
    });
  }

  return {
    content: [{
      type: 'text',
      text: extra.authInfo ? await memberDeals() : await publicDeals()
    }]
  };
};
Decide whether to escalate from an explicit input parameter, as signIn does here, rather than by inspecting the user’s wording.
Set error to match the condition you are reporting. Use invalid_token when the caller has no valid session and needs to sign in, as in the example above, and insufficient_scope when the caller is already signed in but the token lacks a scope the action needs. The LLM platform chooses the wording of the prompt the user sees, and how far that wording varies with this value differs by platform — so send the code that describes the condition accurately.
Challenge only when the identity you need is genuinely missing, as the !extra.authInfo check does here. A handler that challenges unconditionally cannot be satisfied by signing in, so the user is asked to authenticate again on every call.
Keep the identity server-side. Pass only what the widget needs into structuredContent, and never put the access token there — see Customize a generated handler.
For the full contract, see Handler auth API.
Test the protected app
Your existing plugin or connector picks up the change after the deploy. To set one up from scratch:
ChatGPT
In the New Plugin dialog, set Authentication to match how you configured the app’s actions:
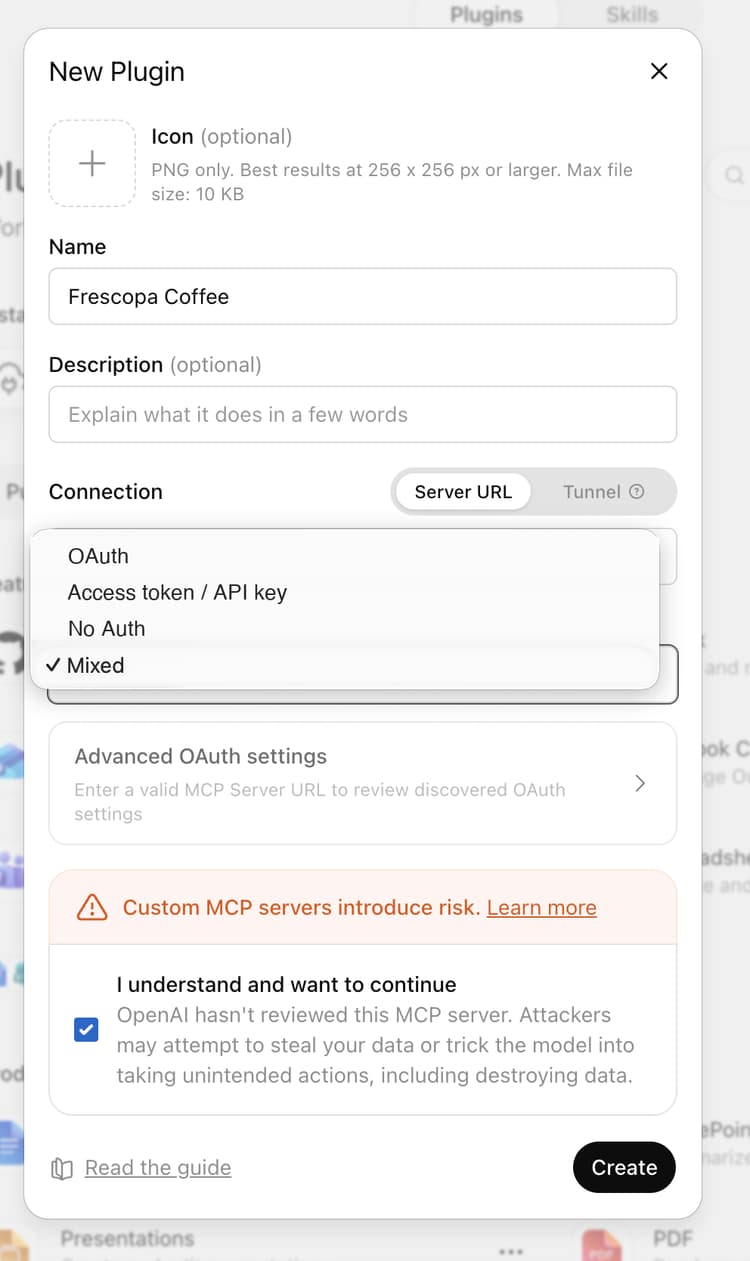
An Optional action always accepts anonymous calls, so an app that contains one is never fully gated — choose Mixed even if every action is set to Optional. Only Required refuses unauthenticated callers.
See Test the ChatGPT plugin for the rest of the dialog.
Claude
Add the custom connector, then select Connect and complete the sign-in your identity provider presents. There is no authentication choice to make — Claude gates the whole connector whenever any action is gated. See Test the Claude connector.
Verify
- The platform redirects you to your own identity provider’s sign-in page.
- A protected action returns user-specific data after sign-in.
- A protected action prompts you to sign in when you are signed out.
- On ChatGPT, an action set to None still responds without signing in. On Claude, the whole connector is gated.
If sign-in does not start, or a token is rejected, see Troubleshooting.
Security guidance
- Grant the narrowest scope that each action needs. Do not reuse one broad scope across every action.
- Keep your client secret in your identity provider and on the LLM platform’s connector configuration. Never put it in action metadata, handler code, widget JavaScript, or source control.
- Treat token claims as input from an external system. Validate anything you read out of
authInfo.extrabefore using it in a query. - Authorize as well as authenticate. A valid token proves who the user is, not that they may see a particular record — check ownership in your handler before returning data.
- Do not log tokens, complete claim sets, or user identifiers.
- Return safe errors. Do not surface upstream identity provider responses or stack traces to the user.
- Set up and verify Stage against a non-production identity provider tenant before enabling authentication on Production.
What’s next
- Authentication reference — fields, token requirements, and platform behavior.
- Customize a generated handler — call a protected upstream API from a handler.
- Deploy your app.