Advanced settings in Adobe Learning Manager
Catalog labels
Catalog Labels in Adobe Learning Manager are used to tag learning objects (courses, certifications, learning paths, etc.) with specific fields and values. These labels help you and authors categorize and organize content effectively, enabling better filtering, tracking, and reporting.
See Catalog labels in Adobe Learning Manager for more information.
- Mandatory labels: You can choose to make catalog labels mandatory for authors during course creation.
- Author workflow: Authors must add compliance labels while creating or editing courses to ensure proper categorization.
Content Folder
Content folders in Adobe Learning Manager control which authors can see and access content in the Content Library. With hierarchical content folders, administrators can organize large content libraries into up to three levels of nested private folders, making content easier to find, manage, and reuse across your organization.
What is a content folder
A content folder is a container that groups related content and determines who can access it. Every content file in Adobe Learning Manager belongs to at least one folder at all times.
There are two types of content folders:
Public folder- present in every account by default. The public folder has these properties:
- All authors in the account can access content in the public folder.
- Content in the public folder cannot be in any private folder. The reverse is also true. Content in a private folder cannot be in the public folder.
- The public folder is not part of role-based access configuration. Restricting a custom role to specific private folders does not restrict access to the public folder.
Private folders- created by administrators. Private folders support a three-level hierarchy, and their access is controlled through role configuration.
Understand folder hierarchy levels
Private content folders support up to three levels of nesting:
-
Level 1 folders- top-level folders at the root of your content library
-
Level 2 folders- subfolders nested inside a Level 1 folder
-
Level 3 folders- subfolders nested inside a Level 2 folder
This structure gives organizations the flexibility to mirror real-world content organization, by topic area, delivery type, audience, or team, rather than managing thousands of files in a flat list.
Folder naming rules
Folder names must be unique within the same level under the same parent folder. Specifically:
How folder paths appear
The Content Library displays each content file’s full folder path. For example, Training Programs / Onboarding / SCORM Assets. This path shows the complete location of the content.
If a file exists in more than one folder, all paths appear separated by commas. If a path is long, it is truncated from the beginning with an ellipsis (…), and the deepest folder name is always shown.
Role-based access to folders
Access to private folders is assigned at Level 1 only. When a custom role is granted access to a Level 1 folder, that access automatically cascades to all Level 2 and Level 3 subfolders within it. There is no option to grant access at the subfolder level independently.
The following table describes what each role can do with the folder hierarchy.
Folder structure limits
When to use a hierarchical folder structure
Hierarchical content folders are particularly valuable when your organization manages many content files and needs a structured way to navigate, reuse, and control access to them.
Common scenarios include:
-
Large content libraries: When you have thousands of content files, a three-level hierarchy lets authors navigate directly to what they need, rather than scrolling through a flat list.
-
Multiple teams or projects: Level 1 folders can separate team or project areas; Level 2 folders can be organized by delivery type; Level 3 folders can hold individual assets.
-
Role-based content separation: When different author teams should access only the content relevant to their work, the Level 1 folder access assignment keeps each team’s content private.
Real-world use cases of hierarchical content folders
Use case 1- Compliance training with jurisdiction-specific content
A global organization runs mandatory compliance training across multiple regions. Each region has core modules that apply to everyone plus jurisdiction-specific legal addendums, like data privacy regulations, local labor law, financial disclosure requirements, that vary by country or region.
Without hierarchical folders, all compliance assets sit in a flat list, making it hard for regional content teams to know which files belong to which program or jurisdiction.
With a three-level structure:
-
Level 1: Compliance Training
-
Level 2: EMEA / APAC / Americas (one subfolder per region)
-
Level 3: Specific modules or assets per region (Privacy Regulation PDFs, Local Policy Decks, Assessment files)
In cases of regional authors, being a custom role, only level 1 folder can be selected during custom role creation. Level 2 folder selection is not an option. They can find, update, and reuse only the assets relevant to their jurisdiction without seeing or accidentally modifying another region’s content.
Use case 2- Large-scale onboarding program with many roles
An organization onboards thousands of employees per year across several distinct roles: individual contributors, managers, contractors, and technical specialists. Each role has its own onboarding track with shared foundational content and role-specific modules.
With a three-level structure:
-
Level 1: Onboarding
-
Level 2: Role (Individual Contributor / Manager / Contractor / Technical Specialist)
-
Level 3: Module type (SCORM packages / ILT decks / Activity guides / Assessments)
Authors building courses for each role navigate directly to Level 2 and find the exact files for that track. When a module is reused across roles, such as a company values video, it can be copied or linked into multiple folders without creating duplicates. The content stays single-source but appears in all the relevant branches.
Use case 3- High-volume technical skills library with multiple content teams
A technology company maintains an internal skills training library with thousands of content files across product lines, cloud infrastructure, developer tools, security, and data engineering. Multiple author teams contribute, each responsible for one product area. Course modules can run 40–60 files per course.
Without hierarchy, all thousands of files sit in a handful of top-level folders, and authors from different teams frequently pick the wrong file version or accidentally overwrite shared assets.
With a three-level structure:
-
Level 1: Product Area (Cloud / Dev Tools / Security / Data Engineering)
-
Level 2: Course Name
-
Level 3: Asset Type (Videos / PDFs / SCORM / Quizzes)
Each product team is granted access only to their Level 1 folder. Finding a specific quiz for a specific course means navigating to exactly the right Level 3 folder rather than searching across thousands of files. When the security team updates a SCORM package, they know it lives in Security > [Course Name] > SCORM and can’t accidentally land in another team’s branch.
Manage content folders as an administrator
As an administrator in Adobe Learning Manager, you create and maintain the content folder hierarchy, control which custom roles have access to specific folders, and manage folder names and deletions. Authors can add content to folders and organize content within the hierarchy, but only administrators can create, rename, or delete folders.
Create a content folder
- Sign in to Adobe Learning Manager as an administrator.
- In the left navigation, select Configure > Settings.
- Under the Advanced section, select Content Folder.
- Select Add in the upper-right corner of the page. The Add New Folder dialog opens.
- Enter a name and an optional description for the folder.
- Select Save. The folder is created and appears in the folder list.
Create a sub-folder
- On the Content Folder page, locate the parent folder.
- Select the Create subfolder option next to the folder name.
- Enter a name and an optional description for the subfolder.
- Select Save. The subfolder appears indented below its parent in the folder list.
Rename a folder
- On the Content Folder page, select the folder you want to rename. The folder opens in edit mode.
- Update the folder name and, if needed, the description.
- Select Save. The folder is saved with the new name.
Delete a folder
Before deleting, be aware of the following rules:
- You can delete an empty folder at any level.
- Only empty folders can be deleted. Folders that contain content cannot be deleted, regardless of whether the content is linked to other folders or not.
- Deleting a parent folder deletes all its subfolders, provided the folder and all of its subfolders are empty. Selecting a parent folder automatically selects all its children.
Delete the parent folder
- On the Content Folder page, select the checkbox next to each folder you want to delete.
- Select Actions > Delete Folder in the upper-right corner of the page.
- Confirm the deletion when prompted. All subfolders inside the parent folders are also deleted.
Delete a sub-folder
- On the Content Folder page, select the checkbox next to the subfolder you want to delete.
- Select Actions > Delete Folder in the upper-right corner of the page.
- Confirm the deletion when prompted. The subfolder is deleted.
Configure folder access for custom roles
You can restrict custom roles to specific Level 1 folders so that custom administrators and authors with those roles see only the content relevant to them.
Access is set at the Level 1 folder level only. When you grant a custom role access to a Level 1 folder, that role automatically gains access to all Level 2 and Level 3 subfolders inside it. You cannot assign access at the subfolder level independently.
- In the left navigation, select Users > Custom Roles.
- Open the custom role you want to configure or create a new one.
- Under Account Privileges, locate the Content Folders section.
- Select Selected Folders.
- Select the Level 1 folders this role should have access to.
- Select OK.
Users with this role see only the content in the selected Level 1 folders and their subfolders. Content in other private folders and in the public folder remains inaccessible to them.
Best practices
The following practices help you build a folder structure that scales well and remains easy to navigate.
-
Plan your structure before creating folders. Once content is organized into a hierarchy, restructuring requires moving large volumes of content. Decide on your Level 1 categories, such as product lines, departments, or training programs, before you begin.
-
Use three levels for meaningful groupings. A common pattern is: Level 1 for a broad domain or program, Level 2 for delivery type or team, Level 3 for individual assets. For example:
-
Level 1: Sales Training
-
Level 2: Self-Paced Modules
-
Level 3: PDF Assets
-
-
Keep names short, descriptive, and unique within their parent. Avoid generic names like “Module 1” or “Content.” Use identifiers that make sense to the authors browsing the library.
-
Assign custom role access at Level 1 only. Because access cascades automatically, assigning at Level 1 is sufficient and keeps access management simple. You do not need to update access when you add Level 2 or Level 3 subfolders.
Holidays
The Holidays setting in Adobe Learning Manager lets you define organization-wide holidays. Holidays appear on the Instructor calendar as non-working days, affecting instructor availability when scheduling Live
Hub sessions.
Key points
Holidays are a set of non-working days maintained at the account level, with the following properties:
-
Only the Administrator can add, edit, or delete holidays.
-
Holidays apply organization-wide and appear on every instructor’s calendar as non-working days.
-
Because holidays mark instructors as unavailable, Live Hub sessions cannot be scheduled on those dates.
-
Each holiday requires a date and a name; a description is optional.
-
You can add holidays one at a time or import multiple holidays at once using a CSV file.
-
Once added, holidays appear on the Holidays page, where you can view, search, and manage them.
View Manage Holidays for more information.
Classroom Locations
Create and manage a library of physical or virtual classroom locations. These locations can be used by authors and administrators to set up instructor-led training (ILT) events. The feature ensures that classroom details, such as seat limits and location information, are pre-configured and easily accessible.
See Add classroom locations in Adobe Learning Manager for more information.
Reports
This section allows you to configure Compliance and Group Success dashboards.
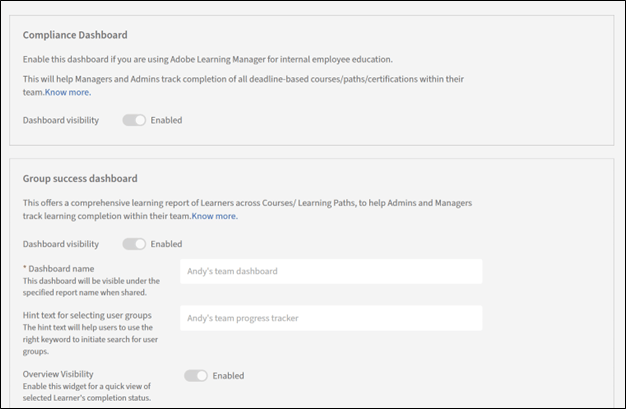
See the following for more information: