On this page: Learn how to use the Load file data management activity to target an Orchestrated campaign audience from an external CSV or TXT file at execution time, without ingesting the file into Adobe Experience Platform.
The Load file activity is a Data Management activity. Use it to work with profiles and data stored in an external file. It supports file-based targeting in Orchestrated campaigns when your recipient list comes from an external system (for example, a CRM export or a partner file) and you want to run a campaign without building a full Adobe Experience Platform ingestion pipeline first.
During file setup, you can define column mappings, data types, NULL handling, and per-column error policies. Rows that fail validation are rejected and logged before the campaign runs, keeping the audience clean without manual pre-processing.
Guardrails and limitations limitations
The following limitations apply to the Load file activity:
- You can upload up to 50 MB per file.
- Only flat-structure CSV and TXT files are supported.
- Uploaded data is used when the campaign runs and is not stored as an Adobe Experience Platform dataset.
For limits on channel and canvas activities, see Guardrails and limitations.
Prerequisites prerequisites
Before you can add a Load file activity to an Orchestrated campaign and connect it to a message activity, an administrator must complete the following one-time setup.
To use the Load file activity in an Orchestrated campaign, users must be assigned Manage File in Orchestrated Campaigns permission.
For instructions on assigning permissions, see Manage users and roles.
Create a File-type target dimension file-target-dimension
A Profile Target Dimension of type File lets Orchestrated campaigns resolve recipients from an uploaded file instead of an Adobe Experience Platform schema. It defines the identity namespace and the identifier field used when the file audience is processed at campaign execution.
Create a target dimension from Administration > Configurations > Campaign Target Dimension. Learn more about target dimensions
When creating the target dimension for file-based targeting, make sure to:
- Set Dimension source to File.
- Select the Identity namespace that matches the identifier column in your files, for example Email.
- Enter the Identity field path. Use the file field that contains the identifier, for example
emailif your uploaded files include anemailcolumn.
Create a channel configuration for file-based delivery file-channel-configuration
Create a dedicated channel configuration that uses the File-type target dimension. This configuration is selected in the message activity that follows the Load file activity in your campaign canvas.
-
Navigate to Administration > Channels > Channel configurations and create a new configuration.
-
Under Execution details, select the Orchestrated campaigns tab and enable the configuration for Orchestrated campaigns.
-
In the Profile Target Dimension field, select the File-type target dimension created in the previous step.
-
Complete the remaining channel configuration fields and save. Learn more about channel configurations for Orchestrated campaigns
Configure the Load file activity load-file-configuration
Configure the activity in two parts: define the expected file structure with a sample file, then specify the file to load when the campaign runs.
-
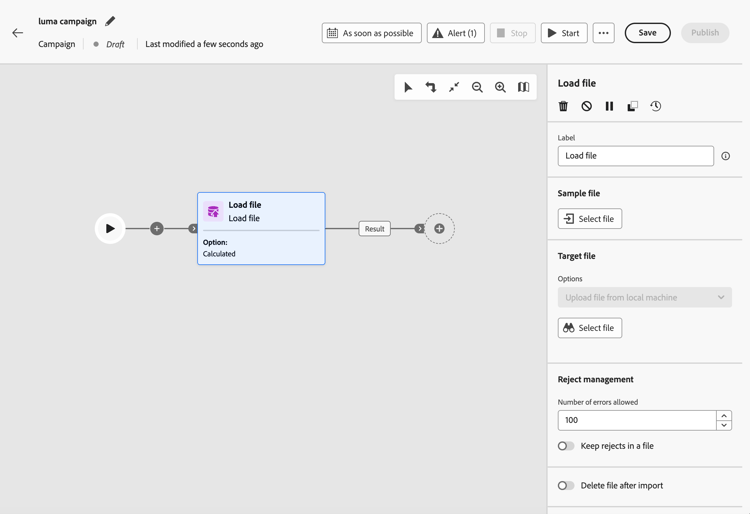
Add a Load file activity to your Orchestrated campaign canvas.
-
Enter a Label for the activity.
Define the sample file sample-file
Use a sample file to configure Columns and Formatting. The sample data is not imported as the campaign audience.
-
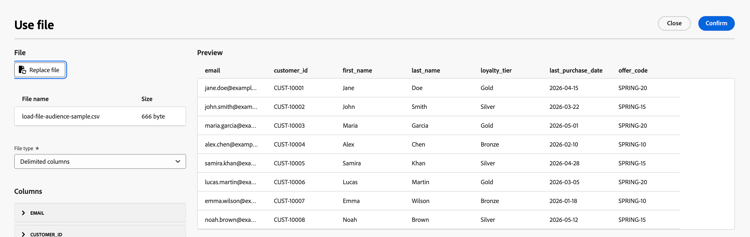
In the Sample file section, select the local file that defines the expected structure.
note NOTE The sample file is used to configure columns and formatting only, its data is not imported as the campaign audience. The format must match the files you will load when the campaign runs. -
In the File type drop-down, specify whether the file uses delimited columns or fixed-width columns.
-
In the Columns section, expand each column and configure its properties.
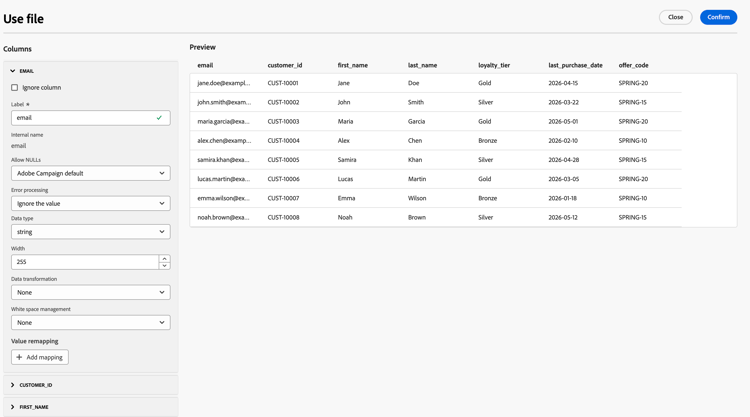
After you select a Data type, additional options appear for that type. Expand the sections below for parameters common to all columns and for type-specific options.
accordion Common column parameters -
Ignore column — Exclude the column from the import when selected.
-
Label — Display name for the column (for example,
email). -
Internal name — System name for the column, derived from the file header (read-only).
-
Data type — Type of data in the column.
-
Allow NULLs — Specifies how to manage empty values in the column:
- Adobe Campaign default — Generates an error for numerical fields only. Otherwise inserts a NULL value.
- Empty value allowed — Authorizes empty values. The value NULL is therefore inserted.
- Always populated — Generates an error if a value is empty.
-
Error processing — Defines the behavior if an error is encountered in the column:
- Ignore the value — The value is ignored.
- Reject the line — The entire line is not processed.
- Use a default value in case of error — Replaces the value causing the error with a default value, defined in the Default value field.
- Use a default value in case the value is not remapped — Replaces the value causing the error with a default value, defined in the Default value field, unless a mapping had been defined for the erroneous value.
- Reject the line when there is no remapping value — The whole line is not processed unless a mapping had been defined for the erroneous value.
-
Default value — Default value to use when Error processing is set to use a default value.
-
Value remapping — Map specific values to new ones. Click Add mapping to define each mapping (for example, replace
True/Falsewith1/0).
accordion String columns parameters - Width — Maximum number of characters.
- Data transformation — Case transformation applied to string values (for example, none or upper/lower case).
- White space management — How to handle leading or trailing spaces in string values.
accordion Integer and floating number columns parameters -
Format — Defines how numerical values in the file are read:
- Other — Define the Thousand separator and Decimal separator in the Separators section.
- 1,000.00 — Comma as thousands separator and period as decimal separator.
- 1 000,00 — Space as thousands separator and comma as decimal separator.
-
Separators (when Format is Other):
- Thousand separator — Character that groups thousands in numeric values (leave empty if not used).
- Decimal separator — Character used for the decimal portion of numeric values (for example,
,or.).
accordion Date and time columns parameters Options depend on whether Data type is Date, Time, or Date and time.
Date
-
Date format — Pattern that matches how dates appear in the file (for example,
yyyy/mm/dd). -
Separators:
- Year, month, day — Character between the year, month, and day components (for example,
/).
- Year, month, day — Character between the year, month, and day components (for example,
Time
-
Time format — Pattern that matches how times appear in the file (for example,
13:30for 24-hour hours and minutes). -
Separators:
- Hour, minute, second — Character between the hour, minute, and second components (for example,
:).
- Hour, minute, second — Character between the hour, minute, and second components (for example,
Date and time
- Date format — Pattern that matches how the date portion appears in the file.
- Time format — Pattern that matches how the time portion appears in the file.
- Separators — Characters between date and time components.
-
-
In the Formatting section, specify how the file is structured so rows and columns are read correctly when the campaign runs. The target file must use the same formatting as the sample file.
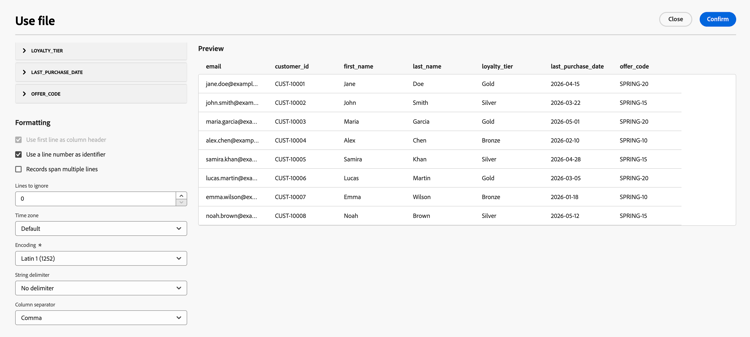
- Use first line as column header — When selected, the first line of the file is treated as column names. This option is typically enabled when you configure the sample from a file that includes a header row.
- Use a line number as identifier — When selected, each row is identified by its line number in the file.
- Records span multiple lines — When selected, a single record can span several lines in the file (for example, when fields contain line breaks).
- Lines to ignore — Number of lines to skip at the beginning of the file before data is read (for example, comment or metadata lines).
- Time zone — Time zone applied when date and time values are imported.
- Encoding — Character encoding of the file. Select the encoding that matches your source file.
- String delimiter — Character used to enclose string values in the file.
- Column separator — Character that separates columns in a delimited file.
-
Click Confirm to validate the sample file configuration.
Define the target file target-file
Specify the file to load at campaign execution and how each row is matched to existing recipients.
-
In the Target file section, select the CSV or TXT file containing the audience to target.
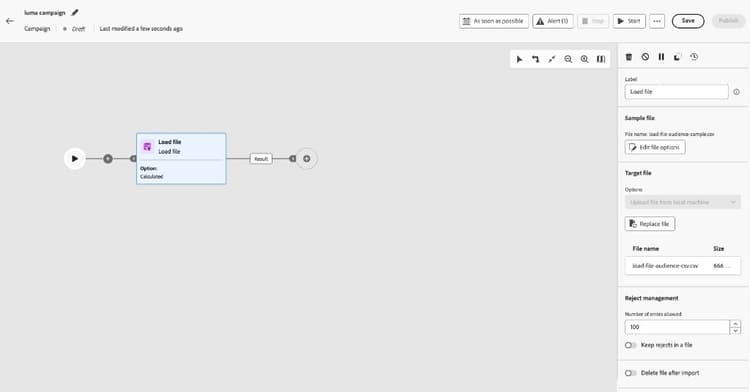
note caution CAUTION Ensure the target file follows the same format, column structure, and number of columns as the sample file. -
In the Reject management section, define how the activity behaves when errors occur during file processing:
- Number of errors allowed — Maximum number of errors permitted before the activity fails.
- Keep rejects in a file — When enabled, rows that could not be loaded are written to a reject file on the server for review after execution.
-
Optionally, enable Delete file after import to remove the uploaded file from the server after the campaign runs.
After Load file resolves the audience, connect the outbound transition to downstream activities. Learn how to orchestrate campaign activities