[AEM Assets]{class="badge positive" title="Applies to AEM Assets)."}
Manage collections in Content Hub manage-collections
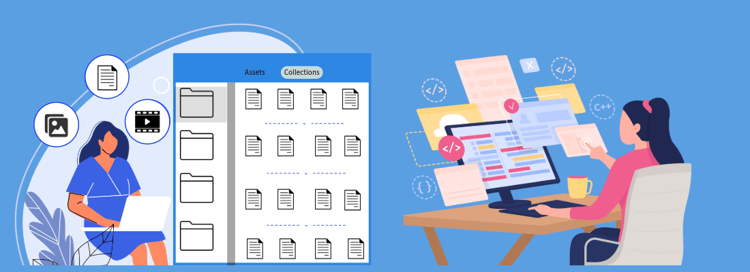
A collection is a curated set of assets that can be shared among users. A collection can include assets drawn from different locations while maintaining their referential integrity, meaning each asset stays linked to its original source and metadata even when grouped together.
Content Hub enables you to create public collections. These collections are accessible to all entitled users, creating a shared space where multiple users can efficiently access and utilize content. Collections promote the collaborative use of resources, functioning as a centralized workspace that increases efficiency and convenience across teams. Within the collection browse page, you can:
- Create: Create one or more collections to organize related assets in a single place.
- View: View the assets and their properties to evaluate content before use.
- Share: Share assets as a link with others, enabling quick distribution without transferring files.
- Download: Download the assets for local use.
- Remove: Remove specific assets from a collection without deleting them from Content Hub.
- Delete: Delete the entire collection when it is no longer needed.
- Pin/Unpin: Pin or unpin a collection to keep frequently used sets readily accessible.
- Favorite: Mark a collection as favorite for faster future retrieval.
Collections help users easily access and manage the diverse assets available within Content Hub.
Prerequisites prerequisites
Before performing the procedures in this article, ensure the appropriate access requirements are met.
Content Hub users are authorized to perform all actions described in this article. Only accounts that have been onboarded as Content Hub users have the permissions required to complete the tasks and procedures covered here. This role-based prerequisite ensures that the necessary access rights are granted before you begin, because the workflows in this article depend on the capabilities assigned to onboarded Content Hub users.
If you have not yet been set up with this access, complete the onboarding step first so that you can perform each of the actions that follow.
Create collections create-collections
A collection is a grouping of related assets that you organize and manage together, making it easier to apply consistent controls across those assets. Collections are a core tool for asset governance, because grouping assets streamlines how policies, access, and oversight are applied at scale rather than to individual items one at a time.
While managing governance, two options are available:
- Create a new collection — start a fresh collection to group related assets from the outset.
- Add assets to an existing collection — extend an already-defined collection with additional assets.
Choosing either option during governance management ensures assets remain organized and consistently governed. Grouping assets into collections supports clearer oversight, simplifies the application of governance policies, and reduces the effort required to manage large sets of assets.
Create a new collection create-new-collection
Follow the steps below to create a collection and set access controls that determine who can view and edit its contents. Choosing the right access level at creation time establishes clear collaboration boundaries and protects sensitive assets from unintended edits.
-
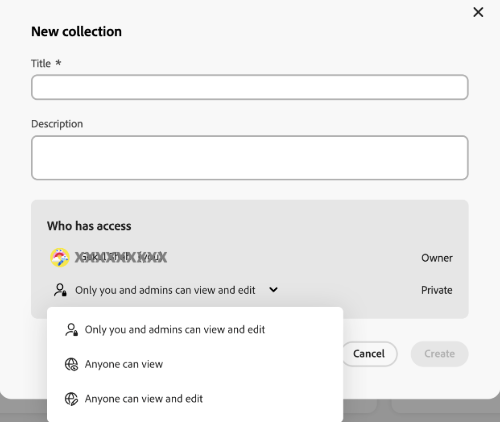
Go to the Collections tab and click Create Collection. A new Collection window appears.
-
Add a Title and Description for the collection so it is easy to identify and organize later.
-
Under the Who can access dropdown, select the access control type that matches your collaboration and security needs. The following options are available:
table 0-row-3 1-row-3 2-row-3 3-row-3 Access method Access type Description Only you and administrators can edit Private Only the creator and the administrators can edit and access this collection. Choose this option to keep the collection restricted while it is being built or when its contents are confidential. Anyone can view Public Everyone can access this collection, but only the creator and administrators can edit. Choose this option to share finalized assets broadly while preserving control over changes. Anyone can view and edit Public This collection is open to everyone, with full access and editing permissions granted without restrictions. Choose this option for open, collaborative work where any user can contribute. note NOTE A Content Hub administrator can view all the options available under the Who can access dropdown. For regular users, you must specify and configure which options they can access. -
Click Create. Once the collection is created, add assets to the collection.
Add assets to an existing collection add-assets-to-existing-collection
Adding assets to an existing collection takes a few clear steps. Follow the numbered procedure below to move one or more selected assets into a collection you have already created:
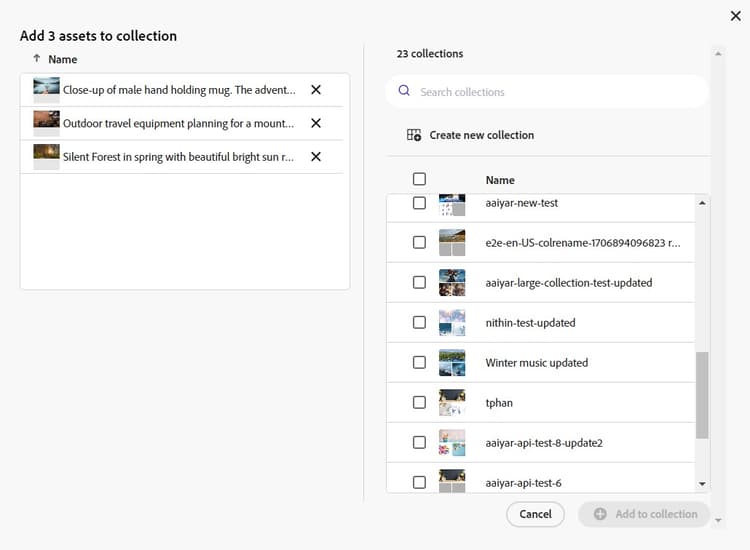
- Select the assets you want to add to the collection.
- Click Add to collection. A dialog opens, prompting you to select the target collection.
- Choose the collection where you want to add the assets. When you have many collections, use the search bar in the dialog to locate the correct collection quickly instead of scrolling through the full list.
- Select the collection(s) to which you want to add the assets, then click Add to collection to confirm.
Once you confirm, the selected assets are added to the chosen collection(s), and they become accessible from within each collection alongside its existing assets.
View collections view-collections
Use the Collections tab to locate, open, and browse the assets grouped within a collection in Content Hub. Collections organize related assets together, so filtering and drilling into them lets you find the exact content you need without scrolling through the entire asset library.
Find a collection find-a-collection
- Navigate to the Collections tab.
- Search for the collection by name.
- Apply filters to refine your search results by selecting specific criteria. Filtering narrows a large set of collections to the most relevant matches, which quickly surfaces the most relevant collections.
View assets within a collection view-assets-within-a-collection
- Click the collection name to open the list of assets available in that collection.
- Apply filters within the collection to narrow down the asset results. Filtering inside a collection helps you locate a specific asset faster, which is especially useful when a collection contains a large number of assets.
- Click the asset you want to view within the collection.
Content Hub then displays the detailed view for the selected asset, where you can review its properties. See asset details.
Filter collections view filter-collections-view
Content Hub lets you filter the collections view to quickly locate a specific collection by narrowing options based on ownership and access preferences. Filtering is especially useful when you manage a large number of collections, because it reduces the visible list to only those that match your selected ownership or permission criteria. Before you begin, ensure the configuration of Collections in Content Hub is complete.
Filter by ownership and access level
To filter the collections view by ownership and access level, follow these steps:
-
Go to the Collections tab.
-
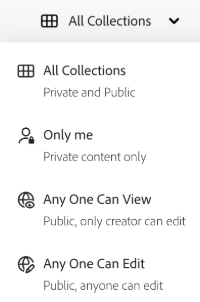
Navigate to the Collections drop-down.
-
Choose one of the following options:
- All Collections: Select this option to view and edit all collections, including those that are private or shared with you. Use this when you want the broadest possible view across every collection available to you.
- Only me: Select this option to view collections that are accessible to you. Use this to focus on the collections tied to your own access without seeing broadly shared ones.
- Anyone can view: This option filters collections that are accessible to everyone but editable only by the creator. Use this to identify read-only shared collections where editing rights remain with the original creator.
- Anyone can edit: Select this option to filter collections that are both accessible and editable by everyone. Use this when you need collections that any user can open and modify.
Filter by collection creator
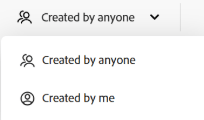
To filter the collections view based on who created each collection, go to the Collections tab and navigate to one of the following options:
-
Created by anyone: This filter restricts the view to collections created by any user. Use this when you want to see collections regardless of their creator.
-
Created by me: This filter restricts the view to collections created by you. Use this to isolate only the collections you personally created.
Download assets available within a collection download-assets-within-collection
Content Hub provides two methods to download assets stored within a collection: downloading the entire collection at once or downloading individual assets selectively. Choose the method that matches whether you need the complete set or only specific files.
Download the entire collection
To download all assets available within a collection, navigate to the Collections tab.
Click the

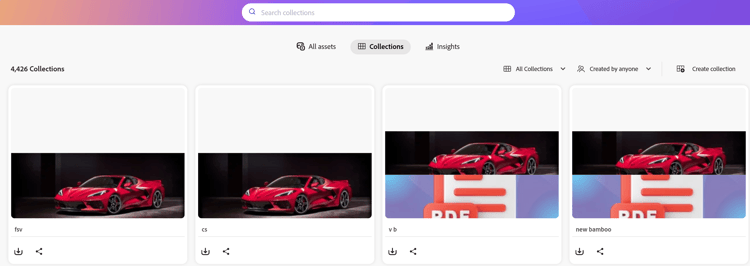
This downloads every asset in the collection in a single action, making it the fastest method when you need the complete set of files at once.
Download individual assets from a collection
Open the collection to download specific assets individually. Unlike the bulk download method, this approach lets you select only the files you need:
- Click the collection containing the assets that you need to download.
- Select the assets you want to download.
- Click Download.
The selected assets are downloaded, giving you control over exactly which files are retrieved.
Learn how to download an asset from the Content Hub.
Share assets available within a collection share-assets-available-within-collection
You can share the assets available within a collection directly from the collection view. Before sharing, enable public link sharing in Content Hub (see Configure Content Hub UI options).
To share an asset from within a collection, follow these steps:
- Navigate to the Collections tab.
- Select the

- Content Hub copies the share link automatically.
- Share the copied link with the intended recipient.
Learn more about sharing assets in the Content Hub.
Governance and Access Control for Shared Assets
Content Hub Collections provides comprehensive governance tools for effective asset management, including customizable sharing permissions and collaboration features that let teams control exactly who can view or modify shared assets. These permissions range from read-only access to full administrative control, supporting fine-grained governance over how assets are distributed across users and teams.
When sharing an asset—either individually or as part of a collection—the scope of access is determined by, and inherited from, the collection’s current access level assigned to the user. As a result, a recipient can only access an asset within the boundaries the collection’s access level already permits, ensuring that sharing never grants broader access than the collection itself allows.
You cannot share a private collection. Private collections are excluded from sharing to preserve the confidentiality of their assets, so any content you intend to distribute must reside in a collection with public link sharing enabled.
Edit details of a collection edit-details-of-collection
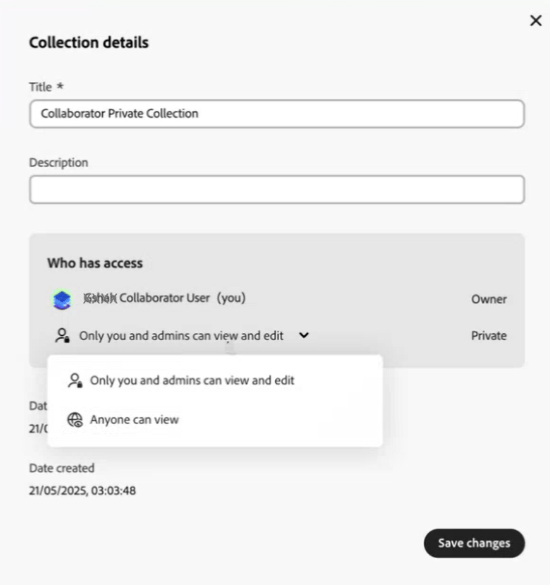
You can update a collection’s Title, Description, and—depending on your configuration—its access settings from the Collection Details screen. These edits let you rename a collection, refine its description for clarity, and control who can view or work with it.
To edit the details of a collection, follow these steps:
-
Click the collection name to open it.
-
Click the

-
Update the Title and Description fields as needed.
-
Click Save Changes to confirm the modifications. This applies and persists your edits so the updated Title and Description take effect immediately.
Moreover, you can update the access to the collection through the Edit Collection dialog. The access options available in this dialog depend on the configuration—that is, on how your account or administrator has set up permissions for the collection. This ensures that access-related edits are governed by the applicable configuration settings.
Remove assets from a collection remove-assets-from-a-collection
Administrators, collection owners, and non-admin users with edit rights can remove single or multiple assets from a collection.
Who can remove assets
The following users have permission to remove one or more assets from a collection:
- An administrator
- An owner of the collection
- A non-admin user with edit rights
Steps to remove assets from a collection
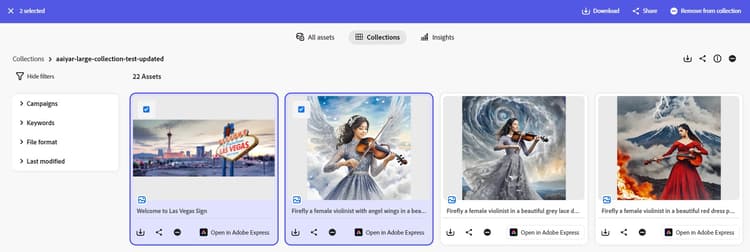
To remove assets from a collection, complete these steps:
- Open the collection from which you want to remove assets by clicking it.
- Select the assets you want to remove.
- Click Remove from collection.
- A confirmation prompt appears asking you to confirm the asset removal. This confirmation step prevents accidental removal of assets.
- Click Remove to complete the action.
The selected assets are removed from the collection successfully. Removing assets from a collection does not delete the underlying assets from the repository; it only removes them from that specific collection, so the original files remain available elsewhere.
Delete a collection delete-collection
Only administrators and the collection creator can delete a collection. This permission is deliberately restricted to these roles to prevent accidental or unauthorized data loss, since deleting a collection is a significant action that removes it from the workspace.
To delete a collection, follow these steps:
- Navigate to the Collections tab.
- Click the collection that you need to delete.
- Click the

Deleting a collection is permanent, so administrators and creators should confirm the correct collection is selected before proceeding. If a confirmation prompt appears, complete it to finalize the deletion and remove the collection from the Collections tab.
Pin or Unpin collection pin-unpin-collection
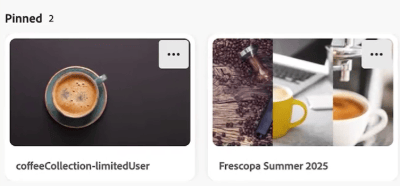
Content Hub Administrators can pin collections in Content Hub to keep frequently used collections within immediate reach. Pinned collections are displayed in a dedicated Pinned section at the top of the Collections home page, which separates high-priority collections from the rest of the library and reduces the time spent searching for them. This is especially useful when an administrator returns to the same collections repeatedly, because pinning surfaces those collections first rather than requiring a manual search each time. Administrators can pin or unpin a collection at any time by executing the steps below.
To pin a collection for quick access:
-
Browse to the collection which you want to pin.
-
Click More actions

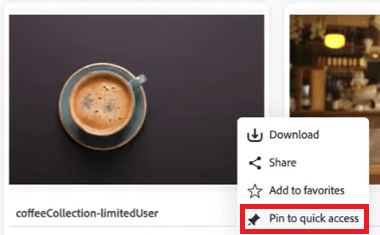
-
Click Pin to confirm. When you pin a private collection, a warning message appears, so review the message before confirming to ensure the correct collection is being pinned.
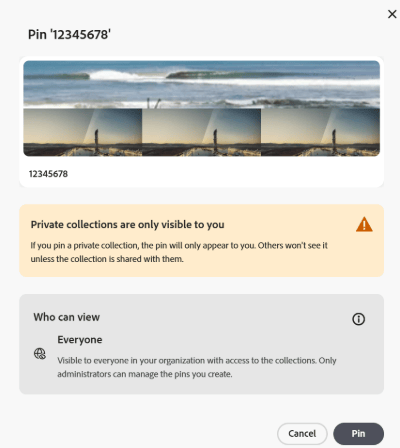
As a result, the pinned collections appear at the top of the Collections home page, ensuring quick access on every visit.
To unpin a collection:
Click More actions
Mark Collections as Favorite favorite-collection
Marking Collections as Favorite in Content Hub lets you organize and retrieve them quickly, reducing the time spent navigating between multiple Collections. Once a Collection is marked as a Favorite, it appears directly in the Favorites tab on the Content Hub home page, so frequently used Collections stay within immediate reach. You can also search assets within Favorite Collections, which streamlines asset discovery by narrowing results to the Collections you rely on most. To mark Collections as Favorites, follow these steps:
-
Browse to the Collections you want to mark as Favorites.
-
Click More actions
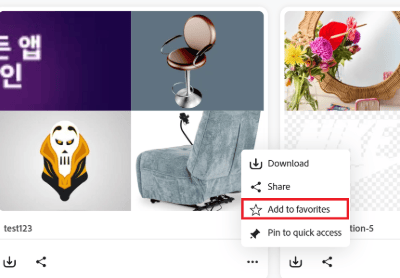
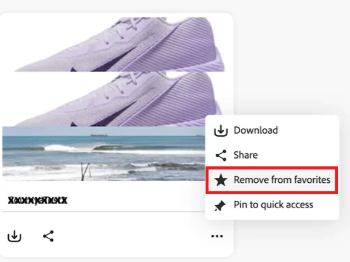
Collections marked as Favorites now display under the My Favorites tab. To remove a Collection from My Favorites, click More actions
Frequently asked questions faqs-manage-collections-content-hub
What do you refer to as collections in AEM Assets Content Hub?
A collection in Adobe Experience Manager (AEM) Assets Content Hub is a curated set of digital assets grouped together so they can be shared among users. Collections establish a shared workspace that lets teams efficiently locate, organize, and reuse content across a project or brand. In the broader context of digital asset management, collections function much like flexible folders or playlists — a way to assemble related content without moving or copying the underlying files.
Key Characteristics of Collections
- Shareable across users — a collection acts as a common access point, so multiple team members can view and work with the same grouped assets.
- Assets from different locations — a single collection can pull together assets stored in separate locations within the repository, uniting scattered content under one heading.
- Referential integrity preserved — collections reference the original assets rather than duplicating them, so each item stays linked to its source of truth. This ensures that updates to an original asset remain reflected, and it avoids the storage overhead and version confusion that duplication would cause.
Why Collections Matter
Collections streamline collaboration by giving users a single, organized space to access and utilize content. Because they consolidate assets from multiple locations while maintaining their referential integrity, collections support practical workflows such as assembling assets for a specific campaign, sharing a curated set with reviewers or stakeholders, and grouping frequently used materials for quick reuse. The result is faster content discovery and more consistent asset usage across teams working within AEM Assets Content Hub.
How can I create a new collection in AEM Assets Content Hub?
Creating a new collection in Adobe Experience Manager (AEM) Assets Content Hub is a straightforward process carried out within the Collections tab. A collection groups related digital assets together, making them easier to organize, locate, and share across teams.
Steps to create a collection
- Go to the Collections tab.
- Click Create Collection.
- In the new Collection window, add a Title and a Description.
- Select the access control type under the Who can access dropdown list. This setting determines who can view and collaborate on the collection, so choose the option that matches your intended sharing and permission needs.
- Click Create.
Once the collection is created, add assets to the collection to begin populating it. This allows you to keep related assets grouped in a single, manageable location for streamlined access and reuse.
What types of access control are available when creating a collection in AEM Assets Content Hub?
Adobe Experience Manager (AEM) Assets Content Hub provides three access control types when creating a collection, each defining who can view and who can edit the collection’s contents. Selecting the correct access level ensures that assets are shared appropriately while protecting content from unauthorized changes.
The three access control types are:
-
Private — Only the creator and administrators can access and edit the collection. This is the most restrictive option, ensuring sensitive or in-progress assets remain visible only to authorized owners and administrators.
-
Public — View only — Everyone can view the collection, but only the creator and administrators can edit it. This setting is used to share assets broadly while keeping editing rights limited, so the collection’s contents cannot be altered by general viewers.
-
Public — View and edit — Everyone can access and edit the collection without restrictions. This is the most open option, enabling full collaboration where any user can both view and modify the collection.
In summary, the access control types range from the most restrictive (Private) to the most open (Public — View and edit), with Public — View only offering a middle option that permits broad viewing while reserving editing rights for the creator and administrators.
Who can perform actions on collections in AEM Assets Content Hub?
Both standard users and administrators can perform actions on collections in Adobe Experience Manager (AEM) Assets Content Hub, with administrators holding an expanded set of privileges beyond those available to standard users.
Actions Available to Standard Users
Standard Adobe Experience Manager (AEM) Assets Content Hub users can perform the following actions on collections:
- Creating new collections
- Viewing existing collections
- Sharing collections with others
- Downloading collections
- Removing items from collections
- Deleting collections
- Pinning collections
- Marking collections as favorites
These capabilities allow users to organize, access, and distribute grouped assets efficiently within the platform.
Additional Administrator Privileges
Unlike standard users, Administrators hold additional privileges over collections. In addition to all standard user actions, administrators can:
- View all access options for collections
- Delete collections
This elevated access enables administrators to manage collection permissions and oversee content governance across the AEM Assets Content Hub environment.
How do I add assets to an existing collection in AEM Assets Content Hub?
To add assets to an existing collection in Adobe Experience Manager (AEM) Assets Content Hub, select the assets, click Add to collection, choose the target collection, and confirm. Collections group related assets so teams can locate, reuse, and distribute approved content efficiently, which makes adding assets to the correct collection a core organizational task in Content Hub.
Steps to add assets to an existing collection:
- Select the assets you want to add.
- Click Add to collection.
- Choose the collection from the list of existing collections.
- Search for the collection using the search bar if you have many collections and need to find a specific one quickly.
- Click Add to collection again to confirm the action.
The search bar locates any existing collection by name, so you can add assets to the intended collection without scrolling through the full list. Because collections act as curated groupings of approved assets, adding assets to the right collection ensures the content remains discoverable and available for reuse across your organization.
Can collections be filtered and searched in AEM Assets Content Hub?
Yes. Collections in Adobe Experience Manager (AEM) Assets Content Hub support both filtering and searching, allowing users to quickly locate the right collection by name, access permissions, or creator. This makes it easier to manage large libraries of digital assets where many collections may exist across teams.
Content Hub organizes collection filtering around three primary criteria:
- Name — search directly by the collection title to jump to a specific set of assets.
- Access permissions — filter by how a collection can be used and by whom.
- Creator — narrow results to collections created by a particular user.
The available filter options include:
- All Collections — displays every collection visible to the user, with no filtering applied.
- Only me — shows collections restricted to the current user, useful for private or personal groupings.
- Anyone can view — surfaces collections shared with view-only access, so others can browse but not modify the assets.
- Anyone can edit — lists collections open for collaborative editing, enabling shared teams to add or update assets.
- Created by anyone — includes collections created by any user across the organization.
- Created by me — limits results to collections the current user has personally created, making it simple to return to your own work.
By combining these filters with search, teams can efficiently find, review, and manage collections in AEM Assets Content Hub based on ownership, visibility, and collaboration needs.
How do I download assets from a collection in AEM Assets Content Hub?
You can download assets from a collection in Adobe Experience Manager (AEM) Assets Content Hub in two ways: download the entire collection at once, or download individually selected assets from within a collection. Collections group related assets together for easier discovery and distribution, so both methods let you retrieve approved, brand-ready content directly from the hub.
Method 1: Download an entire collection
- Navigate to the Collections tab.
- Locate the collection card for the assets you want.
- Click the download icon on the collection card to download all assets in that collection at once.
Use this method when you need every asset in the collection, since it retrieves the complete set in a single action.
Method 2: Download selected assets from a collection
- Open the collection.
- Select the individual assets you want.
- Click Download to download only the selected assets separately.
Choose this method when you need only specific files rather than the full collection, giving you precise control over which assets you retrieve.
How can assets be shared from a collection in AEM Assets Content Hub?
Assets are shared from a collection in Adobe Experience Manager (AEM) Assets Content Hub by enabling public link sharing. Public link sharing generates a distributable URL that grants recipients access to the selected asset without requiring them to be internal AEM users.
Steps to share an asset:
- Enable public link sharing for the asset you want to distribute.
- Select the share icon on the asset card.
- Copy the generated share link.
- Send the copied link to the intended recipients.
Because the share link is publicly accessible, anyone who receives it can open the shared asset, making this method well suited for distributing approved content to external stakeholders or partners.
Important limitation: Private collections cannot be shared. Private collections are restricted by design, so their access controls prevent public link generation. To share assets that currently sit in a private collection, the assets must first reside in a shareable, non-private context before public link sharing can be enabled.
Who can remove assets from a collection in AEM Assets Content Hub?
Three types of users can remove assets from a collection in Adobe Experience Manager (AEM) Assets Content Hub: the collection owner, an administrator, or a non-admin user granted edit rights. Any of these authorized users can remove a single asset or multiple assets at once from a collection.
Who Can Remove Assets
- Collection owner — the user who owns the collection has full control over its contents, including asset removal.
- Administrator — administrators can remove assets from any collection as part of their broader management permissions.
- Non-admin user with edit rights — a standard user who has been granted edit rights on the collection can also remove assets.
This permission structure ensures that only users with an established ownership, administrative, or edit-level relationship to the collection can modify its contents, protecting collections from unintended changes by users with view-only access.
How to Remove Assets from a Collection
- Open the collection in AEM Assets Content Hub.
- The authorized user selects the single asset or multiple assets to be removed.
- Click Remove from collection.
- Confirm the removal when prompted.
The confirmation step exists to prevent accidental removal, requiring the user to deliberately validate the action before the selected assets are taken out of the collection. Removing assets from a collection affects only the collection’s membership and does not delete the underlying assets from AEM Assets Content Hub.
Who is allowed to delete a collection from AEM Assets Content Hub and how is it done?
Only administrators and the creator of a collection can delete it in Adobe Experience Manager (AEM) Assets Content Hub. This role-based restriction ensures that collections cannot be removed by users who neither own the collection nor hold administrative privileges, protecting shared assets from accidental or unauthorized deletion.
Who Can Delete a Collection
- Administrators — users with administrative privileges in AEM Assets Content Hub.
- The creator of the collection — the user who originally created the collection.
Any user outside these two roles cannot delete a given collection. Because deletion is limited to owners and administrators, accountability for removing shared collections stays with the people responsible for managing them.
How to Delete a Collection
To delete a collection in AEM Assets Content Hub, follow these steps:
- Navigate to the Collections tab in AEM Assets Content Hub.
- Select the collection you want to delete.
- Click the delete icon to remove it.
Once these steps are completed, the collection is removed from AEM Assets Content Hub. Because removal is performed directly on the collection, administrators and creators should confirm the correct collection is selected before deleting, as the action clears the collection from the Content Hub.
What all options can an administrator configure for collections in AEM Assets Content Hub?
Administrators configure collection access and editing permissions in Adobe Experience Manager (AEM) Assets Content Hub by enabling or disabling two toggles that govern how collections can be viewed and edited. These settings determine which collection types non-admin users are permitted to create.
Two administrator-controlled toggles govern collection visibility and editing rights:
-
Enable the View Only Collections toggle to allow collections that are accessible to everyone but editable only by the creator and administrator. Unlike fully open collections, this option preserves broad visibility while restricting changes, ensuring content remains consistent and protected from unintended edits by other users.
-
Enable the Public Collections toggle to allow collections that are both accessible and editable by everyone. In contrast to view-only collections, public collections grant full read and write access across all users, supporting open collaboration on shared assets.
If both the View Only Collections and Public Collections toggles are disabled, then by default, non-admin users can create only private collections. Because private collections are visible and editable only to their creator and the administrator, this default enforces the most restrictive access model, keeping collections confined to their owner unless an administrator explicitly opens up broader sharing.
In summary, these administrator settings enable three distinct collection types:
- View Only Collections — accessible to everyone, editable only by the creator and administrator.
- Public Collections — both accessible and editable by everyone.
- Private Collections — the default when both toggles are disabled, accessible and editable only by the creator and administrator.
Why I cannot see newly added or removed collection or assets in Content Hub?
Newly created collections, or assets added to or removed from a collection, may not appear immediately in Content Hub because collections are subject to backend propagation and index-refresh latency. This is expected system behavior, not a failure of the add or remove action itself.
Cause
When you create a collection, or add and remove assets from one, the change is written to the backend before it is reflected in the search index that powers the interface. Index-refresh latency is the short delay between when an operation is committed and when the refreshed index makes that change visible in the user interface (UI). As a result, the UI may not immediately reflect the change even though the operation completed successfully. Distributed content systems commonly rely on this kind of asynchronous propagation, so a brief lag between the action and its visible result is normal.
Resolution
The add or remove action typically succeeds even when the outcome is not visible right away. If a change does not appear right away, apply these steps:
- Refresh the browser or retry in a new session before assuming the operation failed. This forces the interface to request an updated view of the collection.
- Re-verify after a short wait rather than repeating the same add or remove action multiple times. Repeating the action prematurely creates confusing duplicate-looking states, because each attempt can register against the backend before the index catches up.
Waiting briefly and re-checking is the reliable approach, as the change will surface once backend propagation and the index refresh complete.
See also
- Translate Assets
- Assets HTTP API
- Assets supported file formats
- Search assets
- Connected assets
- Asset reports
- Metadata schemas
- Download assets
- Manage metadata
- Manage Dynamic Media templates
- Manage reports in Assets view
- Search facets
- Manage collections
- Bulk metadata import
- Publish Assets to AEM and Dynamic Media